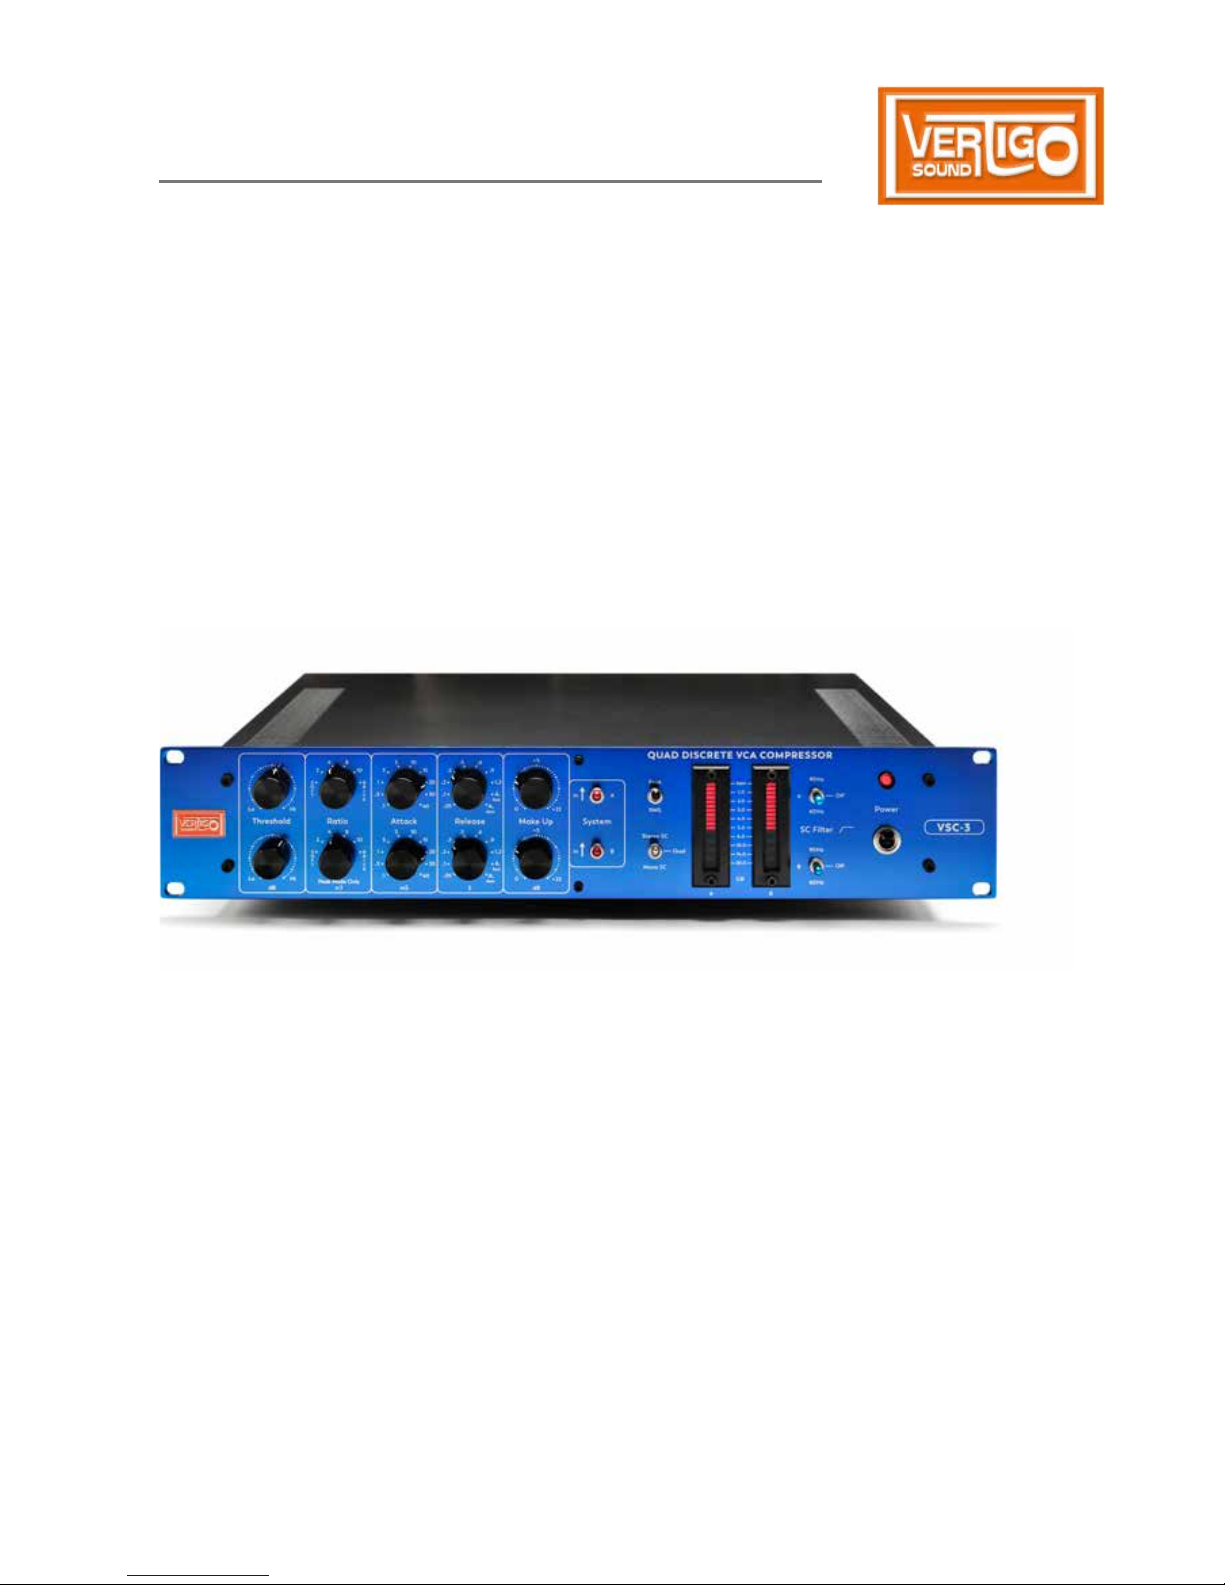
Vertigo Sound VSC-3 User manual

The Vertigo Sound VSC-3
Quad Discrete VCA Compressor
Operation Manual
Thank you for purchasing a Vertigo Sound Product.
The VSC-3 is the legal successor of the VSC-2, which now is a modern classic and can be
found in many top class studios around the world.
Vertigo Sound spent a lot of effort making a good product even better. The VSC-3 can do
all the tricks the VSC-2 is known and loved for plus a bunch of new features and options.
The VSC-3 is still named Q D C because it’s topology stays the same.
It is so named, because it uses 4 VCAs built using only discrete components.
It’s design is a nod toward the best VCA based compressors of the 70s and 80s.
The Vertigo VCA is in fact named 1979. Some of the best features of these classic Compressors
have been complimented in the VSC.
This classic based topology is combined with a modern mastering grade signal path.
Some unique and innovative features lie beneath the bonnet, such as the ratio which increases
with level in S mode.
The basic idea and concept of the VSC-3
The Vertigo Sound Limiter incorporates four discrete 1979 VCAs for two channels. Each channel
has one VCA in the Audio Path and another one inside the sidechain. In stereo mode both
sidechains are active (they are not summed together) and the higher signal peak on any of both
channels results in the compression of both (in Stereo SC Mode).
Therefore the VSC-3 is reacting also on out of phase signals without image shift.
Moreover, the detector (a Peak Forward Design) of each channel works in such a way, that stereo
compression can be achieved even without stereolinking. This precision makes the VSC-3 also
the first choice for mastering applications. Although the VSC-3 was developed as a
B C. Each channel provides all controls separately which makes it also a Must Have
for processing while recording.

2
Installation and Hook Up
The VSC-3 generates very little heat so it is not necessary to leave an empty space
for ventilation above or below the unit. But: Discrete Vcas are sensitive for all
heating influences (especially differences in temperature). Don’t put heat generating
devices below and above inside your rack.
The unit can be used with either balanced or unbalanced sources and the outputs
can be loaded either balanced or unbalanced:
output
The audio output is of the type electronically floating
balanced with B B® or 1646 IC-Type.
The output load should not be less then 600 Ohms.
If one of the output pin 2 or 3 is grounded, the signal
level on the other pin raises by +6dB.
Max Output Level is +27dbu at 600 Ohms.
input
The audio input is totally isolated by a C input
line transformer. The primary winding of the trans-
former is wired to Pin 2 and Pin 3.
Max. Input Level is + 22 dbu.
Balanced IN
/OUT
Pin 1
=
Ground/Shield
Pin 2
=
Audio + (hot)
Pin 3
=
Audio – (cold)
unBalanced IN
/OUT
Pin 1
=
Ground/Shield
Pin 2
=
Audio + (hot)
Pin 3
=
Audio Common/Ground/Shield
The Threshold
Sets the level above which signals will be compressed or limited. Rotating
the control clockwise raises the threshold. The Threshold is adjustable from
–22 to + 23 dBu. We incorporated a Zoom In between – 6dBu and +10 dBu
to give you a more sensitive control and resolution between this commonly
used Level Area.
Start with threshold fully clockwise. Then turn the control slowly anticlockwise until the right
amount of compression is processed. Re-adjust setting if other parameters are changed.

3
The Ratio
Sets the compression slope, which determines how the output signal
will change in relation to the input signal once the input signal exceeds
the threshold. The higher the ratio, the greater the compression, and
the more squeezed the sound.
Examples
With a setting of 2:1, a 2 dB input change for signals above
the threshold results in a 1 dB output change.
Use the S TT M for all
applications where a harsh start of gain
reduction or audible compression is
unwanted. Please feel free to experiment!
Try e.g, on Snare!!!
This characteristic comes close to the
sound of some classic Opto-and variable
MU Compressors.
Use both compressor channels for 1 Signal!
Connect Output A to Input B and use it for
processing a mono signal (e.g. vocals)-put
channel A in Soft Mode and channel B to 8:1-
Use channel B controls (Attack and Theshold)
to create your own compression curves.
soft
This is not the commonly known
soft knee characteristic!
Soft is better described with Tip Toe — a Ratio
which increases with level — a Threshold related
Ratio from 1 : 1 up to 8: 1.
The compressor tiptoes into compression with
very low ratios getting higher, analogue
to the signal, providing an inaudible start of
compression.
Medium to Hard Knee
Characteristics
Hard knee or soft knee response: each type of
response gives a different limiting action.
The hard knee response is generally considered
more severe but punchy and the soft knee
response more musical but limp.
2: 1 / 4 : 1 / 8 : 1 / 10 : 1/ Brick (40 : 1) = compressing
from medium to hard knee
Brick = Limit
Ratio selection switch compensates to provide
equal loudness, allowing immediate comparison.
N N

4
The attack
The parameter A of the peak detector sets how fast the limiter’s internal
circuitry reacts to changes in input level. The longer the attack time, the
more of a signal’s dynamics are let through before the limiting action kicks in.
With slower attack times, the limiter responds more to average signal level.
This produces a smoother sound that tends to retain dynamic character, but
the trade-off is that the VSC-3 cannot react as rapidly to sudden level shifts.
There’s a right setting for all situations:
0,1ms · 0,3 ms · 1,0 ms · 3,0 ms · 5,0 ms · 10,0 ms · 15,0ms · 20,0ms · 30,0 ms · 40,0ms
Start from 10 ms setting. Shorter Attacks may be musical in soft mode. Just find your sound!
Put a big amount of compression (10 db gain reduction) onto your mix and search for the best
musical and rhythm action of your compressor when changing the Attack setting!
Reduce the amount of gain reduction to a sensible amount (2–4 dB) with the threshold knob.
Try this strategy with the release time and maybe jump back to this procedure (attack) again.
This approach is close to using an EQ, where unwanted signals are spotted with a high boost
when switching and sweeping through the frequency band.
Setting a longer attack time with a
bass guitar allows more of the picking
attack to come through.
The Attack times can be set fast enough
to use the VSC-3 as an overload protector
but in common musical use slower
attacks like 3 ms or higher leave transients
unprocessed and offer a quite musical
squeezing.
N
Examples
k

5
The release
This control determines how long it takes for the VSC-3 to return to unity gain
after going into limiting. With short release times, the limiter tracks every
little change in level, producing a potentially uneven or nervous and rippling
but fresh effect that decreases dynamics but increases the average output level.
Longer release times tend to squash the signal more, producing less overall
output but retaining more of the signal’s dynamics.
Excessive release times can be used as an effect. In the 60s the use of lots of
limiting with a long release time e. g. on drums was a popular recording
technique (Fairchild 670 Release).
There’s a right setting for all situations:
0,05s · 0,1s · 0,2 s · 0,3 s · 0,5 s · 0,6 s · 0,9s · 1,2 s · Auto fast · Auto slow
Start from 0,6 s setting but don’t stop to experiment.
Please don’t be afraid of short release times. Your program material may allow it!
Put a big amount of compression (10 db gain reduction) onto your mix and search for the best
musical and rhythm action of your compressor when changing the Release setting.
Reduce the amount of gain reduction to a sensible amount (2–4 dB) with the threshold knob.
Try this strategy with the Attack time and maybe jump back to this procedure (Release) again.
This approach is close to using an EQ where unwanted signals are spotted with a high boost
when switching and sweeping through the frequency band.
k
The Make up
The process of reducing dynamics lowers the signal’s overall level.
Use this control to compensate by adding output gain.
The 1979 VCAs offer + 22dBu of make up. We incorporated a
Zoom In between 0 dBu and + 6 dBu to give you a more sensitive
control and resolution between this commonly used Level Area.
Use the right portion of make up to get the same loudness impression on/system out/system
in setting. Compare if compression provides a sonic benefit or not.

6
SC Filter
If the VSC-3 should react too much to kickdrum, bass or other bass signals
pumping effect you can activate the SC Filter inside each sidechain.
This Low Cut makes the VSC-3 react less sensitively to those signals. Both
filter curves were set very gently, smoothly and musically to avoid a
complete cut off which would leave some parts of the bass audio material
unprocessed. So, the low end of your mix will be processed with less
compression. The use of SC-Filters elevates the low end and bass of your
audio material. You can choose between two different settings. These
frequencies were chosen to provide larger flexibility and a maximum musical
treatment and balance of the complete mix.
Stereo SC
The detector of each channel works so precisely that compression can be done
without stereolinking but in stereo mode all upper Channel A knobs, Bypass
or SC Filter A switches become the masters for Left and Right. (All controls B
are switched off). So there’s no complicated L-R trimming ! In stereo mode both
sidechains are active (they are not summed together) and the higher signal
peak on any of both channels results in the compression of both (Stereo Mode).
Both channels can be the compressors Master. Therefore the VSC-3 is reacting
also on out of phase signals peakswithout image shift.
Search for the limit where the VSC-3 begins to pump-then activate your SC-Filter.
The VSC-3 detectors work very precise. Stereo compression can be achieved even without stereo
linking. Adjust all parameters the same on both channels and switch the unit into Dual-Mode.
This stragety can widen your stereo image. This procedure might be the cure and a enhancement
to your mix. If the stereo image gets too shaky switch back to the conventional stereo mode.

7
Mono SC
This is the opposite of Stereo SC mode. Like In stereo mode all upper
Channel A knobs, Bypass or SC Filter A switches become the
masters for Left and Right. (All controls B are switched off). So there’s
no complicated L-R trimming! The compressor is now reacting to
the Mono summed Signal on both channels.
Peak and RMS Mode
Peak is the standard mode known from the VSC-2 Compressor.
Set to Peak the compressor reacts as soon the signal passes the
threshold value —of course depending on the chosen Attack
time value.
In RMS Mode the compressor reacts to the average level of the
program material. Switched to RMS the Ratio selection is inactive.
Mono SC mode can be useful if you want the compressor to react more to Vocals,
Bass and Kick. This mode narrows the stereo image but offers more Glue. Try it out on
subgroups like Backing Vocals …
Peak or RMS ?
The recommended standard choice for Mix Bus duties is Peak Mode. If the music material has a
very high dynamic content the RMS Mode might be a problem solver.
Generally we suggest to use RMS more for individual instruments and vocals where an equal
loudness impression is desired.

8
Gainreduction Metering
This metering shows the amount of gain reduction being applied to
the input signal. The metering is equipped with a non-linear scale
and corresponding electronics to visualize the common area up to 6dB
gain reduction with utmost precision. It shows quick and exactly what
is done to your material.
Colouration, Distortion
and Sound
Colouration is one of the hidden secrets and is the basis for a
unique sound and one first step creating a classic of tomorow.
In fact the 1979 VCA produces mainly second harmonics depending
on Gainreduction and Make Up. The cocktail of clean precise sound
and the right mix out of second and third harmonics dynamically
and frequency dependent is the secret of the 1979 VCA.
If you want to use the VSC-3 adding some colouration without Gain Reduction then turn the
threshold pots fully clockwise, and use the Make Up to control the amount of harmonics.
(In many large consoles at that time like SSL, MCI, Quad Eight the discrete VCA remained in
the signal path of the output section also when deactivating the Compressor/Limiter).

9
The signal Path:
Less components — more clarity
The input section of the audio path is equipped with Cinemag transformers
which provide the maximum possible Common Mode Rejection of unwanted signals.
This transformers have a single Faraday and a 30 dB magnetic MU-metal shield can.
The audio then already reaches the VCA. Again leaving the VCA the signal passes
the device via a B B® or 1646-type output stage.
The power supply PCB, the audio PCBs and signalprocessing PCBs are completely
separated, so any unwanted interaction between those is impossible (= no noise,
bleedthrough, crosstalk, hum etc.) We can guarantee that no unwanted interferences
are added to the audiosignal.
Deactivating the system bypasses the processor completely (real hardwire bypass).
The outer appearance of the VSC-3 and all mechanical parts are constructed
in the same manner like we engineered the electronic design:
Ratio, Attack and Release controls are fixed position gold plated rotary switches for
easy recall, CNC machined aluminium knobs and a rugged housing construction.

10
Vertigo Sound
— One name steps out of the herd
Technical Specifications
gStereo / Dual Mono / Mono switchable
gCinemag Balanced In. That 1646 or B B® Balanced Out
gDynamic Range: 117db
gFrequency response: 10 Hz – 70kHz (–3db)
gMax. Output Level: +27dBu / 600 Ohm balanced floating
gSignal to Noise Ratio at + 6 dBu = 97 db (20–20 kHz, unweighted, RMS)
gNoise: – 91 dBu (20Hz–22 khz – unweighted, RMS) at 0db Unity Gain
gCrosstalk between channels: > 100 db at any frequency
gPower consumption: max 12 Watts
Saftey, Grounding, Groundloops and more
This Appartus must be earthed!
gTo avoid groundloops all Audio-Grounds (XLR-Pin 1)
are separated from the outer metallcase (housing of the VSC-3)
gTo keep them separated, please avoid connecting any XLR-Pin 1
with of any XLR-housing or the housing of the VSC-3. Unnecessary
groundloops might occur!
gThe powersupply is secured against overload and is fire-protected:
Several melting fuses, overheat sensors, security resistors etc.
The powersupply is of noiseless linear construction: There is no
digitally switching type psu with unaudible but AD-Conversion
disturbing HF-Noise.
gThere are no signal relevant magnetic or static fields coming out
of the unit. The toroidal power transformer works with reduced
primary voltage, therewith the already neglectable stray field is
reduced once again dramatically. The steelcase of the VSC-3 shields
all the rest, electrostatic and magnetic and for that reason your
studio stays 100 % clean after installing the VSC-3.

11
Mains Voltage either 115 V or 230 V.
Please contact the manufacturer for Mains
voltage change.
Mainfuse 230V 200 mA slow
Mainfuse 115 V 400 mA slow
Note
Check the line voltage marked on the rear panel
of the VSC-3 and verify that it is correct for
your country.
Caution
Never remove the cover. There are no user
serviceable parts inside.
Grounding
This Appartus must be earthed!
Warning
If the ground is defeated, certain fault conditions in
the unit or in the system to which it is
connected can result in full line voltage between
chassis and earth ground. Severe injury or
death can then result if the chassis and earth ground
are touched simultaneously.
Water And Moisture
Appliance should not be used near water
(e.g. near a bathtub, washbowl, kitchen sink,
laundry tub, in a wet basement, or near a
swimming pool, etc). Care should be taken so that
objects do not fall and liquids are not
spilled into the enclosure through openings.
Power Sources
The appliance should be connected to a
power supply only of the type described in
the operating instructions or as marked
on the appliance.
Grounding Or Polarization
Precautions should be taken so that the
grounding or polarization means of an
appliance is not defeated.
Servicing
To reduce the risk of fire or electric shock,
the user should not attempt to service the
appliance. All servicing should be referred to qualified
service personnel.
For units equipped with externally
accessible fuse receptacle
Replace fuse with same type and rating only.
Multiple-Input Voltage
This equipment may require the use of a
different line cord, attachment plug, or both,
depending on the available power source
at installation. Connect this equipment only
to the power source indicated on the
equipment rear panel. To reduce the risk of
fire or electric shock, refer servicing to
qualified service personnel or equivalent.
RoHS Conformity
Vertigo Sound herewith declares that all our products
will be manufactured RoHS conformal.
FCC Compliance Statement
This device complies with the FCC Rules.
Vertigo Sound declares a FCC grant of
equipment authorization and a FCC Id is not
required, but the equipment complies with
FCC technical requirements.
Notes on Environmental Protection
At the end of its operating life, this product
must not be disposed of with regular house-hold
waste but must be returned to a collection
point for the recycling of electrical and electronic
equipment. The wheelie bin symbol on the
product, user’s manual and packaging indicates that.
The materials can be reused in accordance with their
markings. Through reuse, recycling
of raw materials, or other forms of recycling of old
products, you are making an important
contribution to the protection of our environment.
Your local administrative office can advise you of the
responsible waste disposal point.
SAFETY INSTRUCTIONS

Contact
MUSTANG SOUND GERMANY
Zenettistraße 11
80337 München
Germany
Phone: +49 – (0)89- 840 617–77
contac[email protected]
www.mustangsound.com
Table of contents
Other Vertigo Sound Recording Equipment manuals