VEVOR EP1140 User manual

Support and E-Warranty Certificate www.vevor.com/support
SOUS VIDE COOKER
INSTRUCTION MANUAL
We continue to be committed to provide you tools with competitive price.
"Save Half", "Half Price" or any other similar expressions used by us only represents an
estimate of savings you might benefit from buying certain tools with us compared to the major
top brands and doses not necessarily mean to cover all categories of tools offered by us. You
are kindly reminded to verify carefully when you are placing an order with us if you are
actually saving half in comparison with the top major brands.

- 1 -
MODEL:EP1140
Have product questions? Need technical support? Please feel free to
contact us:
CustomerService@vevor.com
NEED HELP? CONTACT US!
This is the original instruction, please read all manual instructions
carefully before operating. VEVOR reserves a clear interpretation of our
user manual. The appearance of the product shall be subject to the
product you received. Please forgive us that we won't inform you again if
there are any technology or software updates on our product.
SOUS VIDE COOKER

- 2 -
READ THESE INSTRUCTIONS CAREFULLY BEFORE
USING THIS APPLIANCE.
1. Before using, check that the voltage power corresponds to the one shown on
the appliance nameplate.
2. Do not operate any appliance with a damaged cord or plug or after the
appliance malfunctions, or has been damaged in any manner. Return appliance to
the nearest authorized service facility for examination, repair or adjustment.
3. If the supply cord is damaged, it must be replaced by the manufacturer or its
service agent or a similarly qualified person in order to avoid a hazard.
4. Do not touch the hot surface.
5. Do not let the cord hang over the edge of a table or counter or touch hot surface.
6. Do not place on or near a hot gas, electric burner, or heated oven.
7. This appliance is an indoor appliance and is not a toy.
8. Do not use appliance for other than intended use.
9. Do not use outdoors. HOUSEHOLD USE ONLY
10. To protect against fire, electric shock, or personal injury, do not immerse cords,
electric plugs, or appliances in water or other liquids.
11. The use of accessories, which the appliance manufacturer does not
IMPORTANT SAFETY
INSTRUCTIONS

- 3 -
recommend, may result in fire, electric shock, or personal injury.
12. Extreme caution must be used when moving an appliance containing hot
liquids.
13. This appliance can be used by children aged from 8 years and above and
persons with reduced physical, sensory or mental capabilities or lack of
experience and knowledge if they have been given supervision or instruction
concerning use of the appliance in a safe way and understand the hazards
involved.
14. Close supervision is necessary when any appliance is used by or near children.
Children shall not use the appliance. Cleaning and user maintenance shall not be
made by children.
15. A short power-supply cord should reduce the risk of entering or tripping over a
longer cord.
16. Do not use an extension cord with this product.
17. The appliance should not come into direct contact with food. Use approved
boilable bags.
18. Food products like juice, soup, or milk must still be bagged or sealed in jars for
cooking.
19. Operate the appliance in water only. Keep the water level between the “Min”
and “Max” levels indicated on the appliance. Do not use the appliance for other
than intended purposes.
20. Keep the appliance dry. Never operate the appliance unless the water level is

- 4 -
between the indicated “Min” and “Max” levels on the appliance. Only the heater
and impeller portion should be underwater. Do not immerse the cord or upper
portion of the appliance into liquid. If the appliance or parts become submerged,
unplug them immediately and contact us.
21. The power cord should lie flat on a table or counter surface, and may not hang
over the edge. Keep it away from hot surfaces and water.
22. Unplug the appliance before moving it, cleaning and when not in use. Allow the
appliance to cool before lifting or storing.
23. Wait for the appliance to cool before moving. Do not touch hot surface.
24. Remember circulated water can be very hot. Use a trivet to protect your
countertop from any container being used with the appliance. Use tongs to reach
anything inside the water bath. Extreme caution must be used when moving
containers of hot water.
25. Cover the water bath. Energy can be saved by covering the water bath with
cling wrap when cooking. Do not cover any part of the appliance with cling wrap.
SAVE THESE INSTRUCTIONS
What is sous vide cooking?
Sous vide, which means “under vacuum” in French, refers to the process of
vacuum-sealing food in a bag, then cooking it to a very precise temperature in a
KNOW YOUR SOUS VIDE COOKER

- 5 -
water bath.
SOUS VIDE COOKER:
CONTROL PANEL:
This manual applies to both basic and WIFI Bluetooth models, users can buy
according to the product corresponding to the use of functional instructions.
FCC statement: This device complies with Part 15 of the FCC Rules. Operation is
subject to the following two conditions:(1)This device may not cause harmful
interference, and (2)this device must accept any interference received, including
interference that may cause undesired operation.
OPERATION INSTRUCTIONS
Maximum water level
Minimum water level
Control panel
Power cord
Fixing clamp
Skirt (with heater and impeller inside)
Display
Temperature/Time key Start/Stop key
Time icon
Temperature unit
For increasing temperature or time
For decreasing temperature or time
WiFi Iindicator

- 6 -
CAUTION: When working, the part above “Max” mark must not be immersed into
the liquid.
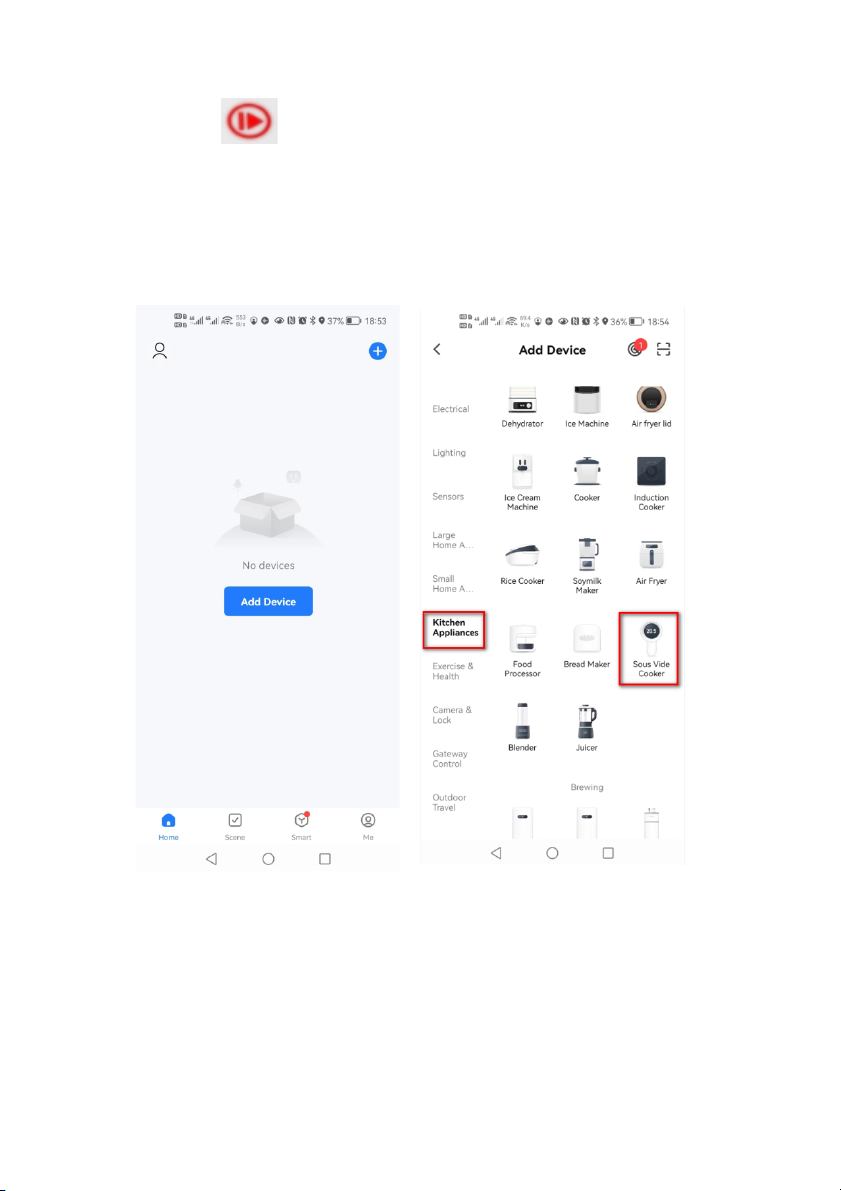
1. Attach the appliance to a pot. It should clip on the far side of the pot and face
toward you. We recommend using a pot that is at least 4.25 inches (11cm) tall.
2. Add water to the pot. The water level should be between the “Min” and “Max”
levels on the appliance. The water level will rise when you add food to the
container, so don’t fill it up too high.
3. Connect the appliance to a power source, one long beep can be heard, all the
indicators illuminate for about 1 second and then they extinguish, while the
indicator of “ ” key lights in red solidly and the WiFi indicator flashes.
4. Press “ ” key once, its indicator blinks in red and the “ ” blinks too,
and“ ”,“” , “ ” and “ ” light solidly. The “Display” shows the last
saved temperature flickeringly, then you can set your desired temperature by “ ”
and “ ” keys, the adjustable temperature ranges between 30°C and 95°C, and
the “Display” will show the setting temperature after finish setting. 0.1°C can be
increased after every press of “ ” key while 0.1°C can be decreased after every
press of “ ” key. And you can hold and press the “ ” or “ ” keys to increase
or decrease the temperature fast.
5. After finishing setting the temperature, press “ ” key to enter into “Hour”
setting mode, at that time, the “ ” blinks, the “Display” shows the last saved
time flickeringly and the former two digits shown at the “Display” blink, then press
“” and “ ” keys to adjust hour, one hour can be increased after every press

- 7 -
of “ ” key while one hour can be decreased after every press of “ ” key, and
you can hold and press the “ ” or “ ” keys to increase or decrease the hour
fast. After finishing setting the hour, press “ ” key to enter into “Minute” setting
mode, at that time, the latter two digits shown at the “Display” blink, then press
“” and “ ” keys to adjust minute, one minute can be increased after every
press of “ ” key while one minute can be decreased after every press of “ ”
key, and you can hold and press the “ ” or “ ” keys to increase or decrease
the minute fast. The adjustable time ranges between zero (00:00) and 99 hours
and 59 minutes (99:59), and the “Display” will show the set time after finishing the
settingg.
6. After finish setting time, press “ ” key once, the indicator of “” key
turns to illuminate solidly from blinking , the appliance starts to heat basing on the
above settings.
NOTE:
(1) During working, you can press “ ” key to check the setting temperature
and time, and you can also reset the temperature and time by following the above
operation. Press “ ” once after reset, then its corresponding indicator turns to
illuminate solidly from blinking, and the appliance will work based on the reset
settings. But the operation for every button during the process of resetting the
temperature and time shall be finished within 3 seconds, or the resetting will be
invalid and the appliance will still work based on the current settings.
(2) During working, you can hold and press “ ” key for about 2 seconds to

- 8 -
make the appliance stop working and enter into standby mode.
(3) If you do not want to set the temperature or time, you can press “ ” key to
make the appliance directly work according to the last saved settings.
7. Wait for the water to heat up to the setting temperature. One long beep can be
heard when the setting temperature is reached and then the time starts to count
down.
8. Add your food to the pot and let the appliance work. Three beeps can be heard
when the countdown is finished and the appliance enters standby mode. At that
time, remove the cooked food and eat it.
CAUTION: The skirt part will become very hot during or after work. Please do not
touch it unless it is cooled down completely.
9. Unplug the appliance and clean it by following the " CLEANING " operation,
then put it away.
10. The appliance is of parameter reset function. If the appliance is unplugged, it
will display the default temperature and time setting that is “50:0” and “03:00”
respectively after being turned on again.
11. The appliance is of memory function, which means the appliance will work
according to the last setting temperature/time after being powered on again no
matter if it is shut off accidentally or normally.
12. Introduction to WiFi Bluetooth operation
(1)Place the appliance in a water tank containing an appropriate amount of
water. Connect the appliance with power source, one long beep can be heard,

- 9 -
all the indicators illuminate for about 1 second and then they extinguish, while
the indicator of “ ” key lights in red solidly and the WiFi indicator flashes.
(2)The first time you use your phone, you need to connect to the WIFI network.
Open the Doodle APP.
(3) APP ”Add device,” click on kitchen appliances, and select sous vide cooker.
(4) Enter your password for the WIFI connection and proceed to the next step.

- 10 -
(5) Verify that the WIFI indicator light on the appliance control panel flashes. When
the WIFI indicator light flash, the mobile APP selects the flash to enter the link
status. When the appliance drops twice, it means that the appliance is successfully
paired with the APP.

- 11 -
(6) After successful pairing, click to complete and enter the operation interface. At
this time, the APP can control the appliance at a long distance. Click the "ON"
appliance to enter the boot state.
(7) After boot, click cooking mode to enter the cooking menu (vegetables, meat
and rice) and select the appropriate menu mode.

- 12 -
(8)Adjust the time and temperature, you can set the reservation time and cooking
time on the APP after the boot, and the same can also set the cooking temperature.
Click "Temperature Scale Switch" on the APP, and the APP temperature can be
switched in "℃" and "℉"
(9)After the time and temperature are set, click the APP start-stop button "Start /
Pause", and the appliance starts to work automatically.
CAUTION:
For the first time using APP control, the phone can be connected to WIFI.
When the appliance is working, the WIFI of the mobile phone is disconnected and
the appliance is constantly charged, the mobile phone can open Bluetooth or data
network to control. After the appliance is power off, Bluetooth cannot be controlled
alone.
After the mobile APP is successfully paired with the appliance for the first time,
without removing the background data, the mobile phone can simultaneously open

- 13 -
the data network and Bluetooth to control the appliance to work.
CLEANING
CAUTION: The whole appliance can not be put into the dishwasher for cleaning.
Allow the appliance to cool to room temperature, wipe it down carefully with a
damp cloth and dry it before storing.
If the immersed parts become greasy or need more cleaning:
1. Put the appliance in a pot as described in “OPERATION” and fill the pot with
water to the “Max” level indicated on the appliance.
2. Set the temperature to 65°C.
3. Add 1/2 tablespoon non-foaming dishwashing liquid per gallon of water used.
4. Allow the water to circulate for 10 minutes after 65°C is reached.
5. Turn off and unplug the appliance.
6. When the appliance is cool, rinse the bottom with cold water and dry it before
storage.
DESCALING
With frequent use, descaling should be done every month or more often in regions
with hard water. To descale:
1. Put the appliance in a pot as described in “OPERATION” and fill the pot with
water to the “Max” level indicated on the appliance.
Clean and Maintenance

- 14 -
2. Set the temperature to 80°C.
3. Add 1/4 cup of citric acid powder per gallon of water.
4. Allow the water to circulate for 20 minutes after 80°C is reached.
5. Turn off and unplug the appliance.
6. When the appliance is cool, rinse the bottom with cold water and dry it before
storage.
Any other servicing should be performed by an authorized service representative.
MADE IN CHINA
Problem
Solution
Low water-If the water level is below the
“Min” level, a low water warning “ER1” will
appear.
Add water so that it fills between the
“Min” and “Max” as indicated before
plugging in the appliance again.
Overheat-If the appliance gets too hot, an
overheating warning “ER2” will appear.
It may be necessary to add water to
the container. Wait a few minutes for
the appliance to cool down before
restarting.
TROUBLESHOOTING

Technical Support and E-Warranty Certificate
https://www.vevor.com/support
Table of contents
Other VEVOR Cooker manuals