manuals.online logo
Brands
  1. Home
  2. •
  3. Brands
  4. •
  5. VEVOR
  6. •
  7. Sander
  8. •
  9. VEVOR VV-JH-6P User manual

VEVOR VV-JH-6P User manual

Other VEVOR Sander manuals

VEVOR MM4113 User manual

VEVOR

VEVOR MM4113 User manual

VEVOR KPSA0311 User manual

VEVOR

VEVOR KPSA0311 User manual

VEVOR ZL225-JCL User manual

VEVOR

VEVOR ZL225-JCL User manual

VEVOR WS225-KCL User manual

VEVOR

VEVOR WS225-KCL User manual

VEVOR SBWP2006 User manual

VEVOR

VEVOR SBWP2006 User manual

VEVOR KD-68081 User manual

VEVOR

VEVOR KD-68081 User manual

VEVOR ZS180-DL User manual

VEVOR

VEVOR ZS180-DL User manual

Popular Sander manuals by other brands

Dynabrade 51830 user manual

Dynabrade

Dynabrade 51830 user manual

FXA FXAJD2523 instruction manual

FXA

FXA FXAJD2523 instruction manual

Grizzly T33256 owner's manual

Grizzly

Grizzly T33256 owner's manual

Silverline 631320 User instructions

Silverline

Silverline 631320 User instructions

Black & Decker 7041 instruction manual

Black & Decker

Black & Decker 7041 instruction manual

DeWalt D26441 instruction manual

DeWalt

DeWalt D26441 instruction manual

OMCA SMR 930 Handbook

OMCA

OMCA SMR 930 Handbook

Schleifhexe BS 200 Original instructions

Schleifhexe

Schleifhexe BS 200 Original instructions

Ryobi RPS80 Original instructions

Ryobi

Ryobi RPS80 Original instructions

Oliver 6305 owner's manual

Oliver

Oliver 6305 owner's manual

Jet 22-44 Pro-3 Operating instructions and parts manual

Jet

Jet 22-44 Pro-3 Operating instructions and parts manual

Workzone 47561 user guide

Workzone

Workzone 47561 user guide

Makita M9204 technical information

Makita

Makita M9204 technical information

Makita M9204 instruction manual

Makita

Makita M9204 instruction manual

Clarke Woodworker CBS1-5B Operation & maintenance instructions

Clarke

Clarke Woodworker CBS1-5B Operation & maintenance instructions

Chicago Pneumatic CP9778 Operator's manual

Chicago Pneumatic

Chicago Pneumatic CP9778 Operator's manual

Ferm FEOS-135 user manual

Ferm

Ferm FEOS-135 user manual

Unior 1510 Operating	 instruction

Unior

Unior 1510 Operating instruction

manuals.online logo
manuals.online logoBrands
  • About & Mission
  • Contact us
  • Privacy Policy
  • Terms and Conditions

Copyright 2025 Manuals.Online. All Rights Reserved.

Technical Support and E-Warranty Certificate www.vevor.com/support
LA PID A R Y R O C K G R IN D E R P O L ISH E R
M O D E L :V V -J H -6 P
We continue to be committed to provide you tools with competitive price.
"Save Half", "Half Price" or any other similar expressions used by us only represents an
estimate of savings you might benefit from buying certain tools with us compared to the major
top brands and doses not necessarily mean to cover all categories of tools offered by us. You
are kindly reminded to verify carefully when you are placing an order with us if you are
actually saving half in comparison with the top major brands.
- 1 -
M O D E L :V V -J H -6 P
Have product questions? Need technical support? Please feel free to
contact us:
C u sto m e rS e rv ice @ ve vo r.c om
N E E D H E L P ? C O N TA C T U S !
This is the original instruction, please read all manual instructions
carefully before operating. VEVOR reserves a clear interpretation of our
user manual. The appearance of the product shall be subject to the
product you received. Please forgive us that we won't inform you again if
there are any technology or software updates on our product.
L AP ID A R Y R O C K
G R IN D E R P O L IS H E R
- 2 -
Warning-To reduce the risk of injury, user must read instructions
manual carefully.
This symbol, placed before a safety comment, indicates a kind of
precaution, warning, or danger. Ignoring this warning may lead to an
accident. To reduce the risk of injury, fire, or electrocution, please
always follow the recommendation shown below.
This device complies with Part 15 of the FCC Rules. Operation is
subject to the following two conditions:(1)This device may not cause
harmful interference, and (2)this device must accept any interference
received, including interference that may cause undesired operation.
Warning- Be sure to wear gloves when using this product.
IM P O R TA N T S AFE T Y IN S T R U C TIO N S
R E A D A L L IN S TR U C T IO N S F IR S T
For your own safety, be sure to read, understand and follow all warnings, safety
rules and instructions in this instruction manual and on the machine before use.
Failure to do so can result in serious personal injury.
S E T U P S A F E T Y
KNOW YOUR POWER TOOL.Read this instruction manual carefully.Learn the
applications, limitations, specific warnings, and hazards related to this machine.
KEEP GUARDS IN PLACE AND SECURED.Never operate this machine without
hoods. Make sure all guards are operating and properly secured before each use.
- 3 -
INTENDED FOR INDOOR USE ONLY.
AVOID DANGEROUS ENVIRONMENTS. Do not use this machine near gasoline
or other flammable liquids.
MAKE SURE MACHINE IS SECURELY MOUNTED. Abide by the proper mounting
instructions before connecting the tool into a power supply.
USE ONLY RECOMMENDED ACCESSORIES. The use of improper accessories
on this machine may cause risk of injury.
CHECK FOR DAMAGED PARTS.Before use of this machine, always check for
any damaged guards or parts to determine that it will operate properly and perform
its intended function.Check for proper alignment of moving parts, binding of
moving parts, breakage of parts, mounting and any other conditions that may
affect its operation. A guard or other part that is damaged must be properly
replaced through the manufacturer of this machine to avoid risk of injury.
USE ONLY IDENTICAL PARTS FOR REPLACEMENT PARTS.Use of any other
parts may create a hazard or cause product damage.
E L E C TR IC A L S A F E TY
USE ONLY GROUNDED OUTLET OR GFCI OUTLET.All electrical cords must
either be securely grounded, connected to a surge protected outlet, or preferably,
connected to a GFCI (Ground Fault Circuit Interrupter) outlet. A GFCI is highly
recommended to prevent electric shock. Do NOT use an extension cord.
DON'T ABUSE THE CORD.Never carry the machine by the cord or yank the
machine and pull it straight out of the socket. Keep cord away from heat, oil and
sharp edges.
U S A G E S A F E T Y
- 4 -
NEVER DISCONNECT MOTOR,LAMP OR PUMP WITH WET HANDS.Though
the motor is sealed, you must make sure to keep all electrical connections dry.
Avoid touching the pump when connected to the power.
ALWAYS WEAR PROPER EYE PROTECTION.Enclosed are safety goggles to
protect you from any debris that may fly out while grinding. We recommend
wearing the enclosed goggles or safety glasses with side shields. Everyday
eyeglasses are NOT safety glasses. If anyone is around the machine while it is in
use, they must wear safety glasses.
WEAR PROPER APPAREL. Do not wear any loose clothing, gloves, neckties or
jewelry that can get caught in the machine's moving parts. Long hair must be
secured with a rubber band or hair tie.
KEEP WORK AREA WELL LIT,CLEAN,AND UNCLUTTERED.
ADULT SUPERVISION IS REQUIRED AT ALL TIMES. Never leave the machine
running unattended.
DO NOT TOUCH MOTOR HOUSING.Avoid contact with the motor housing when
in use. The motor is totally enclosed and non-ventilated so it produces high
temperatures. The running temperature can reach around 220°F.
DO NOT OPERATE THIS MACHINE WHILE UNDER THE INFLUENCE OF
DRUGS, ALCOHOL OR ANY MEDICATION.
NEVER RUN WHEELS DRY. Make sure there is adequate water used while
grinding so that rock dust is not formed. The dust can contain chemicals that are
harmful to the lungs and can cause cancer, birth defects or other reproductive
damage.To reduce your exposure to these Chemicals,work in a well ventilated
area and wear a dust mask if the grinding operation is dusty.
USE ONLY WATER AS COOLANT.
SOME ROCKS CONTAIN POISONOUS ELEMENTS.Avoid grinding rocks that
- 5 -
contain uranium,mercury,lead, arsenic, etc. Know the material you are grinding.
DO NOT FORCE THE TOOL or attachment to do a job it is not designed to do.
DIRECTION OF FEED. Be aware of the wheel rotation direction before use.
ALWAYS EASE THE WORKPIECE AGAINST THE RESIN WHEELS.A harsh
impact can break the wheel. Use light pressure when starting to grind. Too much
pressure can cause the wheel to crack.
NEVER GRIND MORE THAN ONE WORKPIECE AT A TIME.
NEVER START THE MACHINE IF A WHEEL IS IN CONTACT WITH A
WORKPIECE.
WHEELS CONTINUE TO SPIN AFTER TURN OFF eventually slowing to a stop.
AVOID AWKWARD OPERATIONS AND HAND POSITIONS.Make sure you have
good balance while working on this machine. A sudden slip could cause your hand
to move into the wheel.
ALWAYS STAY ALERT. You must be focused while working on this machine. It is
possible for stones to catch on the wheels and be ejected out of the grinding area.
M A IN TE N A N C E S A F E TY
ALWAYS DISCONNECT POWER BEFORE SERVICING.Disconnect machine,
lamp and water pump from power before making adjustments and when not in
use.
DO NOT OPEN MOTOR. No user serviceable parts inside.
CLEAN AND DRY MACHINE AFTER USE.
- 6 -
S PA R E PA R T S L IS T
1
MOTOR
1
2
BASEBOARD
1
3
LED LAMP
1
4
DRIP PAN
2
5
HOOD
2
6
HAND REST
2
7
PAN SPLASH GUARD
2
8
DRIP PAN TUBING
4
9
WATER PUMP
1
10
FLANGE WRENCH
2
11
280# RESIN WHEEL
2
12
600# RESIN WHEEL
1
13
1200# RESIN WHEEL
1
14
3000# RESIN WHEEL
1
15
80# GRINDING WHEEL
1
16
220# GRINDING WHEEL
1
17
TRANSPARENT STORAGE BOX
1
18
8“ SAW BLADE
1
19
GUARD SUPPORT
1
20
SPACER
1
21
WATERPIPE
1
22
TRIDENT ADAPTER
1
- 7 -
3. Please check the parts list to ensure that all parts appear on the machine and in
the accessory box. If you find any missing or damaged parts, please call (+626)
275-4507 (for the United States) directly or send an email to service@vevor.com.
- 8 -
M A C H IN E U S A G E
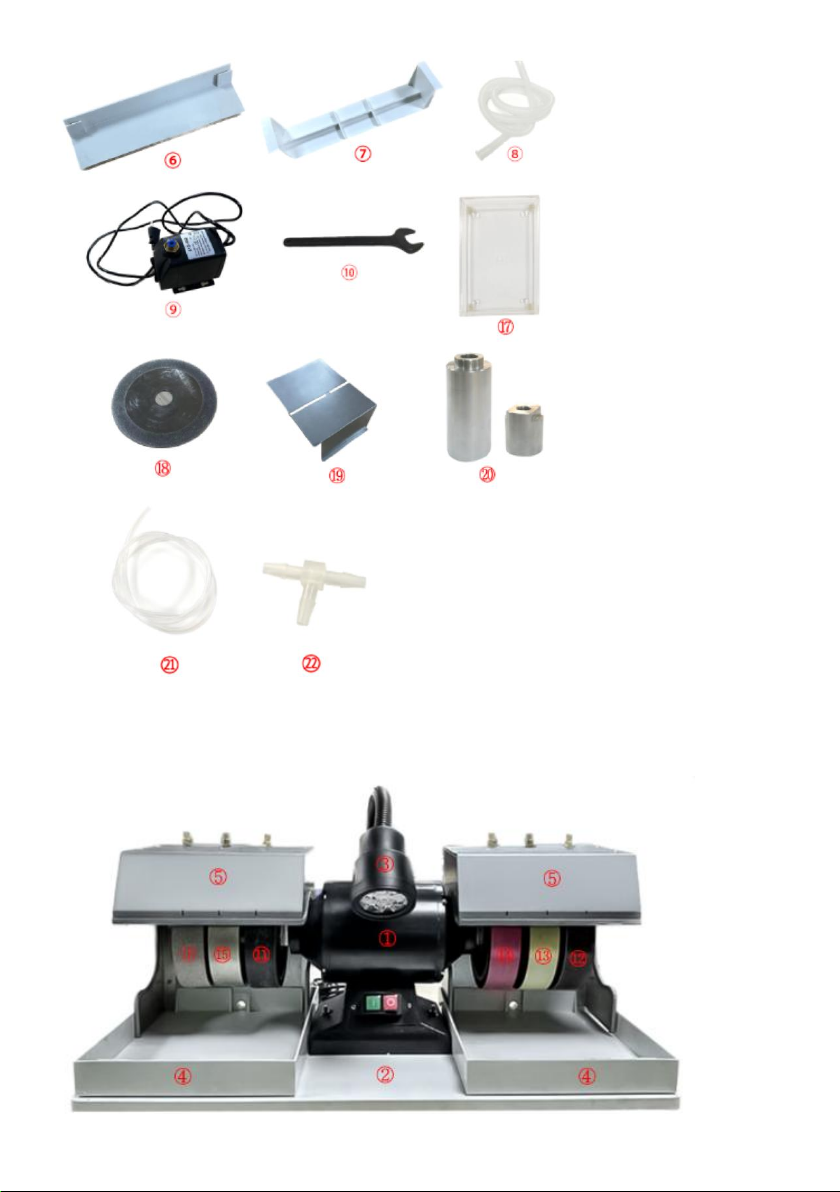
The machine comes with two electroplated diamond wheels, four resin diamond
wheels, one full face diamond flat lap and one canvas polishing pad. The direct
drive motor on eliminates belts and other exterior motor parts to maintain or
replace. The unique water system and allows you to independently control the
water spray on the wheels. Always use adequate water while in use to avoid
running the wheels dry. If the wheels become covered with stone residue, increase
the water flow. We recommend wearing the included apron to keep you from
getting wet while you work.
Another advantage of our water system is that you can adjust the direction of
spray on each wheel. This allows you to use wheels of different widths. This is
achieved by locating the y-split under the hood. Adjust the two nozzles inserted
into the Y-split by twisting to the left or right.
Use rocks, glass, synthetic materials and metaL to polish and polish various
shapes and designs. The most popular use is to make cabinets.
Grinding starts with the electroplated diamond wheel on the left axle to complete
the grinding process. The grinding process shapes your cabinet and eliminates
any surface irregularities so that stones can be smooth and polished. Hold your
stone free hand or on a pigeon stick. Start with 80 # electroplated diamond wheel.
Grind the surface of the stone completely with enough water. If the stone is not
completely ground, it will be scratched. Ensuring that all scratches are removed is
the most important part of grinding debris. We recommend that you often dry your
clothes with paper towels or clean rags to expose the remaining scratches during
work. Repeat this process for 220 # electroplated diamond wheel.
The sequence of resin wheel starts from 280 # resin wheel, then continues to 600
#, 1200 #, and finally 3000 #. Thoroughly grind and smooth your stone on each
wheel and move to the next wheel to finish. After you finish the resin wheel
sequence, your cabinet will be ready for polishing. Adjust the lamp to provide
additional light while working.