VEVOR CPF-2500 User manual

Support and E-Warranty Certificate www.vevor.com/support
WATER FILTER
(UV-C POND BIO PRESSURE FILTER)
INSTRUCTION MANUAL
We continue to be committed to providing you with tools at a competitive price. "Save Half",
"Half Price" or any other similar expressions used by us only represent an estimate of savings
you might benefit from buying certain tools with us compared to the major top brands and do
not necessarily mean to cover all categories of tools offered by us. You are kindly reminded to
verify carefully when placing an order with us if you are actually saving half compared to the
top major brands.

- 1 -
MODEL:
CPF-2500 CPF-3500 CPF-10000
Have product questions? Need technical support? Please feel free to
contact us:
CustomerService@vevor.com
NEED HELP? CONTACT US!
This is the original instruction, please read all manual instructions
carefully before operating. VEVOR reserves a clear interpretation of our
user manual. The appearance of the product shall be subject to the
product you received. Please forgive us that we won't inform you again if
there are any technology or software updates on our product.
WATER FILTER

- 2 -
Before operating this appliance, please read this instruction manual
completely and keep it handy for future reference.
INSTRUCTION FOR USE
Use these instructions to familiarise yourself with the device before you
use it for the first time. It is imperative that you observe the safety
guidelines on the proper and safe use of this device.
For safety reasons, children and young people under 16 years of age, as
well as people who can not recognize potential hazards or who are not
familiar with these instructions, must not use the device.
Please keep these instructions in a safe place! In the event of a change of
ownership, please pass these instructions on to the new owner along with
the product.
ATTENTION
Please follow these steps and read the instructions carefully before using
the filter.
1.Remove the screw holding the lamp cap with a screwdriver.
2.Carefully lift the lamp cap up, and remove protective bushing over glass
tube.
3.Re-insert the lamp holder assembly and lock with a screwdriver.

- 3 -
SYMBOLS
UNPACKING
1. When unpacking, if external damage is visible which could impact the
function of important parts of the equipment, please inform the carrier of
the defects immediately, on the same day if possible, and insist on the
facts being recorded in writing. Then contact your supplier who will take
care of everything else.
2. Before use, be sure to remove the protective bushing under the lamp
cap assembly, and then re-lock the lamp cap assembly.
CONVENTIONAL USE
1. The pressure filter with integrated UV is a sealed pressure filter system
for biological and mechanical filtering of normal pond water with a
temperature of +39.2°F to +95°F.
2. This pressure filter is exclusively intended for private use for cleaning
garden ponds with or without pond fish.
3. Never filter liquids other than water.
Water goes through the pump into the filter.
Water goes through the filter into the pond.
Water from the cleaning outlet goes into the sewerage
system or flower bed, etc.

- 4 -
SAFETY INSTRUCTIONS
CAUTION:
The C series UV-Clarifiter device is a kind of stationary type machine that is fixed
with a UV-C lamp. Unintended use of the appliance or damage to the housing may
result in the escape of the dangerous UV-C radiation. UV-C radiation may, even in
little doses, cause harm to the eyes and skin. Appliances that are obviously
damaged must not be operated. This device is not intended for use by persons or
children with impaired physical, sensory or intellectual impairments, or if lacking in
experience and or know-how, unless they are under supervision or have been
trained in the use of the device by a person responsible for their safety. Children or
persons under 16 years old, persons who can not distinguish danger, or persons
unfamiliar with this instruction are not allowed to use this device.
1. Electrical installation must be in accordance with the provisions of the
domestic.
2. Extension cable and adapter (such as socket board) must be suitable
for outdoor use(To prevent water splashing ).
3. Make sure that the filter UV is equipment with a measured fault
current not greater than 30mA via a fault current protection switch( FI or
RCD).
4. Power supply connection section of the wire shall not be lower than
with the abbreviated symbol SJTW rubber cable.
5. If you have problems or difficulties, please seek help from electrical
professionals.
6. The electrical data of the supply must correspond to the data on the
label.
7. Dangerous ultraviolet radiation, UV rays are harmful to your eyes and
skin. Never operate the lamp outside the container.
8. Do not operate this product if the connecting cable, UV lamp or there is
any breakage on the shell.
9. If someone in water can not run this product.

- 5 -
10. In addition to the clear requirements in the manual, do not open the
equipment or other accessories.
11. Before any operation on the equipment, cut off all the power of the
equipment.
12. Equipment, the interface and the plug are not waterproof, so do not
allow the underwater laid or installation.
13. Keep dry.
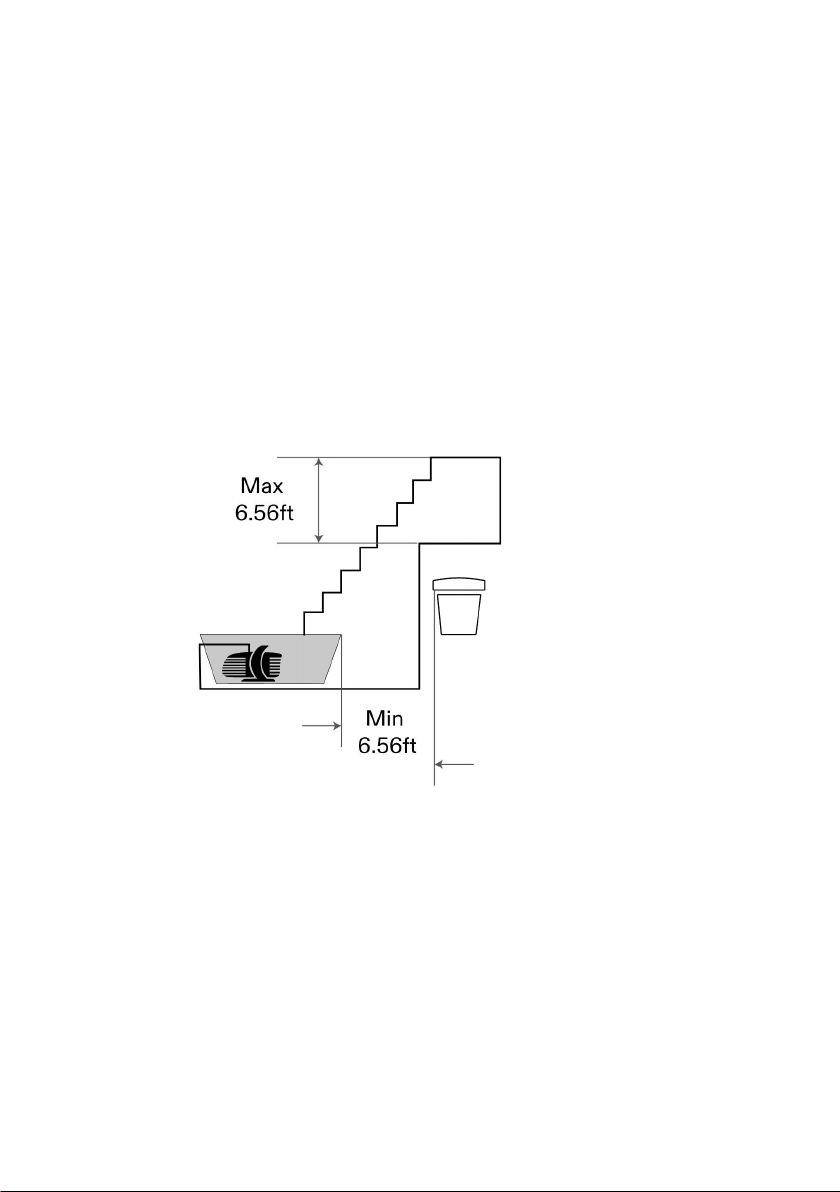
14. Need a pump(separately buy)to run this product.The maximum head
of the pump shall not exceed the maximum pressure that the product can
withstand.
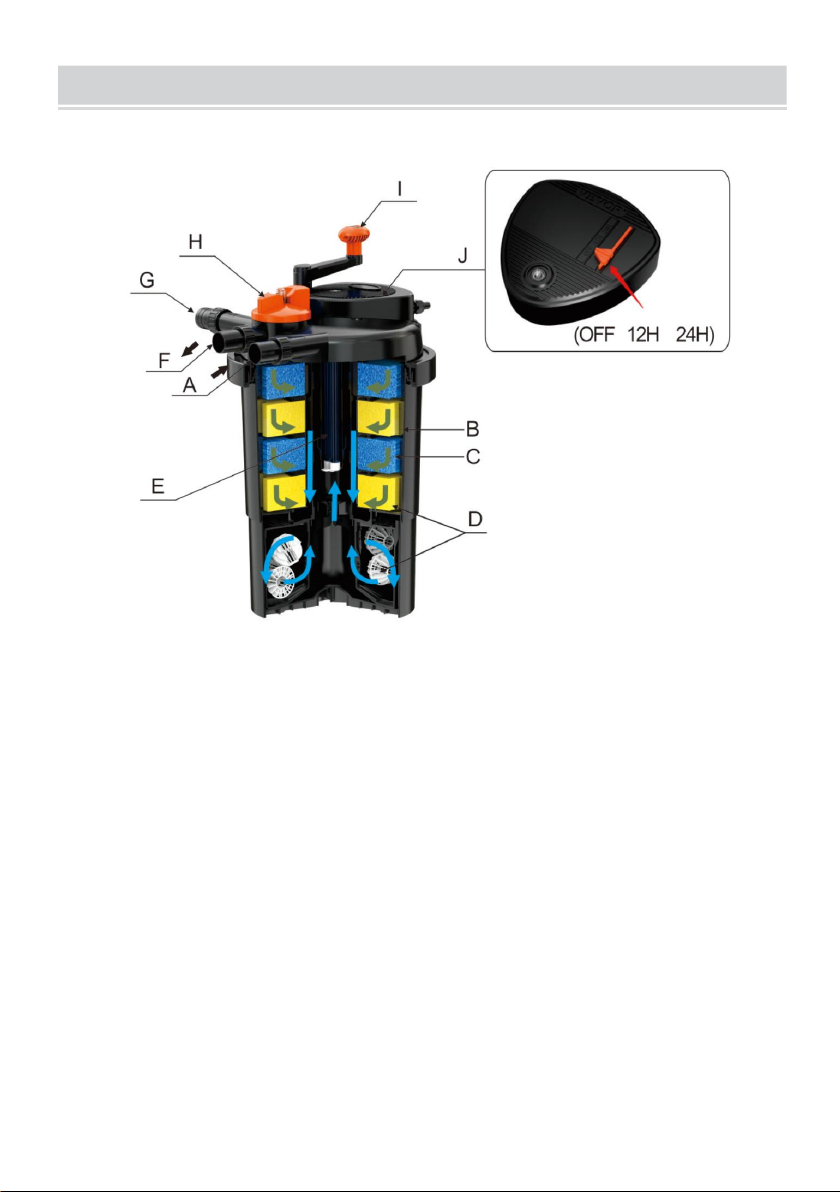
15. The internal pressure shall not exceed 0.3 bar(when the red buoy in
the middle of the function switch floats, it means the inner filter sponges
should be cleaned).
16. Hoses that connect the filter and pump must withstand pressure
greater than the maximum head of the pump.
17. In normal work, you should ensure the function switches to
"filter".Only when cleaning, switch to "clean".
18. Before starting up the filter, check the connected hoses and the clamp
are correct.
19. If it is a frost day, you have to remove the filter.
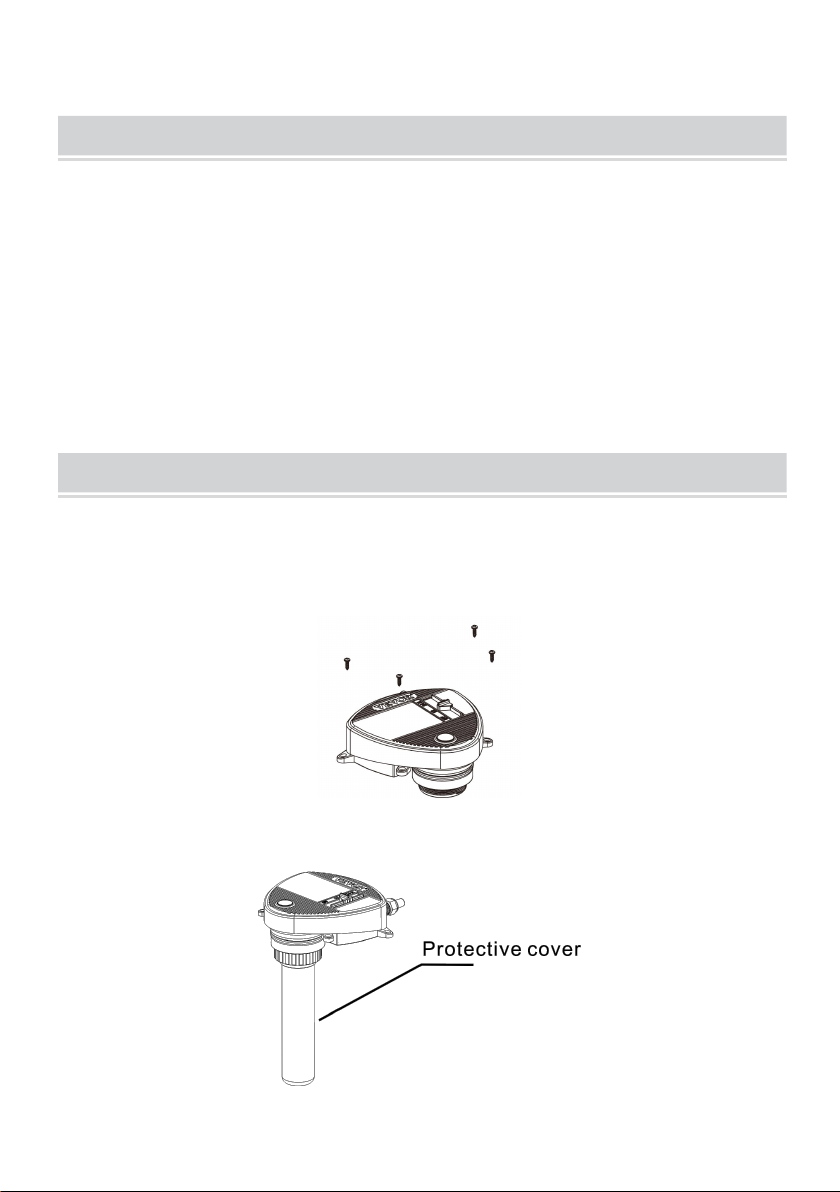
20. Install the filter where it will not be exposed to direct sunlight.
21. Type Y attachment: If the supply cord is damaged, it must be replaced
by the manufacturer, its service agent or similarly qualified persons in
order to avoid a hazard.
22. GROUNDING INSTRUCTIONS - This appliance must be grounded.
In the event of a malfunction or breakdown, grounding will reduce the risk
of electric shock by providing a path of least resistance to electric current.
This appliance is equipped with a cord having an appliance-grounding
conductor and a grounding plug. The plug must be plugged into an
appropriate outlet that is installed and grounded in accordance with all
local codes and ordinances.
23. WARNING - Improper connection of the appliance-grounding
conductor can result in a risk of electric shock. Check with a qualified
electrician or service representative if you are doubt whether the

- 6 -
appliance is properly grounded. Do not modify the plug provided with the
appliance; if it will does not fit the outlet, have a proper outlet installed by a
qualified technician.
FEATURES
1. Integral filter system, filter effect is remarkable.
2. With a complete UV-C clarifier, the UV lamp can be timed and set at
will at OFF, 12 and 24 hours. The correct use can effectively improve the
water quality to ensure that the water is clear and healthy.
3. Patented cleaning technology, easy to maintain.
4. Suitable for garden ponds, koi ponds, etc.

- 7 -
HOW THE FILTER WORKS
The pressure filter with integrated UV is a sealed filter system for the
biological and mechanical cleaning of pond water.
A. Water inlet
The pump is connected to the water inlet with a pressure hose.
B. Vortex system
Under the action of gravity, suspended solids and mud are separated.
C.Mechanical filtration
When the water is through the filter sponge into the internal, dirt particles
will be stopped by the sponge surface.
D.Biological clarifying
The pores of the filter sponge form a large inner surface which
microorganisms can colonize. The yellow and blue filter sponges differ in

- 8 -
size and density. This creates zones in which the water can flow at
different speeds. Zones with a high flow speed (blue filter sponges) favor
the colonization of microorganisms that convert ammonium to nitrate via
nitride(nitrification). Zones with a low flow speed (yellow sponges) support
the colonization of anaerobic microorganisms, which reduce nitrate to
nitrogen(denitrification).
Biological materials can help cultivate all kinds of anaerobic bacteria, and
the anaerobic bacteria will turn the nitrate into ammonia gas.
Note: CPF-2500 does not contain biochemical materials.
E. UV-C filtration
As the water flows out, it is briefly exposed to ultraviolet radiation under
the UV lamp. This kills off germs and bacteria and inhibits algae growth.
The water subsequently flows from the edge into the filter in a circular
fashion.
F. Water outlet
At the water outlet, the clarified water is fed back into the garden pond via
a pressure hose or a watercourse, etc.
G. Cleaning connection
When cleaning the filter, a drainage hose can be connected to the
cleaning connection, which diverts the dirty water into the sewerage
system or onto a flower bed.
H. Function switch
The function switch is used to switch between normal water discharge into
the pond "filter" and the cleaning connection "clean".
I. Cleaning handle
When the function switch is on the"clean" position, the sponges can be
cleaned by turning around the cleaning handle. Please turn the function
switch back to the "filter" position when the cleaning process ends.
J.UV timing switch
It is recommended to set 24 hours in summer and 12 hours in spring and
autumn. The UV lamp can be turned off when the temperature is low in
winter or when the filter is just starting to work.
Definition of clear water

- 9 -
The clear water is achieved if the fish or stones at the bottom of the
pond can be seen at a depth of 3.28ft
1. The installation of the filter
1) Install the filter so that it is safe from flooding. Secure your filter so
that it will not fall into the pond. It should be placed at least 6.56ft from
the edge of the pond.
2) Dig a hole beside the pond, bedded filters below the clamp or clip. Or
put the filter in a strong and smooth place.
3) In order to facilitate work on the filter, installed to ensure that the lid
can open.
4) Pumping height (the vertical height of the outlet to the pond water),
more than 3.28ft to choose a correspondingly more powerful pump.
5.Connecting hoses
We recommend warming the hose with hot water, pushing it onto the
spiral stepped hose adapter and securing it with a hose clip.
This makes the connection more watertight.
1. Try to choose a larger diameter hose to connect the filter.
2. For hoses that are longer than 13.12ft, please always use hoses that
correspond to the upper value of the scale.
3. In order to avoid pressure loss, cut the spiral stepped hose adapter at
the relevant points for each hose.

- 10 -
6.Cleaning connection
Connected to the cleaning connection. This allows you to drain the dirty
water directly into the sewerage system or onto a flower bed.
Starting on the pressure filter
Before each start-up, you should check that the connected hoses and the
clamp are sitting correctly. The function switch must be set to the "filter"
symbol. It is imperative that you read and follow the safety instructions
before start-up.
1) Switch on the pump. Caution! The UV lamp must not be operated
without water flowing through it.
2) Check all the sealing connections. If there is leaking, it should be
adjusted.
3) Pass the filter on the power supply.
4) The filter system with integrated UV must be running permanently,
24 hours a day.
5) The UV lamp must be replaced after 8,000 hours of operation in order
to ensure that the filter UV continues to operate with optimum
effectiveness.
6) The filter system must be cleaned regularly.
Attention: in the case of a new installation, the pressure filter only
reaches its full biological cleaning effectiveness after a few weeks.
Extensive bacterial activity only starts at a temperature of +50°F or
above.
Washing the filter sponges
Suspended matter and dirt are deposited in the filter sponges over time.
These deposits reduce the effectiveness of the filter, so the filter sponges
should be cleaned regularly, e.g., every week.
The filter sponges should be cleaned when cloudy or even dirty water
flows out of the water outlet and back into the pond. (When the red
indicator in the function switch is floated on).
1) Turn clockwise until it clicks into the "clean" position.
2) Turn the cleaning handle, and the clean gear will be squeezed into the

- 11 -
sponge to achieve mechanical cleaning.
3) The filter will now be rinsed. Once clean water can be seen through the
transparent spiral stepped hose adapter at the cleaning connection, turn
anti-clockwise until it clicks into the "filter" position.
4) The filter is now operating again. Check the water flow into the pond.
5)
REPLACEMENT OF THE FILTER SPONGES
If the water flow is too small due to dirty filter sponges, and can not be
improved by cleaning the handle. The filter sponges must be washed or
replaced.
Please do not use any chemical cleaning agents so as not to kill off the
microorganisms in the filter sponges.
1. Disconnect the mains plug of the filter.
2. Switch off the pump and ensure that it cannot be switched on
unintentionally.Remove all hoses by unscrewing the union nuts.
3. Remove the protective buckle, then open the clamp.
4. Lift off the lid with the filter sponge assembly. Place the lid upside down
on another clean surface. The filter sponges are lying with the filter plate
facing up.
5. Remove the diversion pipe anti-clockwise, and remove the screws on
the gear and the separate plate.
6. Remove the filter sponges to replace or clean them.
7. Pull off the filter sponges part and clean them under flowing water. Give
the filter sponges a good squeeze.
8. Clean the container, filter sponges, O-ring and the edge of the container
by spraying them with a water hose.
9. Put the sponge part as follow, put it on a separate plate, fix the
leanness gear set, and fasten the diversion pipe.
10. Place the O-ring onto the upper edge of the container(To easily fit, you
should make it wet). Press down on the lid.
11. Put the clamp in the right place, pull on the pull tab, and finally, push

- 12 -
the safety latch in.
12. Fasten all hoses with flat seals or flow vane to the corresponding
connection by screwing the union nuts on tight.
13. Start the pressure filter up again.
Note: As for the difference between models, please refer to the
actual prevail.
CLEANING THE QUARTZ TUBE AND REPLACEING THE UV LAMP
1. Unscrew the screw on the lid.
2. Pull out the UV head, then you can clean the quartz glass tube.
3. Clean the quartz glass tube with a wet cloth.
4. Remove the fixing nut on the quartz glass tube.
5. Pull out of the quartz glass tube then you can replace the UV lamp.
6. Check the quartz glass tube set. Change it if broken.
7. Set up all parts of the filter as before and start up the filter again.
Note: as the difference between models, please refer to the actual
prevail.
WEARING PARTS
1. UV lamp 2.Filter sponges 3.Seal set

- 13 -
TROUBLE SHOOTING
STORAGE
In order to prevent frost, you must drain the water, clean and check the
filter after use. Then store it in a dry place.

- 14 -
TECHNICAL PARAMETERS
CRITERIA: POND SIZE AND WITHOUT FISH POPULATION

- 15 -
PART LIST
CPF-2500

- 16 -
CPF-3500
No.
Name
1
Screw 1
2
UV head
3
O-ring 1
4
UV lamp
5
O-ring 2
6
Quartz glass tube set
7
Fixing-nut
8
Lid
9
Sponge
10
Separate plate
11
Sponge fix part
12
Filter basket cover
13
Bio ball
14
Filter basket
15
Clamp
16
O-ring 3
17
Container
18
Screw 2
19
Washer
20
Down bearing
21
Clean gear set
22
Inlet&Outlet
23
O-ring 4
24
Cleaning handle
Screwdriver

- 17 -
CPF-10000
No.
Name
1
Screw 1
2
UV head
3
O-ring 1
4
UV lamp
5
O-ring 2
6
Quartz glass tube set
7
Fixing-nut
8
Lid
9
Sponge
10
Separate plate
11
Diversion pipe
12
Filter basket set
13
Clamp
14
O-ring 3
15
Container
16
Screw 2
17
Washer
18
Down bearing
19
Clean gear set
20
Drain outlet
21
Gasket
22
Flow impeller
23
Inlet&Outlet
24
Inlet&Outlet nut
25
Cleaning handle
Screwdriver

- 18 -
ENVIRONMENTAL PROTECTION
This product is subject to the provision of European Directive 2012/19/EC.
The symbol showing a wheelie bin crossed through indicates that the
product requires separate refuse collection in the European Union. This
applies to the product and all accessories marked with this symbol.
Products marked with this symbol cannot be discarded with normal
household waste but must be taken to an electrical and electronic
equipment collection point for recycling.
MADE IN CHINA
This manual suits for next models
2
Table of contents
Other VEVOR Water Filtration System manuals
Popular Water Filtration System manuals by other brands

Culligan
Culligan GoodWater Machine DrinkingWater System owner's guide

Filters itm
Filters itm HYDRAULIC-200-H-INOX user manual

Fantech
Fantech FB6 installation instructions

Oasis
Oasis QE Series Installation and operation manual

Weh
Weh TSF4 operating instructions

HEISSNER
HEISSNER F30000-00 Instructions for use

HotSpring
HotSpring ACE Operation guide

Kessel
Kessel EasyClean free Instructions for installation, operation and maintenance

Force of Nature
Force of Nature FON-KIT-001 quick start guide

WaterLogic
WaterLogic WL270 Service manual

Watts
Watts 70608 Series installation manual

Cuckoo
Cuckoo CP-QN1401SW/WHCBMYCI user manual