VEVOR YT6077 User manual

Technical Support and E-Warranty Certificate www.vevor.com/support
METEOROLOGICAL STATION
MODEL:YT6077
We continue to be committed to provide you tools with competitive price.
"Save Half", "Half Price" or any other similar expressions used by us only represents an
estimate of savings you might benefit from buying certain tools with us compared to the major
top brands and doses not necessarily mean to cover all categories of tools offered by us. You
are kindly reminded to verify carefully when you are placing an order with us if you are
actually saving half in comparison with the top major brands.

- 1 -
MODEL:YT6077
Have product questions? Need technical support? Please feel free to
contact us:
CustomerService@vevor.com
NEED HELP? CONTACT US!
This is the original instruction, please read all manual instructions
carefully before operating. VEVOR reserves a clear interpretation of our
user manual. The appearance of the product shall be subject to the
product you received. Please forgive us that we won't inform you again if
there are any technology or software updates on our product.
METEOROLOGICAL
STATION

- 2 -
Warning-To reduce the risk of injury, user must read
instructions manual carefully.
This product is subject to the provision of European
Directive 2012/19/EC. The symbol showing a wheelie bin
crossed through indicates that the product requires separate
refuse collection in the European Union. This applies to the
product and all accessories marked with this symbol.
Products marked as such may not be discarded with normal
domestic waste, but must be taken to a collection point for
recycling electrical and electronic devices

- 3 -
WEATHER STATION UNIT

- 4 -
1 Outdoor temperature/humidity reading
2 Atmosphere display
3 Indoor temperature/humidity reading
4 Moon phase display
5 Time display
6 Weekday display and Calendar with month, date display
7 Battery compartment (3 x AAA batteries)
8 TIME SET button
9 ALARM button
10 ALERT button
11 ▲/MAX/MIN button
12 SNOOZE/DIMMER button
13 ▼/RCC/°C/°F button
14 HEAT/DEW button
15 CHANNEL button
MAIN FEATURES
Colorful and big digit display with super bright backlight.
8 functional buttons: TIME SET, ALARM, ALERT, ▲/MAX/MIN,
SNOOZE/DIMMER, ▼/RCC/°C/°F , HEAT/DEW, CHANNEL.
Self setting accurate atomic time function.
Time display: Hour, minute.
Calendar display: Month, date and weekday.

- 5 -
Time zone: -12~12.
Alarm with snooze function.
Display Indoor & outdoor temperature (°C/°F) & humidity readings with
trend.
Low battery indication for both weather station and wireless sensor.
3-level brightness of backlight.
7 languages for weekdays display.
OUTDOOR TEMPERATURE & HUMIDITY SENSOR STATION
1. MAIN FEATURES
• Temperature & Humidity measurement.
• Low Battery Indication.
2. TX BUTTONS ON THE BACK
1 LED: Flashes when the unit transmits a reading
2 Wall mount
3 Channel switch: Channel 1,2,3 inside battery compartment
4 Temperature unit switch: ℃/℉, inside battery compartment
5 Battery compartment: Use 2 x AAA batteries
6 Battery door

- 6 -
FIRST TIME TO USE
1. PAIR THE OUTDOOR REMOTE SENSOR
First of all, it needs to do the pairing between outdoor sensor and weather
station. Please follow below procedure to pair the sensor.
1) Plug the included AC-AC adaptor into the weather station. (optional)
insert 3 new “AAA”alkaline batteries for backup.
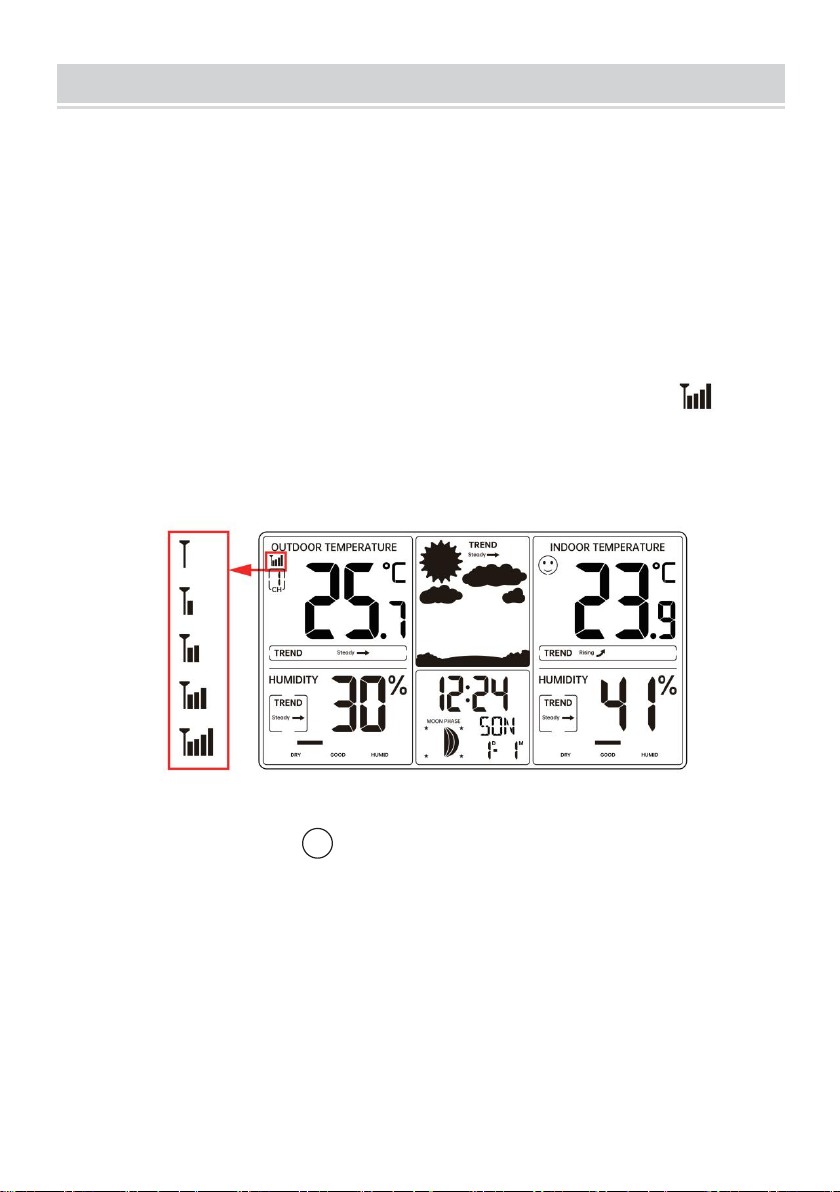
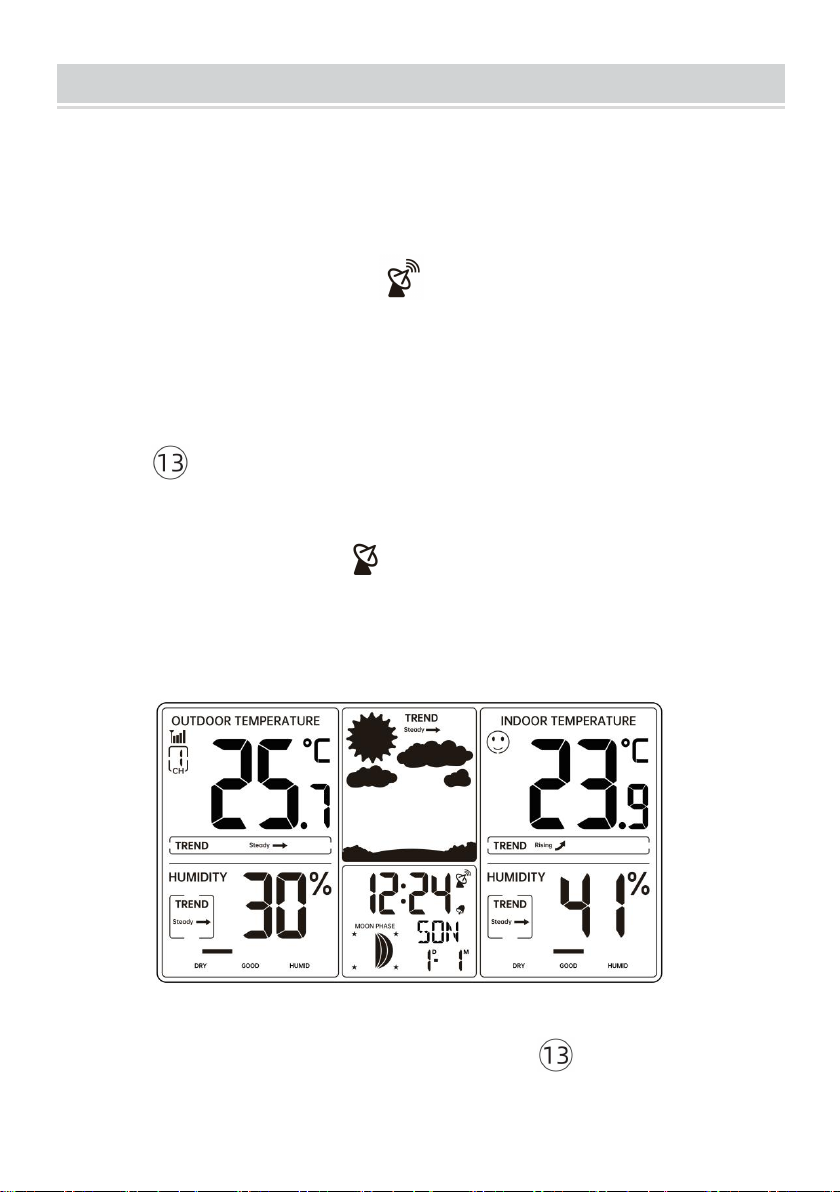
The screen is turned on. It starts to search sensor and register the
received sensor. During RF pairing, the signal strength icon will
animate until the sensor signal is received or for 5 minutes if no signal
is available.
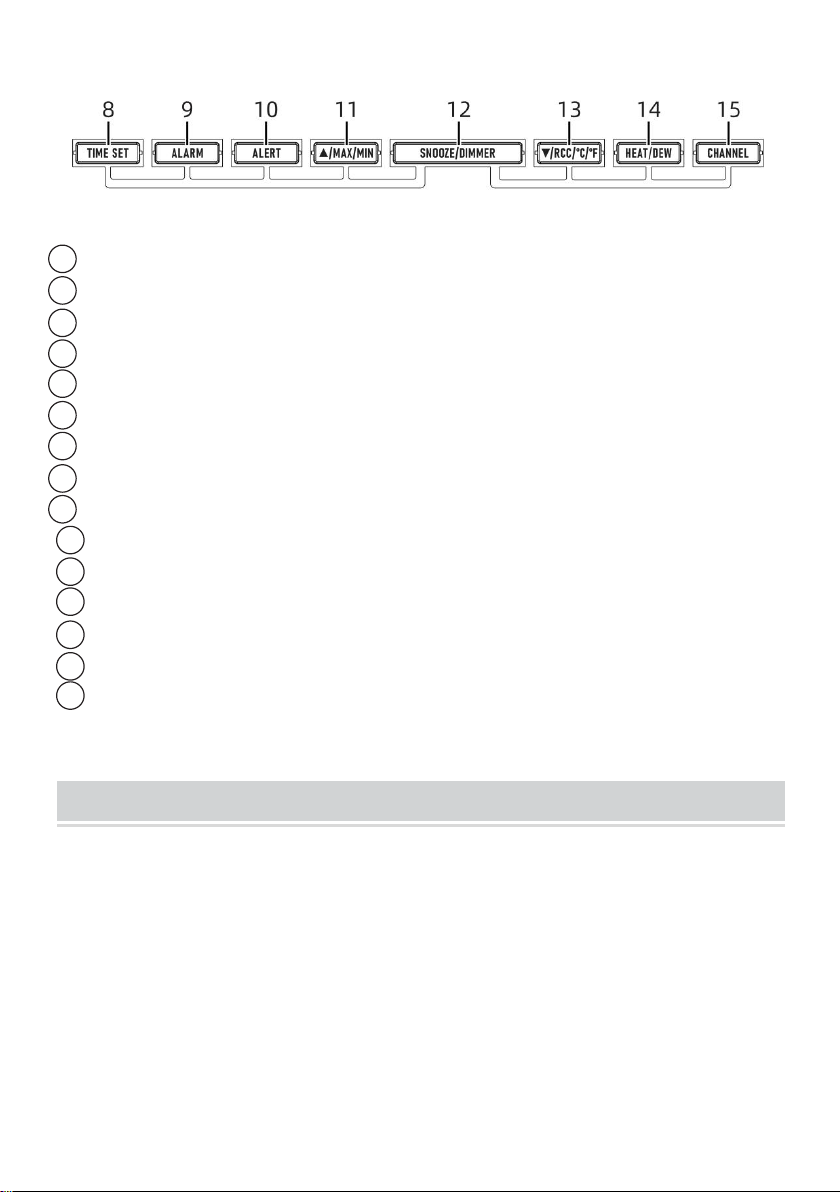
Note: If no sensors is paired, you can pair the sensor again manually by
pressing and holding the 15 【CHANNEL】key over 2 seconds. Please
refer to “SEARCH FOR OUTDOOR SENSOR”.
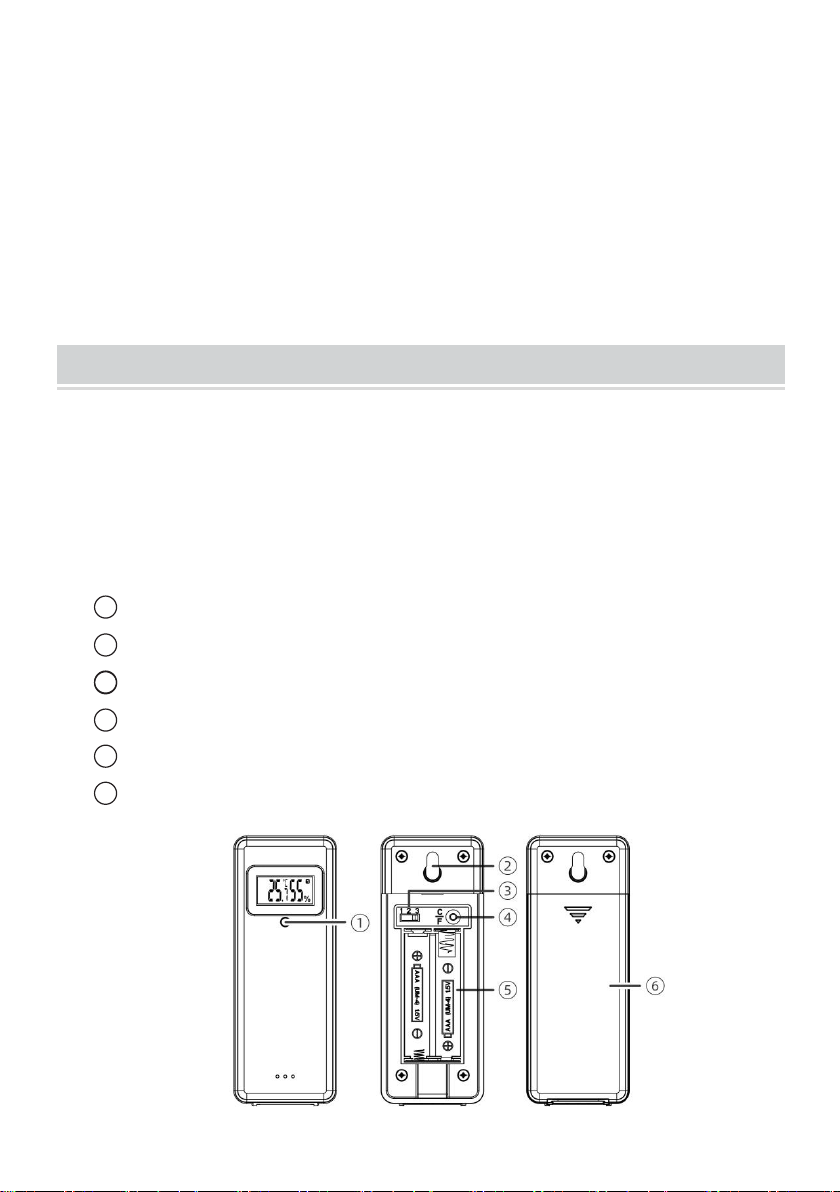
2) Insert 2 new“AAA”alkaline batteries for the wireless outdoor remote
sensor.
3) The wireless remote sensor will transmit the signal and LED will flash
during transmission.
4) Keep the outdoor sensor 5-10 feet from the weather station.
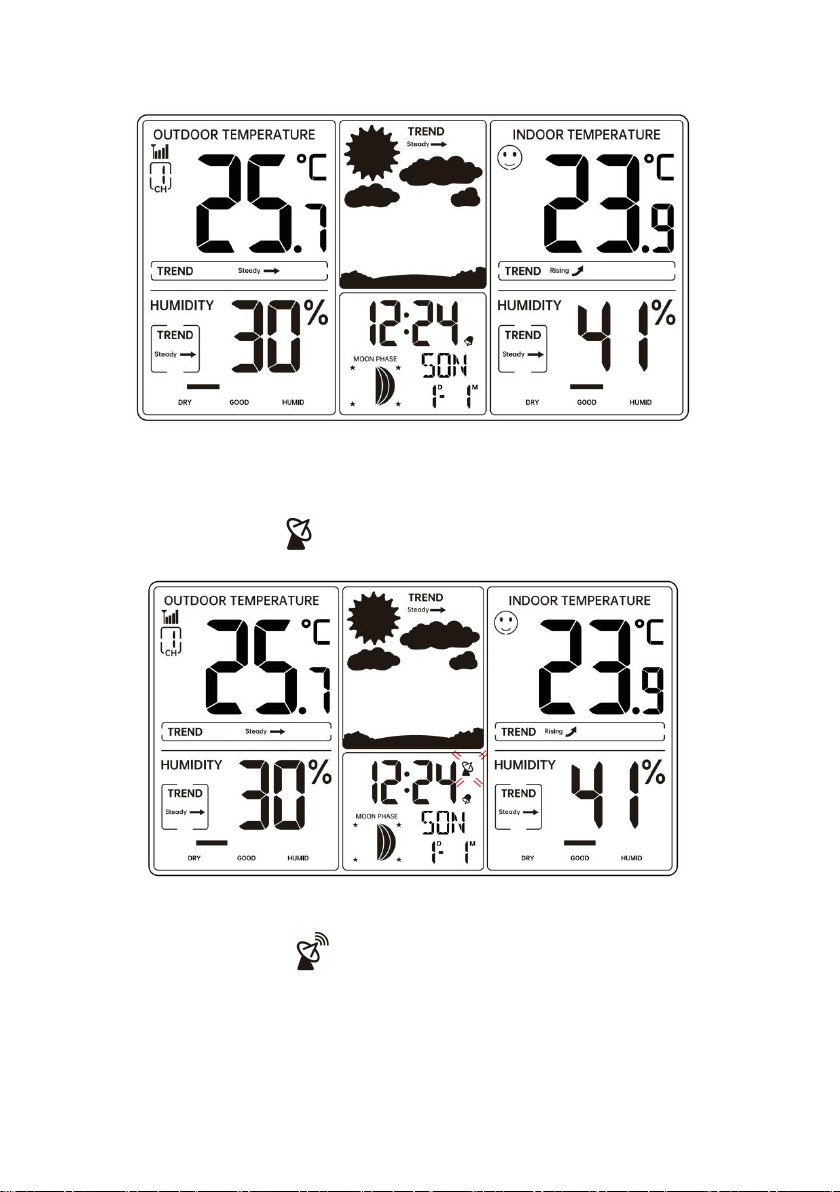
5) When the RF connection is established, the temperature and humidity

- 7 -
readings will appear on the station.
6) fter the RF connection is established or 5 minutes of pairing time, the
weather station will automatically receive atomic clock signal, the RCC
receiving dot icon “ ”will be flashing.
7) When the weather station detects the atomic clock signal, the signal
strength indication will be indicated.

- 8 -
8) Put the weather station away from interference, such as electronic
devices.(TV, computer, microwave, radio, etc.)
9) When the atomic clock signal is received successfully, the time and
date will be updated.
10) Allow the outdoor sensor and weather station to sit together for 15
minutes to establish a strong connection.
11) Do not press button for 15 minutes.
12) After 15 minutes, place the sensor in a shaded outdoor location.

- 9 -
ATOMIC CLOCK RECEPTION
The weather station automatically begins to search the DCF signal
and update the time every day at 1:00 am, 2:00 am, 3:00 am, 4:00 am,
5:00 am.
The Atomic Time tower icon will flash while searching and will be
solid when it has connected.
1. MANUAL RCC RECEPTION
You can receive the atomic clock signal manually.In Normal display,press
and hold 【▼/RCC/°C/°F】over 2 seconds to receive the atomic clock
signal manually.
The RCC receiving dot icon “ ” is flashing and will start atomic clock
reception. When the atomic clock signal is received successfully, the time
and date will be updated.
During atomic clock reception,press and release 【▼/RCC/°C/°F】
button to exit atomic clock reception.

- 10 -
TIME SETTING
In Normal time display, press and hold 【TIME SET】over 2 seconds to
enter time setting mode.
Press and release 【▲/MAX/MIN】and 【▼/RCC/°C/°F】to adjust
the values. Hold to adjust quickly.
Press and release 【TIME SET】to confirm and move to the next item.
1. SETTING ORDER
1. RCC On/Off
4. Year
7. 12/24 Hour Format
10. End of Setting
2. Time Zone
5. Month
8. Hour
3. Language
6. Date
9. Minute
1.) Press and hold 【TIME SET 】button entering the settings. RCC ON
flashes. Press 【▲/MAX/MIN 】and 【▼/RCC/°C/°F】to set RCC
on/off . Press 【TIME SET】to select Time Zone.
Note: If RCC OFF is selected, you will skip time zone setting and move
year setting.
2.) When Time zone flashes, press 【▲/MAX/MIN】or
【▼/RCC/°C/°F】to adjust the time zone(-12~12). Press 【TIME SET】
to select language for weekday display.

- 11 -
3.) When weekday flashes, press 【▲/MAX/MIN】or
【▼/RCC/°C/°F】to adjust the desire language. Press 【TIME SET】to
select Year.
4.) When Year flashes, press 【▲/MAX/MIN】or 【▼/RCC/°C/°F】
to adjust the year. Press 【TIME SET】to select Month.
5.) When Month flashes, press 【▲/MAX/MIN】or 【▼/RCC/°C/°F】
to adjust the month. Press 【TIME SET】to select date.
6.) When Date flashes, press 【▲/MAX/MIN】or 【▼/RCC/°C/°F】
to adjust the date. Press 【TIME SET】to select 12/24 hour time format.
7.) When 12 Hr flashes, press 【▲/MAX/MIN】or 【▼/RCC/°C/°F】
to adjust 12 hour or 24 hour time format. Press 【TIME SET】to select
hour.
8.) When Hour flashes, press 【▲/MAX/MIN】or 【▼/RCC/°C/°F】
to adjust the hours. Press 【TIME SET】to select minute.
9.) When Minute flashes, press 【▲/MAX/MIN】or 【▼/RCC/°C/°F】
to adjust the minutes. Press 【TIME SET】to save all settings and exit
the setting.
Note: If there is no valid operation within 20 seconds, it will automatically
return to the normal display mode from the setting mode.

- 12 -
2. 7 LANGUAGES
GER (German), FRE (French), ITA (Italian), DUT (Dutch), SPA (Spanish),
DAN (Danish), ENG (English)

- 13 -
SET ALARM TIME
1. CHECK ALARM TIME
In Normal time display, press 【ALARM】to switch display alarm time
(Alarm time mode).
2. SETTING THE DAILY ALARMS
In Alarm time display, press and release 【ALARM】to confirm and
move to the next item.
Press and hold 【ALARM】over 2 seconds to enter alarm setting
mode. Hour of Alarm starts to flash.

- 14 -
Press 【▲/MAX/MIN】or 【▼/RCC/°C/°F】button to set
required alarm hours. Hold 【▲/MAX/MIN】or 【▼/RCC/°C/°
F】button to adjust alarm hours quickly. Press 【ALARM】to select
minute of Alarm.
When minute of Alarm flashes.
Press 【▲/MAX/MIN】or 【▼/RCC/°C/°F】button to set
required alarm minutes. Hold 【▲/MAX/MIN】or 【▼/RCC/°

- 15 -
C/°F】button to adjust alarm minutes quickly.
Press 【ALARM】to save all settings and exit to alarm mode.
Note: If there is no valid operation within 20 seconds, it will automatically
return to the normal display mode from the setting mode.
3. DEACTIVATE/ACTIVATE ALARM
In Alarm time display, press 【ALARM】to select the Alarm on or
off.
If the alarm is on, its corresponding alarm icon will be shown on
the display.
4. SWITCHING OFF THE ALARM SIGNAL
When the alarm is ringing, press any buttons except
【Snooze/Dimmer】to stop the alarm signal. It is not necessary to
reactivate the alarm. It will ring again this time next day.
5. SNOOZE FUNCTION
When the alarm rings, press 【Snooze/Dimmer】button to pause
the alarm. The snooze indicator icon keeps flashing.
The alarm will resume after 5 minutes.

- 16 -
HEAT INDEX AND DEW POINT
The value of HEAT INDEX is displayed when the outdoor temperature
is ≥26.6°C. The value of DEW POINT is displayed when the outdoor
temperature is <26.6°C.
Press 【HEAT/DEW】to switch between heat index and dew point
display, humidity is not displayed when heat/dew point index is viewed.
TEMPERATURE AND HUMIDITY TREND
1. TEMPERATURE TREND
The temperature trend indicators update with every 15 minutes and look
back over the past hour.
Change in temperature (2°F/1°C)
Temperature has
risen > 1°C/2°F in
the past hour
Temperature has not
changed more than
1°C/2°F in the past hour
Temperature has
fallen < 1°C/2°F in
the past hour

- 17 -
2. HUMIDITY TREND
The humidity trend indicators update with every 15 minutes and look back
over the past hour.
Change in humidity (3% RH)
Humidity has
risen > 3% in
the past hour
Humidity has not
changed more than 3%
in the past hour
Humidity has
fallen < 3% in
the past hour
3. TEMPERATURE AND HUMIDITY MAX/MIN RECORD
Press 【 ▲/MAX/MIN】to display the maximum value of
indoor/outdoor temperature and humidity, press again to display the
minimum value, and press again to return to the normal display.
Note: If there is no valid operation within 5 seconds, it will automatically
return to the normal display mode from the setting mode.
4. HUMIDITY COMFORT INDICATOR
When the humidity is in the corresponding range, the corresponding
number of grids is displayed.

- 18 -
ALERT FUNCTION
In normal display mode, press 【ALARM】to turn on/offthe alert
function. When the alert function turns on, the icon and will
display.
Note: Alert function is turned off by default when powering up.
1. CHECK ALERT VALUE
In normal time display, press 【ALERT】to display the high alert
value of indoor and outdoor temperature and humidity. The icon will
display. Press 【ALERT】to display the low alert value of indoor
and outdoor temperature and humidity. The icon will display.
Press 【ALERT】to return to normal display mode.
2. SETTING THE ALERT
In normal time display, press and hold 【ALERT】over 2 seconds
to enter alert setting mode.
Press and release 【 ▲/MAX/MIN 】or 【▼/RCC/°C/°F】to
adjust the values. Hold to adjust quickly.
Press and release 【ALERT】to confirm and move to the next item.
The icon will display when the upper limit value is set. The icon
will display when the lower limit value is set. The setting item flashes.

- 19 -
3. SETTING ORDER
(1) Outdoor temperature upper limit value
(2) Outdoor temperature lower limit value
(3) Outdoor humidity upper limit value
(4) Outdoor humidity lower limit value
(5) Indoor temperature upper limit value
(6) Indoor temperature lower limit value
(7) Indoor humidity upper limit value
(8) Indoor humidity lower limit value
(9) End of setting
Note: When setting the alert value, press 【CHANNEL】to switch to set
for other outdoor temperature/humidity sensors.
4. ALARM
When the temperature or humidity alert is activated, the corresponding
value and alert icon or flashes. The alarm is automatically
turned off after 1 minute of continuous ringing, but the alert icon will
still flash.
If the alarm is not for the currently displayed outdoor sensor, only the
alert icon will flash and the alarm will ring, but the alert value will not be
displayed.
5. DEACTIVATE THE ALARM
When the alarm is ringing, press any buttons to stop the alarm. The
alert indicator icon keeps flashing.
Temperature or humidity returns to the alert value range to
automatically stop the alarm.
Table of contents
Other VEVOR Weather Station manuals
Popular Weather Station manuals by other brands

La Crosse Technology
La Crosse Technology Wireless Weather Station instruction manual

Hyundai
Hyundai WS 1855 instruction manual

Kestrel
Kestrel 4000 Instructional manual

Technoline
Technoline Mobile Alerts MA 10920 instruction manual

digi-tech
digi-tech XC0412 user manual

Technoline
Technoline WS 9255 user manual