Vicko CM6821E User manual

20
Electric Coffee Maker for Expresso & Capuccino.
Proper for Ground coffee.
Power 850W.
Pressure: 15 Bar.
1,6L Detachable Water Tank.
Single and Double Dose Stainless Steel Mesh-Filters.
Froth Nozzle.
Auto Shut-Off fuction
INSTRUCTIONS MANUAL
Model No: CM6821E
Ref. No: 878-110010

21
ATTENTION! - IMPORTANT SAFEGUARDS
1. This appliance is designed for private, domestic use only. No responsibility is
accepted for damage resulting from use non-compatible with the instructions.
2. The appliance is not intended to be used in the following applications, and
the guarantee will not apply for:
Any commercial use.
Staff kitchen areas in shops, offices and other working environments.
Farm houses.
By clients in hotels, motels and other residential, bed and breakfast type
environments.
3. This appliance is used only for preparing Expresso & Capuccino coffee.
4. The appliance is only intended to be used indoors and not outdoors.
5. Do not operate the appliance if the power cord shows any signs of damage.
If the supply cord is damaged, it must be repaired by a qualified person in
order to avoid a hazard. Improper repairs may place the user at serious risk.
6. Always handle the power cord with care. Do not pull or strain the power cord.
The power cord may never be folded or pinched. Always pull the plug to
disconnect the power cord, never pull the cord to disconnect it.
7. Do not use the cord as a handle.
8. Do not pull the cord near sharp corners.
9. Do not let the cable resting on a hot surface or hanging on the edge of the
table.
10. Do not use any accessories not recommended by the manufacturer. It may
cause injury and device destruction.
11. Do not use with a voltage converter.
12. Always connect this appliance to a mains socket outlet with a protective
earthing connection.
13. The appliance should only be placed on flat and stable surfaces.
14. Do not place the appliance next to the edges of a kitchen bench or table as
there is a risk of falling.
15. Do not place the appliance on or near a microwave oven, electric oven, gas
oven or washing machine.
16. Keep the appliance away from flammable objects or other heat source.
17. Do not use outdoors or where aerosol spray products are being used or
where oxygen is being administrated.
18. The appliance must not be located immediately below or above a socket-
outlet.
19. The socket must be easily accessible at any time to ensure that the unit can
be disconnected quickly from the electricity supply.
20. Never use the appliance in the bathroom near a swimming pool, or any other
place with humidity and high temperature.
21. The appliance should not be exposed to extreme weather conditions (rain,
etc.) or any wet conditions.

22
22. Do not place or store the appliance where it can fall or be pulled into a tub of
sink.
23. Always leave enough space around the device when it is in use among other
items. Do not place the device near flammable materials such as furniture,
pillows, fabrics, curtains, etc. WARNING! If you use the device on a surface
that can be damaged by heating, it is recommended to place an insulation
base under the device.
24. Always use the device in an upright position.
25. Do not operate the appliance with wet hands.
26. Do not use while you are in contact with water.
27. Do not immerse the appliance in water or any other liquids.
28. Do not touch an appliance that has fallen into water. Just pull the plug off.
29. Do not use the device when it is empty.
30. Always make sure to unplug the appliance from the power supply before
adding water in the water tank.
31. Never fill the water tank above its printed “MAX” indication. Always add water
when its surface goes below the tank’s printed “MIN” indication.
32. Always fill the water tank with natural water. Never use carbonated water.
33. Do not insert any objects into any opening.
34. Do not touch the heated surfaces when the device is in operation, as there is
a risk of burns. Do not let bare skin or eyes touch heated surfaces.
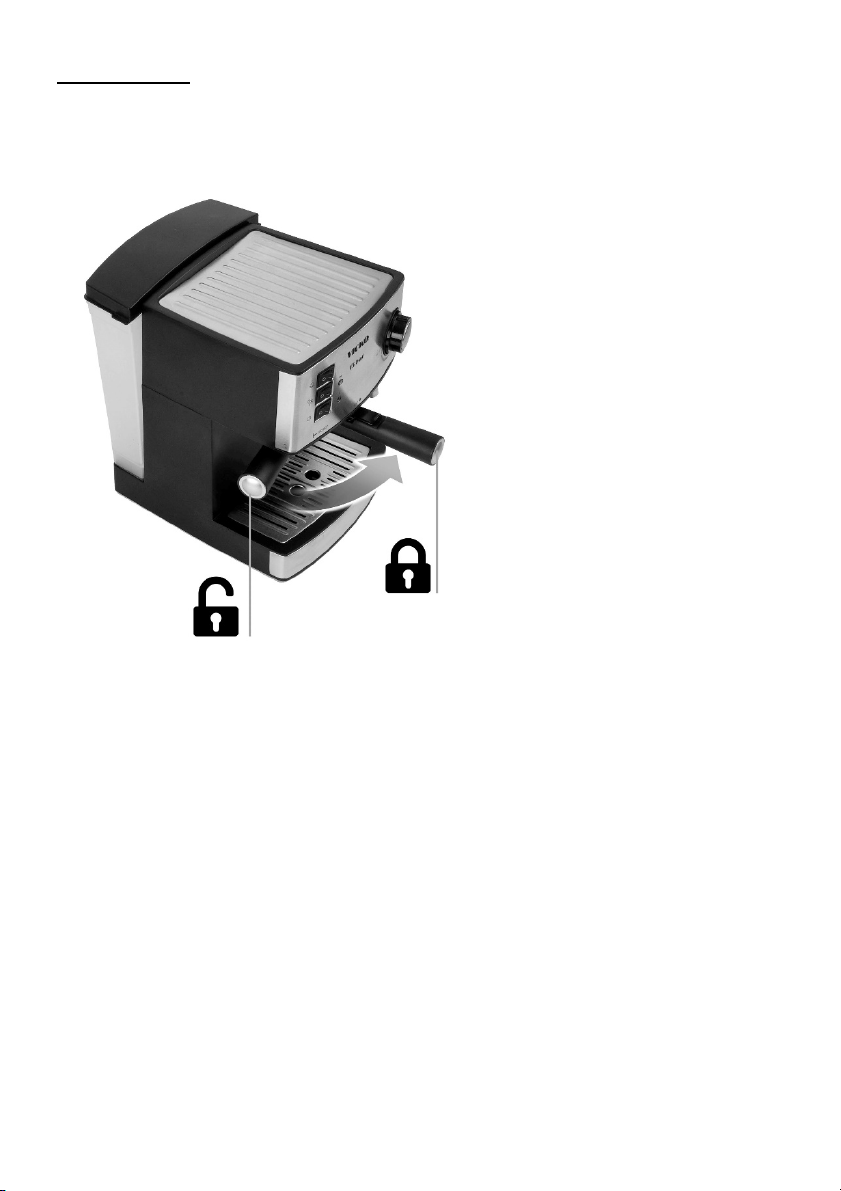
35. During machine operation lots of attention is needed on the way you use the
steam wand as there is a danger of causing burns. In order to use it
correctly:
Steam wand should always face away from your body parts.
Any controls with hands must be done exclusively by holding the
steam wand from its protruding rubber handle.
36. Avoid direct contact with the hot water produced by the boiler as there is a
danger of causing burns.
37. Do not forget that the temperature of the coffee prepared is high. Handle with
care your coffee cups to avoid any risk of splashes.
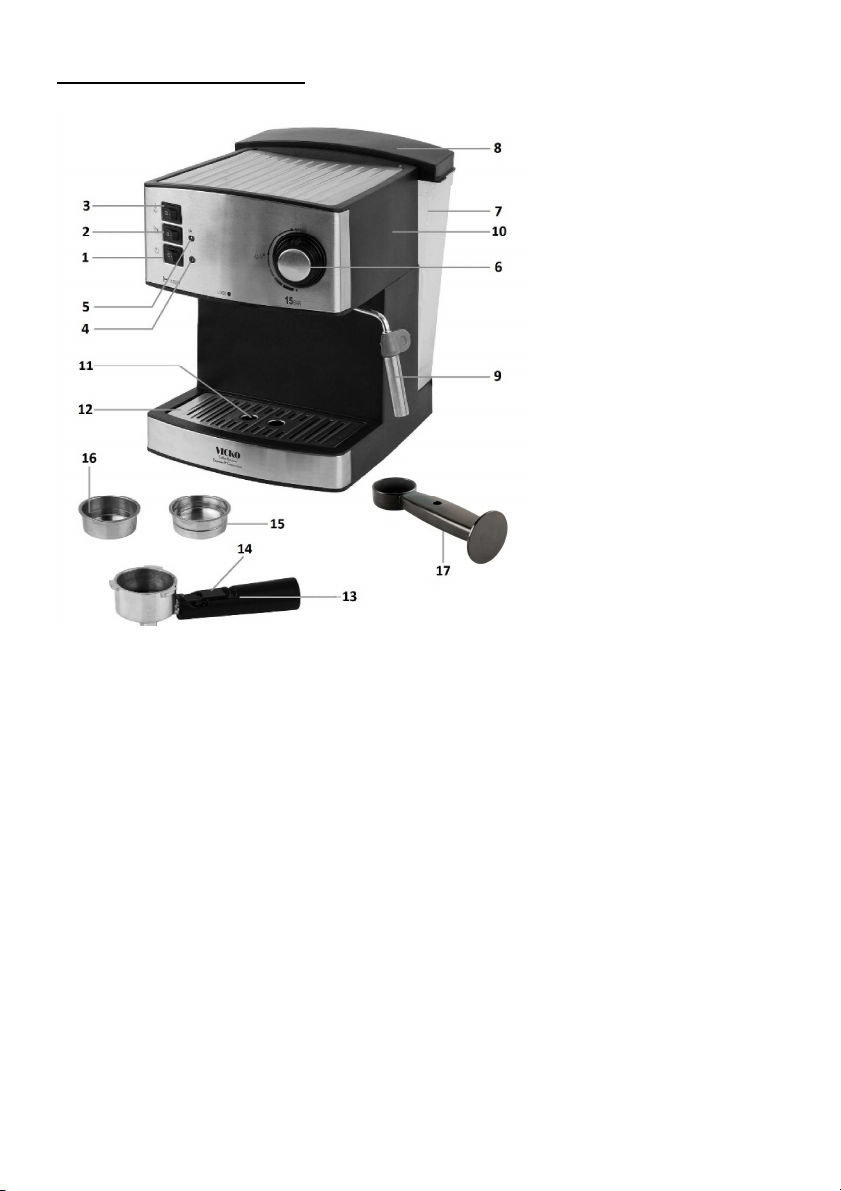
38. Do not use the appliance without the water tank, the filter, the funnel, the
steam wand, the drip tray and all parts installed in place.
39. Do not detach the water tank, the funnel, the steam wand, the drip tray or
any detachable part while the appliance is in operation and during making
coffee / hot water / steam.
40. Do not move the appliance while it is operating.
41. Do not use the device when temperature is below 0ºC. In such low
temperatures water can turn to ice crystals and cause a malfunction on the
inner hydraulic circuit of the device (water pump, inner piping etc.).
42. The device should always be disconnected from the mains when not in use.
Always switch OFF and unplug the appliance if it is not in use before moving,
cleaning and storing it.

23
43. Always switch OFF the appliance before disconnecting it from the socket. In
order to switch OFF the appliance please press all switches in position “O”
and turn the Steam Control Knob in position “OFF”.
44. Please note that the device is powered up when connected to the power
supply, even when the power switch is OFF (all switches are turned to “O”
and “OFF”).
45. The device should be used only by adults.
46. Keep the appliance away from children. Children must be under supervision
when they are near the device.
47. The device is not a toy. Children should be supervised to ensure that they do
not play with the appliance.
48. Always supervise the device when it is in use.
49. The appliance should only be stored indoors in a dry place away from
moisture and high or very low temperature. Avoid direct exposure under
ultraviolet.
50. Always make sure the appliance is clean and dry before storing it.
51. Do not store the appliance while it is still warm.

24
CAUTION!
Read all the instructions carefully before you use the
appliance and keep them for future use.
When passing on the appliance to a third person, make sure to
include these instructions for use.
CAUTION, HOT SURFACE!
Do not touch the heated surfaces when the device is in
operation, as there is a risk of burns.
WARNING!
The appliances are not intended to be operated by means of
an external timer or separate remote-control system.
WARNING!
This appliance is not intended for use by persons (including
children) with reduced physical, sensory or mental
capabilities, or lack of experience and knowledge, unless they
have been given supervision or instruction concerning use of
the appliance by a person responsible for their safety.
Children should be supervised to ensure that they do not play
with the appliance.
CAUTION - RISK OF ELECTRIC SHOCK!
To reduce the risk of electric shock do not open this device,
there are not serviceable parts for customers. Please refer
any maintenance or repair to qualified personnel.

25
BEFORE USE
1. Ensure the packaging of this appliance is disposed of properly as all materials
are recyclable.
2. Keep plastic bags away from babies and children.
3. After you remove the device from its packing, clean it according to the
following instruction:
Clean the external surface of the appliance with a damp cloth.
Wash the detachable parts (Water tank, Steam Wand, Drip Tray,
Removable Shelf, Funnel, Filters, Measuring spoon) with warm, soapy
water using a dish cloth. Rinse thoroughly to remove any soapy residue.
Do not put the main body of the appliance in water, neither rinse it under
tap water or any other liquid.
Do not put the detachable parts (Water tank, Steam Wand, Drip Tray,
Removable Shelf, Funnel, Filters, Measuring spoon) in dishwasher or
disinfector machine.
Do not use sharp objects, hard brushes or oven cleaners to clean the
device or any of the detachable parts.
Make sure that all parts of the device are completely dry before you
reassemble the device.
4. Place the appliance on a flat, stable and dry surface.
5. Before using the device unfold the cord completely and make sure that it does
not show any signs of damage.
6. Ensure that the main voltage rating of your power supply corresponds to the
voltage requirements of the appliance.
7. Make sure that all parts of the device are properly mounted before using the
appliance.
8. If you notice that there is a little smell or smoke going out of the appliance
during the first use, do not worry, it is normal.

26
CLEANING OF THE INNER HYDRAULIC CIRCUIT
Attention:
The following actions must be done before making your first espresso
coffee and be repeated every time the device is not used for some days
in order to clean effectively its inner circuit and achieve in any case the
proper coffee taste.
1. Make sure that all switches of the appliance are in position “O”, the steam
control knob (6) is in position “OFF” and the appliance is disconnected from
the power supply.
2. Fill the water tank (7) making sure that it does not get over the “MAX”
indication and place the tank on the back of the device. To make sure that it
has attached properly, if it is needed, press it slightly down. Do not worry if
you see some drips of water on its base, this is normal, you can wipe them
off.
It is recommended to use filtered or bottled water as they achieve
better coffee taste and leave fewer mineral deposits behind.
3. Place one of the two stainless steel meshes in the metal funnel of the funnel
handle and secure it properly onto the machine as shown on Figure 2. Do not
place any coffee in the mesh in this step.
4. Place one large cup or coffee pot on the removable shelf right underneath the
mouthpiece(s) of the stainless steel mesh that you used. Turn the steam
wand right and place underneath it a similar utensil.
5. Connect the device to the power supply.
6. Press the ON/OFF switch of the device to its “I” position. The orange light will
switch on.
7. Press the coffee/hot water switch (2) to its “I” position. As soon as water
begins to flow press it immediately back to its
“O” position.
8. After some seconds the green light (5) will switch on. Press again the coffee /
hot water switch (2) to its “I” position and hot water will begin flowing. After
you fill 2-3 cups of water, stop this function by turning the same switch to its
“O” position.
9. Turn the steam switch (3) to its “I” position. As soon as the green light (5)
switches on, rotate gradually the steam control knob (6) counterclockwise for
some seconds to produce steam. Repeat this for 5-6 times.
10. The device is now ready to produce coffee so you can shut it off by turning all
switches to their “O” positions and the steam control knob (6) to its “OFF”
position. If you do not want to make coffee right away, you can unplug the
device from the power grid.

27
During the first function of the pump some sound may be produced. Do
not worry, this is normal. This sound will fade out after some 20 seconds
of pump function.

28
APPLIANCE DETAILS
1. ON/OFF switch
2. Coffee/hot water selector switch
3. Steam switch
4. Power Indication Light “I” (Orange)
5. Ready Indication Light “ok” (Green)
6. Steam Control Knob (for Steam regulation)
7. Water tank
8. Water tank lid
9. Steam Wand / Froth Nozzle
10. Main body of the appliance
11. Drip Tray (for liquid collection)
12. Removable Shelf / Cups Stand
13. Funnel / Filter Holder
14. Funnel handle safety lock
15. Single dose mesh filter
16. Double dose mesh filter
17. Measuring spoon - Tamper

29
ASSEMBLY
►ATTACHING THE FUNNEL HANDLE ONTO THE DEVICE
Locking the funnel handle onto the device

30
INSTRUCTIONS
Please follow the instructions below in order to use the appliance.
►DEVICE PRE-HEAT
In order to achieve the appropriate taste of coffee it is important every time
before its making to preheat both the device and the steel mesh you are about
to use but also the cup in which you are about to serve the coffee. To do that
follow these steps:
1. Make sure that all switches of the appliance are in position “O”, the steam
control knob (6) is in position “OFF” and the appliance is disconnected
from the power supply.
2. Fill the water tank (7) making sure that it does not get over the “MAX”
indication and place the tank on the back of the device. To make sure that
it has attached properly, if it is needed, press it slightly down. Do not worry
if you see some drips of water on its base, this is normal, you can wipe
them off.
3. Place one of the two stainless steel meshes (15 or 16) in the metal funnel
of the funnel handle (13) and secure it properly onto the machine. Do not
place any coffee in the mesh in this step.
4. Place one or two cups on the removable shelf (12) just underneath the
mouthpiece(s) of the steel filter you used.
5. Connect the device to the power supply.
6. Press the ON/OFF switch of the device to its “I” position. The orange light
will switch on.
7. Press the coffee/hot water (2) switch to its “I” position. As soon as water
begins to flow press it immediately back to its “O” position.
8. After some seconds the green light (5) will switch on. Press again the
coffee / hot water switch (2) to its “I” position and hot water will begin
flowing. Turn the same switch back to its “O” position when you see either
your cup filled with water or the green light (5) switched off. The machine
is now ready to make coffee.

31
►ESPRESSO COFFEE MAKING
1. Make sure that all switches of the appliance are in position “O”, the steam
control knob (6) is in position “OFF” and the appliance is disconnected
from the power supply.
2. If you have the funnel handle attached onto the machine, detach it.
3. Add water in the tank (7) always watching not to get over its printed “MAX”
indication.
4. Insert in the funnel handle (13) your preferred stainless steel mesh (single
or double dose) (15 or 16)
5. With the measuring spoon – tamper (17) add coffee in the stainless steel
mesh (15 or 16). One spoonful is roughly the quantity needed for a single
dose of coffee. Press the coffee slightly with the flat surface of the tamper
(17) to make the coffee surface flat. Remove any coffee remaining on the
edge of the funnel handle (13).
6. Attach the funnel handle (13) onto the machine.
7. Empty the hot water in the coffee cup(s) that remained from the pre-heat
step and place it/them on the removable shelf(12) , underneath the
mouthpiece(s) of the stainless steel mesh(es) that you used.
8. Connect the device to the power supply.
9. Press the ON/OFF switch of the device to its “I” position. The orange light
will switch on.
10. When the green light switches on (5), or if it is already switched on, press
the coffee/hot water (2) switch to its “I” position and after a while coffee will
begin flowing.
11. When enough quantity of coffee is made you must press the coffee/hot
water (2) switch to its “O” position.
12. Detach the funnel handle (13) from the espresso machine. There will be
plenty of coffee - water on its inside. To clean it, raise its safety lock (14)
located on the handle in order to lock the stainless steel mesh (15 or 16) in
its position and turn it upside down. Clean the utensil.
13. If you do not want to make more coffee turn the ON/OFF switch (1) to its
“O” position.
ATTENTION
Do not let in any case the operating machine unattended. The coffee
making procedure and the flow is never automatically terminated, it
is always terminated manually by the user.

32
Useful Advice
You can use the device just to make hot water for other uses (for other
types of food, drinks, or cleaning tasks) in the same fashion that you use it
to make espresso coffee. Just use the machine with the same ways as
described above but add no coffee in the stainless steel mesh (15 or 16)
you use.
Pressure applied with tamper (17) will have a direct effect on the final
result. Small pressure will make the coffee flow easier, have a lighter color
and taste while the opposite results will be produced when the pressure is
larger. Attention: do not apply too much pressure with the tamper (17)
as this may spoil the coffee’s final taste.
If you see the green light (5) switching off during the coffee flow, this
means that the temperature of the coffee produced had been significantly
reduced.
To avoid possible leaks from the area where the funnel handle (13)
attaches on the machine it is necessary to clean regularly any local
remnants of coffee. Attention: this area might be too hot.

33
►CAPUCCINO COFFEE MAKING
1. Follow the step by step process of espresso coffee making as described
above until your coffee is ready.
2. Turn the steam switch (3) to its “I” position and wait until the green light (5)
switches on.
3. For each single dose of coffee you want to make fill with roughly 100ml
cold milk a jug or a big briquette.
Keep in mind that milk’s volume roughly doubles during frothing so
take care in using a sufficiently larger utensil than the intended
quantity of milk you will use, with a diameter of at least 75mm.
In any case prefer cold milk in fridge’s temperature than hot milk or
milk in room’s temperature as these last two tend to not froth correctly.
4. After you finish frothing you must turn all switches to position “O” and
“OFF” and disconnect the appliance from the power supply.
Useful advice
To produce steam for other liquids, follow the same step by step procedure
described above and, if that hinders you, remove the metal shaft of the steam
wand (9) by pulling it down.
Do not use the steam function continuously for over 2 minutes as its pressure
will drop down. You must keep small intervals among several consecutive
doses of produced froth.
Do not use the steam function until the milk boils as this will spoil your
coffee’s taste.
Frothing must be done after first completing the making of all espresso doses
that you want.

34
CLEANING
Clean the appliance regularly and always after each use.
Unplug the appliance and let it cool down before you clean it.
Clean the external surface of the appliance with a damp cloth.
Wash the detachable parts (Water tank, Steam Wand, Drip Tray, Removable
Shelf, Funnel, Filters, Measuring spoon) with warm, soapy water using a dish
cloth. Rinse thoroughly to remove any soapy residue.
Do not put the main body of the appliance in water, neither rinse it under
tap water or any other liquid.
Do not put the detachable parts (Water tank, Steam Wand, Drip Tray,
Removable Shelf, Funnel, Filters, Measuring spoon) in dishwasher or
disinfector machine.
Do not use sharp objects, hard brushes or oven cleaners to clean the
device or any of the detachable parts.
Make sure that all parts of the device are completely dry before you
reassemble the device.
The filters and steam wand may sometimes clog from grains of coffee / milk
remnants so you should clean them with a needle.

35
DESCALING
To ensure the device’s proper operation and that you achieve the best possible
coffee’s taste you should clean the device’s inner piping circuit from mineral salts
that settle on it every 2-3 months.
1. Fill the water tank (7) up to its printed “MAX” indication with a mix of water
and descaler. The most common proportion of water – descaler is 4:1 but
address yourselves for greater accuracy to your descaler’s user manual.
Take care in assuring that your descaler is proper for home use and
espresso machines by asking its retailer.
2. Just like espresso machine’s pre-heating procedure attach the funnel handle
having already placed on its inside one of the stainless steel meshes (15 or
16) (do not fill it with coffee at this step) and plug the device to the power
grid.
3. Place one or two cups on the removable shelf right under the mouthpiece(s)
of the filter.
4. Press the ON/OFF switch to its “I” position. After a while the orange light will
be switched on.
5. Press the coffee/hot water switch to its “I” position. As soon as water begins
flowing press immediately the same switch to its “O” position.
6. As soon as the green light switches on press again the coffee/hot water
switch to its “I” position and fill with water a total of 2 cups. After that press
the coffee/hot water switch to its “O” position and wait for 5 seconds.
7. Press the steam switch to its “I” position and wait until the green light
switches on. When this is done turn counterclockwise and slowly the steam
control knob to produce steam for 2 minutes. In the end of it turn the steam
control knob to its “OFF” position kai press the steam switch to its “O”
position.
8. Switch off the machine for 15 minutes.
9. Repeat steps 5-9 at least 3 more times.
10. Switch on the machine and press the coffee/hot water switch to its “I”
position. Empty all the remainder of the water - descaler mix of the water
tank.
11. Fill the water tank with tap water up until its printed “MAX” indication. Repeat
steps 5-8 for at least 3 more times and after that empty all of the remaining
water from the tank.
12. Repeat step 12 for at least 3 more times so the internal piping cleans
completely.

36
TROUBLESHOOTING
P
roblem
Analysis
Solution
There is a water
leakage either
from the water
tank or from its lid.
The water tank is not attached
properly.
Correct the placement of the water tank so
as it attaches to the center of the relative
reception on the machine.
Water has exceeded the
printed “MAX” indication.
In any case the water level in the tank
must be between the printed “MIN” and
“MAX” levels.
There is a water
leakage near the
base of the
espresso machine
There is too much water in the
drip tray.
Empty the drip tray.
The device has a malfunction. Please address yourselves to a
specialized technician.
There is a water
leakage near the
mouthpiece of the
stainless steel
mesh.
There are coffee remnants on
the mouthpiece of the
stainless steel mesh.
Clean the coffee remnants in this area.
Coffee has an
acid taste.
Cleaning of mineral deposits
has not been executed
properly.
Clean the machine with the way described
on section “initial cleaning of the device’s
inner hydraulic circuit” on page 3 of this
instruction manual.
Coffee powder had been
stored in a hot and wet place
for a long time and has gone
bad.
Use fresh coffee powder. Store each new
sealed packings of coffee powder in cool
and dry environments. When you open a
new packing of coffee powder store it in
the fridge to keep it fresh.
The device does
not work at all.
Its plug is not properly
connected to the power grid.
Connect the plug properly to the power
grid. If it keeps on not working address
yourselve
s to a specialized technician.
Steam does not
create froth.
Green light has not switched
on.
Steam wand can create froth only after the
green light has switched on.
The utensil in which you
create froth is too large or has
an improper shape.
Prefer tall and narrow pots.
You use fully skimmed milk.
Use milk of at least 1,5
–
2% fat.
Do not take apart the appliance by yourself.
The appliance must be repaired by a qualified person of certified serving
center.

37
T
ECHNICA
L SPECIFICATIONS
Model
:
CM6821E
Ref
.
No
:
878
-
110010
Power
:
850W
Rating
:
220
-
2
40V
Frequency
:
50/60Hz
Proper for
:
Proper for
Ground coffee
Pressure
:
15
Bar
Water Tank
:
Capa
city
:
1,6L
(
Detachable
)
Filters:
1pc Single Dose Mesh-Filter
1pc Double Dose Mesh-Filter
(
Stainless Steel
)
Froth Nozzle
:
Froth Nozzle
included
Features: Drip Tray.
Removable stainless steel Cups Stand.
ON/OFF Switch (Included), 1 x Button Switch.
Coffee / Hot Water Selector Switch (Included), 1 x Button
Switch for Coffee / Hot Water Function.
Steam Switch (Included), 1 x Button Switch for Steam
Function.
Steam Control Knob (Included), 1 x Rotary Switch for Steam
regulation.
Power Indication Light (Included).
Ready Indication Light (Included).
Skid-resistant feet.
Accessories
• Measuring spoon & Tamper (Included)
Easy to clean.
Stainless steel decoration.
Modern ergonomic design.
With overheat protection
Proper for contact with foodstuff.

38
AUTO
SHUT
-
OFF
The appliance is automatically switched off after 25 minutes of
use as it is in compliance with the energy saving requirements
"ECODESIGN" of European Union.
RECYCLING OF USED ELECTRICAL OR ELECTRONIC APPLIANCES
This marking indicates that this product should not be disposed with
other household wastes throughout EU. To prevent possible harm to the
environment or human health from uncontrolled waste disposal, recycle
it responsibly to promote the sustainable reuse of material resources. To
return your used device, please use the return and collection systems or
contact the retailer where the product was purchased. They can take
this product for environmental safe recycling.
PROTECT THE ENVIRONMENT
The product COMPLIES with EU directives WEEE (about recycling) and
ROHS (Restriction of the use of Certain Hazardous Substance
GUARANTEED QUALITY
All products are guaranteed for their quality.
NOTE
This unit may be submitted to changes in specifications, characteristics and/or
operation without prior notice to the user, in order to continue improving and
developing its technology.
Table of contents
Other Vicko Coffee Maker manuals
Popular Coffee Maker manuals by other brands

Saeco
Saeco Xelsis Evo HD8954 user manual

Bosch
Bosch Tassimo Professional TAS6512CUL user manual

Saeco
Saeco Xsmall Sup 033R operating instructions

BRAYER
BRAYER BR1112 instruction manual

Bunn
Bunn Tiger Super Automatic Espresso Machine with Steam Wand XL... Specification sheet

Grindmaster
Grindmaster AT-2W/AT-2WE Installation, operating and service manual