Victa MV 1200 User manual

1
IMPORTANT
READ THIS BOOK CAREFULLY BEFORE OPERATING THIS MACHINE
Not for
Reproduction

MINI-VAC
CONTENTS
Features......................................................................................1
Safety instructions ............................................................................2
Assembling your Mini Vac .....................................................................4
Using your Mini Vac ...........................................................................6
Maintenance & helpful tips ....................................................................8
Warranty ....................................................................................10
Not for
Reproduction

1
Powerful 1400 Watt
electric motor
ON/OFF switch
Ergonomic handle
Easy to remove
lightweight
consumable bag
Easy to manoeuvre
wheel design
Extra wide low
clearance vacuum inlet
FEATURES
Adjustable operating
height
Cooling Air inlets
Not for
Reproduction

2
MINI-VAC
SAFETY INSTRUCTIONS
Caution
Read the instructions carefully. Be familiar with the controls and proper use of
the appliance.
Ensure that the power point is switched o and the plug removed before you
attempt any maintenance, adjustment or cleaning of your Victa Mini Vac. Before
using check the supply and extension cords for wear or damage. Do not use the
appliance if the cord is damaged or worn.
Keep bystanders away. The Victa Mini Vac should not be used any closer than 15m
to other people. Never operate while children or pets are nearby.
Wear safety glasses or goggles when operating the Victa Mini Vac. Use a face or
dust mask whenever the conditions are dusty. Hearing protection should always
be used.
Don’t use your Victa Mini Vac in wet conditions. Don’t leave or use it in the rain. Do
not vacuum water, liquids or excessively damp debris.
IT IS ESSENTIAL TO READ AND UNDERSTAND THESE
INSTRUCTIONS BEFORE USING MACHINE
Not for
Reproduction

3
t /FWFSBMMPXQFPQMFVOGBNJMJBSXJUIUIFTFJOTUSVDUJPOTUPVTFZPVS.JOJ7BD
t /FWFSPQFSBUFZPVS7JDUB.JOJ7BDXJUIPVUUIFCBHQSPQFSMZöUUFE*GUIFCBHJT
OPUQSPQFSMZöUUFEUIFNBDIJOFNBZNPWFGPSXBSEPSQSPKFDUQBSUJDMFTPVUPGUIF
discharge chute. These particles may cause injury.
t .BLFTVSFZPVSQPXFSQPJOUJTQSPQFSMZFBSUIFEBOEUIBUZPVSFYUFOTJPODPSE
complies to electrical standards, is in good condition and is weather proof.
t )BWFZPVS7JDUB.JOJ7BDJOTQFDUFEBOETFSWJDFEBUBOBQQSPWFETFSWJDFDFOUSFPS
agent if:
o The motor, cord or switch needs repair or maintenance.
o It is running abnormally or eratically.
o The switch action is not positive or the motor emits burning odours or sparks.
o It is dropped or damaged in any way.
t 5IJTBQQMJBODFJTOPUJOUFOEFEGPSVTFCZZPVOHDIJMESFOPSJOöSNQFSTPOTVOMFTT
they have been adequately supervised by a responsible person to ensure that they
use the appliance safely.
t %POPUVTFBSPVOEBTXJNNJOHQPPMXIJMFQFPQMFBSFTXJNNJOH*GUIFNBDIJOF
falls into the water there is the danger of electrocution.
t 8IJMFVTJOHUIF.JOJ7BDBMXBZTXFBSTVCTUBOUJBMGPPUXFBSMPOHUSPVTFST
t %POPUXFBSMPPTFDMPUIJOHPSKFXFMMFSZUIBUDBOCFESBXOJOUPUIFBJSJOMFU,FFQ
long hair away from the air inlets.
t /FWFSWBDVVNöTIJOHMJOFTUSJOHQMBTUJDCBHTPSTJNJMBSNBUFSJBMJOUPUIFVOJUBT
tangling with the impeller may cause the motor to overload and stall. If this occurs
switch the Mini Vac o. Do not allow the Mini Vac to remain switched on in the
stalled or overloaded condition.
Note: Do not use the Mini Vac for anything out side of its intended use.
See a authorised dealer for further assistance if required.
t "MXBZTPQFSBUFUIFVOJUJOBOVQSJHIUQPTJUJPO%POPUPQFSBUFUIFVOJUXIFO
tipped on its side or upturned.
t "MXBZTVTFBOFYUFOTJPODPSEXJUIIFBWZEVUZJOTVMBUJPOUIBUJTXFBUIFSQSPPGBOE
designed for outdoor use. Nominal cross-sectional area of the conductors should
not be less than 1.0mm2.
Not for
Reproduction

4
MINI-VAC
ASSEMBLING
YOUR MINI-VAC
Mini Vac unit
Bag
Unassembled
handle
Not for
Reproduction

5
Bag Hook
FITTING THE HANDLE
1. Fit loose bolt through lower tube. Fit
center tube over bolt, then screw on
hand knob.
2. Fit handle to center tube and screw on
other hand knob.
)BOHCBHGSPNIBOEMFCZöUUJOHFZFMFU
over handle hook.
ATTACHING THE VACUUM BAG
1. Fit“twist-and-seal” bag attachment to
vacuum discharge.
2. Twist bag attachment handle to upright
position
ON
OFF
DO NOT FORCE
HANDLE
Not for
Reproduction

6
MINI-VAC
USING YOUR
MINI-VAC
BEFORE YOU START
t &OTVSFUIBUUIFIBOEMFIBTCFFODPSSFDUMZ
öUUFEBOEJTöSNMZGBTUFOFEUPUIFNBDIJOF
(see assembly instructions) P5.
t "MXBZTFOTVSFUIBUUIFWBDVVNCBHJT
öUUFEUPUIF.JOJ7BDCFGPSFTXJUDIJOHPO
(see assembly instructions) P5.
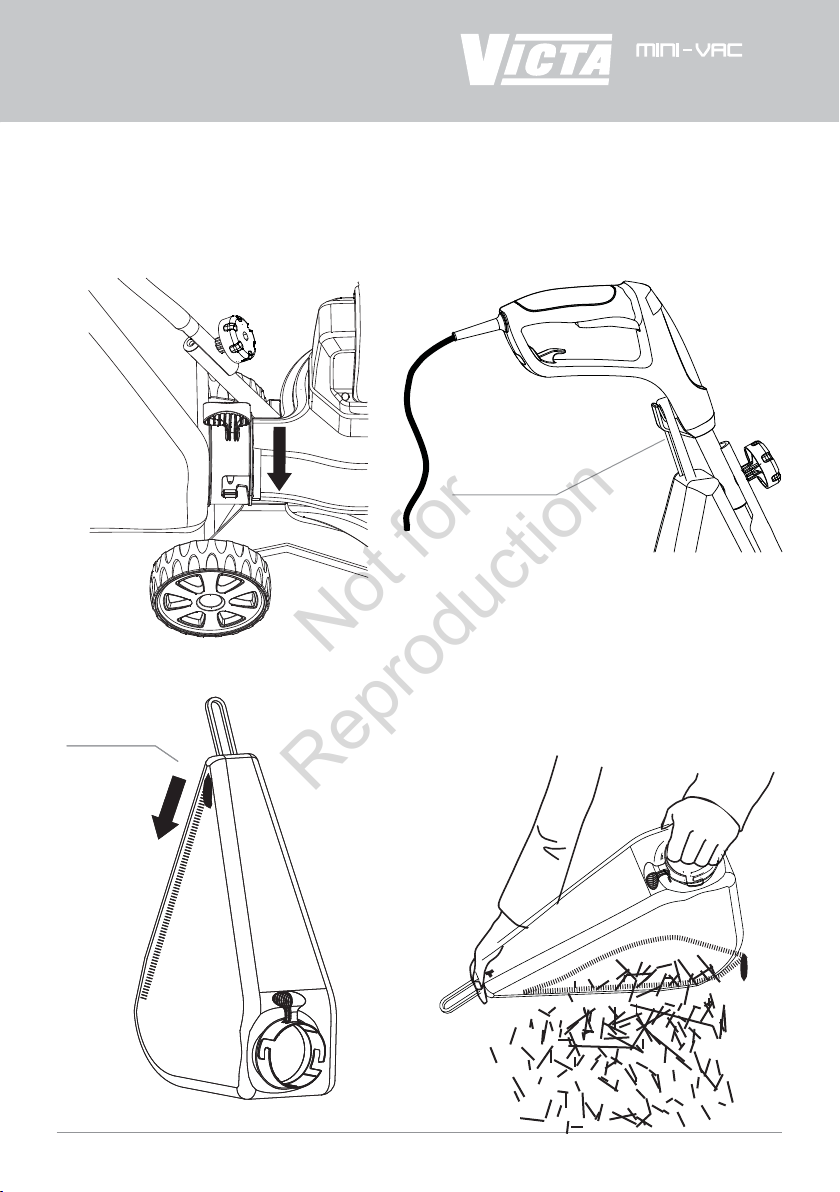
t Connect to an extension cord. Loop the
extension cord through the handle and
around the cord restraint as shown.
t "MXBZTEJSFDUUIFDPSEUPUIFSFBSBXBZ
from the appliance.
t *GBDPSECFDPNFTEBNBHFEEVSJOHVTF
disconnect the supply cord from the
mains immediately.
DO NOT TOUCH THE CORD BEFORE
DISCONNECTING THE SUPPLY.
t %POPUDBSSZUIFBQQMJBODFCZUIFDPSE
t %JTDPOOFDUUIFBQQMJBODFGSPNUIFNBJOT
supply.
- whenever you leave the machine;
- before clearing a blockage;
- before checking, cleaning or
working on the appliance;
- if the appliance starts to vibrate
abnormally.
t 0QFSBUFUIFBQQMJBODFPOMZJOEBZMJHIUPS
JOHPPEBSUJöDJBMMJHIU
t %POPUPWFSSFBDIBOELFFQZPVSCBMBODF
at all times.
t "MXBZTCFTVSFPGZPVSGPPUJOHPOTMPQFT
t 8BMLOFWFSSVO
t ,FFQ BMM DPPMJOH BJS JOMFUT DMFBS PG EFCSJT
It is recommended that the Mini Vac
should be connected to the mains through
a Residual Current Device (RCD) with a
tripping current of not more than 30 mA.
Always use a heavy duty extension cord.
t &OTVSFUIF.JOJ7BDJTTXJUDIFEPò
t 4XJUDIPOBUUIFIBOEMFo"MXBZTEPUIJT
from a standing position. Never while
kneeling or sitting next to the Mini Vac .
t i7BDwBXBZEFCSJTCZNPWJOHUIF.JOJ7BD
over the area to be cleared.
Cord Restraint
Not for
Reproduction

7
2. Unhook bag
EMPTYING THE VACUUM BAG
3. Unzip bag
4. Empty bag into
a rubbish bin
3. Unzip bag
1. Rotate “twist-and-seal”
collar to the OFF position
OFF
Note: Shake bag to empty contents.
Always wear eye protection when
cleaning the bag.
NOTE: ENSURE THE MINI VAC IS SWITCHED OFF!
Not for
Reproduction

8
MINI-VAC
MAINTENANCE
& HELPFUL TIPS
High
Setting
low
Setting
HEIGHT ADJUSTMENT
The Mini Vac has height adjustment
that is easy to change.
Note: Ensure your Mini Vac is switched
o before adjusting the operating
height.
t 'PSUIFIJHIIFJHIUTFUUJOHNPWF
the front wheels forward, so they are in
the slot closest to the vacuum inlet.
t 'PSUIFMPXIFJHIUTFUUJOHNPWFUIF
front wheels back, so they are in the slot
closest to the handle.
Not for
Reproduction

9
VACUUM BAG
"TXJUIBMMTJNJMBSCBHTUIFNBUFSJBMCFDPNFTDMPHHFEXJUIöOFQBSUJDMFTEVSJOHVTFBOEUIF
operating eciency of the machine will deteriorate without simple routine maintenance.
It is good practice to unclog the bag by shaking it after each use to ensure the bag material is
BCMFUPöMUFSDPSSFDUMZ
Remove the bag from the Mini Vac and clean with a garden hose. Always ensure the bag is
completely dry before storage or use.
The vacuum bag is a consumable item. It is subject to high degrees of wear and tear and as
such will need replacing from time to time.
To reduce unnecessary wear on your vacuum bag, avoid operating the machine in a manner
that causes the bag to drag on the ground.
NOTE: Vacuuming of high wear materials is not recommended.
These materials include glass, stones, rocks or any other sharp object which will cause a high
degree of wear to the bag and will cause a rapid decline in the life of the bag.
For further assistance please contact a Victa service representative on which materials are
suitable for use.
If the bag is damaged please replace immediately. Replacement bags are available from your
Victa dealer.
MAINTENANCE AND STORAGE
t,FFQBMMOVUTCPMUTBOETDSFXTUJHIUUPCFTVSFUIFBQQMJBODFJTJOTBGFXPSLJOHDPOEJUJPO
t$IFDLUIFWBDVVNCBHGSFRVFOUMZGPSXFBSPSEFUFSJPSBUJPO
t3FQMBDFXPSOPSEBNBHFEQBSUT
t6TFPOMZHFOVJOFSFQMBDFNFOUQBSUTBOEBDDFTTPSJFT
t4UPSFUIFBQQMJBODFPOMZJOBESZQMBDF
CLEARING AN INLET BLOCKAGE
Twigs and long material may cause a blockage in the inlet chute of your Mini Vac. If this occurs
try giving the machine a gentle shake while it is still running. If this is not successful, switch your
Mini Vac o and unplug the cord at the power outlet and clear the blockage.
To prevent a recurrence of the Mini Vac blocking it may be necessary to move your Mini Vac more
slowly over the debris to be picked up.
Not for
Reproduction

10
MINI-VAC
WARRANTY
CONSUMER RIGHTS
The buyer should be aware that in relation to goods which are of a kind ordinarily acquired for
personal, domestic or household use or consumption, certain provisions such as the Trade
Practices Act, 1974 (Aust) and the Consumer Guarantees Act, 1993 (NZ) apply. The terms set
out below do not exclude rights and remedies implied by a statute which are non-excludable and
which may be more extensive than those provided by this warranty.
WARRANTY SERVICE
Warranty Service under both the Express Warranty and the warranties implied by law is available
at any VICTA Authorised Service Centre. These centres are staffed and equipped to provide expert
service.
Warranty Period
Model Domestic Use only
Victa MV 1200 1 Year/12 months
VICTA EXPRESS WARRANTY
The VICTA Express Warranty is additional to the conditions and warranties which are mandatorily
implied by the laws and regulations of the individual States and Territories of Australia and the
Trade Practices Act, 1974 (Aust) and the Consumer Guarantees Act in New Zealand and any
non-excludable laws.
Under Express Warranty the 'Mini Vac' is warranted from the date of purchase for 12 months
against mechanical defects and faulty workmanship or material. Express Warranty covers only the
replacement, repair or adjustment of parts which fail due to a fault in manufacture. Defective parts
will be replaced or serviced by an Authorised VICTA representative without charge for labour or
materials, subject to conditions. Repairs or adjustments required by normal use or by failure to follow
the manufacturer's instructions are chargeable to the owner.
VICTA Service Representatives or agents are authorised to determine whether a claim will be
covered under warranty, or payable by the owner on completion.
You should seek independent legal advice to determine whether a claim not covered by the
Express Warranty is covered by any warranties implied by law.
t &YQSFTT 8BSSBOUZ BQQMJFT UP UIF PSJHJOBM QVSDIBTFS POMZ 1SPPG PG QVSDIBTF EBUF NVTU CF
provided prior to Express Warranty work.
t 6TFPGQBSUTPUIFSUIBOHFOVJOF7*$5"4QBSF1BSUTDBODFMTUIF&YQSFTT8BSSBOUZ
Not for
Reproduction

11
t 3FQBJSTPUIFSUIBOCZB7*$5""VUIPSJTFE4FSWJDF$FOUSFDBODFMTUIF&YQSFTT8BSSBOUZ
t "MUFSJOHUIFQSPEVDUDBODFMTUIF&YQSFTT8BSSBOUZ
t 'BJMVSFUPGPMMPXUIFJOTUSVDUJPONBOVBMPSMBCFMTBUUBDIFEDBODFMTUIF&YQSFTT8BSSBOUZ
t 'BJSBOESFBTPOBCMFXFBSJTDPWFSFECZUIF&YQSFTT8BSSBOUZ
t %BNBHFGSPNBOBDDJEFOUNJTVTFPSOFHMFDUJTOPUDPWFSFECZUIF&YQSFTT8BSSBOUZ
t $PTUTPGUSBOTQPSUBUJPOPGUIFh.JOJ7BDhBSFUPCFQBJECZUIFPXOFS
LIMITATIONS OF WARRANTY
Nothing in these terms shall exclude, restrict or modify any term, condition, warranty or liability
implied into this contract by statute, where to do so would be unlawful or would render any
provision of this contract void. Subject to that, all warranties implied by statute in respect of the
goods are hereby expressly negated and VICTA's liability for the goods is limited to any warranties
issued in writing by VICTA and VICTA is excluded from any liability whether under this contract
or otherwise to the buyer of any third party for any loss, injury, cost or damage (direct, indirect,
special, consequential, or otherwise and whether or not arising from a negligent act or omission of
VICTA), incurred or suffered by reason for the goods, their use, their design or any failure to deliver
or delay in delivering them. Where it is legal to do so, any remaining liability implied by statute or
resulting from breach of any term, condition or warranty implied by statute is limited to, at VICTA's
sole option:
t 5IFSFQMBDFNFOUPGUIFHPPETPSUIFTVQQMZPGFRVJWBMFOUHPPET
t 5IFSFQBJSPGHPPET
t 5IFQBZNFOUPGUIFDPTUPGSFQMBDJOHUIFHPPETPSPGBDRVJSJOHFRVJWBMFOUHPPETPS
t 5IFQBZNFOUPGIBWJOHUIFDPTUPGUIFHPPETSFQBJSFE
In particular, your rights and remedies under the Trade Practices Act (Aust) and the Consumer
Guarantees Act (NZ) are not excluded.
WARRANTY AND SERVICE
Australia 02 8778 5550
New Zealand 09 912 0747
www.victa.com
Not for
Reproduction

12
MINI-VAC
NOTES
Not for
Reproduction

13
Not for
Reproduction

MINI-VAC
LR00880A - A5 MV 1200
Victa Lawncare Pty Ltd
ACN 008 627 110 ABN 22 008 627 110
Australian Head Office
Locked Bag 4096
Milperra BC NSW 1891
P: 02 8778 5550
F: 1800 022 154
Website: www.victa.com
New Zealand Office
PO Box 12463
Penrose, Auckland
P: 09 912 0747
F: 09 912 3577
International
Please visit
www.victa.com
for relevant distributor
details
A5 AT PB Revised 13/01/10
A4 AT PB Revised 30/09/09
A3 AT PB Production 07/09/09
Rev Own Chk Release Date
Not for
Reproduction
Table of contents
Other Victa Blower manuals