Victa VBE 1500 User manual

1
C
I
R
T
C
E
L
E
c
a
v&w
o
lb
IMPORTANT
READ THIS BOOK CAREFULLY BEFORE OPERATING THIS MACHINE
VBE 1500
Outdoor Vac/Blow
Not for
Reproduction

CONTENTS
Features . . . . . . . . . . . . . . . . . . . . . . . . . . . . . . . . . . . . . . . . . . . . . . . . . . . . . . . . . . . . . . . . .1
Safety instructions . . . . . . . . . . . . . . . . . . . . . . . . . . . . . . . . . . . . . . . . . . . . . . . . . . . . . . . . .2
Assembling your Vac & Blow . . . . . . . . . . . . . . . . . . . . . . . . . . . . . . . . . . . . . . . . . . . . . . . . .4
Using your Vac & Blow . . . . . . . . . . . . . . . . . . . . . . . . . . . . . . . . . . . . . . . . . . . . . . . . . . . . . .6
Maintenance & helpful tips . . . . . . . . . . . . . . . . . . . . . . . . . . . . . . . . . . . . . . . . . . . . . . . . . . .8
Warranty. . . . . . . . . . . . . . . . . . . . . . . . . . . . . . . . . . . . . . . . . . . . . . . . . . . . . . . . . . . . . . . .10
Not for
Reproduction

1
C
IRTCELE
c
av &w
o
l
b
Powerful electric
motor
ON/OFF switch
Ergonomic handle
Metal Impeller
Easy to
remove
lightweight
catcher
Easy to manoeuvre
wheel design
Built-in Brush
Ground level high velocity blower
Extra wide low
clearance vacuum inlet
FEATURES
Single action
function switch
Not for
Reproduction

2
SAFETY INSTRUCTIONS
Caution
Read the instructions carefully. Be familiar with the controls and proper use of
the appliance.
Ensure that the power point is switched off and the plug removed before you
attempt any maintenance, adjustment or cleaning of your Victa Vac & Blow.
Before using check the supply and extension cords for wear or damage.
Do not use the appliance if the cord is damaged or worn.
Keep bystanders away. The Victa Vac & Blow should not be used any closer
than 15m to other people. Never operate while children or pets are nearby.
Wear safety glasses or goggles & hearing protection when operating the
Victa Vac & Blow. Use a face or dust mask whenever the conditions are dusty.
Don’t use your Victa Vac & Blow in wet conditions. Don’t leave or use it in the
rain. Do not vacuum water, liquids or excessively damp debris.
IT IS ESSENTIAL TO READ AND UNDERSTAND THESE
INSTRUCTIONS BEFORE USING MACHINE
Not for
Reproduction

3
• Never allow people unfamiliar with these instructions to use your Vac & Blow.
• Never operate your Victa Vac & Blow without the bag properly fitted. If the bag is
not properly fitted the machine may move forward or project particles out of the
discharge chute. These particles may cause injury.
• The operator or user is responsible for accidents or hazards occurring to other
people or their property.
• Make sure your power point is properly earthed and that your extension cord
complies to electrical standards, is in good condition and is weather proof.
• Have your Victa Vac & Blow inspected and serviced at an approved service
centre or agent if:
o The motor, cord or switch needs repair or maintenance.
o It is running abnormally or erratically.
o The switch action is not positive or the motor emits burning odours or sparks.
o It is dropped or damaged in any way.
• This appliance is not intended for use by young children or infirm persons unless
• Do not use around a swimming pool while people are swimming. If the machine
• Never allow children to use the appliance. Young children should be supervised
falls into the water there is a danger of electrocution. Turn off and unplug the
they have been adequately supervised by a responsible person to ensure that
lead at the power point immediately.
to ensure that they do not play with the appliance.
they use the appliance safely.
• While using the Victa Vac & Blow, always wear substantial foot wear & long trousers.
• Do not wear loose clothing or jewellery that can be drawn into the air inlet. Keep
long hair away from the air inlets.
• Avoid vacuuming fishing line, string, plastic bags or similar material into the
unit as tangling with the impeller may cause the motor to overload and stall. If
this occurs, switch the Vac & Blow off. Do not allow the Vac & Blow to remain
switched on in the stalled or overloaded condition.
• Always operate the unit in an upright position. Do not operate the unit when tipped
on its side or upturned.
• It is recommended that the Vac & Blow be connected to the mains through a
Residual Current Device (RCD) with a tripping current of not more than 30mA.
• Always use an extension cord with heavy duty insulation that is weather proof and
designed for outdoor use. Nominal cross-sectional area of the conductors should
not be less than 1.0mm2
Not for
Reproduction

4
ASSEMBLING
YOUR VAC & BLOW
Vac/Blow unit
Bag
Unassembled
handle
Not for
Reproduction

5
ATTACHING THE VACUUM BAG
1 Place the bottom of the bag frame in the supports on the rear of the chassis.
2 Depress and hold the bag latch trigger in the bag handle to retract the bag latch.
3 Pivot the bag frame into position.
4 Release the bag latch trigger to engage the bag latch.
5 Unclip the locking collar from the bottom of the main handle and slide it down the handle
tube. Clip the locking collar to the top of the bag frame to lock in position.
FITTING THE HANDLE
1 Remove the two handle mounting
screws from their position in
the chassis using the supplied
screwdriver.
2 Insert the handle tube & power cable
into chassis as shown.
3 Fasten the handle firmly in position
by re-inserting the two screws
and tightening using the supplied
screwdriver.
NOTE: DO NOT OVER TIGHTEN
TAKE CARE NOT TO DAMAGE
THE POWER CABLE
Handle Mounting Screw x 2
Chassis
Bag Frame
Bag Frame Handle
Power Cable
Locking
Collar
Bag Latch
Trigger
Not for
Reproduction

6
USING YOUR
VAC & BLOW
BEFORE YOU START
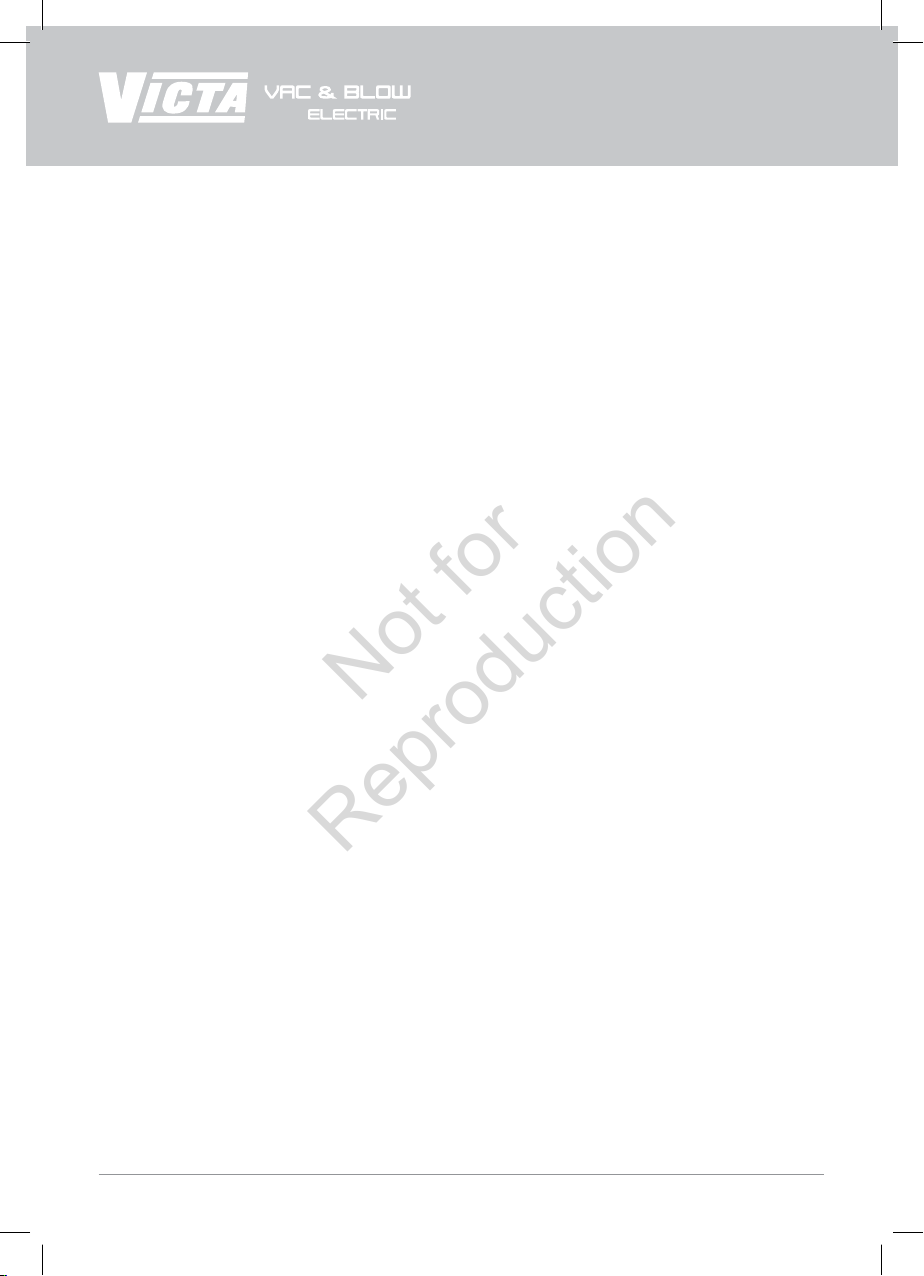
• Ensure that the handle has been
correctly fitted and is firmly fastened to
the machine (see assembly instructions).
• Always ensure that the vacuum bag is
fitted to the Vac & Blow before switching
on in both Vac & Blow modes (see
assembly instructions).
• Your Vac & Blow Electric is controlled by
the ON/OFF switch in the handle. Ensure
the switch is in the off position.
• Connect to an extension cord. Loop the
extension cord through the handle and
around the cord restraint as shown.
• Always direct the cord to the rear, away
from the appliance.
• If a cord becomes damaged during use,
turn off at powerpoint & disconnect the
supply cord from the mains immediately.
Do not touch the cord before
disconnecting the power supply.
• Do not carry the appliance by the cord.
• Disconnect the appliance from the mains
supply.
- whenever you leave the machine;
- before clearing a blockage;
- before checking, cleaning or
working on the appliance;
- if the appliance starts to vibrate
abnormally.
• Operate the appliance only in daylight or
in good artificial light.
• Do not overreach and keep your balance
at all times.
• Always be sure of your footing on slopes.
• Walk, never run.
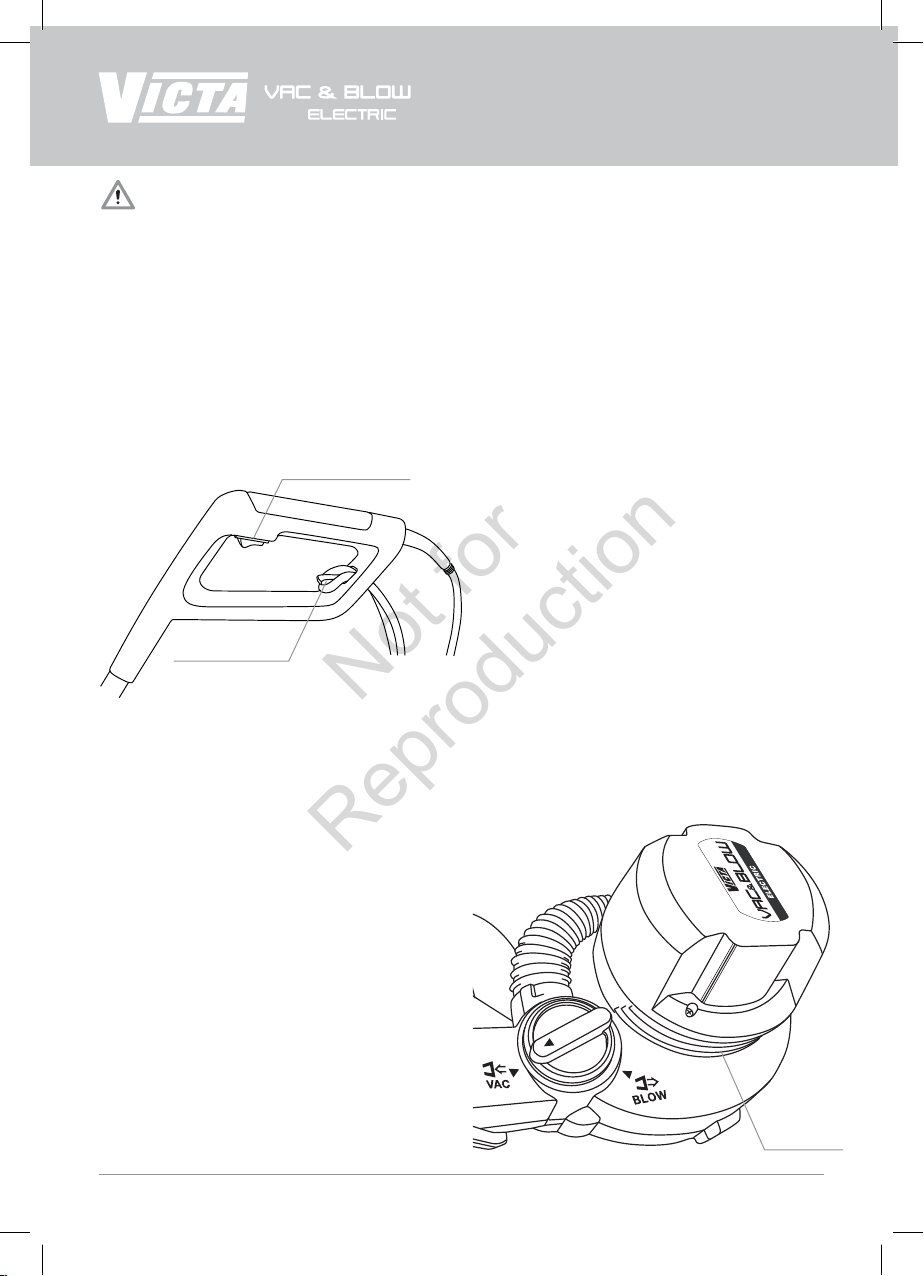
• Keep all cooling air inlets (shown below)
clear of debris.
It is recommended that the Vac & Blow
should be connected to the mains through
a Residual Current Device (RCD) with a
tripping current of not more than 30 mA.
Always use an extension cord with heavy duty
insulation that is designed for outdoor use.
USING VACUUM MODE
• Ensure the Vac & Blow is switched off.
• Turn function switch clockwise until the
arrow on the switch lines up with the
arrow for “Vac” mode.
• Switch on at the handle – Always do this
from a standing position. Never while
kneeling or sitting next to the Vac & Blow.
• “Vac” away debris by moving the Vac &
Blow over the area to be cleared.
ON/OFF Switch
Cord Restraint
Cooling
Air Inlets
Not for
Reproduction

7
EMPTYING THE BAG
• When the bag is full switch the Vac &
Blow off at the handle, switch off at the
power point and unplug the lead.
• Unclip the locking collar from the bag
frame and slide it up the handle tube
until it clicks in place at the base of the
handle.
• Grip the bag handle and depress the
yellow part to disengage the latch. When
the latch is disengaged the weight of the
bag will need to be supported by the
operator.
• Move the top of the bag frame away
from the Vac & Blow, letting the bag rest
on the ground.
• Using both hands, carry the full bag to
your rubbish receptacle or compost
heap, making sure to keep the bag
opening facing upwards.
• Invert the bag to empty the mulched
debris. If material becomes stuck in the
bag unfasten the two Velcro tabs at the
top of the bag and turn bag inside out.
Unlatching bag
Emptying bag
USING BLOW MODE
• Ensure the Vac & Blow is switched off.
• Turn function switch anti-clockwise until
the arrow on the switch lines up with the
arrow for “Blow” mode.
• “Blow” away debris by moving Vac &
Blow forwards while using a sweeping
motion.
• Never blow debris in the direction of
bystanders.
• Avoid moving the Vac & Blow backwards
over uncleared surfaces when using
Blow mode.
Locking
collar
Not for
Reproduction

8
UNBLOCKING THE BLOW TUBE
In the event that the blowing tube or nozzle
becomes blocked, follow these instructions
for unblocking:
1 Switch the Vac & Blow off at the handle,
switch off at the power point and unplug
the lead.
2 Remove the two screws located beneath
the blowing nozzle.
3 Rotate the nozzle and tube upwards, as
shown, to disengage the bayonet fitting
at the Blow/Vac function switch.
4 Pull the nozzle and tube away from the
Blow/Vac function switch as shown.
5 Clear the blockage. A flexible hose can
be used to push out any material that is
blocking the tube.
6 Re-assembly is reverse of disassembly.
3
4
ca
v
&
wo
l
b
5
2
Screws x 2
MAINTENANCE
& HELPFUL TIPS
NEVER OPERATE YOUR VAC & BLOW
WITH THE BLOW TUBE REMOVED
Not for
Reproduction

9
VACUUM BAG
As with all similar bags, the material becomes clogged with fine particles during use and the
operating efficiency of the machine will deteriorate without simple routine maintenance.
It is good practice to unclog the bag by shaking it after each use to ensure the bag material is
able to filter correctly. Where a bag is clogged with damp particles, it should be allowed to dry
before dusting.
The Vac bag may be cleaned by using a garden hose. Always hose the bag from the outside.
The bag may be turned inside out to assist this. Never store a damp bag. Always ensure the bag
is completely dry before storage or use.
The vacuum bag is a consumable item. It is subject to high degrees of wear and tear and as
such will need replacing from time to time. Replacement bags are available from your Victa
dealer. Part No. VB00057 Always replace a worn bag immediately.
To reduce unneccessary wear on your vacuum bag, avoid operating the machine in a manner
MAINTENANCE AND STORAGE
Keep all nuts, bolts and screws tight to be sure the appliance is in safe working condition.
Check the vacuum bag frequently for wear or deterioration.
Replace worn or damaged parts.
Use only genuine replacement parts and accessories.
Store the appliance only in a dry place.
CLEARING A BLOCKAGE IN THE VACUUM INLET
that causes the bag to drag on the ground.
Twigs and long material may cause a blockage in the vacuum inlet on the underside of your
Vac & Blow. If this occurs try giving the machine a gentle shake while it is still running. If this
is not successful, switch your Vac & Blow off and unplug the cord at the power outlet.
Clear the blockage using a stick or similar long thin object (never use a metal object).
To prevent a recurrence when vacuuming this type of material, it may be necessary to move
your Vac & Blow more slowly over the debris to be picked up.
VAC & BLOW FUNCTION SWITCH
If the Vac & Blow function switch becomes jammed or blocked, operate the switch while the
Vac & Blow is running. Rotating the switch several times while air is flowing in the appliance
should clear the blockage. Make sure you are clear of the blow outlet while operating the switch.
Not for
Reproduction

10
WARRANTY
CONSUMER RIGHTS
The buyer should be aware that in relation to goods which are of a kind ordinarily acquired for
personal, domestic or household use or consumption, certain provisions such as the Trade
Practices Act, 1974 (Aust) and the Consumer Guarantees Act, 1993 (NZ) apply. The terms set
out below do not exclude rights and remedies implied by a statute which are non-excludable and
which may be more extensive than those provided by this warranty.
WARRANTY SERVICE
Warranty Service under both the Express Warranty and the warranties implied by law is available
at any VICTA Authorised Service Centre. These centres are staffed and equipped to provide expert
service.
Warranty Period
ylnoesUcitsemoDledoM
shtnom21/raeY10051EBV
VICTA EXPRESS WARRANTY
The VICTA Express Warranty is additional to the conditions and warranties which are mandatorily
implied by the laws and regulations of the individual States and Territories of Australia and the
Trade Practices Act, 1974 (Aust) and the Consumer Guarantees Act in New Zealand and any
non-excludable laws.
Under Express Warranty the 'Victa Vac & Blow' is warranteed from the date of purchase for
12 months against mechanical defects and faulty workmanship or material. Express Warranty
covers only the replacement, repair or adjustment of parts which fail due to a fault in
manufacture. Defective parts will be replaced or serviced by an Authorised VICTA representative
without charge for labour or materials, subject to conditions. Repairs or adjustments required
by normal use or by failure to follow the manufacturer's instructions are chargeable to the owner.
VICTA Service Representatives or agents are authorised to determine whether a claim will be
covered under warranty, or payable by the owner on completion.
You should seek independent legal advice to determine whether a claim not covered by the
Express Warranty is covered by any warranties implied by law.
• Express Warranty applies to the original purchaser only. Proof of purchase date must be
provided prior to Express Warranty work.
• Use of parts other than genuine VICTA Spare Parts cancels the Express Warranty.
Not for
Reproduction

• Failure to follow the instruction manual or labels attached cancels the Express Warranty.
• Fair and reasonable wear is not covered by the Express Warranty.
• Damage from an accident, misuse or neglect is not covered by the Express Warranty.
• Costs of transportation of the 'Victa Vac Blow' are to be paid by the owner.
11
• Repairs other than by a VICTA Authorised Service Centre cancels the Express Warranty.
• Altering the product in any way cancels the Express Warranty.
LIMITATIONS OF WARRANTY
Nothing in these terms shall exclude, restrict or modify any term, condition, warranty or liability
implied into this contract by statute, where to do so would be unlawful or would render any
provision of this contract void. Subject to that, all warranties implied by statute in respect of the
goods are hereby expressly negated and VICTA's liability for the goods is limited to any warranties
issued in writing by VICTA and VICTA is excluded from any liability whether under this contract
or otherwise to the buyer of any third party for any loss, injury, cost or damage (direct, indirect,
special, consequential, or otherwise and whether or not arising from a negligent act or omission of
VICTA), incurred or suffered by reason for the goods, their use, their design or any failure to deliver
or delay in delivering them. Where it is legal to do so, any remaining liability implied by statute or
resulting from breach of any term, condition or warranty implied by statute is limited to, at VICTA's
sole option:
• the replacement of the goods or the supply of equivalent goods;
• the repair of goods;
• the payment of the cost of replacing the goods or of acquiring equivalent goods; or
• the payment of having the cost of the goods repaired.
In particular, your rights and remedies under the Trade Practices Act (Aust) and the Consumer
Guarantees Act (NZ) are not excluded.
WARRANTY AND SERVICE
Australia 02 8778 5550
New Zealand 09 912 0747
www.victa.com
Not for
Reproduction

12
NOTES
Not for
Reproduction

13
Not for
Reproduction

LR00810A-B4
Victa Lawncare Pty Ltd
ACN 008 627 110 ABN 22 008 627 110
Member of the GUD Holdings Ltd group
Australian Head Office
Locked Bag 4096
Milperra BC NSW 1891
P: 02 8778 5550
F: 1800 022 154
Website: www.victa.com
New Zealand Office
PO Box 12463
Penrose, Auckland
P: 09 912 0747
F: 09 912 3577
International
Please visit
www.victa.com
for relevant distributor
details
Not for
Reproduction
Table of contents
Other Victa Blower manuals
Popular Blower manuals by other brands

Milwaukee
Milwaukee M18 0884-20 Operator's manual

Black & Decker
Black & Decker LEAF HOG BV4000 instruction manual

Minuteman
Minuteman Kleen Sweep 40 quick start guide

FLORABEST
FLORABEST FLBA 18 A1 translation of original operation manual

Clemas & Co
Clemas & Co S9 Operator's manual

BorMann
BorMann BHS7000 Translation of the original instructions