VideoLogic GrafixStar 450 User manual

- 1 -
GrafixStar 450 User Guide
Contents
Introduction ............................................................................ 2
Installing GrafixStar 450 ............................................................. 3
SmartTools for Windows 95.......................................................... 8
Technical details .................................................................... 16
Troubleshooting ..................................................................... 18
Technical support.................................................................... 19
Index .................................................................................. 20

- 2 -
GrafixStar 450 User Guide
Introduction
GrafixStar 450, VideoLogic’s 2 MB, 64-bit DRAM graphics card, combines 2D graphics,
multimedia acceleration and 3D rendering in one versatile package. Its S3 ViRGE processor
provides features such as shading and perspective correction, while the free SmartTools
software uses the powerful capabilities of GrafixStar 450 to give you complete control over the
appearance and behavior of your Windows desktop.
To run GrafixStar 450 you need an IBM or fully compatible 486 PC running at 75Hz or above
which complies with the PCI local bus specification and which has a spare PCI bus slot.
Before installing the card, read the file readme.txt in the root directory of the VideoLogic
Software Library CD, or the file vlgx450a.txt in the gs450 folder.
Conventions used in this guide
Throughout this guide: bold text is used for anything you type;
italics
are for references to
other documents; and small capitals are used for keyboard keys, for example SHIFT, CTRL, ALT.
Handling GrafixStar 450
Follow these guidelines to minimize the risk of electrostatic charges damaging the card:
•Keep the card in its protective packaging until you are ready to install it.
•Just before handling the card, touch the metal frame of your PC with the back of your
hand to discharge any static electricity which may have built up on you or your clothes.
•Hold the card by the adapter bracket or by its edges; do not touch the circuit board.
•Do not place the card on top of your computer or on any other metal surface.
•Make sure that the card is not accidentally touched by anyone else.
•Handle the card with care to avoid damage to the components on the circuit board.

- 3 -
GrafixStar 450 User Guide
Installing GrafixStar 450
Installing the GrafixStar 450 hardware
Note: If you are installing GrafixStar 450 for Windows 3.1, make sure you have configured
Windows to run with a standard VGA display before installation. You can do this by using the
Windows Setup from the Main program group, clicking Change Systems settings from the
Options menu and clicking VGA from the display list box. You can also run the Windows Setup
program from DOS. See the
Windows User’s Guide
for details on how to do this.
Warning: Always switch off your computer before removing the cover and observe the
warnings specified in the manufacturer’s documentation. All cables connected to the card
should be properly shielded and comply with radio frequency interference standards.
The diagram below shows the connectors on the card.
monitor
connector
PCI bus connector

- 4 -
GrafixStar 450 User Guide
1. Switch off your computer, monitor, and any hardware devices such as printers connected
to your computer. Leave the power cable connected to the power outlet so that your
computer is grounded.
2. Disconnect your monitor cable from your computer.
3. Remove the computer’s cover. You may need to refer to the documentation supplied with
your computer for instructions on how to do this.
4. Remove your existing display card or disable your built-in graphics controller. Refer to the
documentation supplied with your computer for instructions on how to disable a built-in
graphics controller.
5. Locate an empty PCI bus expansion slot and remove the slot cover. Keep the screw, you
will need it later to secure the card.
6. Touch the bare metal chassis of your computer with the back of your hand to discharge
any static that may have built up on you or your clothes.
7. Align GrafixStar 450 with the slot you have chosen. Firmly press the card into the slot, as
shown in the diagram below. You will need to use some pressure to push the card into
position, but do not use excessive force.

- 5 -
GrafixStar 450 User Guide
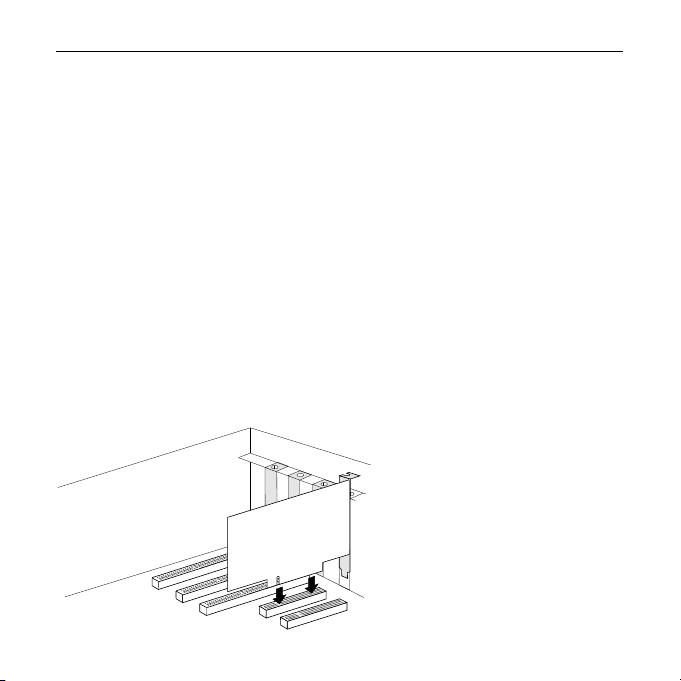
8. Secure GrafixStar 450 using the screw that you removed previously.
9. Replace the cover of your computer.
10. Connect the monitor cable to GrafixStar 450.
11. Switch on your computer and your computer monitor.
You are now ready to install the GrafixStar Windows software. If you are installing for
Windows 95, continue below. If you are installing for Windows 3.1, turn to page 6.
Installing the Windows 95 software
1. When your computer has restarted, a dialog box is displayed saying that Windows has
found new hardware. Click Disk Provided by the Manufacturer, and click OK.
2. Insert the VideoLogic Software Library CD into your CD-ROM drive.
3. Browse to the folder [drive]:\gs450\win95\disk1 where [drive] is your CD drive. Click OK.
4. At the Install From Disk dialog box click OK. The Windows 95 drivers are copied from CD.
5. A message is displayed notifying you of the change to your system’s settings, and asking
whether you want to restart the computer. Click Yes.
6. When your computer has restarted, a dialog box is displayed asking whether you want to
install SmartTools with DirectVideo, or just SmartTools, or neither.
SmartTools is desktop control software that uses the powerful capabilities of the card. If
you want control over the appearance and behavior of your desktop, click SmartTools.
This installs SmartTools and DirectVideo.
DirectVideo is a set of drivers that optimize your computer’s performance when running
Microsoft DirectDraw applications that play video. If you only want to install DirectVideo,
click DirectVideo.
If you don’t want to install either SmartTools or DirectVideo, click Cancel. Note that video
playback performance will not be optimized without DirectVideo.
7. Follow the instructions that appear on the screen.

- 6 -
GrafixStar 450 User Guide
Installing the Windows 3.1 software
Note: If you are running Windows 3.1 or 3.11, Windows should be set for a standard VGA
display before you install the hardware, as explained on page 3 of this guide.
To install the GrafixStar 450 software for Windows 3.1:
1. Insert the VideoLogic Software Library CD into your CD-ROM drive.
2. Start Windows, click the File menu in Program Manager, and click Run.
3. Browse to [drive]:\gs450\win31\disk1\setup where [drive] is your CD drive, and click OK.
4. Follow the instructions that appear on the screen.
At the end of the setup procedure a dialog box appears asking you to choose the display mode
that you want for your monitor, and prompts you to restart Windows when you have chosen a
display mode. You can access this dialog to change your display mode by running the
GrafixStar Display program in your GrafixStar group.
Installing GrafixStar 450 for other operating systems
There are a number of drivers supplied on the disk for operating systems other than Windows
95 and 3.1. These include OS/2, Windows NT and AutoDesk AutoCAD. To install them, follow
the instructions in the file readme.txt in the root directory of the VideoLogic Software
Library CD.

- 7 -
GrafixStar 450 User Guide
Removing SmartTools
Note: Removing SmartTools involves restarting Windows, so save any open documents
before you start.
Removing SmartTools from Windows 95
To remove SmartTools:
1. Click the Start button, and point to Settings.
2. Click Control Panel.
3. Click Add/Remove Programs.
4. From the list of programs displayed, click VideoLogic SmartTools, and click Add/Remove.
5. Follow the instructions that appear on the screen.
Removing SmartTools from Windows 3.1
To remove SmartTools:
1. Insert the VideoLogic Software Library CD into your CD-ROM drive.
2. Start Windows, click the File menu in Program Manager, and click Run.
3. Browse to [drive]:\gs450\win31\disk1\setup where [drive] is your CD drive, and click OK.
4. At the VideoLogic Installer screen, click Remove.
5. At the Remove screen, click GrafixStar display driver software. Click OK, and follow the
instructions that appear on the screen.

- 8 -
GrafixStar 450 User Guide
SmartTools for Windows 95
The SmartTools software is a set of applications that enables you to get the most out of the
powerful capabilities of your graphics card, giving you more control over the appearance and
behavior of your Windows desktop.
The instructions in this chapter give you an overview of how SmartTools work. For more
detailed instructions, refer to the online help supplied with SmartTools.
There are three Smart applications: SmartTools, SmartDisplay and SmartDesktop.
SmartTools
SmartTools enables you to create toolbars for quicker access to your applications and
documents.
With SmartTools you can:
•Use toolbars for the other Smart applications, and customize these toolbars to suit
your needs.
•Create toolbars for other applications, adding buttons for the programs, documents and
files that you use most often.
•Assign hotkeys for the commands that you use most often.
SmartDisplay
SmartDisplay makes it easier and quicker for you to set up the properties for your monitor.
With SmartDisplay you can:
•Find the ideal display settings for the kind of work you are doing, helped by
the SmartDisplay Wizard, which guides you through a step-by-step procedure.
•Select the display size, color palette, refresh rate, desktop size, connectivity and
monitor alignment for your display, using a SmartDisplay set-up procedure for
advanced users.

- 9 -
GrafixStar 450 User Guide
SmartDesktop
SmartDesktop controls the size and behavior of your desktop.
With SmartDesktop you can:
•Set a virtual desktop that is larger than the display size.
•Control the way you move around the desktop and reach an off-screen virtual
desktop portion.
•Change the display size at the touch of a button, enabling you to zoom in and zoom out
while you are working.
Using SmartTools
With SmartTools, you can customize the toolbars for the other Smart applications and create
toolbars of your own.
Starting SmartTools
To start SmartTools, click the Start button, point to Programs, then VideoLogic SmartTools,
then SmartTools, or click the SmartTools shortcut icon on the Windows 95 desktop.
The SmartTools window contains three pages, Toolbar Properties, Customize Toolbars and
Customize Hotkeys.
Toolbar properties
With Toolbar Properties selected, you can:
•Open and close existing toolbars by checking and unchecking them.
•Set the properties (Name, On Top, Tool Tips, Status Bar and Lock) for each toolbar.

- 10 -
GrafixStar 450 User Guide
Customize Toolbars
With Customize Toolbars selected, you can:
•Create new toolbars and add them to the list of toolbars on the Toolbar Properties page
by dragging applications from the Applications list onto the desktop, or by dragging one
of the buttons in the commands list onto the desktop.
•Add buttons to toolbars by dragging them from the Commands list onto the toolbar,
move buttons by holding down the SHIFT key and dragging them along the toolbar, or
remove buttons by holding down the SHIFT key and dragging them off the toolbar.
•Add buttons for other applications to the Other Apps list and set properties for
these buttons.
Assigning hotkeys
With Customize Hotkeys selected, you can assign hotkey combinations to the commands you
use most often, using combinations of SHIFT, CTRL and ALT, plus the other keys on the
keyboard.
Using SmartDisplay
SmartDisplay is an application that enables you to select, customize and create display modes
for your monitor. If you have never set a display mode before, or if you need help in choosing
your settings, you should use the SmartDisplay Settings Wizard. If you are familiar with
setting display modes, you should use the Advanced Settings button.
Starting SmartDisplay
1. Select the Display Properties Control Panel either by right-clicking on the Windows
desktop and choosing Properties from the menu or by clicking the Start button and
pointing at Settings, then Control Panel, then double-clicking Display.

- 11 -
GrafixStar 450 User Guide
2. Click the SmartDisplay tab. The following window appears:
Setting display modes using the Wizard
The Wizard takes you through a step-by-step procedure for setting up a display mode.
To use the Wizard:
1. Click the SmartDisplay page on the Display Properties window.
2. Click the display mode you want to modify from the Display Modes list.
3. Click the SmartDisplay Settings Wizard button.
4. Follow the instructions given by the Wizard.

- 12 -
GrafixStar 450 User Guide
Setting display modes using the Advanced Settings button
This procedure enables you to choose the settings for your display mode. You should only use
it if you are familiar with setting display modes.
To set a display mode:
1. Click the SmartDisplay page on the Display Properties window.
2. Click the display mode you want to modify from the Display Modes list.
3. Click the Advanced Settings button.
This takes you to the SmartDisplay Advanced Settings window. This window has five pages:
•Display for setting the display size
•Desktop for setting the desktop size
•Connectivity for the type of connection to multimedia option cards
•Screen for centering the display on your monitor
•Properties for creating and naming display modes
Using SmartDesktop
SmartDesktop is an application which controls the appearance and behavior of your desktop.
You can use SmartDesktop to set a virtual desktop, where the desktop size is larger than the
display size, and you can change the display size at the touch of a buztton, enabling you to
zoom in and zoom out while you are working.
You can use the SmartDesktop Properties page to set properties that control the way
SmartDesktop works.

- 13 -
GrafixStar 450 User Guide
The SmartDesktop Display Properties page
The SmartDesktop Display Properties page provides you with an alternative way of setting
SmartDesktop’s characteristics.
To open the Display Properties page, click the Display Properties Control Panel and click the
SmartDesktop tab.
The following page appears:
By setting Schemes, you can save different combinations of SmartDesktop settings.

- 14 -
GrafixStar 450 User Guide
The SmartDesktop toolbar
Using SmartTools, you can create a toolbar for running SmartDesktop.
To create a SmartDesktop toolbar:
1. Start SmartTools.
2. Click the Customize Toolbars tab.
3. Click SmartDesktop in the applications list and drag it onto the desktop.
The SmartDesktop toolbar appears as follows:
Maximize in DisplayMaximize on Zoom
Move Right
Move Down
Move Up
Move Left
Auto Pan
Property sheet
Scroll Lock
Smart Zoom
Zoom In
Zoom Out

- 15 -
GrafixStar 450 User Guide
Property Sheet accesses the SmartDesktop Display Properties page.
Scroll Lock disables scrolling functions. This is useful if you are using a virtual desktop and
you want to work on a particular area of the desktop without accidentally moving to other
areas.
When you have Smart Zoom selected, you can use all the virtual desktop functions: when you
zoom in or zoom out with Smart Zoom selected, only the display size changes; the desktop
size stays the same. You can also use the functions such as Scroll Lock, Auto Pan, Maximize
on Zoom and Maximize on Display to control the way your desktop behaves. If Smart Zoom is
not selected, you can only use Zoom In and Zoom Out.
Zoom In and Zoom Out are used to change the size of your display. You can keep clicking the
Zoom In button until the display size reaches the smallest size available (640 x 480). You can
keep clicking the Zoom Out button until the display size reaches the largest size available (this
is set using SmartDisplay).
You can also use the Zoom Display Fully In and Zoom Display Fully Out functions to zoom
directly to the smallest and largest display sizes for your monitor. These functions are
available as hot keys and menu items.
When Maximize on Zoom is selected, all maximized windows fit the new display size when
you zoom in or zoom out.
When Maximize in Display is selected, maximized windows fit the display size. When this is
not selected, maximized windows fit the desktop size.
If you have Auto Pan enabled, and you switch to a window which is currently off-screen
(using ALT+TAB, or using the taskbar), the screen scrolls automatically to the window you
selected.
The Move Up, Move Down, Move Left and Move Right buttons on the toolbar move to the
parts of the desktop which are currently off-screen (when the desktop size is larger than the
display size). You can also move to these areas using the mouse.

- 16 -
GrafixStar 450 User Guide
Technical details
Display modes
The display modes supported by GrafixStar 450 are shown in the table below.
WINDOWS 95 DISPLAY MODES
Resolution Colors Refresh Rate (Hz)
640 x 480 16.7 million 60,72,75,85,90,100,120,150
32,768 60,72,75,85,90,100,120,150
256 60,72,75,85,90,100,120,150
800 x 600 16.7 million 56,60,72,75,85,90,100,120
32,768 56,60,72,75,85,90,100,120
256 56,60,72,75,85,90,100,120
1024 x 768 16.7 million 43,60,70,75,85,72,80,90,100,120
32,768 43,60,70,75,85,72,80,90,100
256 43,60,70,75,85,72,80,90,100
1152 x 864 16.7 million 60,70,72,75,80,85,90
32,768 60,70,72,75,80,85,90
256 60,70,72,75,80,85,90
1280 x 960 16.7 million 60,64,70,75
32,768 60,64,70,75
256 60,64,70,75
1280 x 1024 16.7 million 43,60,70,72,75
32,768 43,60,75,72
256 43,60,75,72
1600 x 1200 32,768 48,60
256 48,60
Bold refresh rates are not available on GrafixStar 450 LC.
Monitor connector

- 17 -
GrafixStar 450 User Guide
GrafixStar 450 uses a standard 15-way high density ‘D’ socket. If your monitor uses a different
connector your monitor dealer will be able to supply an adapter. The pin-outs are as follows:
PIN SIGNAL PIN SIGNAL PIN SIGNAL
1 Red video 6 Red return 11 Unused
2 Green video 7 Green return 12 DDC2B-Data
3 Blue video 8 Blue return 13 Horizontal
4 Reserved 9 +5 V 14 Vertical
5 Ground 10 Sync return 15 DDC2B-Clock
Power and temperature specifications
GrafixStar 450 operates at a nominal power rating of 6.5 watts, at temperatures between 10ºC
(50ºF) and 50ºC (122ºF).
1611
510 15

- 18 -
GrafixStar 450 User Guide
Troubleshooting
This chapter provides solutions to the problems that can happen when installing and using
GrafixStar 450. For more detailed information refer to the file file readme.txt in the root
directory of the VideoLogic Software Library CD, or the file vlgx450a.txt in the gs450 folder.
Problem: After installing GrafixStar 450, my PC does not start.
Solution: Your old graphics controller or graphics card is still active. Remove the old card or
disable your graphics controller, referring to your PC’s documentation for
instructions on how to do this.
The card is not seated properly in your PC. Check that the card’s connectors are
fitted properly into the PCI slot. You may need to move the card into another slot.
Problem: My screen is blank (black) when Windows 95 has loaded.
Solution: The Hardware Acceleration bar in the Graphics section of the System Properties
Performance page has been set to None, and must be changed to Full.
Restart your PC in Safe Mode, then display the ‘My Computer’ group, point at the
monitor icon at the top left corner of the group and click the right-hand mouse
button to display the context-sensitive menu. Click Properties, then Performance,
then Graphics, and then set the bar to Full.
Problem: My screen is blank (black), flickering, or corrupted.
Solution: You have the wrong monitor type selected in Display Properties. Restart your PC (if
you can’t see the screen, use ALT+F4, DOWN ARROW, ENTER), and when the Starting
Windows 95 message is displayed, press the F8 key and choose Safe Mode. When
Windows has restarted, choose a different monitor in Display Properties.
The refresh rate is too high for your monitor. Restart your PC (if you can’t see the
screen, use ALT+F4, DOWN ARROW, ENTER), and when the Starting Windows 95
message is displayed, press the CTRL key, keeping it pressed until Windows has
restarted. This selects the lowest refresh rate for your monitor for the color and
desktop settings. You can now choose a suitable refresh rate in Display Properties.

- 19 -
GrafixStar 450 User Guide
Technical support
If you have any problems while installing or using GrafixStar 450, go through the steps below.
1. Check the troubleshooting information in the readme files on the distribution disk.
2. Contact us online using one of the following services.
- Internet web site: http://www.videologic.com
- Internet FTP site: ftp://ftp.videologic.com
- Bulletin board (USA, Canada & South America): 415 875 7748 (to 28800 baud, 8-N-1)
- Bulletin board (UK): +44 1923 271301 (to 28800 baud, 8-N-1)
- Bulletin board (Germany): +49 61 03 1923 371257 (to 28800 baud, 8-N-1)
3. Contact your original supplier for technical help.
4. Call our customer support group. Try to have details of your system to hand, such as the
card’s serial number and the make of your PC as this will make it easier for us to help you.
USA, Canada & South America: 415 875 0606
Outside USA, Canada & South America: +44 1923 271300
Other products and services
For more information about VideoLogic products, contact us via one of the above services, or
through the addresses on the back cover of this guide, or use our FaxBack service.
The VideoLogic FaxBack service provides a complete listing of current VideoLogic products,
with summary descriptions and reviews. When you use this service you will be asked to
provide your fax number. If calling from outside the USA, Canada and South America your
number is 011, then your country code, then your fax number. If your telephone does not
have a £ key, use the # key when prompted to press the pound sign key.
USA, Canada & South America: 800 203 8587
Outside USA, Canada & South America: +1 800 203 8587

- 20 -
GrafixStar 450 User Guide
M
monitor connector pin-outs 17
R
readme files 2, 6, 18, 19
removing software 7
S
SmartDesktop 12-16
SmartDisplay 10-12
SmartTools 9-10
software installation 6
software removal 7
T
technical support 19
troubleshooting 18
V
VideoLogic
addresses 19
contact points 19
FaxBack service 19
other products and services 19
W
web site 19
Windows 3.1 6, 7
Windows 95 5, 7
Index
B
bulletin boards 19
bus requirement 2
C
customer support group 19
D
display modes 16
F
FaxBack service 19
FTP site 19
G
GrafixStar 450
expansion slot 4
handling 2
installing 3
H
hardware installation 3
I
installation
hardware 3
other operating systems 6
readme files 2, 6
software 5
Table of contents
Other VideoLogic Video Card manuals
Popular Video Card manuals by other brands

Diamond Multimedia
Diamond Multimedia Radeon 7000 Specification sheet

Compaq
Compaq PowerStorm 600 Hardware guide

ATI Technologies
ATI Technologies Radeon HD 3450 manual

EVGA
EVGA GeForce GTX 460 SSC w/ Backplate specification

Gainward
Gainward GTX 580 3072MB PHANTOM brochure

Artesyn
Artesyn SharpStreamer PCIE-7207 manual