VIETA HCD30 User manual


CONTENTS
CONTENTS
Contents 02
SAFETY PRECAUTIONS
Safety precautions 03
IMPORTANT INFORMATION
Important information 04
CONNECTION TO THE MAINS
Connection to the mains 05
REMOTE CONTROL
Installation of batteries 06
Using the remote control 06
Remote control functions 07
FRONT PANEL CONNECTIONS
Front panel 08
BACK PANEL CONNECTIONS
Connections 09
Explanation of LCD Display 09
CONNECTION WITH AMPLIFIER
Audio connection layout 10
OPERATION AND FUNCTIONS
ON, OFF and Standby 11
Load a disc 11
Play/Pause 11
Stop, Skip, Search, Random 12
TROUBLESHOOTING
Troubleshooting 13
TECHNICAL DATA
Technical data 14
02

03
TO MINIMISE THE RISK OF FIRE OR ELECTRICAL SHOCK, DO NOT EXPOSE
THE UNIT TO RAIN OR MOISTURE. DO NOT OPEN THE CABINET AS IT
CONTAINS DANGEROUS VOLTAGE. ONLY QUALIFIED TECHNICIANS ARE
ALLOWED TO CARRY OUT REPAIR AND SERVICE.
if the plug of the power cord needs to be replaced, it is important that the
replacement is identical to the plug to be replaced, or that the new plug has been
recommended by the manufacturer
A triangle with a lightning symbol draws the user's
attention to "dangerous voltage" without insulation in the
cabinet which may be high enough to entail a risk of
electric shock.
A triangle with an exclamation mark draws the user's
attention to important instructions for use and
maintenance in the accompanying manual, which should
be studied.
TO AVOID ELECTRICAL SHOCK, IT IS IMPORTANT TO INSERT THE PLUG
CORRECTLY INTO THE SOCKET.
SAFETY PRECAUTIONS
A symbol for CLASS II (double insulation)
WARNING:
CAUTION:

04
IMPORTANT INFORMATION
Handling instructions
- The top and back panel of the unit may become
warm after prolonged use. This is not due to a
defect.
- Turn off the power when the unit is not used.
Protect the power cord
- Follow the instructions below to prevent
abnormal operation, electrical shock, fire or
personal injury:
- Hold the plug firmly when inserting it into the
socket.
- Avoid heat-producing devices.
- Do not place objects on the power cord.
- Do not carry out service work on or change the
power cord.
Positioning
Do not place the unit in any of the fol. places:
- In sunlight, close to heat-producing devices or in
an enclosed rack.
- In places with high temperatures (40C or more)
or high relative humidity (90% or more).
- In dirty places as some internal parts may be
damaged.
Do not put your fingers or any
other objects into the unit
- Touching the internal parts is dangerous and
may cause injury or damage. Do not open the
cabinet.
- Do not place any foreign matter in the unit.
Interference
Placing the unit near a television set, radio or video
player may cause poor picture and sound quality.
In that case, move the unit further away from the
television set, radio or video player.
Condensation
Condensation may occur in the following cases:
- When the unit is moved directly from a cold to a
warm place.
- When the unit is used in a room where the
radiator has just been switched on or a place
where the cold air from the air-conditioning
system is directed at the unit.
- If the unit is used in the summer in a warm and
humid room just after it has been moved from an
air-conditioned room.
- If there is steam or a high level of humidity in the
room.
In case of condensation, the unit will not work
properly. Turn off the unit. Unplug the unit and
leave it for 2-3 hours. The unit will then have
adapted to the environment and any
condensation will have disappeared.

05
Connection to the mains
Do not turn on the power before all connections have been made correctly.
Check that all connections have been made correctly before turning on the
power.
Check that the mains voltage is 220-240V AC50Hz before turning on the power.
Connection to the mains
Check that all other connections have been made correctly before inserting the mains plug into the wall
socket.
Then insert the plug into a suitable socket.
If the unit is to be used abroad, you may need an adapter.
CONNECTION TO THE MAINS
220-240V AC~50Hz
Stereo Output AC INPUT:
USE O NLY WIT H 250V FU SE
HCD30B

HCD3 0B
06
REMOTE CONTROL
Installation of batteries
1 Remove the cover as illustrated.
2 Position two batteries of the type AAA/R03/UM4
in the battery compartment. Make sure that the
orientation of the batteries is correct (see
drawing at bottom).
3 Replace the cover.
- Do not mix new and old batteries and do not use different types of batteries.
- If the remote control is not used for prolonged periods, remove the batteries from the remote control to
avoid corrosion.
Using the remote control
Direct the remote control at the sensor on the front
panel of the unit. When the remote control signal is
received, the unit reacts accordingly. The remote
control works within a range of 6 metres.
- Sometimes the remote control does not work well in strong light. You may have to move the unit if it is a
problem.
- Malfunction may occur if other remote controls are used near the unit.
- Do not place any objects on the remote control, as the batteries may become flat if a key is depressed
constantly.
- Make sure that there are no obstacles between remote control and unit.
- Do not position the unit behind tinted glass as it may reduce the maximum range of the remote control.

FRONT PANEL AND CONNECTIONS
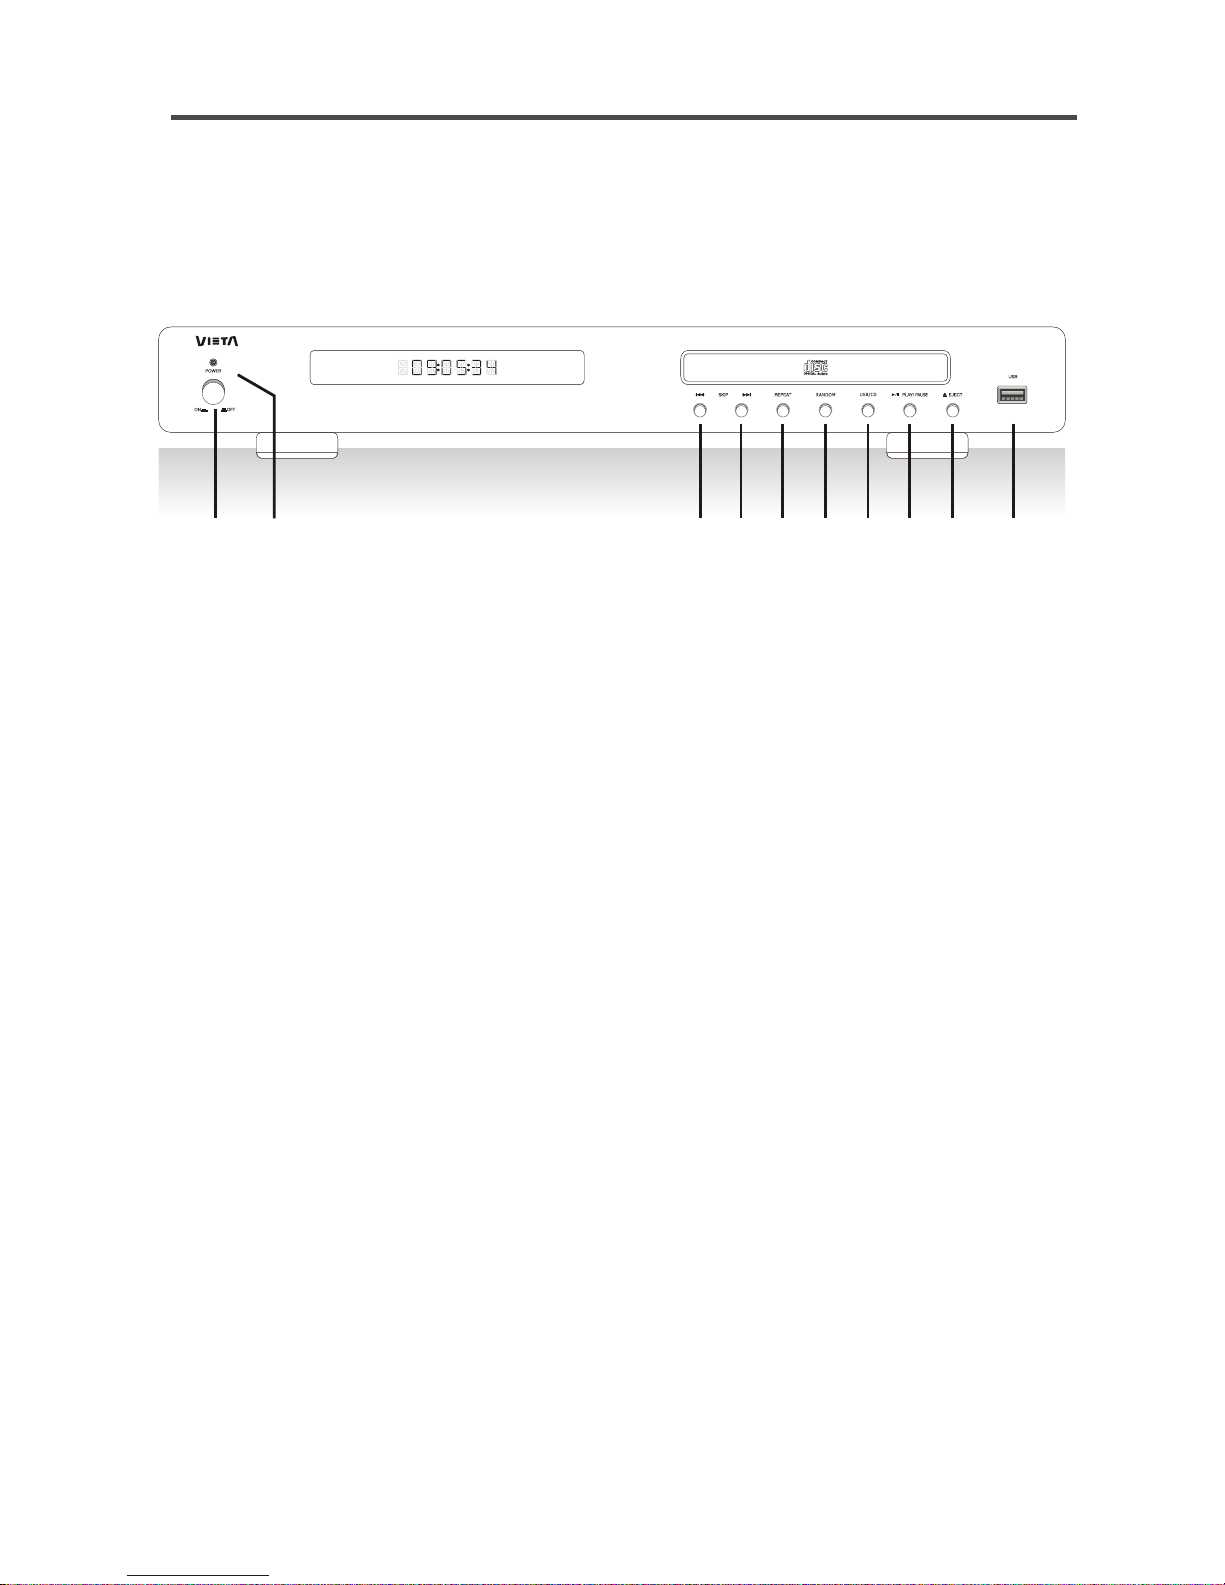
Front panel
1. Mains switch: Used to turn ON/OFF the power.
2. LED .
3.Skip backward (Previous): Selects the previous track.
4.Skip forward (Next): Selects the next track.
5.Repeat: Repeats a single track or all tracks on a CD.
6. Random: Makes it possible to play the tracks of a CD in random order.
7. USB/CD selector: oppositely switch.
8. Play/Pause: Starts playback at first press and stops playback at second press.
:Lights off when HCD30B turns on, lights blue when in standby mode
Switch the CD playback to USB playback;
9 Eject: Open and close the disc tray on HCD30B.
10. USB port: Inserts USB for directly playback.
08
1 2
HCD30B
47
58 9 10
36

Stereo Output AC INPUT:
USE O NLY WIT H 250V FU SE
HCD30B
09
BACK PANEL AND CONNECTIONS
Connections
1. Stereo Output: Analogue stereo output. For connection to stereo amplifier or receiver
with analogue input.
2. AC input: For connection of mains voltage. Make sure that the plug has been correctly
inserted, and that the voltage corresponds to the text printed on the back panel of the
cabinet.
Explanation of VFD display
This unit does not feature any OSD (On Screen Display). Instead it features a more descriptive VFD display
that displays all the information required. Below you can see a picture of the display and an explanation of
the various symbols.
12
Track number
Track time

Stereo Output AC INPU T:
USE O NLY WIT H 250V FU SE
HCD30B
CONNECTION WITH AMPLIFIER
Audio connection layout
Analog amplifier/receiver
This page only contains suggestions for connection of your HCD30B.
Note that the accessories in the pictures on this page are not included in the supply.
10
-+-+L R
Other manuals for HCD30
1
Other VIETA CD Player manuals


