VIEWEG DV-5110 User manual

VIEWEG
Bedienungsanleitung
Operating Manual
Uživatelský Manuál
DE
EN
CZ
Handventil DV-5110
Pinch Tube Pen DV-5110
Ruční ventil DV-5110

3

VIEWEG
3
DE
Bedienungsanleitung DV-5110
1 Allgemein
2 Lieferumfang
Im Lieferumfang sind folgende Teile enthalten:
Anzahl Bezeichnung Artikel-Nr.
1 Bedienungsanleitung
1 Handventil DV-5110 DV-5110
2 Schlaucheinsatz, ca. 11 cm, Ø 2,5 mm 580045A
1 Schlauchleitung, ca. 60 cm, Ø 1,8 mm 580047A-07-24
1 Nadelsortiment klein 990062-K
1 Luer-Lock Adapter 560519PP
2 Innensechskantschlüssel (3/32“ und 1/16“)
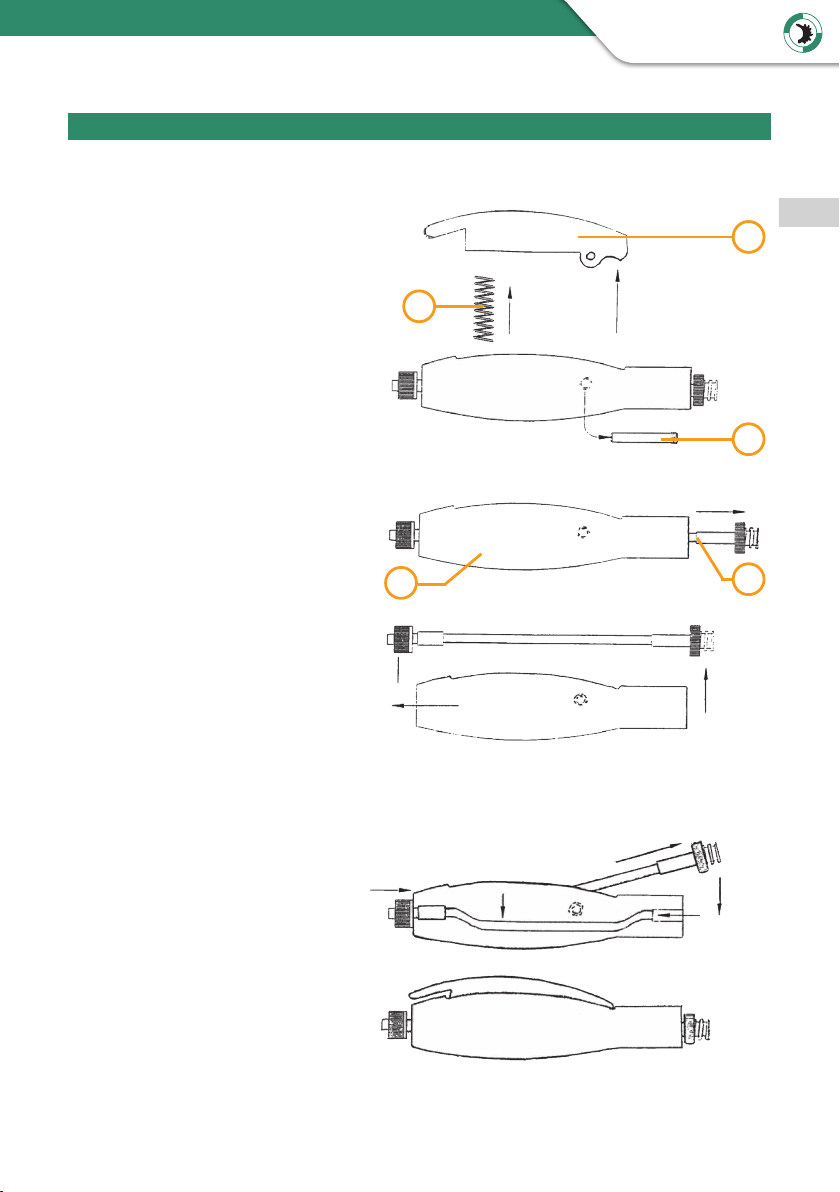
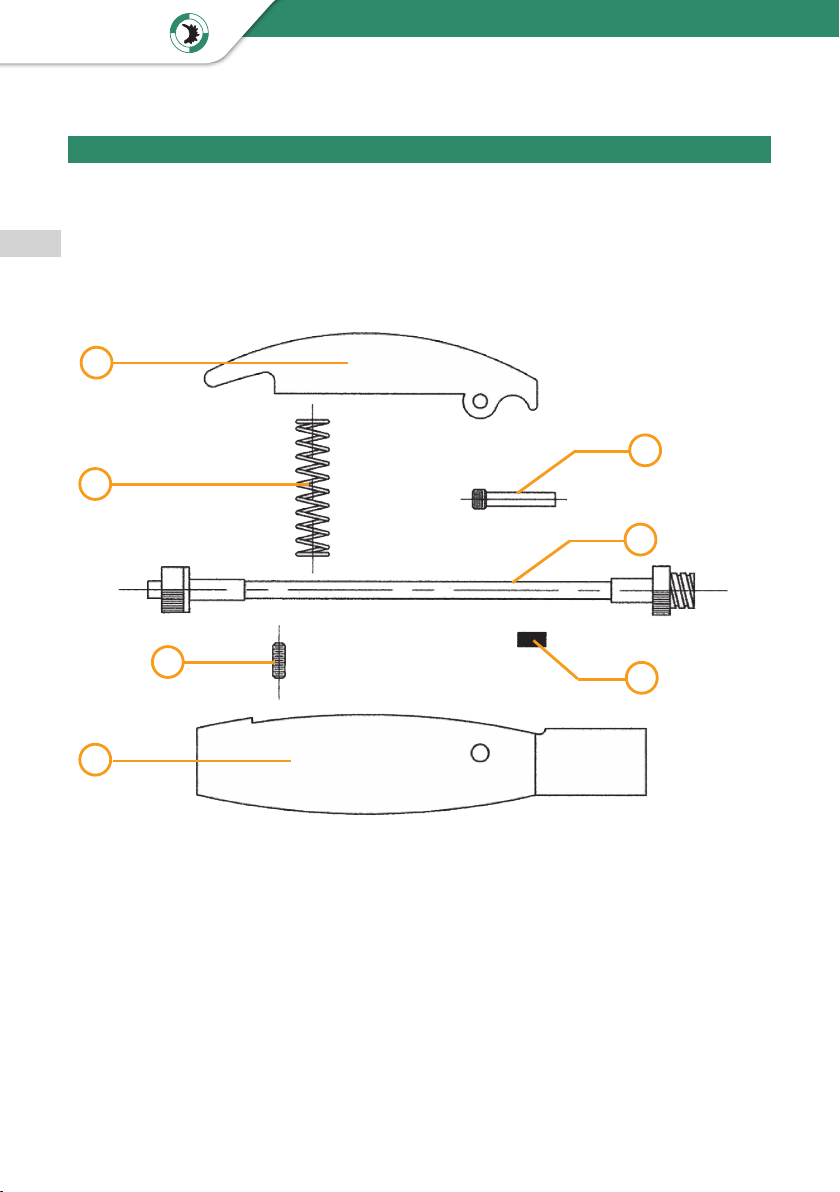
Das DV-5110 ist ein Hand-Schlauchquetschventil und ist auf Grund seiner Funktions-
und Bauweise für ein sehr breites Spektrum an Anwendungen geeignet.
1. Der austauschbare Schlauch besitzt am Ein- und Auslass jeweils einen Luer-Lock
Anschluss zur problemlosen Adaptierung des Materialschlauches, bzw. der
Dosiernadel. Das Ventil ist geeignet den Quetschlauch bis zu einem Materialdruck
von max. 3,5 bar zu verschließen.
2. Die AN / AUS Handbetätigung erlaubt eine präzise Bedienung um sehr kleine
Dosierpunkte oder kontinuierliche Dosierraupen zu erzeugen.
3. Im Ventilkörper ist eine Hubeinstellung eingebaut, wodurch die wiederholgenaue
Dosierung von sehr kleinen Dosierpunkten gewährleistet wird.
Dabei wird der Hub während des Drückens (Dosierens) nach vorne begrenzt.
4. Zur Adaptierung auf unterschiedliche Anschlussschläuche und Materialbehälter
können zahlreiche, austauschbare Fittinge zum Einsatz kommen.

VIEWEG
4 5
DE
Bedienungsanleitung DV-5110
3 Aufbau
Das DV-5110 wird als komplett aufgebautes Schlauchquetschventil ausgeliefert.
Diverses Zubehör, wie Ersatzschlaucheinsätze, Dosiernadel, Versorgungsschlauch und
ein ¼“ NPT Adapter sind im Lieferumfang enthalten.
1 Handhebel 5 Gelenkschraube
2 Feder 6 Schlaucheinsatz
3 Ventilkörper 7 Quetschgegenstück
4 Einstellschraube
1
3
2
5
6
47

VIEWEG
5
DE
Bedienungsanleitung DV-5110
4 Einlegen und Wechsel des Schlaucheinsatzes
1. Schrauben Sie das Gelenk (5) des
Handhebels (1) aus.
Entfernen Sie den Handhebel (1)
und die Feder (2).
2. Ziehen Sie an einem Ende
des Schlaucheinsatzes (6) bis
sich der Schlauchanschluss
außerhalb des Ventilkörpers
(3) befindet.
3. Ziehen Sie nun den Schlauch-
einsatz nach oben aus dem
Ventilkörper heraus.
6
5
1
2
1. Drücken Sie den neuen
Schlaucheinsatz auf der einen
Seite in den Ventilkörper ein,
ziehen ihn lang und legen ihn
auf der anderen Seite ein.
2. Anschließend montieren Sie die
Feder, den Handhebel und das
Gelenk in umgekehrter Reihen-
folge wie beim Ausbau.
Zum Wechseln des Schlauches entfernen Sie zunächst den alten Schlauch.
Legen Sie dann einen neuen Schlaucheinsatz ein.
3

VIEWEG
6 7
DE
Bedienungsanleitung DV-5110
5 Materialzufuhr
1. Schließen Sie Ihren Materialbehälter oder die Kartusche mit einen Schlauch und
dem entsprechenden Fitting an den Materialeingang des Handventils DV-5110 an.
2. Geben Sie anschließend die notwendige Druckluft auf Ihren Materialbehälter.
3. Nehmen Sie das Handventil wie einen Stift in Ihre Hand.
Betätigen Sie den Handhebel des DV-5110 und beobachten Sie, ob das Material aus
Ihrem Materialbehälter zu fliessen beginnt. Halten Sie den Handhebel gedrückt, bis
in Material- und Quetschschlauch im Ventil keine Luft mehr ist und Dosiermaterial
am Ende sichtbar wird. Nun ist das Ventil bereit zum Dosieren. Schließen Sie die
gewählte Dosiernadel am Materialauslass des DV-5110 Ventils an.
3. Verwenden Sie die kleine Madenschraube um den Hub des Handhebels zu justieren.
Dadurch kann die Dosierpunktgröße bzw. die Dosiermenge eingestellt werden.
Diese Einstellschraube befindet auf der Ventilunterseite.
4. Um einen wiederholgenauen Prozess zu realisieren, gibt es folgende
Einflussgrößen die darauf Einfluss nehmen:
A. Materialdruck
B. Dosiernadelgröße
C. Hubeinstellung des Handhebels am DV-5110 Handventil

VIEWEG
7
DE
Bedienungsanleitung DV-5110
Nr. Artikelnr. Beschreibung
1 - Handhebel
2 - Ventilkörper
3580043CW Feder
4 580042 Einstellschraube
5 580044 Gelenkschraube
6 580045A Schlaucheinsatz, ca. 11 cm, Ø 2,5 mm
o. Abb. 580047A-07-24 Schlauchleitung, ca. 60 cm, Ø 1,8 mm
o. Abb. 990062-K Nadelsortiment klein
o. Abb. 560519PP Luer-Lock Adapter
o. Abb. - Innensechskantschlüssel 3/32“
o. Abb. - Innensechskantschlüssel 1/16“
6 Stück- und Ersatzteilliste
Die Nummern beziehen sich auf die Abbildung auf Seite 4.

9

VIEWEG
9
EN
Operating Manual DV-5110
1 General
2 Scope of delivery
The following parts are included in the scope of delivery:
Qty. Description Part No.
1 Operating Manual
1Pinch Tube Valve DV-5110 DV-5110
2Pinch Tube Assembly, ca. 11 cm, Ø 2,5 mm 580045A
1Pinch Tube Assembly, ca. 60 cm, Ø 1,8 mm 580047A-07-24
1Dispensing Tip Set small 990062-K
1 Luer-Lock Adapter 560519PP
2 Allen Key (3/32“ und 1/16“)
The DV-5110 Pen is a basic Pinch Tube type valve. It has several unique features that
provide very broad areas of application.
1. The replaceable pinch tube assembly has inlet and outlet fittings molded onto a
polyethylene tube. The assembly is capable of shutting off fluid flow with input
pressures up to 50 psi of the supply source.
2. The valving or ON/OFF lever actuator provides precision control, capable of making
small microdots or continuous beads.
3. A stroke adjustment for the lever is built into the PEN body. This adjustment pro-
vides a positive stop point for the lever when dispensing. This adjustment makes
possible the dispensing of small dots with a high degree of repeatable control.
4. A wide range of interchangeable fittings can be used to adapt supply hoses from eit-
her gravity or pressurized supply reservoirs. The standard supply hose provided with
the PEN is a duplicate form of the pinch tube assembly and quickly connects the
PEN to almost any supply reservoir, using the appropriate adapter (sold separately).

VIEWEG
10 11
EN
Operating Manual DV-5110
3 Assembly
The DV-5110 Pen is supplied as a pre-assembled applicator.
In addition, spare pinch tube assemblies and dispensing needle tips, a supply hose and
¼“ NPT adapter are included.
1 Trigger 5 Pivot pin
2 Spring 6 Pinch Tube Assembly
3 Valve Body 7 Pinch Cushion
4 Flow Adjust Screw
1
3
2
5
6
47

VIEWEG
11
EN
Operating Manual DV-5110
4 Pinch Tube Assembly Replacement
1. Unscrew Pivot Pin (5), remove
Trigger (1) and Spring (2).
2. Pull one end of pinch tube
assembly out (6), stretching
it until fitting clears body.
3. Now pull stretched end of
pinch tube assembly up.
Then pull out the opposite
end to remove.
6
5
1
2
1. Press the new pinch tube
assembly on one side into the
valve body, pull it long and
insert it on the other side.
2. Then install the spring, the trig-
ger and the pivot pin in reverse
order as with the extension.
To change the pinch tube assembly, first remove the used.
Insertion of a new pinch tube assembly.
3

VIEWEG
12 13
EN
Operating Manual DV-5110
5 Material Supply
1. Thread the luer lock adapter onto your cartridge reservoir with ¼“ NPT port.
Assemble the reservoir into the appropriate retainer and cap. Twist lock the female
end of the supply hose onto the adapter and connect the male end onto the inlet
side of the DV-5110 Pen.
2. Hold the PEN in your hand as if you were writing. Depress the ON/OFF lever and
open the supply reservoir to feed the PEN. As soon as all air has been purged from
the supply hose and pinch tube assembly, release the ON/OFF lever to stop flow.
Attach the desired needle tip.
3. To fine-tune the flow control or dot size desired, use the included allen wrench to
adjust the stroke of the ON/OFF lever. This adjustment is on the underside of the
PEN body, opposite the lever.
4. With repeated use, a closely controlled application can be achieved with the
availability of adjusting the following:
A. Pressure on the supply reservoir
B. Needle tip size
C. Stroke adjustment on the ON/OFF lever

VIEWEG
13
EN
Operating Manual DV-5110
Nr. Artikelnr. Beschreibung
1 - Trigger
2 - Valve Body
3580043CW Spring
4 580042 Flow Adjustment Screw
5 580044 Pivot Pin
6 580045A Pinch Tube Assembly, ca. 11 cm, Ø 2,5 mm
n. Img. 580047A-07-24 Pinch Tube Assembly, ca. 60 cm, Ø 1,8 mm
n. Img. 990062-K Dispensing Tip Set small
n. Img. 560519PP Luer-Lock Adapter
n. Img. - Allen Key 3/32“
n. Img. - Allen Key 1/16“
6 Parts and spare parts list
The numbers refer to the illustration on page 10.

15

VIEWEG
15
CZ
Uživatelský manuál DV-5110
1 Obecné
2 Obsah dodávky
Součástí dodávky jsou následující díly:
Počet Popis Objednací č.
1 Uživatelský manuál
1 Ruční svírací hadicový ventil DV-5110 DV-5110
2 Sestava svírací hadice (11 cm, Ø 2,5 mm) 580045A
1 Sestava svírací hadice (60 cm, Ø 1,8 mm) 580047A-07-24
1Malý set dávkovacích jehel 990062-K
1 Luer-Lock adaptér 560519PP
2 Imbusový klíč (3/32”a 1/16”)
Pero DV-5110 je základním typem svíracího ventilu. Má několik jedinečných funkcí a
poskytuje velmi široké spektrum použití.
1. Vyměnitelná sestava má vstupní a výstupní adaptér integrovaný na polyethylenové
trubici. Sestava je schopna uzavřít tok tekutiny se vstupním tlakem až do 50 psi z
přívodního zdroje.
2. Ovládací spoušť ventilu zajišťuje přesnou manipulaci a umožňuje vytvářet malé
dávkovací body nebo souvislé linky.
3. Stavěcí šroub je integrovaný do těla ventilu a slouží pro nastavení krajní polohy při
otevření ventilu. Díky tomu je možné dosahovat malých dávek s vysokým stupněm
opakovatelnosti.
4. Široké spektrum vyměnitelných adaptérů zajišťuje možnost připojení gravitačních
nebo tlakových zásobníků materiálu. Standardní přívodní hadice dodávaná s
ventilem je duplicitní formou sestavy svírací hadice a s její pomocí je možno rychle
připojit téměř jakýkoli zásobník materiálu
(pomocí vhodného adaptéru; prodává se samostatně).

VIEWEG
16 17
CZ
Uživatelský manuál DV-5110
3 Montáž
Ventil DV-5110 je dodáván ve smontovaném stavu.
Součástí dodávky jsou dále náhradní sestavy svíracích hadic, dávkovací jehly, přívodní
hadice a adaptér ¼“ NPT.
1 Spoušť 5 Otočný čep
2 Pružina 6 Sestava svírací hadice
3 Tělo ventilu 7 Poduška
4 Šroub pro nastavení průtoku
1
3
2
5
6
47

VIEWEG
17
CZ
Uživatelský manuál DV-5110
4 Výměna svírací hadice
1. Odšroubujte otočný čep (5),
vyjměte spoušť (1) a pružinu (2).
2. Vytáhněte jeden konec svírací
hadice (6) a natahujte ji,
dokud nedojde k odpojení
adaptéru od těla ventilu.
3. Nyní vytáhněte natažený
konec svírací hadice nahoru.
Potom vytáhněte opačný
konec a vyjměte jej.
6
5
1
2
Pro výměnu svírací hadice je nejprve nutné odstranit použitou hadici:
Vložení nové svírací hadice:
1. Vložte jeden konec nové hadice
do těla ventilu a následně
hadici natáhněte tak, aby bylo
možné uložit i protilehlou stra-
nu hadice.
2. Poté vložte zpět pružinu, spoušť
a otočný čep v opačném
pořadí, než při vyjmutí hadice.
3

VIEWEG
18 19
CZ
Uživatelský manuál DV-5110
5 Přívod materiálu
1. Našroubujte Luer-Lock adaptér na kartuši se závitem ¼“ NPT. Tu následně vložte do
vhodného tlakového pouzdra s víkem. Zastrčte samičí konec přívodní hadice na
adaptér a připojte samčí konec na vstupní stranu ventilu DV-5110.
2. Držte ventil v ruce tak, jako byste psali. Stiskněte spoušť ZAP / VYP a otevřete
přívodní nádrž, aby materiál mohl napájet ventil. Jakmile je veškerý vzduch vytlačen
ze sestavy přívodní hadice, uvolněte spoušť ZAP / VYP a zastavte průtok. Připojte
požadovaný typ dávkovací jehly.
3. Chcete-li jemně doladit požadovaný průtok nebo velikost dávky, použijte přiložený
imbusový klíč k nastavení zdvihu spouště ZAP / VYP. Toto nastavení je na spodní
straně těla ventilu, naproti spouště.
4. Jemné nastavení dávkovacích parametrů je možné dosáhnout kombinací následu-
jících faktorů:
A. Tlak na zásobníku materiálu
B. Průměr dávkovací jehly
C. Nastavení zdvihu na spoušti ZAP / VYP

VIEWEG
19
CZ
Uživatelský manuál DV-5110
Obrázek č. Objednací č. Popis
1 - Spoušť
2 - Tělo ventilu
3580043CW Pružina
4 580042 Stavěcí šroub pro nastavení průtoku
5 580044 Otočný čep
6 580045A Sestava svírací hadice (11 cm, Ø 2,5 mm)
bez obr. 580047A-07-24 Sestava svírací hadice (60 cm, Ø 1,8 mm)
bez obr. 990062-K Malý set dávkovacích jehel
bez obr. 560519PP Luer-Lock adaptér
bez obr. -Imbusový klíč 3/32“
bez obr. -Imbusový klíč 1/16“
6 Seznam náhradních dílů
Čísla odkazují na obrázek na straně 16.

www.dosieren.de
VIEWEG GmbH
Dosier- und Mischtechnik
Gewerbepark 13
85402 Kranzberg
Deutschland / Germany
Tel. +49 8166 6784 -0
info@dosieren.de
www.dosieren.de
www.dosieren.de
VIEWEG
Table of contents
Languages:
Popular Tools manuals by other brands

Hilti
Hilti DX 76 manual

Burndy
Burndy HYTOOL MR15 Operating & maintenance instructions

Kennedy
Kennedy TLA012 instruction manual

Sealey
Sealey AB9321 quick start guide

Utility Solutions
Utility Solutions Jack Jumper USJJ-004 instruction manual

HiPURformer
HiPURformer Adhesive Applicator Tool instruction manual