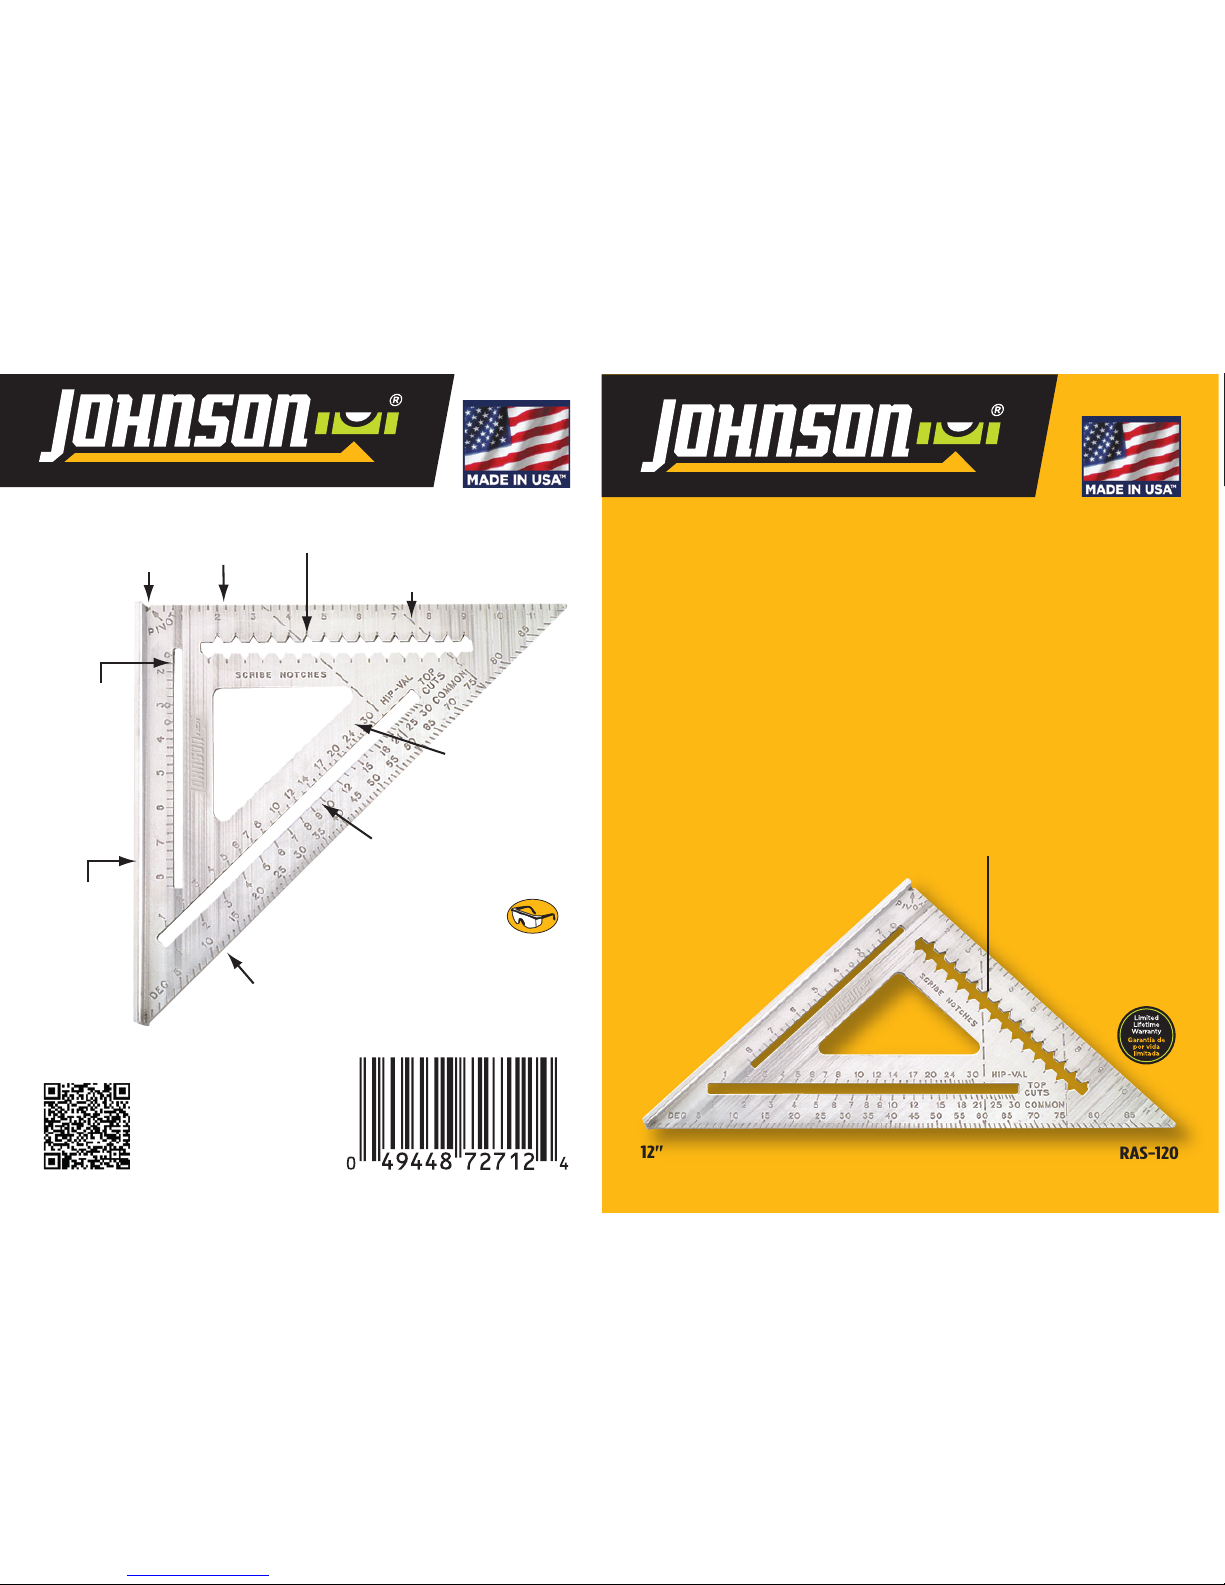
Johnson RAS-120 User manual

RAS-120
12"
30cm
12" Professional Aluminum
Rafter Angle Square
with Rafter Square Instruction Book and Tables
Escuadra Profesional de 12"
para Ángulos de Vigas
Manual de instrucciones y tablas para envigado incluidos
1/4" SCALE
(1-1/2"
TO 8-1/4")
Escala de 1/4"
(entre 1-1/2" y
8-1/4")
“T”-BAR
(FOOT)
Base para
ángulo
recto
PIVOT
Pivote
RAFTER SEAT CUT
Indicación para corte de asiento
1/4" SCRIBING NOTCHES (1-3/4" TO 9")
Muescas para marcaciones (entre 1-3/4" y 9")
TOP CUTS/
HIP & VALLEY
RAFTER SCALE
Escala para cortes
superiores y cortes en
ángulo estilos Hip y Valley
COMMON RAFTER SCALE
Escala común para ángulos de vigas
DEGREE SCALE/
PROTRACTOR
Escala de
grados/transportador
MARKING EDGE
Borde para marcado
Continuous 1/4" Scribing Notches from 1-3/4" to 9" for Fast Rip Cut Layout.
Bordes continuos con muescas para
marcaciones de 1/4" entre 1-3/4"
y 9" para efectuar cortes
largos con diferentes
opciones de
espaciado.
Made in USA Hecho en EE.UU.
Patents Pending Patentes Pendientes
©2012 Johnson Level & Tool Mfg. Co., Inc.
Mequon, WI 53092
Montréal, Québec, Canada
www.johnsonlevel.com

1
The Johnson® Rafter Angle Square
Thank you for purchasing the Johnson® Rafter Angle Square. Since
1947 Johnson Level & Tool has been developing solutions to help
professional tradesmen improve their work. Our products are trusted
by professionals worldwide to work more accurately, more quickly
and more reliably.
This reference book will serve as a guide for providing basic rafter
and angle layout information through various illustrations and tables.
Johnson Level & Tool is not responsible for any errors or omission
with the content of this book. The information outlined is to be used
as a recommendation however other methods not listed may be
acceptable practice.
The Johnson® Rafter Angle Square is available in 7 inch and 12 inch
sizes to accommodate various material dimensions.
Here’s what makes Johnson® Rafter Angle Squares fast and ecient:
•Thenewandimproved7inchhascontinuousscribinggrooves
from 1 inch through 5-1/2 inches. (Please see illustration 1 on
page 2)
•Easytoreadanglescalefrom0°to180°.
•Onenumberlayoutfor:Roofs, solar panel supports, stairs,
cabinets, trim work and many other layout projects.
•Therafterscalesarelaidoutmathematicallytoavoidtime
consuming calculations.
•The12inchhascontinuous1/4inchscribinggroovesfrom
1-3/4 inches through 9 inches.
•Bothrafteranglesquaremodelsserveasasawguidefor
fast cuts.
For additional information on the Johnson® Rafter Angle Square
family of products please visit www.johnsonlevel.com

2
MARKING
EDGE
TOP CUTS/
HIP & VALLEY
RAFTER SCALE
COMMON RAFTER SCALE
DEGREE SCALE/PROTRACTOR
“T”-BAR
(FOOT)
1/4" SCALE
(1" TO 3-1/2")
PIVOT
SCRIBING NOTCHES
(1" TO 5-1/2")
RAFTER SEAT CUT

3
TABLE OF CONTENTS
Types of Rafters . . . . . . . . . . . . . . . . . . . . . . . . 4
Rafter Measurements . . . . . . . . . . . . . . . . . . . . . 6
InchestoFeetConversion(TableA) . . . . . . . . . . . . . 9
Common Rafters . . . . . . . . . . . . . . . . . . . . . . . . 9
Common Rafter Layout . . . . . . . . . . . . . . . . . . . . 12
Hip and Valley Rafters . . . . . . . . . . . . . . . . . . . . . 15
Hip Rafter Layout. . . . . . . . . . . . . . . . . . . . . . . .18
Intersection of Hips on Ridge . . . . . . . . . . . . . . . . . 19
Valley Rafter Layout . . . . . . . . . . . . . . . . . . . . . .20
Jack Rafters. . . . . . . . . . . . . . . . . . . . . . . . . . . 22
Jack Rafter Layout . . . . . . . . . . . . . . . . . . . . . . . 25
Dormer Rafters . . . . . . . . . . . . . . . . . . . . . . . . . 26
Door Overhang . . . . . . . . . . . . . . . . . . . . . . . . . 26
Degree Scale . . . . . . . . . . . . . . . . . . . . . . . . . . 27
StairLayoutExample . . . . . . . . . . . . . . . . . . . . .28
SolarPanelLayoutExample. . . . . . . . . . . . . . . . . . 34
Rafter Length Tables . . . . . . . . . . . . . . . . . . . . . .40

4
TYPES OF RAFTERS
COMMON RAFTER:Arafterthatrunsperpendicular(90°)
from the wall plate to the roof ridge when looking straight
down at the roof. When looking from the side, its length
formsthediagonalleg(orhypotenuse)ofarighttriangle
that has its vertical leg equal to the rise and its horizontal leg
equaltotherun(seeFigures1,3and8).
VALLEY RAFTER: A rafter that runs from the wall plate to
theroofridgeattheintersectionofthegableextensionwith
themainroof(seeFigures1,8,12and13).
VALLEY JACK RAFTER: A rafter that runs from a valley rafter
totheroofridge,90°fromtheroofridge(seeFigures1,8
and 15).
HIP RAFTER: A rafter that runs diagonally from the top of
the wall plate to the roof ridge, so as to form an outside
corneroftheroof(seeFigures1,8,9and10).
HIP JACK RAFTER: A rafter that runs from the top of the
wallplatetoahiprafterat90°tothewallplate(seeFigures
1,8and14).
CRIPPLE JACK RAFTER: A rafter that runs from a hip rafter
toavalleyrafter,perpendiculartotheroofridge(seeFigures
1and8).
DORMER RAFTER: A rafter which sets on top of the main
roof without cutting into it, thus causing the main roof not to
weaken.Forexample,whenremodelingorwhensolarpanels
areadded(seeFigure1).

5
FIG. 1 Types of Rafters. All cuts on this roof can be made by using the
number 8 (i.e. an 8 inch rise).

6
RAFTER MEASUREMENTS
The use of our square for rafter layout is based on two simple and
commonbuildingmeasurements:(1)therafterrun,and(2)the
rafter rise. These are available from either the building blueprints,
drawings, or actual measurements. The tables included in the back
of this book are also based on these two simple measurements
(seeFigures2and3,andalsothetablesstartingonpage40).
RAFTER RUN: Run is the horizontal or level distance the rafter
will span. It is measured in feet.
RAFTER RISE: Rise is the vertical distance of a rafter between
its highest and lowest points. It is measured in feet.
INCH RISE: The rise measured in inches per foot run. It is also
called“InchRisePerFootRun.”Itcanbecalculatedwiththe
following formula:
INCH RISE RAFTER RISE (ft) x 12
OR =
(SCALE NUMBER) RAFTER RUN (ft)
The Inch Rise gives you the corresponding scale number to use
onthesquare(forthecommon&hip-valscales).Itisalsothe“one
numberbywhichyoucanframetheroof.”
The inch rise, the rafter run and the tables in the back of the book
are all that are needed to lay out rafter lengths and the cuts for
common, hip, valley and jack rafters. The instructions outlined
below
show the step-by-step procedure to follow for basic roof
construction.
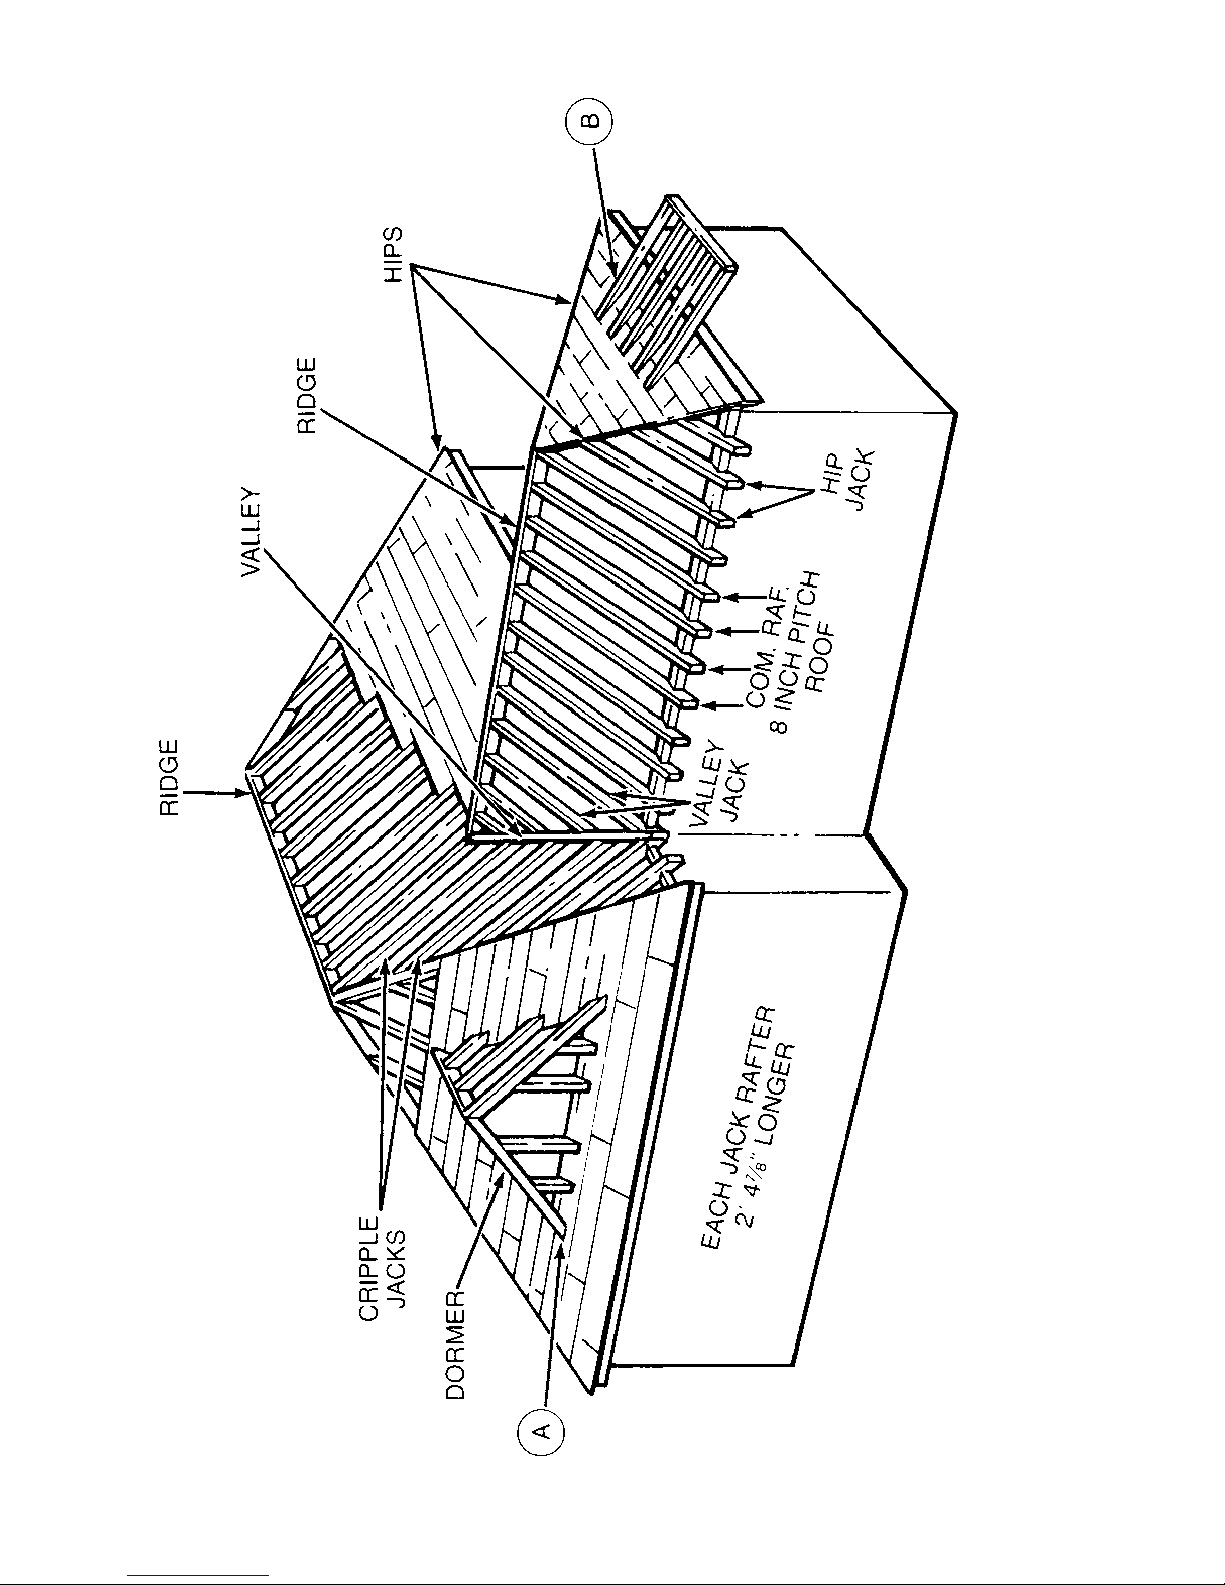
STEP 1. OBTAIN RAFTER RUN:
Measure or calculate the
horizontal distance the rafter will span, starting at the outside of
the wall on which it will rest. Include any boarding on the wall if it
extendstothewalltopplate(seeFigure3).
When measuring building width to obtain rafter run, use a steel tape
if possible so that you can measure the full width of the building.
Measure from outside to outside of the wall or the top plate on
whichtherafterwillrest.Ifboardingextendsuptothetopplate,
measurement is to be taken from outside of the boarding.

7
FIG. 2 Rafter Runs and Rises for Dierent Style Roofs.

8
FIG. 3 The Common Rafter.
Then the run is found by dividing in half the building width.
Whenaridgeboardisbeingused,deduct1/2itsthickness
from the run.
STEP 2. OBTAIN ROOF RISE: Find the distance you wish the
roofridgetobeabovethewall(infeet)bymeasuring,calcu-
latingorobtainingitfromtheblueprints(seeFigure2).
INCHRISEPER
FOOT RUN
RISEX12
RUN
RAFTER
LENGTH RUN
2
+RISE
2
OR
USETABLES
==

9
TABLE A
Change Inches to Feet
1" = .08' 7" = .58'
2" = .16' 8" = .67'
3" = .25' 9" = .75'
4" = .33' 10" = .83'
5" = .42' 11" = .92'
6" = .50'
STEP 3. CALCULATE INCH RISE:Forexample,withthe
Run=13'0"andRise=8'9".Firstconverttherisetofeet
indecimalform,usingTABLEA.Therefore,theRise=
8.75'.Now,usingtheformulaforthe“InchRise”:
8.75' x 12
Inch Rise = = 8.08 in/ft. Run
13'
Round o the Inch Rise to the nearest inch. Since rounding
o won’t make much dierence in most cases. It will make the
actualroofriseslightlyhigherorlower.Inthisexample,round-
ingto8willmaketheheight8'8"insteadof8'9".Roundingo
this figure has more of an eect on buildings with longer rafter
runs or higher roof rises. If the Inch Rise is given on a blueprint,
this calculation is not needed, just use the one given. Now, let
usdoanexampleofeachtypeofrafter.
COMMON RAFTERS
COMMON RAFTER LENGTH:
After the Inch Rise and Run are
found, use the tables in the back of this book to find the com-
monrafterlength.Inourexamplean8InchRiseisused,there-
forendthe8InchRisetable(onpage47)andgodowntheleft
handcolumnheaded“RunFt.”andlocate13'.Totheright,read
thecolumnheaded“CommonRafterLength”fortherafter

10
FIG. 4 Common Rafter Layout.
length.Forourrafterweget15'7-1/2".Thisistherafterlength
fromthetopcuttotheseatplumbmark(seeFigure4).
NOTE:Forarungreaterthanthatgiveninthetables,
simply add any two runs that will equal the run desired.
Then find the lengths for those two rafters and add them
together.Forexample,saythatyourrunis38',addthe
lengthfora18'runandthelengthfora20'runtogether.
Or add a 15' run’s length and a 23' run’s length together.
TAIL OR EAVE LENGTH: The tail or eave overhang now
mustbeaddedtotherafterlength(seeFigure5forsug-
gestedeaveconstruction).Withourexample,letususe

11
FIG. 5 Suggested Eave Construction.

12
atailrunof1'9".Inthesame“Common”tableasused
above,foran8”rise,wend:
1' Run = 1' 2-1/2"
9" Run = 10-7/8"
1'9" Tail = 2' 1-3/8"
COMMON RAFTER LUMBER LENGTH: To obtain the total
length of the rafter, an allowance for the bottom plumb cut
mustnowbemade(seeFigure4).Thisallowancecanbe
obtainedbyusingthetables.Inourexample,letususea2x
6pieceoflumberwhichwillgiveusadepthof51/2inches.
Fromthebottomallowancetable(using8"riseagain),the
commonandjackallowanceequals3-11/16inches.Thetotal
common rafter lumber length then becomes:
RAFTER LENGTH = 15' 7-1/2"
TAIL = 2' 1-3/8"
BOTTOM ALLOWANCE = 3-11/16"
TOTAL LUMBER LENGTH = 18' 0 9/16"
COMMON RAFTER LAYOUT
STEP 1. TOP PLUMB CUT: In choosing the side of your
raftertouse,putthecrown(highside)upiftherafter
is not straight. Now starting at the top of the rafter, lay
oursquareonthefaceoftheraftersothatthe“T”bar
isdrapedoverthetopedgeoftherafter(seeFigure6).
While holding the pivot point firmly against the edge of
therafter,pivotthesquaresothatthenumber8onthe
common scale lines up with the edge of the rafter. Starting
from the pivot point, mark the top plumb cut line along
the top edge of the square.
STEP 2. SEAT NOTCH OR BIRD’S MOUTH: With your rafter
length(inourexample15'7-1/2"),measuredownalongthe
top edge of the rafter and mark another plumb line as you
did in Step 1. This line represents the outside wall of your

13
FIG. 6 Top Plumb Cut of a Common Rafter.

14
building.Nowlineupthedashedline(abovethe80°incre-
mentonthesquare)withtheplumbmark(seeFigure7A&7B).
Draw the horizontal seat mark, a perpendicular line, along
the bottom of square. Never notch more than halfway
through the rafter and make all seat notches the same
depth.
STEP 3. TAIL OR BOTTOM PLUMB CUT: Using your tail
length(2'1-3/8"inourexample),measuredowntherafter
from the seat plumb line and mark the bottom plumb line
FIG. 7A
Seat Notch or
Bird’s Mouth Layout.
FIG. 7B
Seat Notch or
Bird’s Mouth Layout.

15
as you did in Step 1. You may wish to leave the tails long un-
til all the rafters are in place, so that you can mark the ends
to a line and then cut.
NOTE:Thetopandbottomcutsontherakeboardarealso
done in the same way as a common rafter but the distance
from the top cut to the bottom cut is the rake board length.
HIP AND VALLEY RAFTERS
The hip and valley rafters are treated very similarly because
bothrunata45°angletothecommonrafter,andthey
both form the diagonal or hypotenuse of a right triangle
(seeFigure8).Thethreesidesbeingthehip,plateand
common rafter, or the valley, ridge and common rafter.
Therefore, the cuts and lengths apply equally to hip and
valley rafters.
FIG. 8 Top View Rafter Definition.
FIG. 7A
Seat Notch or
Bird’s Mouth Layout.

16
FIG. 9 View of Hip Rafter Layout.
HIP-VAL LENGTH: Use the table on page 47 to obtain the
hiporvalleyrafterlength(continuingthe8InchRiseex-
amplefrompage9,Step3).Inourexamplean8InchRise
isused,thereforendthecolumnheaded“RunFt.”and
locate 13'. To the right read the column headed “Hip or Val.
RafterLength”andndalengthof20'3-7/8"(seeFigures
8,9,10,12and13).

17
TAIL OR EAVE LENGTH: Use the same procedure as you
did for the common rafter but remember to use the Hip-
Valcolumn.Againwehaveinourexampleatail1’9”long,
thus giving us:
1'Run = 1'6-3/4"
9" Run = 14-1/8"
1'9" Tail = 2'8-7/8"
NOTE:Ifamiterisdesired,addforhiporvalmiterallow-
ancefromthetables(seeFigures10and13).
HIP-VAL LUMBER LENGTH: Add an allowance for a bottom
plumb cut and, if used, a miter. Obtaining from the table
theallowanceforthebottomplumbcut(usinga2x6)
FIG. 10 Hip Rafter
Layout.

18
andamiterallowance(usinga11/2"actualrafterthick-
ness) we get:
RAFTER LENGTH = 20'3-7/8"
TAIL LENGTH = 2'8-7/8"
BOTTOM PLUMB ALLOW. = 3-11/16"
MITER ALLOWANCE = 7/8"
LUMBER LENGTH = 23'5-5/16"
NOTE:Onlyaddmiterallowancesiftheyareused.
HIP RAFTER LAYOUT
STEP 1. TOP PLUMB CUT: The square is used in the same
manner as in Step 1 of the common rafter top plumb cut.
Butnow,readtheInch-RiseontheHip-Valscaleinstead.
Remember that the top plumb cut is a bevel cut and that
oppositerafterswillhaveoppositebevelcuts(seeFigures
9and10).Thereforewhenplacingthesquareontherafter,
placeitonthelongsideofthebevel(thebevelcutwillbe
explainedinStep4).
STEP 2. SEAT NOTCH: Measure the rafter length down
along the top of the rafter and make the seat plumb mark
inthesamemannerasyoudidforthecommonrafter(in
ourexampleitis20'3-7/8").Next,measurealongtheseat
plumb mark the seat depth and using the dashed line on
the square, draw a perpendicular line for the horizontal
seatmark(seeFigure10).Besureallhorizontalcutsforall
rafters are the same distance from the top edge of the raf-
ter at the wall line. For the proper fit of the hip rafter, cut
thetopwallplatecornero(asshowninFigure9).This
allows Hip seat notch to set in against a full flat corner,
rather than against an outside point.
STEP 3. TAIL OR BOTTOM PLUMB CUT: Measure down the
top of the hip rafter from the seat plumb mark and mark
thedistanceforthetail(inourexample2'8-7/8").Using
our square, make the bottom plumb mark. If a tail miter is

19
used, make another plumb mark on the other side of the raf-
terjustoppositeofthebottomplumbmark(seeFigure10).
STEP 4. CUTTING HIP RAFTER PATTERN: With your saw
setat45°,cutthetopplumbcut,makingsurethetop
bevels are opposite for opposite rafters. Setting the saw
at45°automaticallygivestheplumbcutandthesidecut
bevel.Makebottomplumbcutona45°angleifmiteris
used.Ifabevelisnotneeded,setsawat90°.Theseat
notchismadewiththesawat90°(seeFigures9and10).
INTERSECTION OF HIPS ON RIDGE
To find the intersection points of the hip on the ridge rafter,
cut ridge one foot longer at the point where hips intersect
the ridge. With a regular length common rafter, set the seat
notch cut over the edge of the top plate, in line with the
ridge(seeFigure11).Makingsureyourwallsarestraight,
place top end of common rafter even with top of ridge.
FIG. 11 Intersection of Hips on Ridge.
Table of contents
Other Johnson Tools manuals