ViewSonic ViewBoard Box VBS200-A User manual

VBS200-A
User Guide
Model No. VS19294
P/N: VBS200-A
IMPORTANT: Please read this User Guide to obtain important information on installing and using your product in
a safe manner, as well as registering your product for future service. Warranty information contained in this User
Guide will describe your limited coverage from ViewSonic®Corporation, which is also found on our web site at
http://www.viewsonic.com in English, or in specific languages using the Regional selection box of our website.

2
Thank you for choosing ViewSonic®
As a world-leading provider of visual solutions, ViewSonic® is dedicated to exceeding
the world’s expectations for technological evolution, innovation, and simplicity.
At ViewSonic®, we believe that our products have the potential to make a positive
impact in the world, and we are confident that the ViewSonic® product you have
chosen will serve you well.
Once again, thank you for choosing ViewSonic®!

3
Contents
Introduction ................................................................ 5
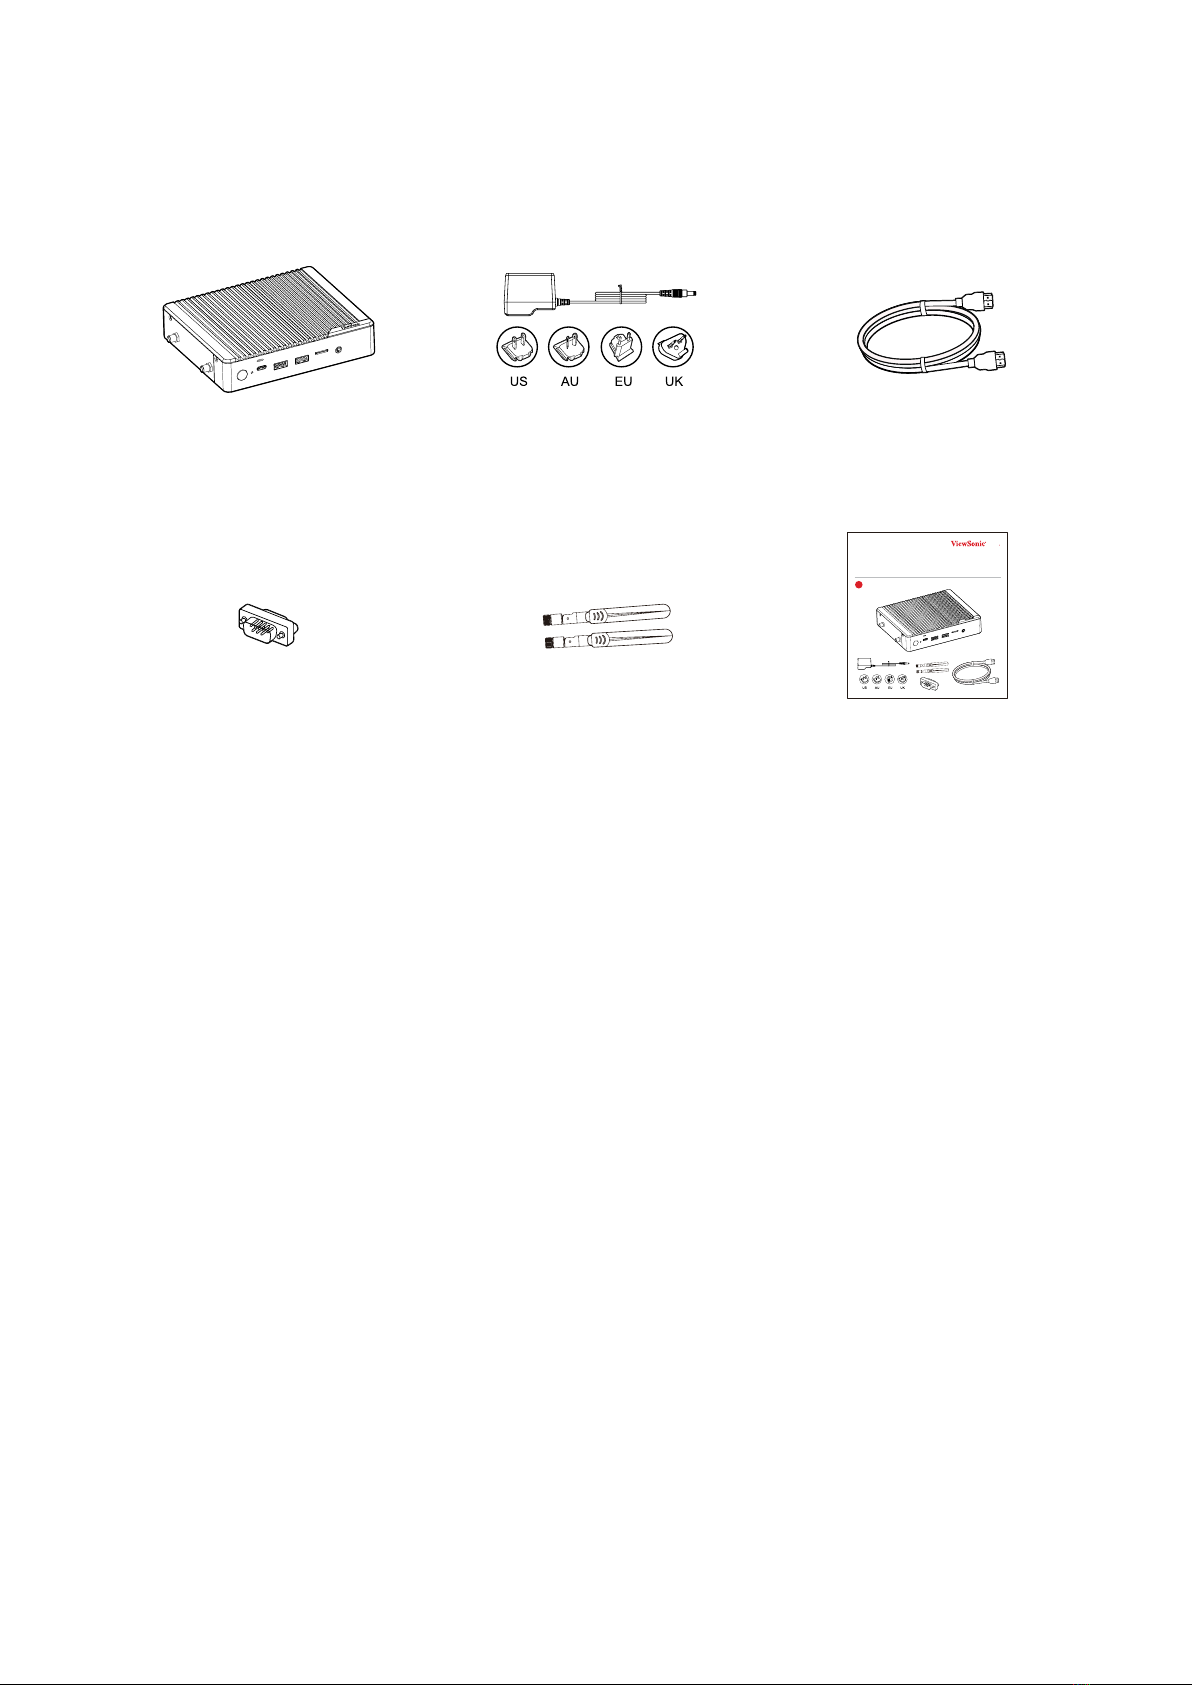
Package Contents ...................................................................................................5
Product Overview...................................................................................................6
Front View............................................................................................................... 6
Rear View ................................................................................................................ 7
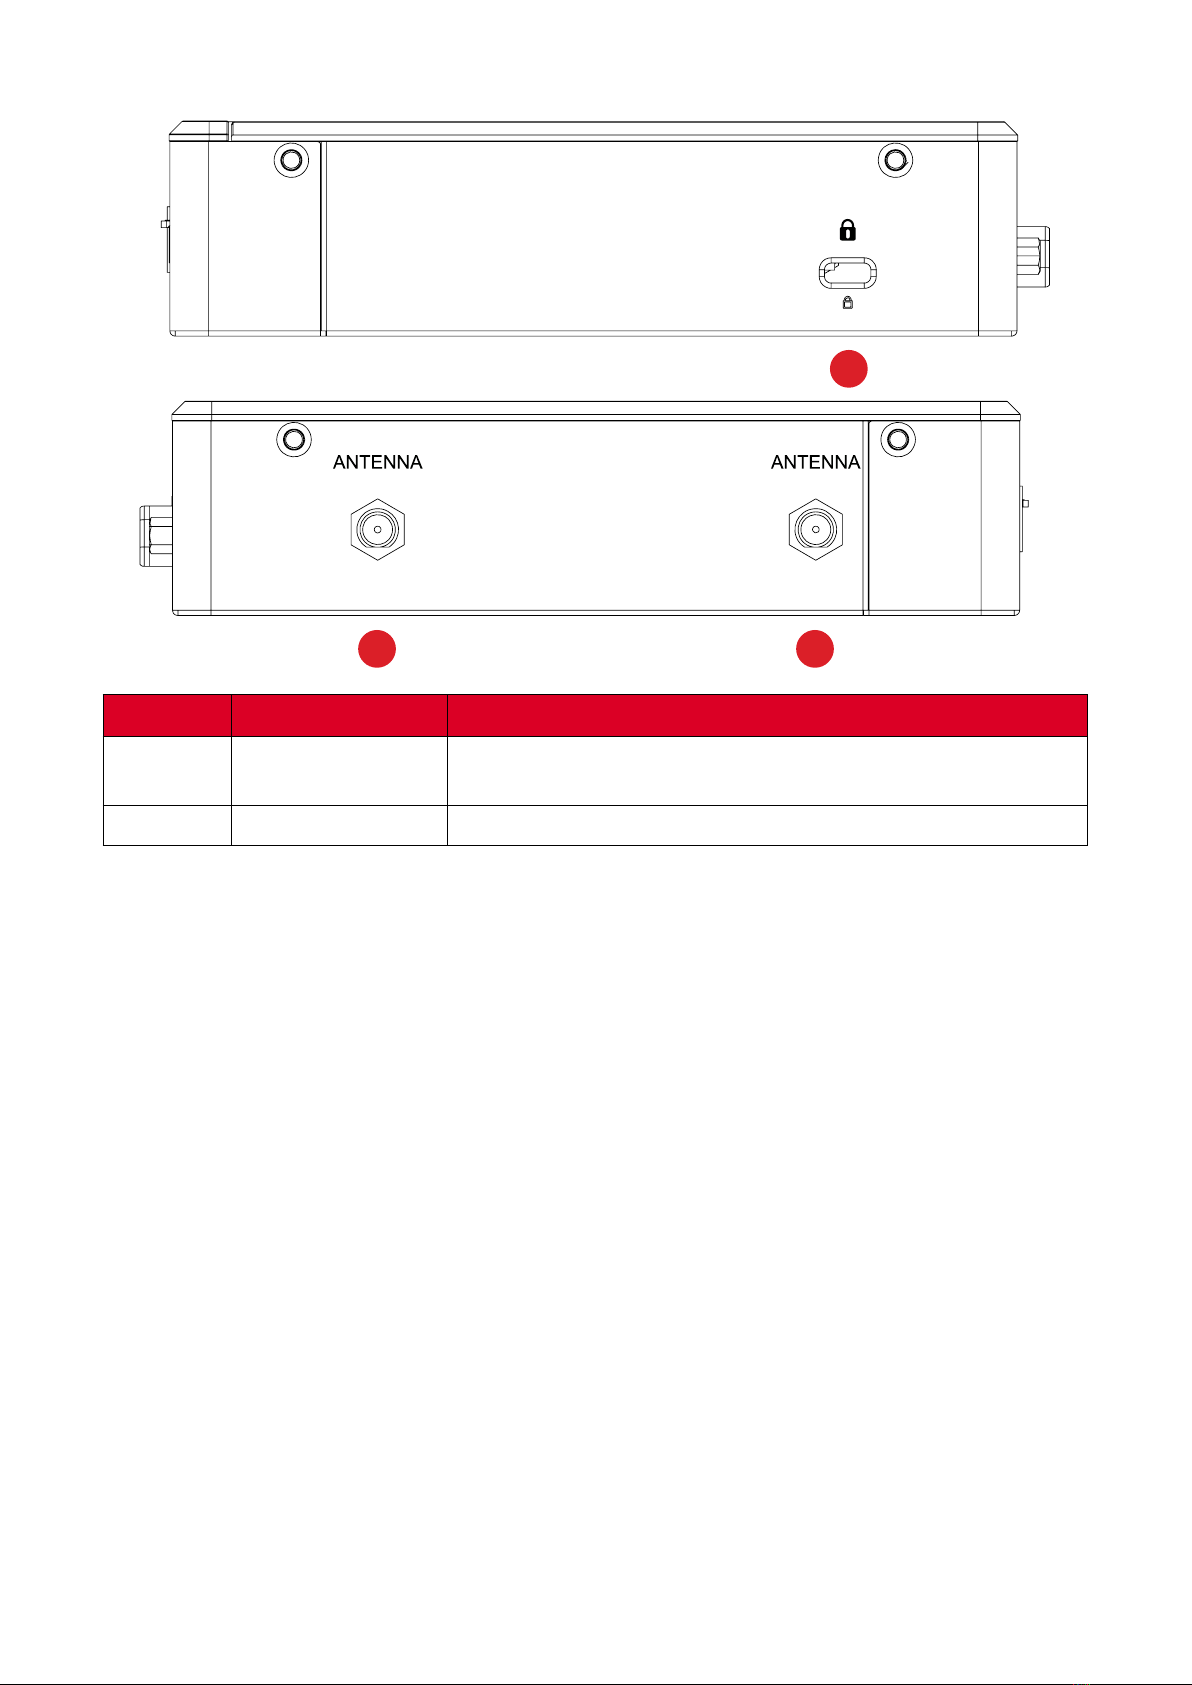
Side View................................................................................................................. 8
Mounting Kit ............................................................... 9
Mount Kit Specifications.........................................................................................9
Mounting the VBS200-A (optional) ......................................................................10
Using the VB-WMK-001/VB-STND-001 ................................................................. 10
Making Connections.................................................. 11
Connecting to Power ............................................................................................11
AC Adapter ............................................................................................................ 11
PoE (Power over Ethernet).................................................................................... 11
Connecting to External Devices............................................................................12
Display Device Connection.................................................................................... 12
Network Connection (Local Area Network) .......................................................... 14
USB Connection (Keyboard, Mouse, Storage Device, etc.) ................................... 14
RS-232 Connection ................................................................................................ 15
Audio Connection.................................................................................................. 15
Using the Device........................................................ 16
Powering On/Off the VBS200-A............................................................................16
Initial Launch Setup ..............................................................................................17
vLauncher - Home Screen.....................................................................................20
Action Bar.............................................................................................................. 20
vLauncher Message............................................................................................... 23
Applications........................................................................................................... 24
On-Screen Display (OSD) Menu............................................................................28
General Settings .................................................................................................... 28
Settings - Embedded Player..................................................................................29
Network & Internet............................................................................................... 29
Display................................................................................................................... 36
Preferences ........................................................................................................... 40
Input Source .......................................................................................................... 48
Apps ...................................................................................................................... 50
System................................................................................................................... 53

4
Appendix................................................................... 60
Specifications........................................................................................................60
Troubleshooting ...................................................................................................61
View Third Party Licenses.....................................................................................62
Regulatory and Service Information .......................... 63
Compliance Information.......................................................................................63
FCC Compliance Statement................................................................................... 63
CE Conformity for European Countries ................................................................. 64
Para su uso en México........................................................................................... 64
Declaration of RoHS2 Compliance......................................................................... 65
Indian Restriction of Hazardous Substances ......................................................... 66
Product Disposal at End of Product Life ................................................................ 66
Copyright Information ..........................................................................................67
Customer Service .................................................................................................. 68

5
Introducon
Package Contents
RESET USB 3.0 USB 2.0 MICRO SD AUDIO OUT
180 ± 5 cm
VBS200-A
ViewBoard Box
Quick Start Guide
Contents
1
RESET USB3.0 USB2.0 MICROSD AUDIO OUT
RESET USB 3.0 USB 2.0 MICRO SD AUDIO OUT
180 ± 5 cm
VBS200-A
ViewBoard Box
Quick Start Guide
Contents
1
RESET USB 3.0 USB 2.0 MICRO SD AUDIO OUT
180 ± 5 cm
VBS200-A
ViewBoard Box
Quick Start Guide
Contents
1
RESET USB 3.0 USB 2.0 MICROSD AUDIO OUT
VBS200-A Power Adapter HDMI Cable (1.8 m)
RESET USB 3.0 USB 2.0 MICRO SD AUDIO OUT
180 ± 5 cm
VBS200-A
ViewBoard Box
Quick Start Guide
Contents
1
RESET USB 3.0 USB 2.0 MICROSD AUDIO OUT
RESET USB 3.0 USB 2.0 MICRO SD AUDIO OUT
180 ± 5 cm
VBS200-A
ViewBoard Box
Quick Start Guide
Contents
1
RESET USB 3.0 USB 2.0 MICRO SD AUDIO OUT
RESET USB 3.0 USB 2.0 MICROSD AUDIOOUT
180 ± 5 cm
VBS200-A
ViewBoard Box
Quick Start Guide
Contents
1
RESET USB3.0 USB2.0 MICRO SD AUDIO OUT
RS-232 Adapter Antenna x 2 Quick Start Guide
NOTE: If anything is missing or damaged, please contact your local reseller for
more informaon.

6
Product Overview
Front View
321 4 5 6 7
Number Item Descripon
1Power Buon
• Power On (Green light)
• Power O (No light)
• When the VBS200-A system is On, pressing the Power
Buon will put the VBS200-A into Sleep Mode.
2 Reset Hardware reset of the device.
3 USB 2.0 C Port USB 2.0, 500mA¹
4 USB 3.0 A Port USB 3.0, 900mA¹
5 USB 2.0 A Port USB 2.0, 500mA¹
6 MicroSD Read/Write MicroSD card
7 AUDIO OUT Audio signal output (3.5 mm DAC)
1 Supports USB and UVC devices/Touch Back/Hot swapping and plugging

7
Rear View
321 45 6
Number Item Descripon
1 DC IN 12V, system power input connector
2 GB-LAN (RJ45)
• PoE-IEEE 802.3at class4 (PD Input: 12v-2A , 24W)
• Recommend PSE IEEE 802.3at class4 (Output: 30W)
Status Indicator
Status Descripon
Yellow (Flashing) Acve link
Yellow (O) Inacve link.
Green (On) Acve link with 100M speed
Orange (On) Acve link with 1000M speed
Green/Orange (O) Acve link with 10M speed
3 HDMI OUT Version 2.0; output video to an external display via HDMI.
4 HDMI IN Version 1.4; connect to a video device with HDMI output.
5 MINI DP Output video to an external display via DisplayPort.
6 RS-232
Connects the display (IFP or Projector) to an external
computer. Certain funcons can be controlled remotely by
the computer, including power on/o, volume adjustment
and more.

8
Side View
2 2
1
Number Item Descripon
1 Security Slot Secure the device to a xed object for increased security
and safety.
2 Antenna Connect the included antennas to increase signal strength.

9
Mounng Kit
Mount Kit Specicaons
NOTE:
• Please follow the instrucons in the ViewSonic wall mount installaon
guide to install your wall mount or mobile mount bracket.
• If aaching to other building materials, please make sure the bracket
mounng paern matches the mounng paern on the VBS200-A. Please
contact your nearest dealer for more details.
B
A
D
C
Model Mounng Spec. (A x B) Standard Screw (C x D) Quanty
VBS200-A 75 mm x 75 mm M4 x 8 mm 4
NOTE: Do not use screws longer than the standard dimensions listed, as they
may cause damage to the inside of the device.

10
Mounng the VBS200-A (oponal)
Using the VB-WMK-001/VB-STND-001
The VBS200-A can be mounted to the rear of your display accessory using the slide-
on mini PC bracket as shown below:

11
Making Connecons
Connecng to Power
AC Adapter
1. Connect the power cord to the POWER jack at the rear of the VBS200-A.
2. Plug the AC adapter into a power outlet.
REWOPNIIMDHPDINIM232SR HDMI OUT
1
2
RJ45 Cable
PoE (Power over Ethernet)
The VBS200-A supports PoE (Power over Ethernet) when connected to a Power
Device (PD) or Power Source Equipment (PSE) and can power itself via the LAN
port.
REWOPNIIMDHPDINIM232SR HDMI OUT
1
2
RJ45 Cable
1. Connect a Power Device (PD) or Power Source Equipment (PSE) to a power
outlet.
2. Connect one end of a RJ45 cable to the Power Device (PD)/Power Source
Equipment (PSE).
3. Connect the other end of the RJ45 cable to the LAN port of the VBS200-A.
NOTE: If both AC Adapter and PoE power sources are available, the VBS200-A
will use the AC adapter as the main power source.

12
Connecng to External Devices
Display Device Connecon
The VBS200-A can connect to an external display via HDMI or DisplayPort.
HDMI Out Connecon
To display content from the VBS200-A, connect one end of an HDMI cable to the
HDMI port of your display device. Then connect the other end of the cable to the
HDMI OUT port of the VBS200-A.
RESET USB 3.0USB 2.0MICRO SD AUDIO OUT
REWOPNIIMDHPDINIM232SR HDMI OUT
IFP / Monitor
IFP / Monitor
RJ-45
Internet
Router
Serial Port Cable
RJ-45
IFP / Monitor
Projector
Mini DP Connecon
To display content from the VBS200-A, connect one end of a DisplayPort cable to
the DisplayPort port of your display device. Then connect the other end of the cable
to the MINI DP port of the VBS200-A.
RESET USB 3.0USB 2.0MICRO SD AUDIO OUT
REWOPNIIMDHPDINIM232SR HDMI OUT
IFP / Monitor
IFP / Monitor
RJ-45
Internet
Router
Serial Port Cable
RJ-45
IFP / Monitor
Projector

13
HDMI In Connecon
To display content from an external device through the VBS200-A, connect an HDMI
cable from the external device to the HDMI IN port of the VBS200-A.
REWOPNIIMDHPDINIM232S
RH
DMI OUT

14
Network Connecon (Local Area Network)
To connect to the Internet or a network, connect one end of a RJ45 cable to the
LAN port of the VBS200-A, then connect the other end to your network.
REWOPNIIMDHPDINIM232SR HDMI OUT
1
2
RJ45 Cable
USB Connecon (Keyboard, Mouse, Storage Device, etc.)
USB peripherals such as keyboards, mice, storage devices, etc. can be connected to
the VBS200-A’s USB ports.
RESET USB 3.0USB 2.0MICRO SD AUDIO OUT
REWOPNIIMDHPDINIM232SR HDMI OUT REWOPNIIMDHPDINIM232SR HDMI OUT
IFP / Monitor IFP / Monitor
RJ-45
Internet
Router
Serial Port Cable
RJ-45
IFP / Monitor
Projector

15
RS-232 Connecon
When you use a RS-232 serial port cable to connect the VBS200-A to an external
computer, certain funcons can be controlled remotely by the PC, including power
on/o, volume adjustment, and input source selecon.
NOTE: Set the baud rate of all control devices to 9600 bps.
RESET USB 3.0USB 2.0MICRO SD AUDIO OUT
REWOPNIIMDHPDINIM232SR HDMI OUT REWOPNIIMDHPDINIM232SR HDMI OUT
IFP / Monitor IFP / Monitor
RJ-45
Internet
Router
Serial Port Cable
RJ-45
IFP / Monitor
Projector
Audio Connecon
Connect an audio cable from your external audio device to the AUDIO OUT port on
the VBS200-A.
RESET USB 3.0USB 2.0MICRO SD AUDIO OUT

16
Using the Device
Powering On/O the VBS200-A
1. Ensure the VBS200-A is connected either via AC Adaper or PoE. For more
informaon, see page 11.
REWOPNIIMDHPDINIM232SR HDMI OUT
1
2
RJ45 Cable
REWOPNIIMDHPDINIM232SR HDMI OUT
1
2
RJ45 Cable
AC Adapter PoE
2. Press the Power () buon to turn on the VBS200-A.
RESET USB 3.0USB 2.0MICRO SD AUDIO OUT
3. To turn the VBS200-A o, press and hold the Power () buon.

17
Inial Launch Setup
When you rst turn on your VBS200-A, an inial setup wizard will launch. Please
follow the on-screen instrucons to set up the VBS200-A.
1. Select your Language.
2. Setup and verify your Network connecon. Both Wi-Fi and Ethernet connecons
are supported.

18
3. Set the Date & Time.
4. Select your preferred System Mode. Choose between Normal and Secured Mode.
In Secured Mode, preloaded applicaons with screen sharing capabilies will be
hidden.

19
5. Choose your Power Saving Plan. In the default seng, the VBS200-A will go into
standby mode aer an hour of inacvity.
6. Review and Accept/Decline the Privacy and Copyright Protecon terms.

20
vLauncher - Home Screen
Acon Bar
The Acon Bar gives quick access to several controls.
Other manuals for ViewBoard Box VBS200-A
1
This manual suits for next models
1
Table of contents
Other ViewSonic Media Converter manuals