Vigoro PC100 User manual

Para consultar sobre productos:
RMM CORPORATION
7677 Equitable Drive
Minneapolis, MN 55344
800-304-1316
MANUAL DEL
USUARIO
Modelo PC100
- Instrucciones de seguridad
importantes
- Instrucciones de montaje
- Identificación de piezas y herrajes
PRECAUCIÓN:
Lea, comprenda y acate TODAS las instrucciones antes de usar este producto.
Carro tolva de plástico
REV 2/05
For product inquiries:
RMM CORPORATION
7677 Equitable Drive
Minneapolis, MN 55344
800-304-1316
OWNER’S
MANUAL
Model PC100
• Important Safety Instructions
• Assembly Instructions
•Parts and Hardware Identification
CAUTION:
Read, understand and follow ALL instructions before using this product
Plastic Dump Cart
REV 2/05
U.S. Patent No. 6,851,756
Other Patents Pending
Patente en Estados Unidos
No. 6,851,756
Otras Patentes Pendientes
PC-100 manual se 2/2/05 3:12 PM Page 1

INSTRUCCIONES DE SEGURIDAD
IMPORTANTES
1. LEA CUIDADOSAMENTE TODAS LAS INSTRUCCIONES ANTES DE USAR EL PRODUCTO.Si no comprende
estas instrucciones, necesita alguna clarificación o mayores explicaciones, por favor llame a nuestra línea gratuita de
respuestas al 1-800-304-1316.
2. No cargue el carro tolva de plástico con más de 1,000 lbs. (453 kg). No utilice la función de descarga del carro
tolva de plástico con más de 400 lbs. (181 kg).
3. No permita que niños usen el carro tolva de plástico sin supervisión. Este carro no es un juguete.
4. Siempre distribuya la carga de manera uniforme sobre la superficie de la plataforma.
5. No cargue objetos en los bordes superiores de la bandeja de plástico.
6. Si cualquiera de las piezas se daña, rompe o extravía, no utilice el carro tolva de plástico sino hasta que obtenga
una pieza de repuesto.
7. No opere ni use el carro sobre objetos que pudieran dañar las ruedas neumáticas o los tubos. No infle las
ruedas a más de 32 PSI.
8. ¡CONSERVE ESTAS INSTRUCCIONES!
INSTRUCCIONES DE MONTAJE
El carro tolva de plástico requiere de montaje. Antes de comenzar el montaje cerciórese de que cuenta con todas
las piezas y herrajes. Si alguna de las piezas falta o está dañada, o si tiene cualquier consulta o necesita
instrucciones adicionales, llame al fabricante al 1-800-304-1316.
Herramientas necesarias para el
montaje: Un destornillador estándar, un
destornillador Phillips y un juego de
cubos (o dos llaves ajustables).
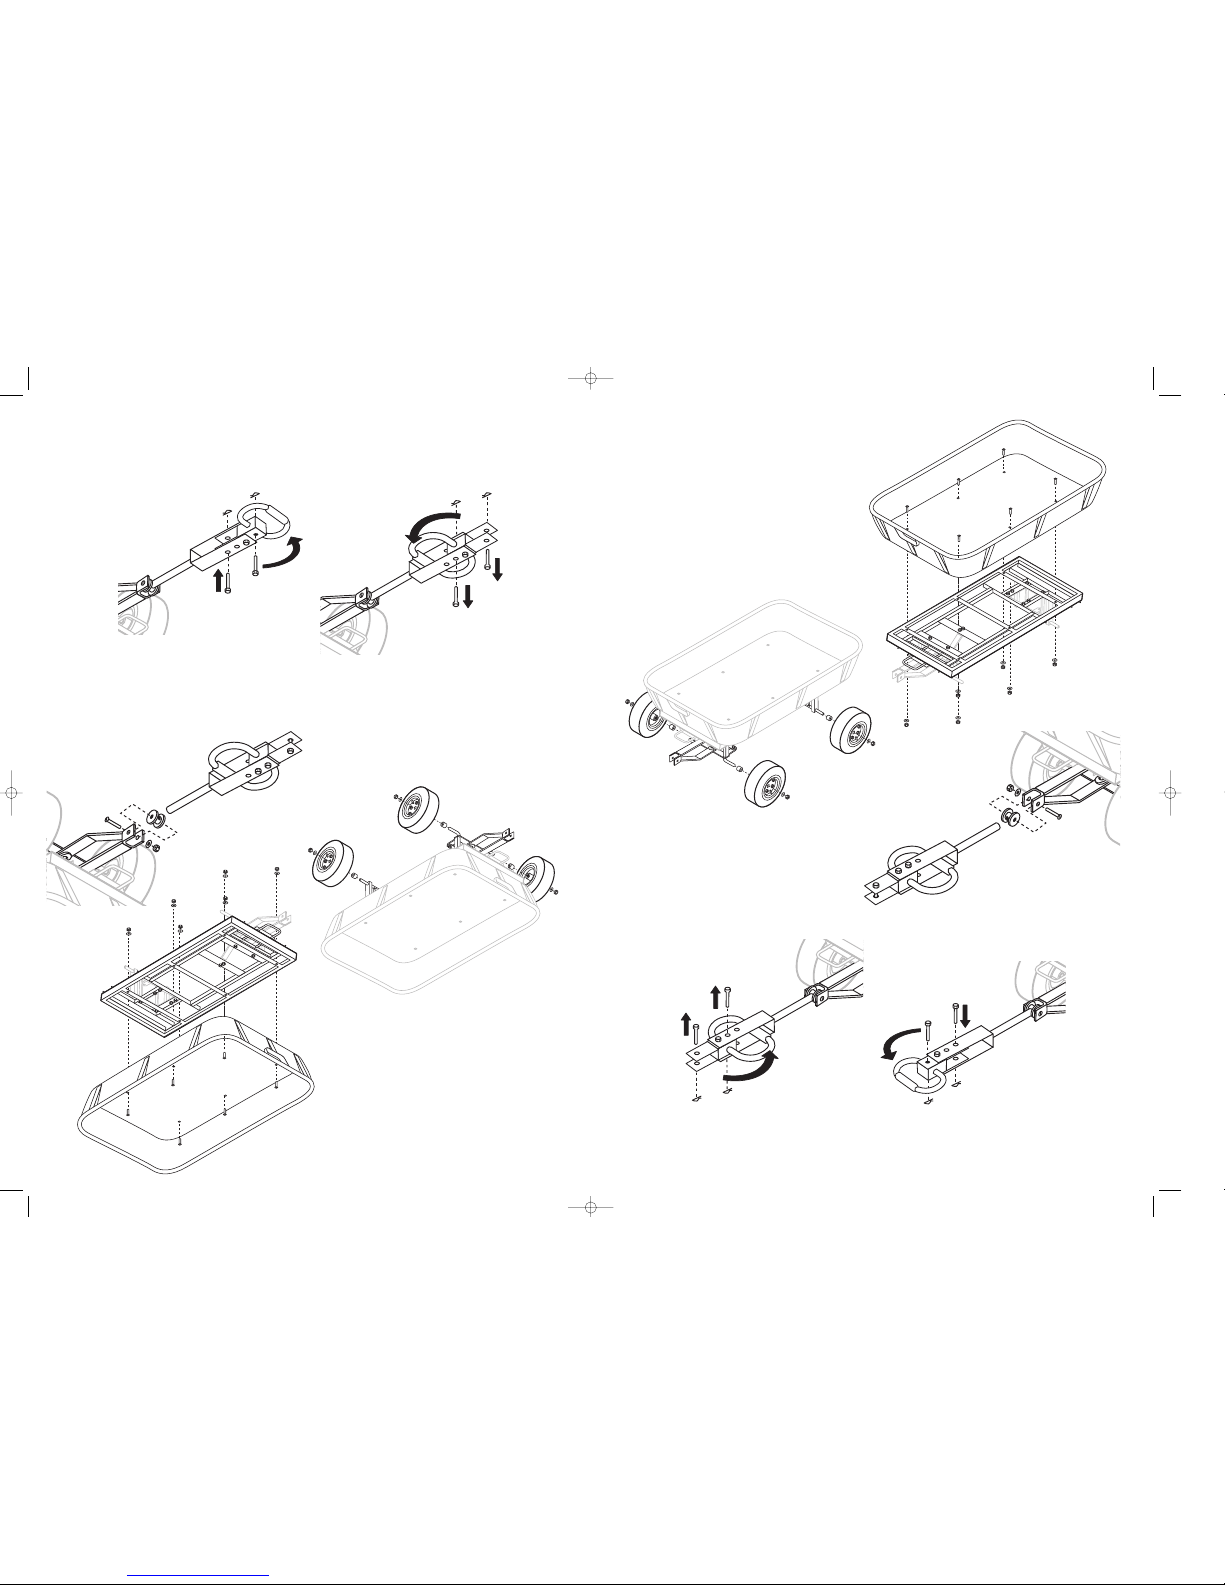
PASO 2 El conjunto de soporte delantero viene mayormente
montado de fábrica. Por favor cerciórese de que
todos los pernos y las tuercas montados de fábrica
estén apretados.
A. Alinee los orificios de los ejes con el conector de
la articulación de dirección en el conjunto de
soporte delantero. Inserte los 2 pernos con
reborde de 6 mm y fíjelos con las arandelas de 6
mm y las contratuercas de 6 mm.
B. Conecte el conjunto de soporte delantero al
bastidor de soporte mediante los 4 pernos del
bastidor de 8 x 20 mm, arandelas de 8 mm, y
contratuercas de 8 mm.
PASO 1 Monte el conjunto de soporte posterior al
bastidor de soporte mediante los 4 pernos de 10
mm, arandelas de 10 mm, y contratuercas de 10
mm y los 2 pernos del bastidor de 8 x 20 mm,
arandelas de 8 mm, y contratuercas de 8 mm.
(2) 8 x 20mm
(4) 10 x 20mm
IMPORTANT SAFETY INSTRUCTIONS
1. READ ALL INSTRUCTIONS CAREFULLY BEFORE USE. If you do not understand these instructions, need
clarification or further explanation, please call our toll free answer line for assistance at 1-800-304-1316.
2. Do not load Plastic Dump Cart with more than 1,000 lbs. (453 kg). Do not use the dumping feature of the Plastic
Dump cart with more than 400 lbs. (181 kg).
3. Do not allow children to use the Plastic Dump Cart unsupervised. This Plastic Dump Cart is not a toy.
4. Always distribute payload evenly over the surface of the bed.
5. Do not load any items on the top edges of the plastic tray.
6. If any parts become damaged, broken, or misplaced, do not use the Plastic Dump Cart until replacement parts
can be obtained.
7. Do not operate or use on objects that can cause damage to the pneumatic tires or tubes.
Do not inflate tires to more than 32 PSI.
8. SAVE THESE INSTRUCTIONS!
ASSEMBLY INSTRUCTIONS
Your Plastic Dump Cart requires assembly. Account for all parts and hardware before beginning assembly. If any
parts are missing or damaged, or if you have any questions or need additional instructions, call the manufacturer at
1-800-304-1316.
Tools required for assembly: standard screwdriver, phillips screwdriver and socket set (or two adjustable wrenches).
Refer to the exploded drawing and the
parts list on the following pages during
assembly.
STEP 2 The front support assembly is mostly pre-assembled
at the factory. Please make sure all bolts and nuts
assembled at the factory are tight.
A. Align the holes of the axles with the steering link
connector on the front support assembly. Insert
(2) 6mm shoulder bolts and attach with
6mm washers and 6mm lock nuts.
B. Attach the front support assembly to the frame
support using (4) 8 x 20mm frame support bolts,
8mm washers, and 8mm lock nuts.
STEP 1 Assemble the rear support assembly to the
frame support using (4) 10mm bolts,
10mm washers, and 10mm lock nuts, and
using (2) 8 x 20mm frame support bolts,
8mm washers, and 8mm lock nuts.
(2) 8 x 20mm
(4) 10 x 20mm
PC-100 manual se 2/2/05 3:12 PM Page 3

PASO 4 Deslice los 4 bujes espaciadores de
las ruedas sobre los ejes. Coloque
las ruedas en los ejes con los
vástagos de las válvulas apuntando
hacia fuera. Conecte las ruedas a los
ejes mediante las 4 arandelas de 12
mm y las contratuercas de 12 mm.
PASO 6 Para cambiar el enganche de remolque a la posición de manija de tiro, simplemente retire el pasador de
la manija y el pasador de horquilla y gire la manija en 180 grados. Vuelva a insertar el pasador a través
del conjunto y fíjelo con el pasador de horquilla. Repita este procedimiento para volver a la posición de
enganche de remolque.
PASO 3 Conecte el conjunto del bastidor de soporte, que se
armó en los pasos anteriores, a la plataforma de
plástico. Alinee todos los orificios en el conjunto del
bastidor de soporte y la plataforma, y conecte
mediante los 6 pernos de 8 x 50 mm, arandelas de 8
mm, y contratuercas de 8 mm.
PASO 5 Coloque el carro boca arriba sobre
sus ruedas. Conecte la manija al
conjunto del bastidor mediante el
acoplamiento de plástico, el perno de
8 x 60 mm, las arandelas de 8 mm, y
la contratuerca de 8 mm.
STEP 4 Slide the (4) wheel spacer bushings
over the axles. Place the wheels over
the axles with the valve stems facing
out. Attach the wheels to the axles
using the (4) 12mm washers and
12mm lock nuts.
STEP 6 To change the trailer hitch to the pull handle position, simply remove the handle pins and clevis pins, rotate
the handle 180 degrees. Re-insert the pins through the assembly and lock in place with the clevis pins.
Repeat this process to change back to the trailer hitch position.
STEP 3 Attach the completed frame support assembly from
the previous steps to the plastic bed. Align all of the
holes in the frame support assembly and the bed,
and attach using (6) 8 x 30mm bolts, 8mm washers,
and 8mm lock nuts.
STEP 5 Attach the handle to the frame
support assembly using the plastic
coupling, the 8 x 60mm bolt, 8mm
washer, and 8mm lock nut.
PC-100 manual se 2/2/05 3:12 PM Page 5

PRECAUCIÓN
NO EXCEDA LA CAPACIDAD MÁXIMA DE CARGA DE 1,000 LBS. –
MÁXIMA CAPACIDAD DE DESCARGA: 400 LBS.
CÓMO USAR LA FUNCIÓN DE
DESCARGA
desenganchar la plataforma de plástico del
mecanismo de bloqueo. Levante la manija
de la plataforma para girar el carro hacia
arriba a la posición de descarga.
CÓMO REGRESAR LA
PLATAFORMA DE PLÁSTICO A LA
POSICIÓN INFERIOR
Gire la plataforma de plástico hacia abajo de
regreso a la posición inferior. Asegúrese de
que la manija de desenganche esté trabada
en su lugar cuando el carro esté en la
posición inferior.
CAUTION
DO NOT EXCEED MAXIMUM OVERALL LOAD CAPACITY 1,000 LBS.
MAXIMUM DUMPING LOAD CAPACITY 400 LBS.
USING THE DUMPING FEATURE
To operate the dumping feature, pull the
dumping release handle outward to release
the plastic bed from the locking mechanism.
Lift on the bed handle to rotate the cart
upward into the dumping position.
RETURNING THE PLASTIC BED TO
THE LOWERED POSITION
Rotate the plastic bed back down to the
lowered position. Make sure the dumping
release handle is locked into place when the
cart is in the lowered position.
PC-100 manual se 2/2/05 3:12 PM Page 7

DIBUJO AMPLIADO PARA EL MONTAJE
PIEZAS
(1) Plataforma de plástico - 1
(2) Ruedas neumáticas de 13" x 5" - 4
(3) Bastidor de soporte - 1
(4) Conjunto de soporte delantero - 1
(5) Conjunto de soporte posterior - 1
(6) Manija - 1
(7) Acoplamiento de plástico - 1
(8) Bandeja grande para accesorios - 1
(9) Bandeja pequeña para accesorios - 1
(1)
(2)
(2)
(2) (2)
(3)
(4)
(5)
(6)
(7)
(8)
(9)
EXPLODED DRAWING FOR ASSEMBLY
PARTS
(1) Plastic Bed - 1
(2) 13” x 5” Pneumatic Wheels - 4
(3) Frame Support - 1
(4) Front Support Assembly - 1
(5) Rear Support Assembly - 1
(6) Handle - 1
(7) Plastic Coupling - 1
(8) Large Accessory Tray - 1
(9) Small Accessory Rack - 1
(1)
(2)
(2)
(2) (2)
(3)
(4)
(5)
(6)
(7)
(8)
(9)
PC-100 manual se 2/2/05 3:12 PM Page 9

IDENTIFICACIÓN DE PIEZAS Y HERRAJES
PAQUETE DE HERRAJES
(10) Pernos del bastidor de soporte de
8 X 20 mm - 6
(11) Pernos de 8 X 50 mm - 6
(12) Perno de 8 X 60 mm - 1
(13) Arandelas de 8 mm - 13
(14) Contratuercas de 8 mm - 13
(15) Pernos con reborde de 6 mm - 2
(16) Arandelas de 6 mm - 2
(17) Contratuercas de 6 mm - 2
(18) Bujes espaciadores
para las ruedas - 4
(19) Arandelas
de 12 mm - 4
(20) Contratuercas
de 12 mm - 4
(21) Pasador de
la manija - 2
(22) Pasador de horquilla
de la manija - 2
(23) Pernos del bastidor de
soporte de 10 X 20 mm - 4
(24) Arandelas de 10 mm - 4
(25) Contratuercas
de 10 mm - 4
PARTS AND HARDWARE IDENTIFICATION
HARDWARE PACKAGE
(10) 8 X 20mm Frame Support Bolts - 6
(11) 8 X 50mm Bolts - 6
(12) 8 X 60mm Bolt - 1
(13) 8mm Washers - 13
(14) 8mm Lock Nuts - 13
(15) 6mm Shoulder Bolts - 2
(16) 6mm Washers - 2
(17) 6mm Lock Nuts - 2
(18) Wheel Spacer
Bushings - 4
(19) 12mm
Washers - 4
(20) 12mm Lock
Nuts - 4
(21) Handle Pin - 2
(22) Handle Clevis Pin - 2
(23) 10 X 20mm Frame
Support Bolts - 4
(24) 10mm Washers - 4
(25) 10mm Lock Nuts - 4
PC-100 manual se 2/2/05 3:12 PM Page 11
Table of contents