Vimar idea 16652 User manual

Istruzioni
Instruction sheet
Notice technique
Radiosveglia elettronica
Electronic clock radio
Radio-réveil électronique
Art. 16652 - 16652.B
Tuning
Chan. Mem.
h
Volume
ON/OFF
Time
Alarm
TSET
M4
M3M1
FM
MHZ
VOL
M2

1
Radiosveglia elettronica con sintonizzatore PLL a modulazione di
frequenza e orologio digitale 24 ore
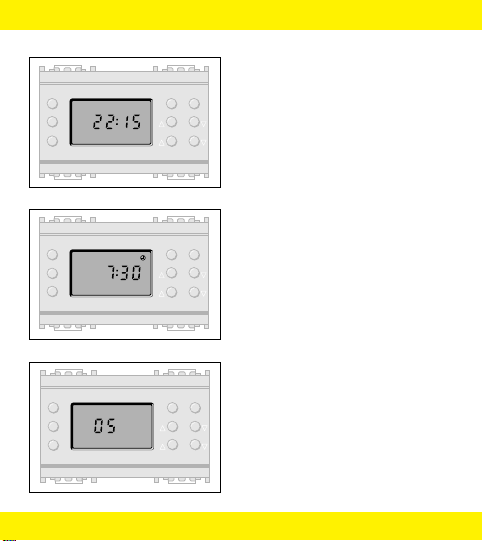
1. Descrizione
Apparecchio modulare intercambiabile 3 moduli serie
idea
da installare a
scatto a mezzo relativi supporti e placche in scatole rettangolari da incasso
3, 4, 5, 6 moduli.
Questo apparecchio, installato come sopra descritto su pareti verticali, ha
grado di protezione IP41 (norme CEI 64-8/87, § 11.1.04). Va comunque
utilizzato in luoghi asciutti e non polverosi ad una temperatura compresa
tra 0 °C e 40 °C.
2. Caratteristiche e installazione
• Involucro in policarbonato autoestinguente
• Installazione a scatto (vedi “Descrizione”)
• Morsetti a piastrina dentata e vite con testa croce/taglio cacciavite,
imperdibili, per il serraggio di due conduttori fino a 2,5 mm2ciascuno
• Comandi a pulsante
• Alimentazione 12 V AC ±10% 50-60 Hz o 12 V DC ±10%
• Assorbimento max 500 mA
• Possibilità di memorizzare 4 stazioni FM (canale M1, M2, M3, M4)
• Riserva di carica per il mantenimento della memoria anche in assenza di
alimentazione fino ad un massimo di 1 ora
Libretto 21-11-1997 10:51 Pagina 1

• Visualizzazione dati a mezzo display a cristalli liquidi di dimensione
37x21 mm.
Dati visualizzati:
- frequenza della stazione sintonizzata (da 87,5 MHz a 108 MHz)
- canale memorizzato
- livello di volume
- ora corrente
- ora di sveglia
- allarme inserito
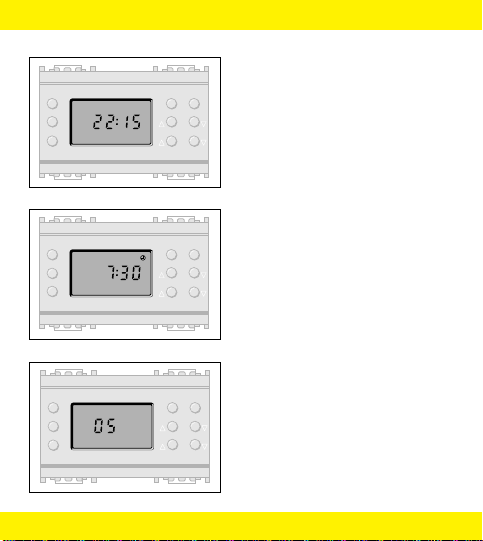
3. Indicazioni e comandi
2
Tuning
Chan. Mem.
h
Volume
ON/OFF
Time
Alarm
TSET
M4
M3M1
FM
MHZ
VOL
M2
1
2
11 10
34 5 67
8
9
13
12
1. ON/OFF
2. Impostazione livello
volume
3. Funzionamento radio
4. Impostazione ora
5. Impostazione allarme
Allarme inserito
6. Selezione canale
7. Memorizzazione
canale
8. Sintonia manuale
9. Regolazione volume
10. Frequenza impostata
11. Canale selezionato
12. Selezione allarme
13. Selezione ora
Libretto 21-11-1997 10:51 Pagina 2
3
Tuning
Chan. Mem.
h
Volume
Time
Alarm
TSET
ON/OFF
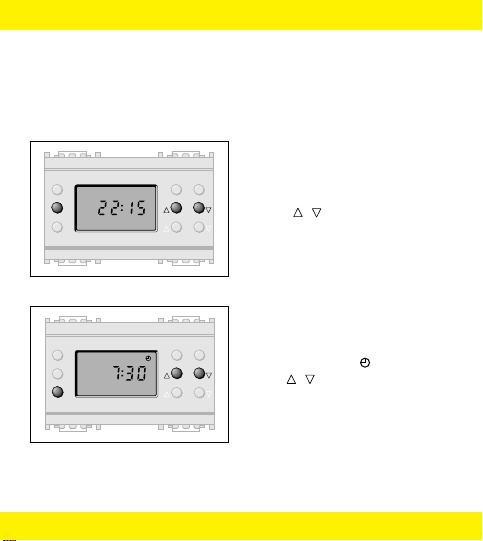
Predisposizione alla regolazione
dell’ora corrente
Tuning
Chan. Mem.
h
Volume
Time
Alarm
ON/OFF
Predisposizione alla regolazione
dell’ora di allarme
Tuning
Chan. Mem.
h
Volume
ON/OFF
Time
Alarm
FM
MHZ
VOL
Livello di volume impostato
Libretto 21-11-1997 10:51 Pagina 3
4. Programmazione e messa in servizio
4.1 Funzione orologio/sveglia
Impostazione dell’ora corrente e dell’ora di allarme
4
4.1.1
Tenendo premuto il tasto Time
(nella parte superiore del display
apparirà la scritta TSET) premere
i tasti hper la regolazione
dell’ora corrente
4.1.2
Tenendo premuto il tasto Alarm
(nella parte superiore del display
apparirà il simbolo ) premere i
tasti hper
la regolazione dell’ora di allarme
Le condizioni di ALLARME INSERITO e ALLARME DISINSERITO si
ottengono agendo sul pulsante Alarm con pressioni di breve
Tuning
Chan. Mem.
h
Volume
Time
Alarm
TSET
ON/OFF
Tuning
Chan. Mem.
h
Volume
Time
Alarm
ON/OFF
Libretto 21-11-1997 10:51 Pagina 4

5
4.2.1
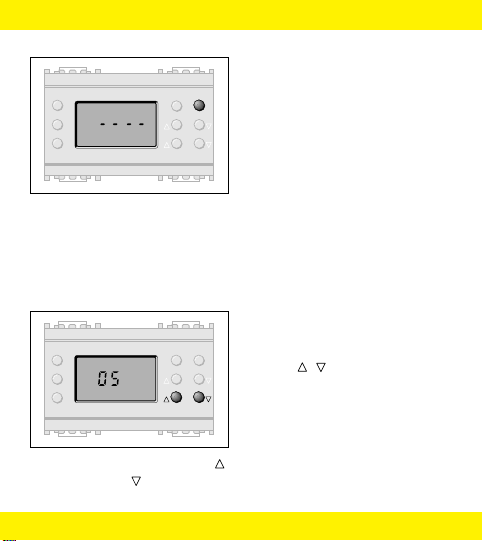
Per accendere la radio premere il
pulsante ON/OFF.
Per sintonizzarsi su una frequenza
compresa tra 87,5 MHz e 108 MHz
utilizzare i pulsanti Tuning
Scelta l’emittente, agire nel modo
seguente per memorizzarla su uno
dei quattro canali di memoria
disponibili:
Tuning
Chan. Mem.
h
Volume
ON/OFF
Time
Alarm
FM
MHZ
4.2.2
Premere il tasto Mem: sul display
inizierà a lampeggiare il numero
del canale
Agire sul tasto Chan per
selezionare il canale desiderato
Tuning
Chan. Mem.
h
Volume
ON/OFF
Time
Alarm
M4
M3M1
FM
MHZ
M2
4.2 Funzione radio
Accensione, sintonia e memorizzazione dei canali
Libretto 21-11-1997 10:51 Pagina 5
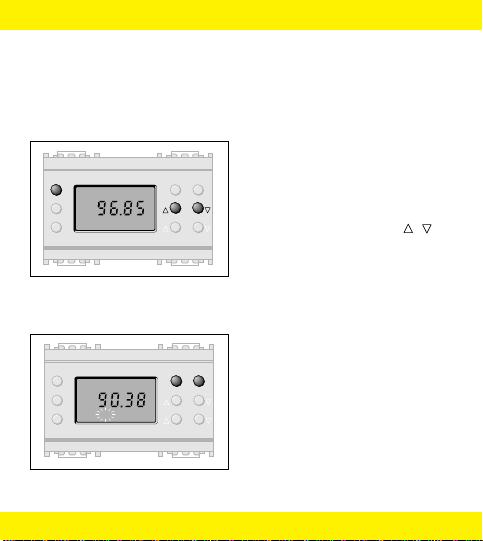
4.3 Regolazione del volume
4.3
Per la regolazione del volume di
ascolto è sufficiente agire sui tasti
Volume . Tenendo premuto
uno dei due tasti il display
visualizzerà la scritta VOL ed un
numero compreso tra 1 e 10 che
indica il livello di volume. Il livello
di volume verrà incrementato
mantenendo premuto il tasto o decrementato mantenendo
premuto il tasto
Tuning
Chan. Mem.
h
Volume
ON/OFF
Time
Alarm
FM
MHZ
VOL
6
4.2.3
Premere nuovamente Mem per
memorizzare definitivamente la
stazione selezionata sul canale
scelto
Tuning
Chan. Mem.
h
Volume
ON/OFF
Time
Alarm
M4
M3M1
FM
MHZ
M2
Libretto 21-11-1997 10:51 Pagina 6
7
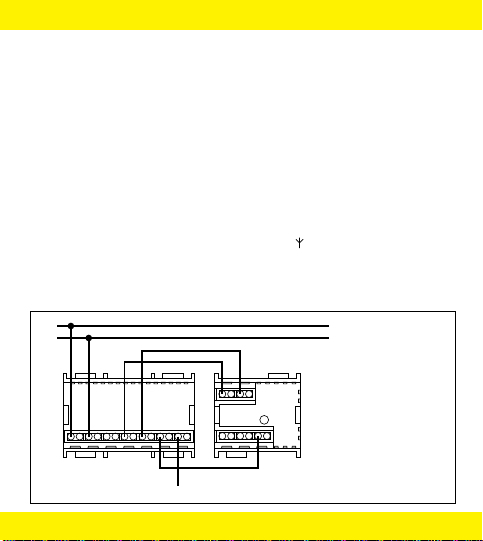
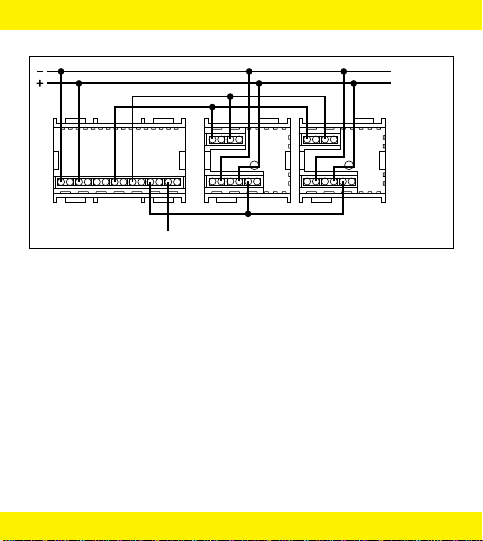
Collegamenti
La radiosveglia elettronica serie
idea
deve essere utilizzata in
abbinamento al diffusore amplificato VIMAR
idea
art. 16656, 16656.B.
La radiosveglia può pilotare direttamente fino a 6 diffusori collegati
in parallelo (Fig. 1). Per collegare un numero superiore di diffusori
(fino ad un max di 15) è necessario che siano alimentati con
tensione 12 V DC ±10% ai morsetti L1 L2 (Fig. 2). E’ importante
rispettare le polarità indicate nel libretto istruzioni e nello
schema stampigliato sul retro dei diffusori.
Per la corretta ricezione delle stazioni FM è necessario collegare
al morsetto contrassegnato con il simbolo un conduttore isolato di
sezione non inferiore a 1,5 mm2e di lunghezza non inferiore a
1,5 m, fungente da antenna. Tale conduttore può essere lasciato
all’interno delle condutture dell’impianto elettrico.
43L2L1 L2
Antenna
art. 16652 art. 16656
5
L1
34
567
12 V AC ±10% 50-60 Hz
12 V DC ±10%
Fig. 1
Collegamento da 1 a 6 diffusori
Libretto 21-11-1997 10:51 Pagina 7

8
Regole generali di installazione
L’installazione deve essere effettuata in conformità alle norme CEI
vigenti.
Prima di operare sull’impianto togliere tensione agendo
sull’interruttore generale.
Utilizzare conduttori di colore giallo/verde solo per il collegamento di
terra.
Verificare che la sezione dei conduttori sia adeguata al carico
comandato e in ogni caso non inferiore a 1,5 mm2.
Serrare accuratamente i conduttori nei morsetti. Serraggi imperfetti
possono provocare surriscaldamenti fino a temperature sufficienti a
innescare un incendio.
43L2L1 L2
5
L1
34
567 L2
5
L1
34
12 V DC ±10%
Antenna
art. 16652 art.
16656 art.
16656
Fig. 2
Collegamento da 6 a 15 diffusori
Libretto 21-11-1997 10:51 Pagina 8

9
Electronic clock radio with FM (frequency modulation) PLL tuner
and 24 hours digital clock
1. Description
Modular interchangeable equipment 3 modules series
idea
, for snap fixing
through relevant supporting frames and cover plates in rectangular flush
mounting boxes 3, 4, 5, 6 modules.
The equipment, flush installed in vertical position, has a protection degree
IP41 (CEI specifications 64-8/87; § 11.1.04). The equipment must be used
only in dry, undusty locations, at a room temperature between 0 °C and
40 °C
2. Features and installation
• Self-extinguishing polycarbonate enclosure
• Snap fixing (see “Description”)
• Screw terminals with captive pressure plate and screw, slotted/cross
recessed screw head, for 2 conductors each up to 2.5 mm2
• Pushbutton controls
• Supply 12 V AC ±10% 50-60 Hz or 12 V DC ±10%
• Absorption 500 mA max
• Possibility of memorizing 4 FM stations (channel M1, M2, M3, M4)
• Power-reserve to maintain the settings even if the supply is interrupted
up to 1 hour max
Libretto 21-11-1997 10:51 Pagina 9

• Liquid crystal display sized 37x21 mm.
Data display:
- frequency of the tuned station (from 87.5 MHz to 108 MHz)
- memorized channel
- volume level
- present time
- alarm time
- alarm-on indication
3. Indications and functions
10
Tuning
Chan. Mem.
h
Volume
ON/OFF
Time
Alarm
TSET
M4
M3M1
FM
MHZ
VOL
M2
1
2
11 10
34 5 67
8
9
13
12
1. ON/OFF
2. Volume level setting
3. Radio function
4. Present time setting
5. Alarm time setting
Alarm-ON condition
6. Channel selection
7. Channel memorizing
8. Tuning
9. Volume adjustment
10. Selected frequency
11. Selected channel
12. Alarm selection
13. Present time
selection
Libretto 21-11-1997 10:51 Pagina 10
11
Tuning
Chan. Mem.
h
Volume
Time
Alarm
TSET
ON/OFF
Ready for present time setting
Tuning
Chan. Mem.
h
Volume
Time
Alarm
ON/OFF
Ready for alarm time setting
Tuning
Chan. Mem.
h
Volume
ON/OFF
Time
Alarm
FM
MHZ
VOL
Selected volume level
Libretto 21-11-1997 10:51 Pagina 11
4. Programming and operating instructions
4.1 Clock/Alarm function
Setting the present time and the alarm time
4.1.1
Keeping Time button pressed (in
the upper part TSET will be
displayed) act on pushes h
to set the present time
4.1.2
Keeping the Alarm button pressed
(in the upper part will be
displayed) act on pushes
hto set the alarm time
The ALARM ON and ALARM OFF conditions are obtained acting
with short pushes on the Alarm button; the symbol indicates the
ALARM ON condition
12
Tuning
Chan. Mem.
h
Volume
Time
Alarm
TSET
ON/OFF
Tuning
Chan. Mem.
h
Volume
Time
Alarm
ON/OFF
Libretto 21-11-1997 10:51 Pagina 12
13
4.2.1
To switch on the radio press the
ON/OFF pushbutton.
Tune the radio on any frequency
between 87.5 MHz and 108 MHz
acting on pushes Tuning .
Once you have found the desired
station you can memorize it on one
of the four channels available for
memorization:
Tuning
Chan. Mem.
h
Volume
ON/OFF
Time
Alarm
FM
MHZ
4.2.2
Press pushbutton Mem: the
channel number starts blinking.
Act on button Chan to select the
desired channel
Tuning
Chan. Mem.
h
Volume
ON/OFF
Time
Alarm
M4
M3M1
FM
MHZ
M2
4.2 Radio function
Switching on, tuning and memorizing the channels
Libretto 21-11-1997 10:51 Pagina 13

4.3 Volume adjustment
4.3
To adjust the volume act on
pushes Volume . Keeping
one of two buttons pressed, VOL
and a number between 1 and 10
indicating the volume level will be
displayed. This can be increased
keeping button pressed or
decresead keeping pressed
button
Tuning
Chan. Mem.
h
Volume
ON/OFF
Time
Alarm
FM
MHZ
VOL
14
4.2.3
Press Mem again to memorize
the selected station on the
desired channel
Tuning
Chan. Mem.
h
Volume
ON/OFF
Time
Alarm
M4
M3M1
FM
MHZ
M2
Libretto 21-11-1997 10:51 Pagina 14

15
Connections
The electronic clock radio series
idea
must be used in connection with
VIMAR amplified speaker series
idea
art. 16656, 16656.B.
The clock radio can directly operate up to 6 amplified speakers
parallel connected (Fig. 1). To connect a higher number of speakers
(up to 15 max) to one single clock radio, it is necessary that these
are supplied at 12 V DC ±10% on terminals L1 L2 (Fig. 2). It is very
important that the polarities indicated on the instruction sheet
and engraved on the rear of the amplified speakers, are
properly aligned.
For a correct FM reception an insulated wire of cross sectional area
not smaller than 1.5 mm2and not less than 1.5 m long, should be
connected as antenna to the terminal marked with the symbol . The
insulated wire can be left in the conduits of the electrical installation.
43L2L1 L2
Antenna
art. 16652 art. 16656
5
L1
34
567
12 V AC ±10% 50-60 Hz
12 V DC ±10%
Fig. 1
Connection from 1 to 6 speakers
Libretto 21-11-1997 10:51 Pagina 15
16
General installation rules
The installation must be done according to in force Italian CEI
specifications (or equivalent rules for buildings electrical installations).
Disconnect the mains acting on the main switch before operating on
the system.
Use the yellow/green insulated conductors only for the connection to
the earthing circuit.
Verify if the supply conductors cross-sectional area is sufficient for the
feeded load, in any case it must never be less than 1.5 mm2.
Clamp fully, with care, the conductors in the terminals. Faulty
clampings can cause temperature rises high enough for a fire risk.
43L2L1 L2
5
L1
34
567 L2
5
L1
34
12 V DC ±10%
Antenna
art. 16652 art.
16656 art.
16656
Fig. 2
Connection from 6 to 15 speakers
Libretto 21-11-1997 10:51 Pagina 16

17
Radio-réveil électronique avec syntonisateur PLL à modulation
de fréquence (FM) et affichage digital de l’horloge du type à 24
heures
1. Description
Appareil modulaire interchangeable 3 modules série
idea
à installer par
encliquetage par les respectifs supports de montage et plaques de
recouvrement dans boîtes de montage rectangulaires 3, 4, 5, 6 modules
pour pose à encastrer.
Cet appareil, installée comme ci-dessus indiqué sur parois verticales, a un
degré de protection de IP41 (Normes CEI 64-8/87, § 11.1.04). L’appareil
doit être utilisé dans des locaux secs et non poussiéreux, à une
temperature ambiante comprise entre 0 °C et 40 °C.
2. Caractéristiques et installation
• Enveloppe en polycarbonate auto-extinguible
• Installation par encliquetage (voir “Description”)
• Bornes à serrage sous tête de vis, avec plaquette dentée et vis de serrage
imperdables, pour deux conducteurs chacun jusqu’à 2,5 mm2
• Commande par boutons-poussoirs
• Alimentation 12 V AC ±10% 50-60 Hz o 12 V DC ±10%
• Consommation 500 mA maxi
• Possibilité de mémoriser 4 stations FM (canaux M1, M2, M3, M4)
• Réserve de marche pour le maintien de la mémoire même si l’alimentation
est coupée jusqu’à 1 heure maxi
Libretto 21-11-1997 10:51 Pagina 17

• Affichage par cristaux liquides 37x21 mm.
Données:
- fréquence de la station syntonisée (de 87,5 MHz à 108 MHz)
- canal mémorisé
- niveau du volume
- heure présente
- heure de réveil
- réveil inséré
3. Indications et fonctions
18
Tuning
Chan. Mem.
h
Volume
ON/OFF
Time
Alarm
TSET
M4
M3M1
FM
MHZ
VOL
M2
1
2
11 10
34 5 67
8
9
13
12
1. ON/OFF
2. Réglage niveau de
volume
3. Fonction radio
4. Réglage de l’heure
présente
5. Réglage de l’heure
de réveil
Alarme inseré
6. Sélection canal
7. Mémorisation canal
8. Syntonisation
9. Réglage volume
10. Fréquence
syntonisée
11. Canal sélectioné
12. Sélection alarme
13. Sélection heure
présente
Libretto 21-11-1997 10:51 Pagina 18

19
Tuning
Chan. Mem.
h
Volume
Time
Alarm
TSET
ON/OFF
Prêt pour le réglage de l’heure
présente
Tuning
Chan. Mem.
h
Volume
Time
Alarm
ON/OFF
Prêt pour le réglage de l’heure de
réveil
Tuning
Chan. Mem.
h
Volume
ON/OFF
Time
Alarm
FM
MHZ
VOL
Niveau sélectionné de volume
Libretto 21-11-1997 10:51 Pagina 19
This manual suits for next models
1
Table of contents
Languages:


