manuals.online logo
Brands
  1. Home
  2. •
  3. Brands
  4. •
  5. Vision grills
  6. •
  7. Grill
  8. •
  9. Vision grills Professional S Series User manual

Vision grills Professional S Series User manual

WELCOME
WELCOME
Cooking with your Kamado
Your new Vision Grills Kamado is the complete outdoor
cooking appliance that allows you to sear, grill, bake and
smoke all types of food. For best results, we recommend
using natural lump charcoal made from hardwoods.
Compared to briquettes, natural charcoals start faster,
burn cleaner and longer, reach higher temperatures
and produce less ash. Left-over natural charcoal also
relights for re-use. Before re-starting the grill, knock
off excess ashes to any remaining charcoal. Routinely
empty ashes, but only empty ashes when grill is cold.
NOTE: USE OF LIGHTER FLUID, ACCELERANTS OR
CHARCOAL BRIQUETTES CONTAINING ACCELERANTS CAN
COMPROMISE THE CERAMIC AND VOID THE WARRANTY.
Starting your Vision Kamado Grill is simple and fast:
Open grill lid, open top and bottom vents wide open, fill
the inner fire bowl with enough charcoal to just cover the
air holes, then light the charcoal using either an electric
starter or approved grill starters. After several coals are
burning, spread evenly, close lid, adjust top and bottom
vents, and wait for the Kamado to reach your desired
cooking temperature. As needed, add more charcoal
by using the flip grate feature, being careful not to burn
yourself with the hot food or cooking grate.
Welcome to Kamado cooking! Our Vision
Grills Kamado is based on 3,000+ years
of clay pot cooking from around the world.
Over generations our ancestors have
continued to refine Kamado techniques
for grilling, smoking, baking and cooking
all types of meats, poultry, fish and vegetables. Kamado
cooking locks in moisture and provides a variety of ways to
infuse different tastes into your foods that turns weekend
grillers into neighborhood chefs.
Our Vision Grills Kamado builds on this heritage with fresh
aesthetics, safety and convenience features, easy-lift lid
with spring assist and high quality materials to define
a new industry standard for design and innovation. The
thick ceramic construction of our grill provides superior
thermal insulation allowing you to grill, cook, bake or smoke
regardless of the season, from the hot summer days in our
home town of St. Louis to the cold snowy days in Ottawa,
Canada.
Canada.
In this manual we provide the basics to get you cooking and
invite you to our website,
www.visiongrills.com
, where we
, where we
share recipes, detailed Use & Care information and contact
information if you need more help. From our entire team
here at Vision Grills, thanks for your purchase and welcome
to becoming the destination eatery in your neighborhood!
Patented
S-SERIES
S-SERIES
CERAMIC
CERAMIC
KAMADO CHARCOAL GRILL
REMEMBER TO REGISTER YOUR GRILL
WITHIN 30 DAYS OF PURCHASE AT
HTTPS://VISIONGRILLS.COM/RESOURCES/REGISTER-YOUR-GRILL
S-Series Manual ENG_2022.indd 1S-Series Manual ENG_2022.indd 1 1/7/22 11:36 AM1/7/22 11:36 AM
ÉTAPE 2
SET-UP
WARNING
ATTENTION! Use caution when cooking, as grill surfaces get hot. To avoid burns, always
use protective gloves to adjust top and bottom vents when grill is in use. Do not wear
loose clothing near the grill.
ATTENTION! This barbecue will become very hot, do not move it during operation.
For outdoor cooking use only. Do not operate grill indoors or in an enclosed space.
Use grill only in well-ventilated areas. Keep immediate area around the grill free from
combustible materials. Allow for at least 3 feet/1 meter of clearance around grill
(house, other outdoor products, hanging tree limbs, shrubs, etc.)
WARNING! Keep children and pets away from the grill at all times.
Do not allow children to operate grill. Never leave grill unattended when in use.
Grill should be placed securely on a level base prior to use. Only operate grill on a hard,
stable, level surface (concrete patio, ground, etc...) capable of supporting the weight of
the grill when loaded with food. Never operate grill on wood support surface, wood deck
or like combustible support surfaces. Never attempt to move grill when in operation
or cooling down. Never operate this grill within 25 feet/7.5 meters of any flammable
liquid. Never operate this grill within 10 feet/3 meters of a gas cylinder. The grill should
not be placed under combustible structures, like garages, porches, patios, or carports.
Burning charcoal produces carbon monoxide, an odorless gas, which can cause death.
The use of alcohol, prescription or non-prescription drugs may impair the operator’s
ability to properly assemble or safely operate the grill.
Do not use on boats or recreational vehicles.
CAUTION: Never use lighter fluid, gasoline, or other volatiles to start your charcoal,
as it is dangerous and will leave a residual taste in your food. NEVER use Charcoal
Briquettes that contain starting chemicals or additives. Use only firelighters complying
to EN 1860-3. Use utmost care when adding charcoal to grill. Dispose of cooled ash
by placing it in aluminum foil, soaking with water and discarding in a non-combustible
container. Always wait for grill to completely cool before opening built-in ash drawer.
CAUTION: WAIT FOR GRILL TO BE COMPLETELY COOLED BEFORE PLACING YOUR
COVER ON THE GRILL.
Step 1: Cart Assembly
First remove the bolts, washers and
spring washers from the two “X”
connectors carefully. Remove the paper
washers and then begin the assembly
for the “X” connectors and legs. Flip the
cart upside down for easy assembly.
Assemble cart by inserting two “X”
connectors into leg ends, then screw
in using the wrench provided. Place
lock washer above flat washer over
bolt before screwing through leg into “X” connector. Screw in casters and
tighten nuts using wrench provided. While assembling, leave screws loose
to allow adjustment in cart. Otherwise it can be difficult to get all of the
screws in. After cart is assembled, confirm all bolts are tightened, then lift
Kamado and set into cart with bottom vent centered between two legs.
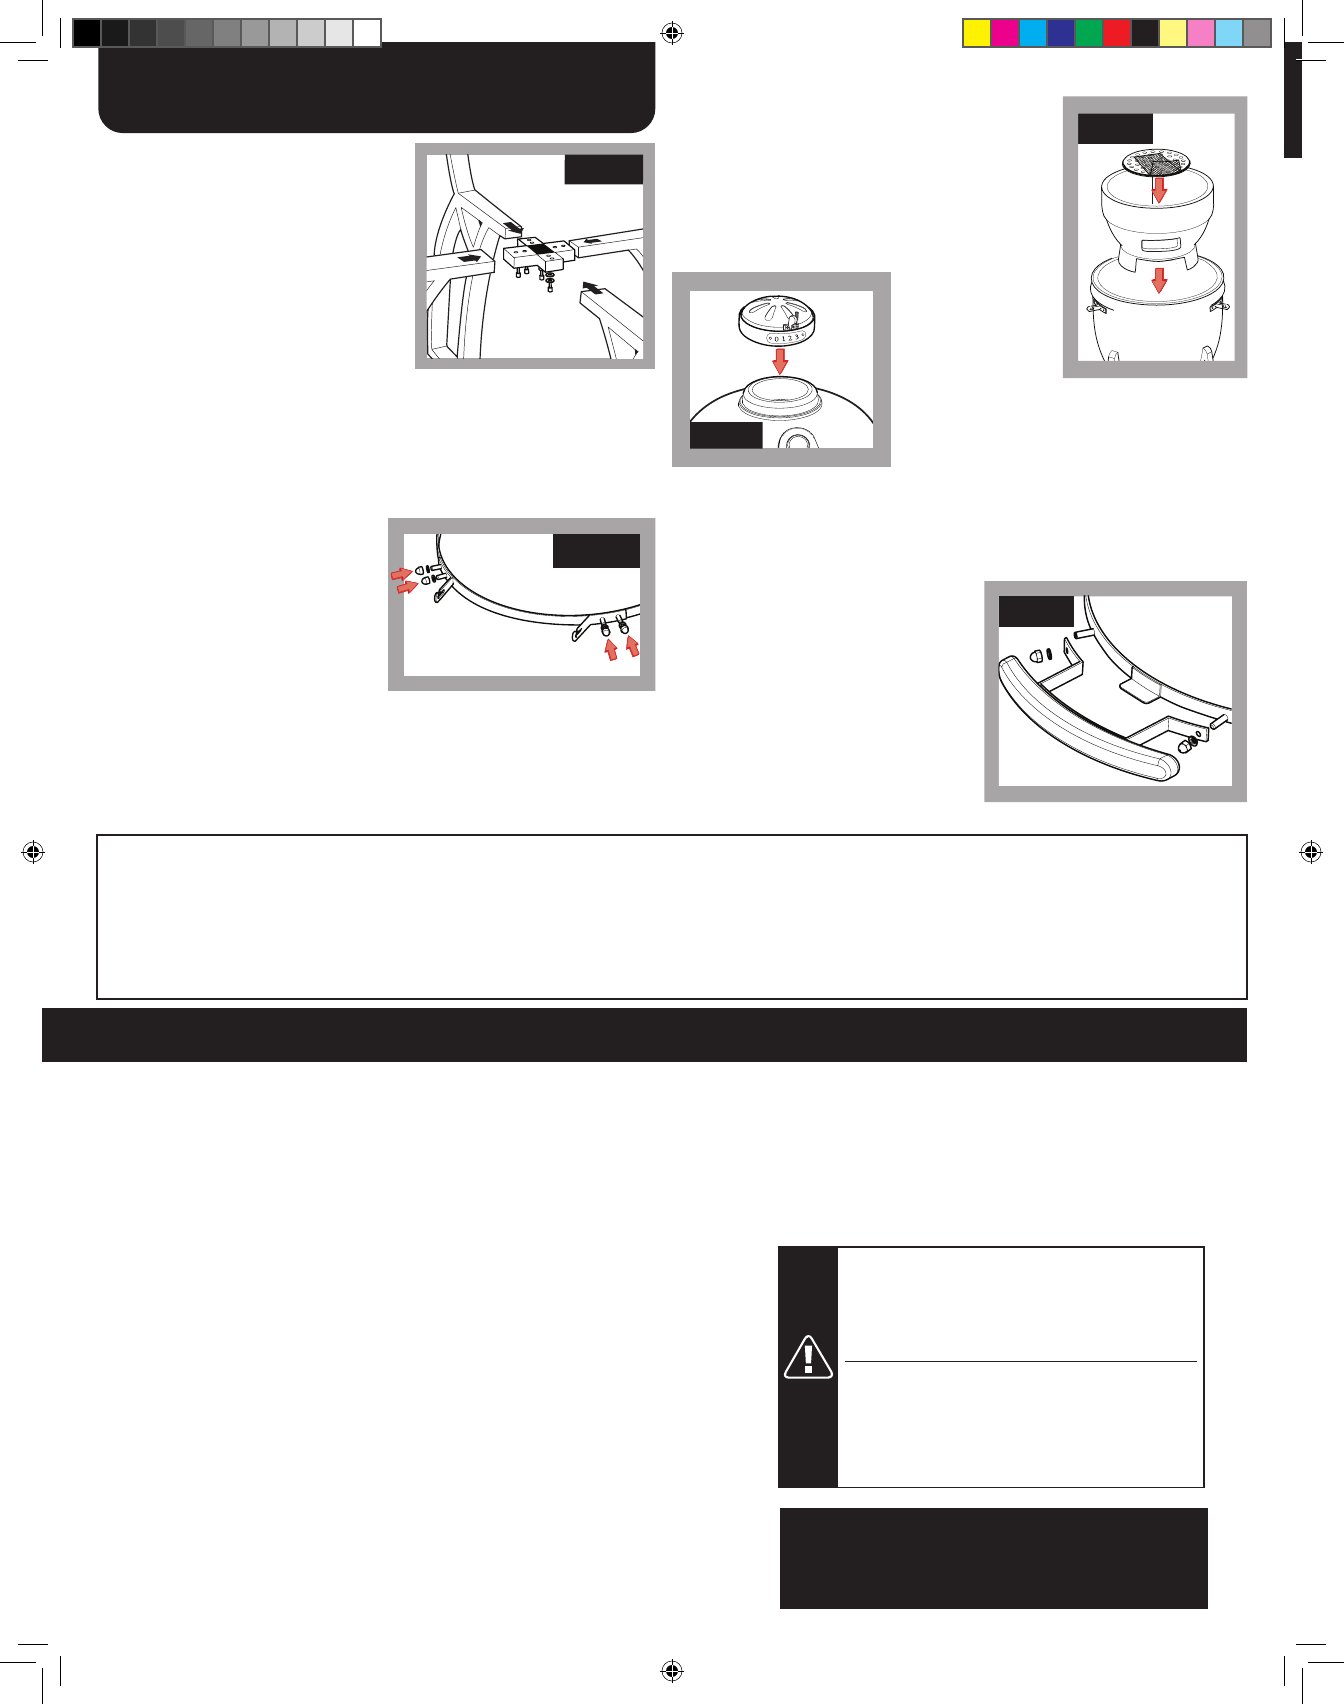
Step 2: Shelf Brackets
Remove the nuts and washers
from the bolts welded on the
bottom banding carefully. Remove
the paper washers. Place the side
brackets on the bolts and screw
side brackets down tightly with
the nuts and washers. Mount shelf
brackets over studs on the sides of
the metal bands on the bottom ceramic grill body with bracket slots facing
up. Brackets are stamped on the back with letters indicating their position
(e.g., LF=Left Front bracket and RB=Right Back bracket). Mount a flat
washer then acorn nut on each stud and tighten with provided wrench.
STEP 1STEP 1 STEP 1
Step 3: Grill Assembly
Take all parts out of grill before lifting. The grill
is heavy and will require 2 people to lift it into
cart and if possible a third person to help guide
the Kamado into cart. Using the shelf brackets as
lift handles, lift grill and set it into cart. (Step 3a:)
Lift fire bowl into the ceramic body and then place
the cast iron grate into the fire bowl. Place cook-
Step 4: Handle and Side Shelf Mounting
Remove the nuts and washers from
the bolts welded on the top banding
carefully. Remove the paper washers,
place the handle on the bolts, and
tightly screw the handle down using the
nuts and washers. Attach the handle
by placing handle bracket over studs,
opposite the hinge. On each stud use
a flat washer, then screw on an acorn
nut and tighten. Mount side shelves by
inserting the shelf rod into the shelf
bracket. Tilting the shelf up slightly and
sliding in or out allows you to deploy or store the shelves.
STEP 4
STEP 3a
STEP 3b
Note: When using Quickchange Gas Insert (sold separately) for gas grilling, the Top
Vent must ALWAYS be locked fully open to position 3. See Quickchange Gas
Insert Owner’s Manual for complete instructions.
ing grate onto grill
with hinged section
facing towards front
of grill. (Step 3b:)
Close lid and press
top vent onto top of
Kamado so spring
clips are gripping the inside of the top open-
ing (you can bend clips outward slightly for a
tighter grip) with calibrations facing the front
of the grill.
WARNING:
FUELS USED IN LIQUEFIED PROPANE GAS
APPLIANCES, AND THE PRODUCTS OF COMBUSTION OF SUCH
FUELS, CAN EXPOSE YOU TO CHEMICALS INCLUDING BENZENE,
WHICH IS KNOWN TO THE STATE OF CALIFORNIA TO CAUSE
CANCER AND CAUSE BIRTH DEFECTS OR OTHER REPRODUCTIVE
HARM.
For more information go to: www.P65Warnings.ca.gov.
ADVERTENCIA:
LOS COMBUSTIBLES USADOS EN EQUIPOS
PARA LICUAR GAS PROPANO, ASÍ COMO LOS PRODUCTOS DE SU
COMBUSTIÓN, PUEDEN EXPONERTE A SUSTANCIAS QUÍMICAS,
ENTRE ELLAS EL BENCENO, QUE EL ESTADO DE CALIFORNIA
RECONOCE COMO CAUSA DE CÁNCER Y DE MALFORMACIONES
CONGÉNITAS Y OTROS DAÑOS AL SISTEMA REPRODUCTOR.
Para más información, visite www.P65Warnings.ca.gov
WARNING:
FUELS USED IN WOOD OR CHARCOAL BURNING
APPLIANCES, AND THE PRODUCTS OF COMBUSTION OF SUCH FUELS,
CAN EXPOSE YOU TO CHEMICALS INCLUDING CARBON BLACK, WHICH
IS KNOWN TO THE STATE OF CALIFORNIA TO CAUSE CANCER, AND
CARBON MONOXIDE, WHICH IS KNOWN TO THE STATE OF
CALIFORNIA TO CAUSE BIRTH DEFECTS OR OTHER REPRODUCTIVE
HARM.
For more information go to: www.P65Warnings.ca.gov.
ADVERTENCIA:
LOS COMBUSTIBLES USADOS EN EQUIPOS PARA
QUEMAR MADERA O CARBÓN, ASÍ COMO LOS PRODUCTOS DE
TAL COMBUSTIÓN, PUEDEN EXPONERTE A SUSTANCIAS
QUÍMICAS, ENTRE ELLAS EL NEGRO DE HUMO Y EL MONÓXIDO
DE CARBONO, QUE EL ESTADO DE CALIFORNIA RECONOCE COMO
CAUSA, RESPECTIVAMENTE, DE CÁNCER Y DE MALFORMACIONES
CONGÉNITAS Y OTROS DAÑOS AL SISTEMA REPRODUCTOR.
Para más información, visite www.P65Warnings.ca.gov
www.visiongrills.com he[email protected]
1-877-917-4273
Vision Grills 1531 Fairview Avenue, Suite B,
St. Louis, MO 63132
1. Your Kamado Grill should be covered when not in use so as to protect all components.
2. Routinely check the Spring Assist Band to make sure the 2 5/8” bolts are tight and secure.
3. When moving your grill please remember to make sure locking casters are in the unlocked position and always pull your grill. Never Push it. Pull
from the Back Hinge. Not the Handle. Your grill is more likely to tip if you push it and it hits a bump or indention on the ground. Have a friend help.
4. Do not remove your Fire Bowl. Clean ash by brushing excess ash into ash drawer and removing. The purpose of the Fire Bowl is to hold your lump
charcoal and will continue to work even if it is cracked.
Long-Term Maintenance
NEVER PLACE COVER ON GRILL THAT IS HOT OR WARM.
When cooking above 500ºF/260ºC, with both top and bottom vents closed,
rapidly opening the lid creates a sudden rush of oxygen into the grill, which
can cause a flare-up. When in this cooking mode, we recommend that, prior to
opening the lid, you open top and bottom vents to allow oxygen to stabilize inside
the grill, minimizing the possibility of a flare-up.
If using for outdoor kitchen, table, or enclosure a lava stone or paving stone must
be placed between bottom of grill and resting surface. Do NOT rest ceramic grill
body on wooden surface.
STEP 2
STEP 1STEP 1 STEP 1
S-Series Manual ENG_2022.indd 2S-Series Manual ENG_2022.indd 2 1/7/22 11:36 AM1/7/22 11:36 AM
PARTS
Subject to the following terms and conditions, Phase 2, LLC, d/b/a Vision Grills (“Vision Grills”),
warrants to the original purchaser that the ceramic cooker manufactured or supplied by Vision
Grills will be free from defects in material and workmanship under normal use for the following
periods from the original date of purchase: limited lifetime for all ceramic parts, five (5) years for
all metal parts, three (3) years for thermoplastic side shelves, one (1) year for temperature gauge,
gaskets and cover. This Limited Lifetime Warranty is contingent upon purchaser registering the
product at www.visiongrills.com/register within 30 days from the date of purchase along with
a copy of the original dated sales receipt, which can be attached in an electronic format (i.e.
scan, photograph, etc.) to an email sent to help@visiongrills.com. Failure to do so will invalidate
the warranty. Any chips or cracks in the finish of the ceramic cooker present at the time of
purchase must be noted on the original dated sales receipt. This Warranty is not transferable to
subsequent owners. If you cannot register online, contact Vision Grills customer service at (877)
917-4273 or email help@visiongrills.com.
If any product covered by this Warranty is defective due to a covered warranty condition, such
product will, at the option of Vision Grills, be repaired to its original condition or replaced with
a comparable new product or part. The repair and/or replacement of parts shall constitute the
extent of the liability and obligations of Vision Grills under this Warranty. Purchaser is required
to provide photographic evidence to assess the damage when submitting claims.
Scratches, cracks, chips, dents, crazing, or minor cosmetic blemishes of the exterior glaze
not affecting performance are not covered under warranty, as determined by Vision Grills.
This Warranty does not cover damages caused by improper assembly, improper care, failure
to follow directions of use, misuse, abuse, negligence, extreme environmental conditions,
normal wear and tear, accidents, acts of nature, or unauthorized repair, alteration or
modification, as determined by Vision Grills. This Warranty does not apply to chips or cracks
in the ceramic cooker which may occur after the ceramic cooker is purchased by the original
purchaser. Vision Grills is not liable for any default or delay in its performance under this
Warranty that is caused by any circumstances beyond its control. This Warranty will be
invalidated if any liquids, including starter lighter fluid, are poured on or in the ceramic cooker.
NOTE: USE OF LIGHTER FLUID, ACCELERANTS OR CHARCOAL BRIQUETTES CONTAINING
ACCELERANTS CAN COMPROMISE THE CERAMIC AND VOID THE WARRANTY. The protective
coating of the ceramic cooker can be compromised by substances or conditions that are
beyond the control of Vision Grills. While Vision Grills uses rust-resistant materials, the
Warranty as to metal parts does not cover rust or oxidation unless the structural integrity of
the ceramic cooker is compromised as determined by Vision Grills.
This Warranty does not cover purchases from unauthorized resellers and/or third parties.
Warranty coverage is limited to products purchased at an authorized reseller only.
Commercial use and related applications are not covered under this Warranty. Warranty
coverage is based on normal residential use and maintenance.
Vision Grills shall not be liable for any delay or default under this Warranty caused by any event
or contingency beyond the control of Vision Grills. This includes acts of nature, fire, government
restrictions or restraints, strikes, reduced supply of materials or transportation delays.
THIS WARRANTY IS THE EXCLUSIVE WARRANTY OF VISION GRILLS. VISION GRILLS
EXPRESSLY DISCLAIMS ANY AND ALL OTHER WARRANTIES, EXPRESS OR IMPLIED,
INCLUDING WARRANTIES OF FITNESS, MERCHANTABILITY, OR FITNESS FOR A PARTICULAR
PURPOSE. THIS WARRANTY DOES NOT COVER, AND VISION GRILLS IS NOT LIABLE FOR, ANY
DAMAGES RELATING TO LOSS OF TIME, LOSS OF USE OF EQUIPMENT, INCONVENIENCE, OR
ANY INCIDENTAL, SPECIAL AND/OR CONSEQUENTIAL DAMAGES. PURCHASER’S EXCLUSIVE
REMEDY FOR BREACH OF THIS WARRANTY SHALL BE LIMITED AS SPECIFIED HEREIN TO
REPLACEMENT OR REPAIR OF THE AFFECTED PRODUCT.
Some states do not allow limitations on how long an implied warranty lasts or the exclusion
or limitation of incidental or consequential damages, so the above limitations and exclusions
may not apply to you. This Warranty gives you specific legal rights, and you may also have
other rights which vary from state to state. Vision Grills does not authorize any person or
entity to assume any obligation or liability on its behalf in connection with the sale and
purchase of any of its products. The purchase of any Vision Grills product from anyone other
than Vision Grills or an authorized dealer will void the Warranty associated with the product.
If you have a question regarding the identity of an authorized dealer, you should contact
Vision Grills before you purchase the product.
WARRANTY
1 Top Vent
1.1 Bakelite Tab with Stopper Pin
2 Ceramic Dome Top
3 Top Ring Assembly
4 Fire Bowl
5 Bottom Ring Assembly
5.1 Right Front Side Shelf Bracket
5.2 Right Back Side Shelf Bracket
5.3 Left Front Side Shelf Bracket
5.4 Left Back Side Shelf Bracket
6 (x2) Wood-Sculpted Thermoplastic
Side Shelves with Accessory Hooks
7 Charcoal Grate
8 Ceramic Dome Bottom
9 Ash Drawer
10 Starter Port Flipper Drawer
11 Tubular Legs (x4) Curved
12 X Leg Connector and Washers (x2)
13 Thermometer
14 Handle
15 Cooking Grid
16 Rubber Wheels (x2) Locking
17 Rubber Wheels (x2) Standard
18 Felt Gasket
19 Electric Starter Pocket
20 Grill Cover
VGKP-F SS2
VGC TV-CA-TSP
VGKP CD-TCD1
VGKP RA-B1
VGKP FP-1
VGKP RA-B2
VGKP TPSB-RF
VGKP TPSB-RB
VGKP TPSB-LF
VGKP TPSB-LB
VGKP TPSS-R/L
VGKP CG-1
VGKP TV-F SS2
VGKP AD-1
VGKP FD-2
VGKP LEG-4
VGKP CPCC
VGKP TMT-1
VGKP HDL-TP1
VGKP CGD-1
VGC WHL-L3
VGKP WHL-S3
VGKP-FLT-1
VGKP-ESP-1
VGKP-GC
PART NAME PART NUMBER
3
14
2
11.1
13
7
ProZone
1
2
3
4
6
7
8
9
8
15
4
6
6
5.1
5.2
5.3
5.4
9
10
11
11
11
11
12
12
20
16
16
19
18
5
17
17
To submit a warranty claim, the original purchaser or authorized agent
of the original purchaser must contact Vision at (877) 917-4273 or
contact Vision Grills via email ([email protected]) or through the
website at www.visiongrills.com.
S-Series Manual ENG_2022.indd 3S-Series Manual ENG_2022.indd 3 1/7/22 11:36 AM1/7/22 11:36 AM
Step 3: Setting Temperature
When charcoal is ready level it out for even heat distribution. Close the lid. Set the top and
bottom vents to the desired setting by referring to the Setting Temperature section in this
manual that tells what number calibrations to use to attain the cooking temperature you
want. Give your Kamado 5-15 minutes to settle into the cooking temperature you want
before you put food on the grill.
NOTE: If smoking, do not bring your temperature up above 200ºF/93ºC.
A)Spread hot charcoal evenly over grate.
B)Set top and bottom vents for cooking.
C)Let temperature stabilize.
A B C
Top Vent
Step 4: Get Cooking
Use a wire grill brush to clean the cooking grate. That’s it - you are ready for the cooking
experience of your life. Go to our website for recipes.
Bottom
Vent
STARTING
SETTING TEMPERATURE
SMOKING
GRILLING (350 - 450°F)
COOKING TEMPERATURE
VISION Grills Kamado cooking temperatures
are controlled by adjusting the calibrated top
and bottom vents.
All cooking times are approximate.
Approximate
Cooking Time Smoker Temp (°F) Meat Temp. (°F)
BEEF
Brisket (8 - 12 lbs) 1.5 hours/lb 225 - 250 185 - 205
Short Ribs 5 hours 225 - 250 Pulls back from bones
Tenderloin (3 - 4 lbs) 1-4 hours 225 - 250 120 - 160
PORK
Baby Back Ribs
(1.5 - 2.5 lbs)
5 hours 225 - 250 Pulls back from bones
Shoulder / Butt (6 - 8 lbs) 1.5 hours/lb 225 - 250 170 - 205
Ham (Bone In) 1.5 hours/lb 225 - 250 160
Spare Ribs (2.5 - 3 lbs) 5 - 7 hours 225 - 250 Pulls back from bones
Tenderloin (1.5 - 2 lbs) 2.5 - 3 hours 225 - 250 160
POULTRY
Turkey
(Whole)
15 - 20 min./lb 240 - 275 170
Chicken
(Whole: 2.5 - 4.5 lbs) 2.
5 - 4 hours 250 - 275 170
Beef Temp (°F) Pork Temp (°F)
Rare 125 + 3 min. Rest ---------
Medium-Rare 130 - 135 145 + 3 min. Rest
Medium 135 - 140 150
Medium-Well 140 - 150 155
Well-Done 155+ 160+
Ground 160
Poultry Temp (°F)
Dark Meat 165 - 175
White Meat 165
Ground 170 - 175
SEARING
GRILLING
SMOKING
TOP VENT BOTTOM VENT
500º + F
260º + C
300º – 450ºF
149º – 233ºC
225º – 250ºF
107º – 221ºC
1
2
3
4
5
6
7
8
9
10
ProZone
1
2
3
4
5
6
7
8
9
10
ProZone
1
2
3
4
5
6
7
8
9
10
ProZone
5 - 10
5 - 7
1/2 -
1
2
3
4
5
6
7
8
9
10
ProZone
Step 1: Measuring Charcoal
Set bottom vent wide open and open lid. Measure out
the amount of charcoal needed. For grilling foods: fill
the fire bowl with enough charcoal to just cover the
air holes. For smoking foods at low temperatures for
longer periods of time (1.5 hours+): you will need to
add a little more charcoal, up to approximately 2” (50 mm) above the
same air holes. Once measured mound charcoal over perforated stainless
steel electric starter pocket. Use lump charcoal for best results.
Electric Starter
(Sold Separately)
Step 2: Starting Charcoal
Open the electric starter flipper door and insert starter as far as possible
then plug in. Wait until edges of charcoal turn white and flames are licking
the mound of charcoal. On average, it takes 10 -15 minutes to start
the charcoal. When coals are started, remove electric starter and close
electric starter flipper door. WARNING: Flipper door and ash drawer will
become hot during operation, do not open until grill is cooled down.
Electric Starter
in Lighter Port
PREVENT FLARE-UPS:
TO EXTEND THE LIFE OF THE FELT, MAKE SURE
TO AVOID FLARE-UPS BY “BURPING YOUR GRILL”.
If the lid is lifted too quickly, oxygen will rush inside the
grill causing a flare-up. To prevent a flare up, lift the lid
1”/25mm and count to three before fully opening the grill.
This method is called “Burping your Grill.”
*Caution – Decide if you’re cooking low and slow, then do not let
the grill get too hot. Keep the temperature low, it takes hours to
cool down.
Increasing air flow through top and bottom air vents increases
cooking temperature, just as decreasing air flow slows the burn and
lowers the cooking temperature. Closing both top and bottom vents
starves the charcoal of oxygen and shuts down the fire.
Experiences may vary depending on your environment,
temperature, wind flow, etc. We suggest grilling initially with the
Kamado for 5-6 times to get past the learning curve of your grill,
in your environment. The top vent plays a big role in regulating
temperatures and putting out fuel. Your grill is properly seasoned
when it has a buildup of creosote on the ceramic and top vent.
*Caution - Continuous grilling at extreme high temperatures will
cause the felt to burn.
This product is covered by one or more U.S. patents as listed at https://visiongrills.com/resources/patent-information/
S-Series Manual ENG_2022.indd 4S-Series Manual ENG_2022.indd 4 1/7/22 11:36 AM1/7/22 11:36 AM

Other Vision grills Grill manuals

Vision grills PROFESSIONAL C HYBRID User manual

Vision grills

Vision grills PROFESSIONAL C HYBRID User manual

Vision grills Signature Series Plaza Manual

Vision grills

Vision grills Signature Series Plaza Manual

Vision grills Kamado Classic XL Series User manual

Vision grills

Vision grills Kamado Classic XL Series User manual

Vision grills RX-K18F1M4 Manual

Vision grills

Vision grills RX-K18F1M4 Manual

Vision grills Classic Kamado User manual

Vision grills

Vision grills Classic Kamado User manual

Vision grills KAMADO User manual

Vision grills

Vision grills KAMADO User manual

Vision grills PRO MEGA KAMADO User manual

Vision grills

Vision grills PRO MEGA KAMADO User manual

Vision grills C-Series User manual

Vision grills

Vision grills C-Series User manual

Vision grills XD702 MAXIS User manual

Vision grills

Vision grills XD702 MAXIS User manual

Vision grills Classic B Series User manual

Vision grills

Vision grills Classic B Series User manual

Vision grills VisionHybrid KAMADO S Series User manual

Vision grills

Vision grills VisionHybrid KAMADO S Series User manual

Vision grills B-DCK16C1AD1 User manual

Vision grills

Vision grills B-DCK16C1AD1 User manual

Vision grills PRO KAMADO User manual

Vision grills

Vision grills PRO KAMADO User manual

Vision grills M-Series Kamado User manual

Vision grills

Vision grills M-Series Kamado User manual

Vision grills VCS 2 User manual

Vision grills

Vision grills VCS 2 User manual

Vision grills Komado Professional S Series User manual

Vision grills

Vision grills Komado Professional S Series User manual

Vision grills Classic B-Series User manual

Vision grills

Vision grills Classic B-Series User manual

Vision grills Signature Series User manual

Vision grills

Vision grills Signature Series User manual

Vision grills KAMADO CLASSIC P SERIES Manual

Vision grills

Vision grills KAMADO CLASSIC P SERIES Manual

Vision grills CADET Series Manual

Vision grills

Vision grills CADET Series Manual

Vision grills XR702 DELUXE User manual

Vision grills

Vision grills XR702 DELUXE User manual

Vision grills Kamado XR402 DELUXE User manual

Vision grills

Vision grills Kamado XR402 DELUXE User manual

Vision grills XD402 DELUXE User manual

Vision grills

Vision grills XD402 DELUXE User manual

Vision grills KAMADO CLASSIC P SERIES User manual

Vision grills

Vision grills KAMADO CLASSIC P SERIES User manual

Popular Grill manuals by other brands

OBH Nordica Compact instruction manual

OBH Nordica

OBH Nordica Compact instruction manual

Electrolux EQT4520BOG user manual

Electrolux

Electrolux EQT4520BOG user manual

Fiesta EZH30040-B301 Assembly manual

Fiesta

Fiesta EZH30040-B301 Assembly manual

Fieldmann FZG 3010 user manual

Fieldmann

Fieldmann FZG 3010 user manual

Thermos C34G 461334814 Product guide

Thermos

Thermos C34G 461334814 Product guide

Cadac Safari Chef 2 User instructions

Cadac

Cadac Safari Chef 2 User instructions

Klarstein 10030306 manual

Klarstein

Klarstein 10030306 manual

George Foreman GRP5842 Use and care book

George Foreman

George Foreman GRP5842 Use and care book

emerio RG-121295 instruction manual

emerio

emerio RG-121295 instruction manual

Lund 67455 manual

Lund

Lund 67455 manual

El Corte Inglés YH28018 Assembly instructions

El Corte Inglés

El Corte Inglés YH28018 Assembly instructions

West Bend PLATINUM EDITION GRILL/GRIDDLE instruction manual

West Bend

West Bend PLATINUM EDITION GRILL/GRIDDLE instruction manual

Salton SCG-4 manual

Salton

Salton SCG-4 manual

Barbecook SPRING 300 CREME user guide

Barbecook

Barbecook SPRING 300 CREME user guide

George Foreman GFPTBBQ1003B manual

George Foreman

George Foreman GFPTBBQ1003B manual

Napoleon RSE525RSIB-MB Assembly guide

Napoleon

Napoleon RSE525RSIB-MB Assembly guide

TEFAL CB658P manual

TEFAL

TEFAL CB658P manual

Cuisinart PORTABLE LP GAS GRILL CGG-180T operating instructions

Cuisinart

Cuisinart PORTABLE LP GAS GRILL CGG-180T operating instructions

manuals.online logo
manuals.online logoBrands
  • About & Mission
  • Contact us
  • Privacy Policy
  • Terms and Conditions

Copyright 2025 Manuals.Online. All Rights Reserved.