Vispero enhanced vision amigo User manual
DOC-000837 Rev. A
AMHD8, June 2022
Advanced Features
and Functions

Enhanced Vision
ii Amigo Advanced Features and Functions
Support Phone Numbers
For support, contact the support number of the office nearest you:
U.S. office 800 440 9476 (toll-free) ext. 2
001 714 465 3400 ext. 2
www.enhancedvision.com
tec[email protected]om
U.K. office 0800 145 6115
www.enhancedvision.co.uk
Order[email protected]
D.E office 49 6078 9698270
www.evoptron.de
rmaeurope@evoptron.de
Canadian office 800-665-3005
ca.optelec.com
canadasales@vispero.com
For incidents involving the device and someone’s health, contact
mdsupport@vispero.com.
Copyright © 2022 by Enhanced Vision. All rights reserved. Product
specifications are subject to change without prior notice.

Enhanced Vision
Amigo Advanced Features and Functions iii
Contents
Support Phone Numbers ............................................................................ii
Getting Started...........................................................................................1
Amigo Components...................................................................................... 3
Instruction Basics ......................................................................................... 4
Where to Begin ..........................................................................................6
Package Contents
......................................................................................... 6
Connect the Power Supply ........................................................................... 7
Charge the Battery ....................................................................................... 8
Power On/Off............................................................................................. 10
First-Run Setup Instructions ....................................................................... 11
Using the Amigo.......................................................................................13
Open the Stand .......................................................................................... 13
Close the Stand .......................................................................................... 14
Reading ...................................................................................................... 14
Writing ....................................................................................................... 15
Distance Viewing........................................................................................ 16
Enhancing an Image ................................................................................... 18
Changing Views........................................................................................20
Live View .................................................................................................... 21
Snapshot View ........................................................................................... 22
Panning (Live View or Snapshot View) ....................................................... 23
Menu View................................................................................................. 25
Saving and Modifying Images ...................................................................34
Before You Take a Snapshot ....................................................................... 34
Take a Snapshot ......................................................................................... 35
Save a Snapshot ......................................................................................... 36
Snapshot Summary .................................................................................... 36
Display a Saved Snapshot........................................................................... 38
Modify a Saved Snapshot........................................................................... 41

Enhanced Vision
iv Amigo Advanced Features and Functions
Customizing Appearance ..........................................................................42
Font Size..................................................................................................... 42
Lines and Masks ......................................................................................... 45
Light Sensitivity Filter ................................................................................. 48
Color Blindness Filter ................................................................................. 49
Color Combinations.................................................................................... 50
Brightness .................................................................................................. 52
Edge Effects ................................................................................................ 53
Managing Files .........................................................................................57
Checking Available Storage ........................................................................ 57
Deleting Files.............................................................................................. 57
Copying Files onto Another Device ............................................................ 59
System Settings ........................................................................................60
Set the Language........................................................................................ 60
Set the Time and Date................................................................................ 60
Restore Default Settings............................................................................. 62
Change the Standby Time .......................................................................... 63
Set the Volume........................................................................................... 64
Updating the Amigo .................................................................................65
Update Using a USB-C Drive....................................................................... 65
Update Using a USB Cable.......................................................................... 67
Support Information.................................................................................69
Technical Support Instructions ................................................................... 69
Release Numbers ....................................................................................... 71
Patents, Trademarks, and Licenses............................................................. 71
Frequently Asked Questions .....................................................................72

Enhanced Vision
Amigo Advanced Features and Functions 1
Getting Started
Congratulations on your new Amigo from Enhanced Vision. This handheld
electronic video magnifier has a stand for table reading or can be held for
viewing nearby objects. Small enough to easily carry with you, the Amigo is
ideal for magnification on the go. A convenient carrying case is provided for
transport.
Featuring a built-in LCD screen, the Amigo allows you to magnify images up
to 30 times. You can adjust the display of live images and image captures
based on your personal preferences, including magnification, brightness and
color filters, color combinations, lines and masks, and edge effects.
You can pan live and still images for extended viewing, as well as pan saved
snapshots. With 40 GB of storage, you can keep many images on the Amigo,
and if you run out of space, you can back them up to a flash drive using the
USB-C port.
An overview of the buttons and other components of your Amigo is shown
on the following two pages to help you acquaint yourself with the device. A
review of Instruction Basics (page 4) will help you understand the device and
quickly grasp the instructions found in this book.
Enhanced Vision
2Amigo Advanced Features and Functions

Enhanced Vision
Amigo Advanced Features and Functions 3
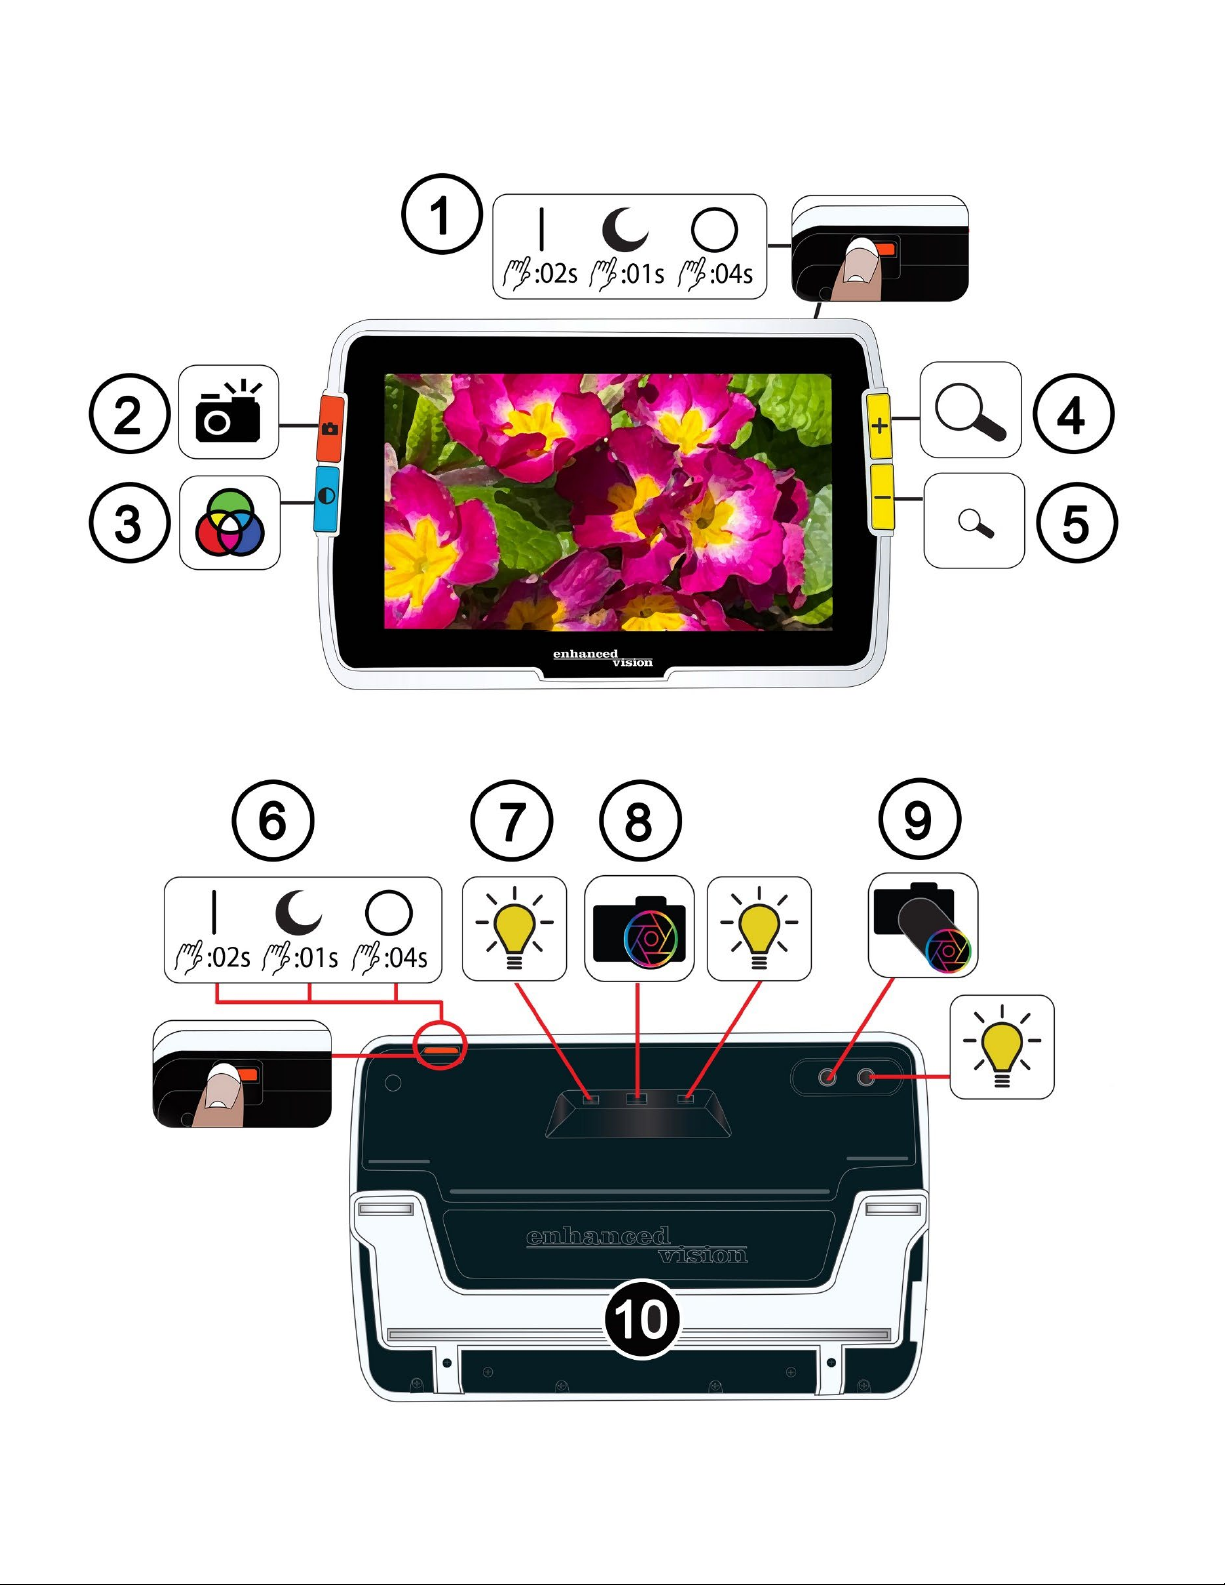
Amigo Components
The previous page shows the front and back of the Amigo, numbering and
graphically describing each of its components. The numbered components
are listed below.
Top
1. Power button on / standby / off (orange)
Front
2. Snapshot button (orange)
3. Color Mode button (blue)
4. Zoom In / increase magnification button (yellow)
5. Zoom Out / decrease magnification button (yellow)
Back
6. Power button on / standby / off (orange)
7. Lights
8. Camera lens (magnification)
9. Camera lens (distance)
10. Built-in stand
Left side
When the Amigo screen is facing you, the left of the device includes a USB-C
port, a status light, and an audio jack (for use with future enhancements).

Enhanced Vision
4Amigo Advanced Features and Functions
Instruction Basics
This section describes some Amigo basics and lays out standards to help you
quickly grasp the directions throughout this document.
Naming Conventions
When steps refer to a physical button on Amigo, the button name is
capitalized, such as the yellow Zoom In button.
When steps refer to text on a screen in the Amigo application, the text is
bold. For example, the Appearance menu is in boldface, as well as the Font
Size option and the Font Size screen.
Button Presses
This document refers to button presses in several ways, depending on the
function being explained:
•Press and release the button to perform a task, such as press the Zoom In
button to magnify the image.
•Press the button for a certain number of seconds to perform a task, such
as press the Power button for 4 seconds to power off the Amigo.
•Simultaneously press two buttons and hold for 0.5 seconds, such as press
and hold Zoom In + Zoom Out for 0.5 seconds to go to the Panning mode.
Note: Button presses are not queued, so wait until the system has responded
before pressing another button.
User Interface Conventions
You can anticipate certain user interface conventions while learning your
Amigo:
•Sound feedback is only provided for the camera shutter sound when
capturing a snapshot or adjusting the volume level. Amigo has no haptic
feedback.

Enhanced Vision
Amigo Advanced Features and Functions 5
•One Sans Serif font is available between 24 pt and 72 pt, and 28 pt is the
default. You can change the default font size using the Font Size screen, or
you can change it dynamically while you are in Menu view by pressing and
holding Zoom In + Zoom Out for 0.5 seconds, then pressing either Zoom In
or Zoom Out to change the font size.
•No bold, italics or underline are available. The default color combination is
white on black. True color is always available.
•The default view is Live view, showing the image currently seen by the
camera.
•Disabled functions are not displayed. If you have panned as far right as you
can go, for example, then the button hint for moving right is not shown.
Printing this Document
This document is formatted for double-sided printing on full-size 8.5-inch by
11-inch paper with odd pages on top (right side) and even pages on the back
(left side).

Enhanced Vision
6Amigo Advanced Features and Functions
Where to Begin
Review this section before using the device. An overview of the device and
instructions for completing the following tasks will get you started:
1. Connect the power supply.
2. Charge the battery until the status light is solid green.
3. Power on the device.
4. Complete first-run setup instructions.
The remainder of the document provides step-by-step instructions for using
product features.
Package Contents
Listed below are the contents of your Amigo package:
•Amigo device
•Protective carry case
•Lens cloth
•AC adapter power supply
Note: Style may vary depending on country.
•USB-C to USB-A power cable
•Information for Use (IFU) documents—Amigo Setup and Use and
Amigo Safety and Care
Enhanced Vision
Amigo Advanced Features and Functions 7
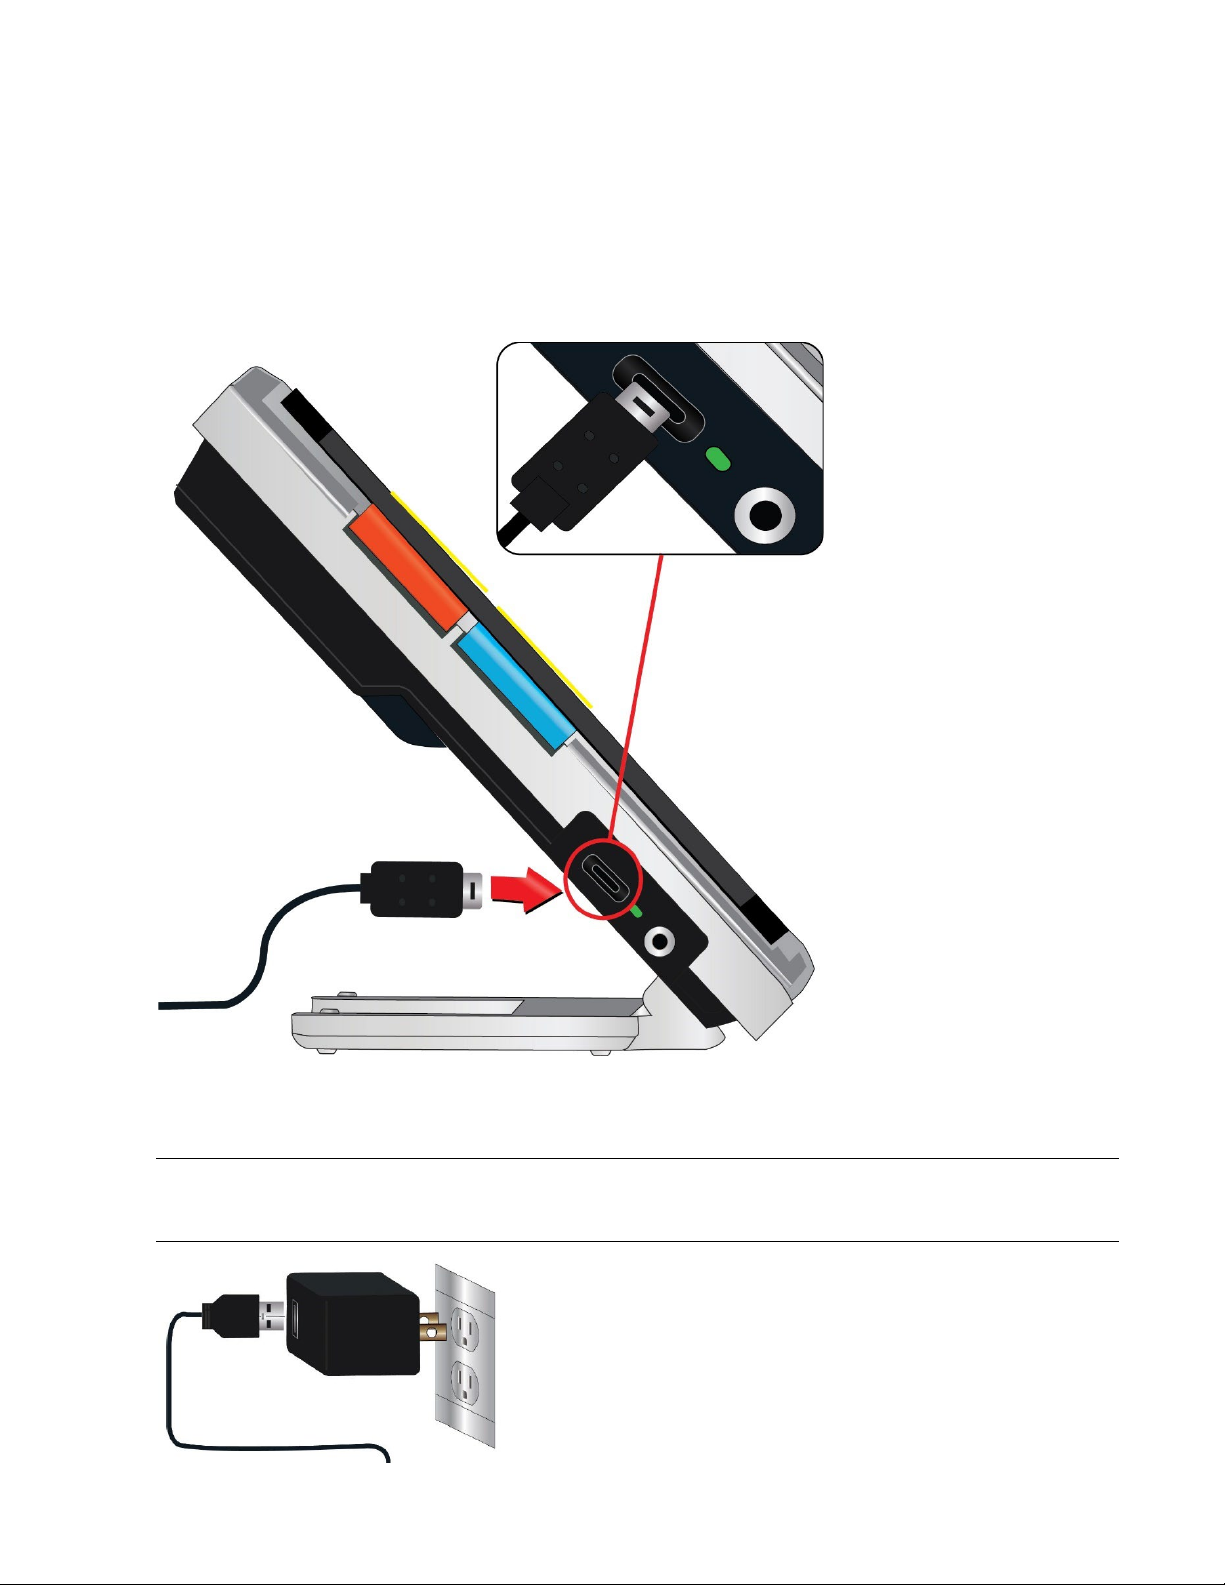
Connect the Power Supply
To connect the Amigo to the AC adapter/power supply:
1. Connect the tip of the included AC adapter/USB-C cable to the USB-C
connector port.
2. Plug in the other end of the AC adapter/power supply to an available AC
wall outlet.
Note: A surge protector is recommended for protection during an
electrical storm or other events that may cause an electrical surge.

Enhanced Vision
8Amigo Advanced Features and Functions
International Orders
International orders receive inserts for multiple outlet types.
Install Insert
To install the correct insert for your country:
1. Find the tab at the top of the insert.
2. Push down until it clicks.
3. Plug into an outlet to begin charging.
Charge the Battery
Fully charge the battery before first use. Wait until the battery charging status
light is solid green to use the device. Your Amigo battery life is about 3.5
hours, depending on usage.
Amigo’s rechargeable battery can be continuously charged, even while the
unit is in operation. It is recommended that you charge the Amigo when its
battery charge level drops below 40 percent of full. You cannot overcharge
the battery.
Enhanced Vision
Amigo Advanced Features and Functions 9
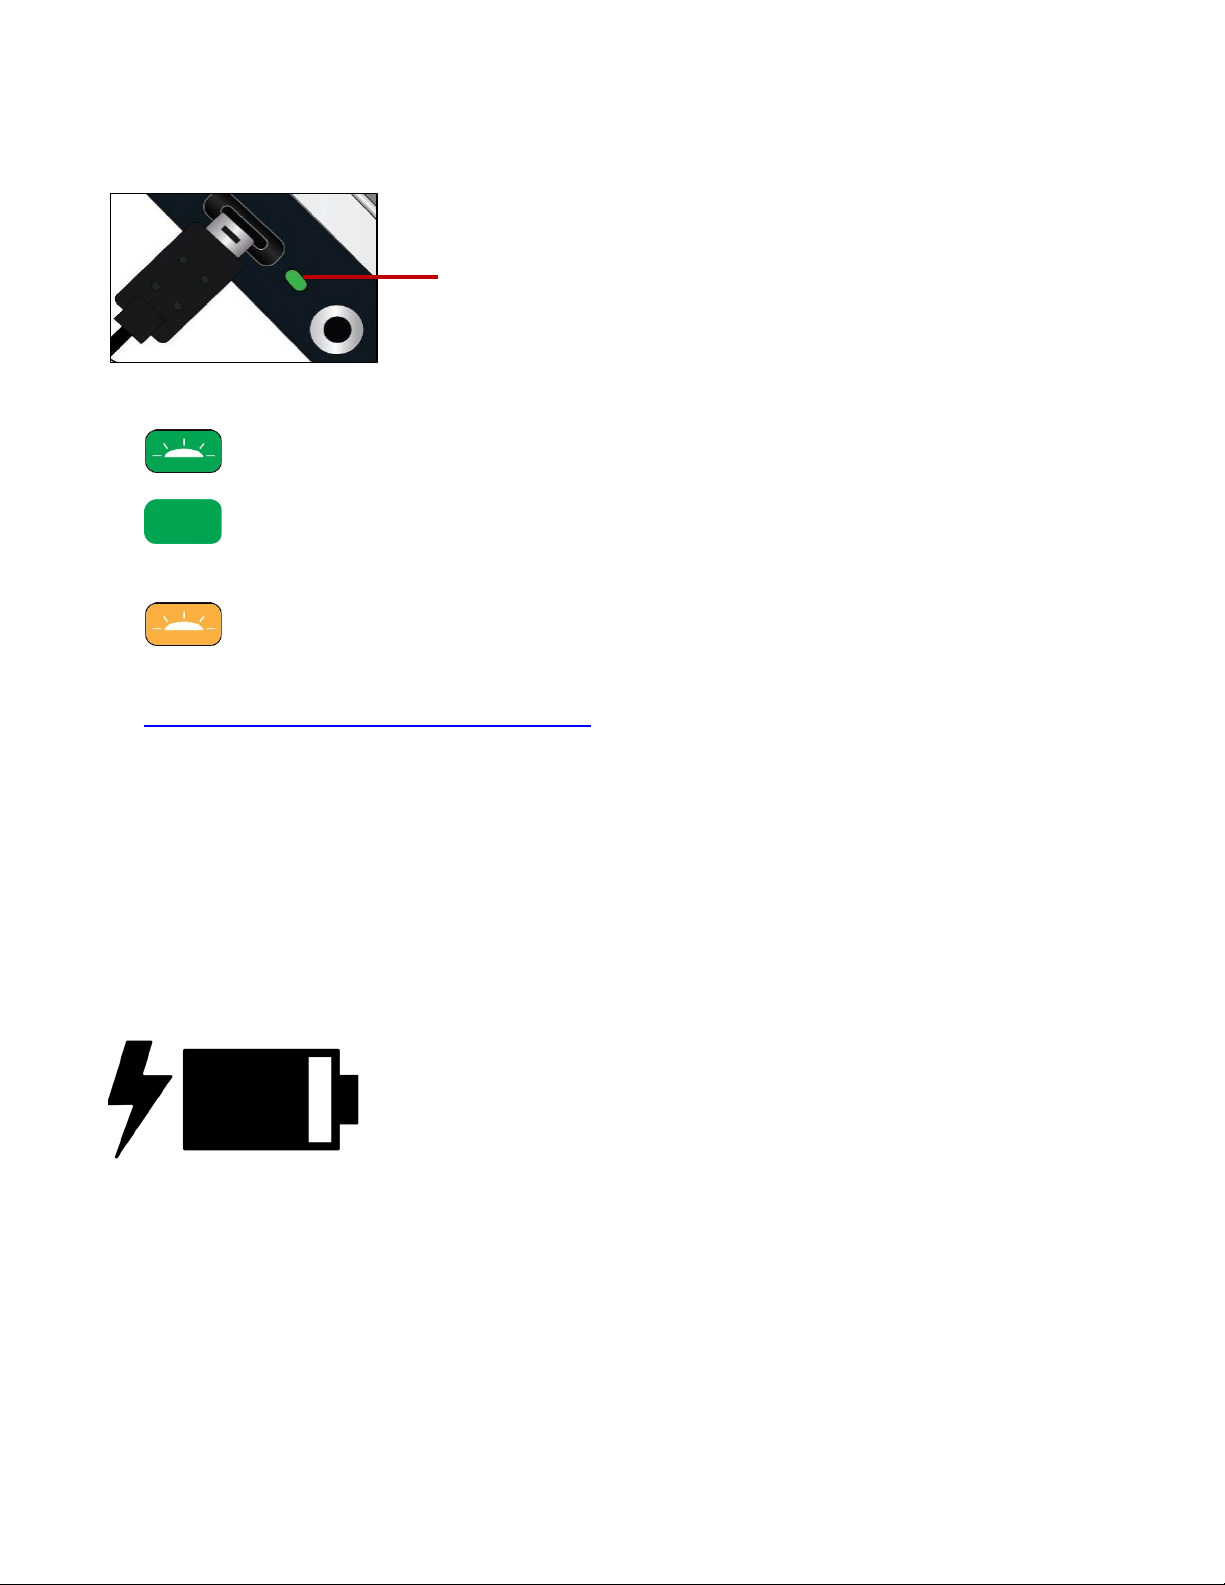
Status Light
An LED light next to the USB port indicates the device’s charging status.
•A blinking green light means the battery is charging.
•A solid green light means the battery is fully charged and the
charger is connected.
•A blinking yellow light indicates a charging failure. If this occurs,
confirm you are using the charger provided with your Amigo; if so, contact
Enhanced Vision technical support for assistance. (See page ii.)
Battery Symbol
A battery symbol on the bottom right of any menu screen indicates the
remaining charge. As the battery is charged, the blocks are filled with each
segment representing about 20% of the total charge capacity. A fully charged
battery is represented by a solid block.
When charging, a lightning bolt displays to the left of the battery symbol.
If the battery is low and the device is not charging, the battery icon is flashed
across the screen to inform you.
LED

Enhanced Vision
10 Amigo Advanced Features and Functions
Power On/Off
The orange Power button located on the top of the device is used to turn the
device on/off or put it in Standby mode.
Mode Action Result
On Press and release Standby mode
On Press 4 seconds Powers off
Off Press and release Shows battery info while charging
Off Press 2 seconds Powers on
Standby Press and release Wakes device
What to Expect When Powering On
When you power on your Amigo:
1. The Amigo logo displays, indicating the device is starting up.
2. An animated splash screen with the Enhanced Vision logo and the Amigo
logo displays.
3. Live view displays, showing the image currently seen by the camera.
What to Expect When Powering Off
When you power off your Amigo:
1. The message “Powering Down” displays.
2. The screen darkens and becomes blank.

Enhanced Vision
Amigo Advanced Features and Functions 11
First-Run Setup Instructions
The first time you use Amigo, you will be asked to complete a short wizard to
set default values. Use the button hints to make selections. (If you need
additional directions, see Menu View on page 25.)
1. On the Select Menu Language screen, press the bottom yellow Zoom Out
button to move down the list or Zoom In to move up. Highlight the
language you want used to display the menus, screens, and messages.
English is the default.
2. Press the blue Color Mode button to select the language and move to the
next screen.
3. On the Font Size screen, press the Zoom buttons to highlight the text size
you want in the menus. The number on the screen is the same size as the
text that will be displayed.
4. Press the Color Mode button to select the text size and move to the next
screen.
Note: To display the previous screen, press the orange Snapshot button.
5. On the Select Date screen, repeat these sub-steps to set the current
month, day, and year:
a. Use the Zoom buttons to move up and down the column until you
highlight the correct value.
b. Press the Color Mode button to select the highlighted value and move
to the next column.
c. When you have selected a value in all three columns, the date is set for
Amigo and the next screen displays.
6. On the Select Time screen, use the Zoom buttons to move up or down
the left column of numbers. When the correct hour is highlighted, press
the Color Mode button. If you select 10, for example, the time is set at 10
o’clock.

Enhanced Vision
12 Amigo Advanced Features and Functions
7. In the next column of numbers, highlight the correct minutes after the
hour and press the Color Mode button. If you select 52, for example, the
time would be set at 10:52.
8. In the third column, highlight AM or PM and press the Color Mode
button. If you select AM, for example, the time would be set at 10:52 AM.
You have completed the first-run instructions and are now in Live view.
See Using the Amigo on page 13 for basic instructions on viewing items.
Enhanced Vision
Amigo Advanced Features and Functions 13
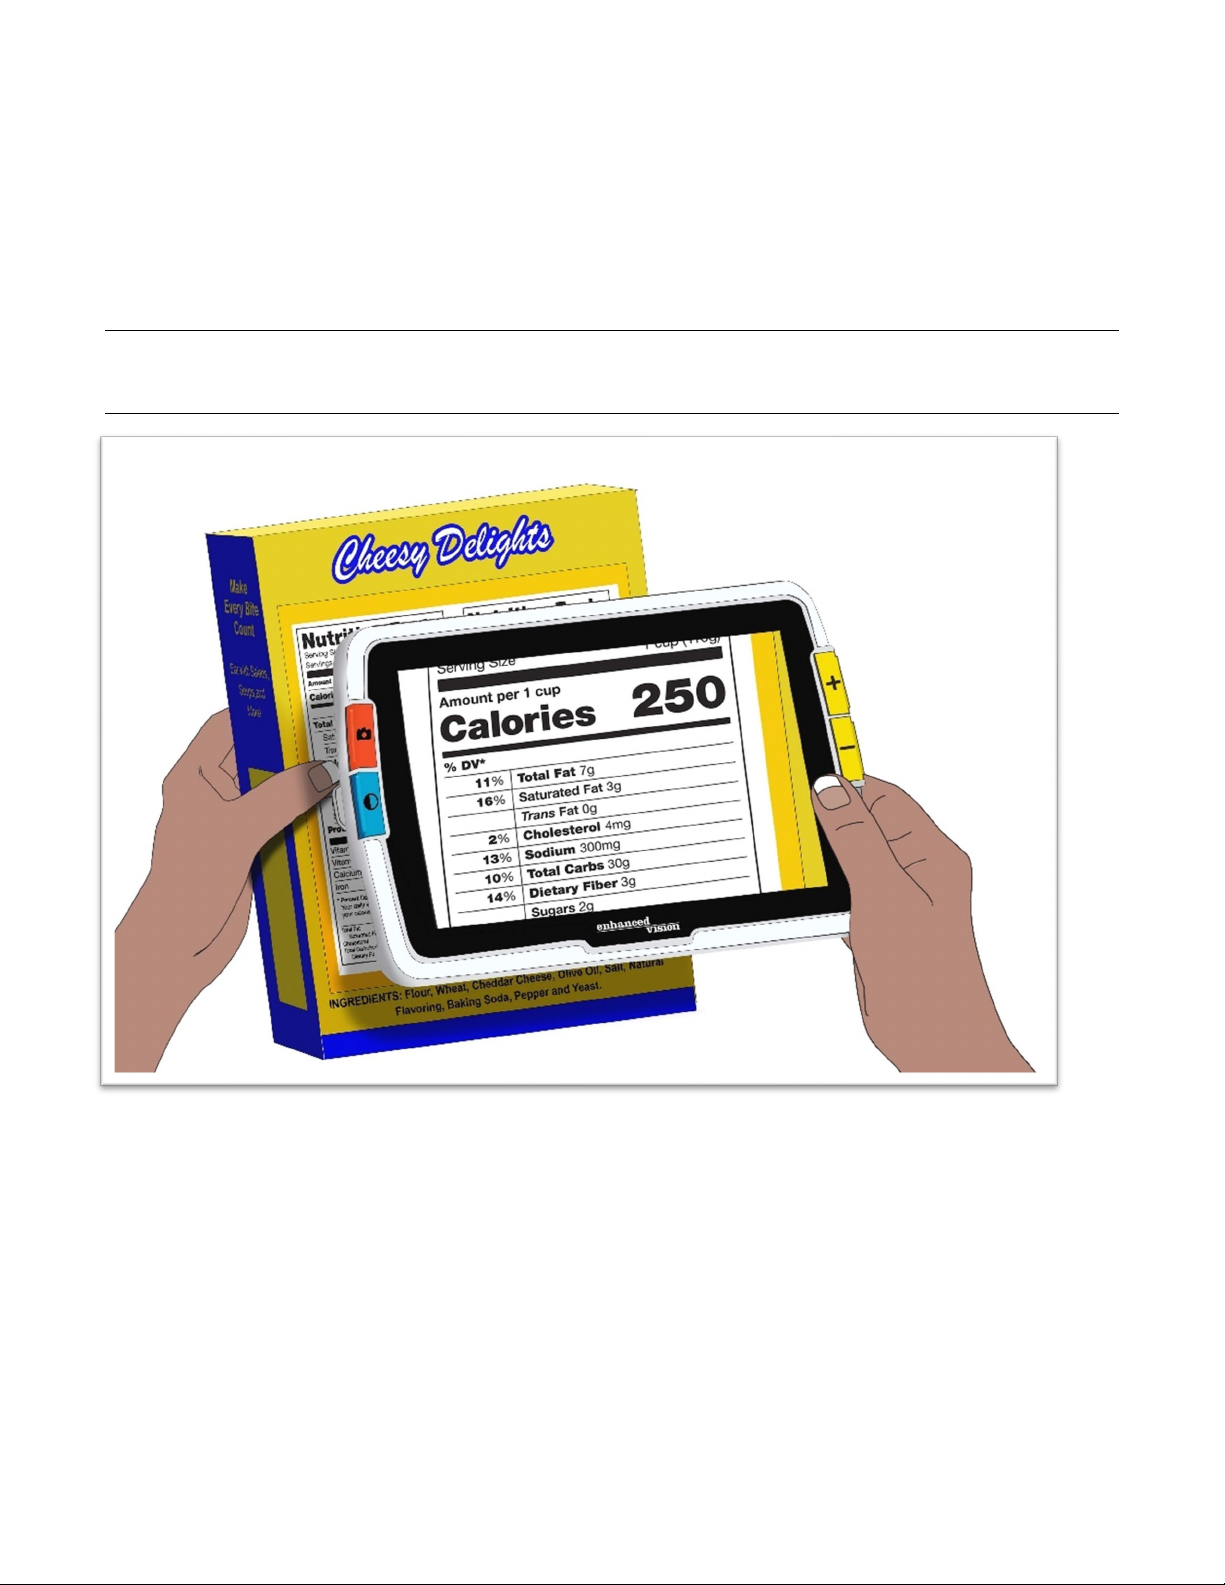
Using the Amigo
Amigo can be used for many tasks whenever you need to magnify an image.
You can hold it to check store labels, read restaurant menus, or magnify
anything nearby.
When you extend the stand, you can read material directly beneath Amigo or
you can write directly behind it. This section provides examples of Amigo’s
uses and describes how to open and close the stand.
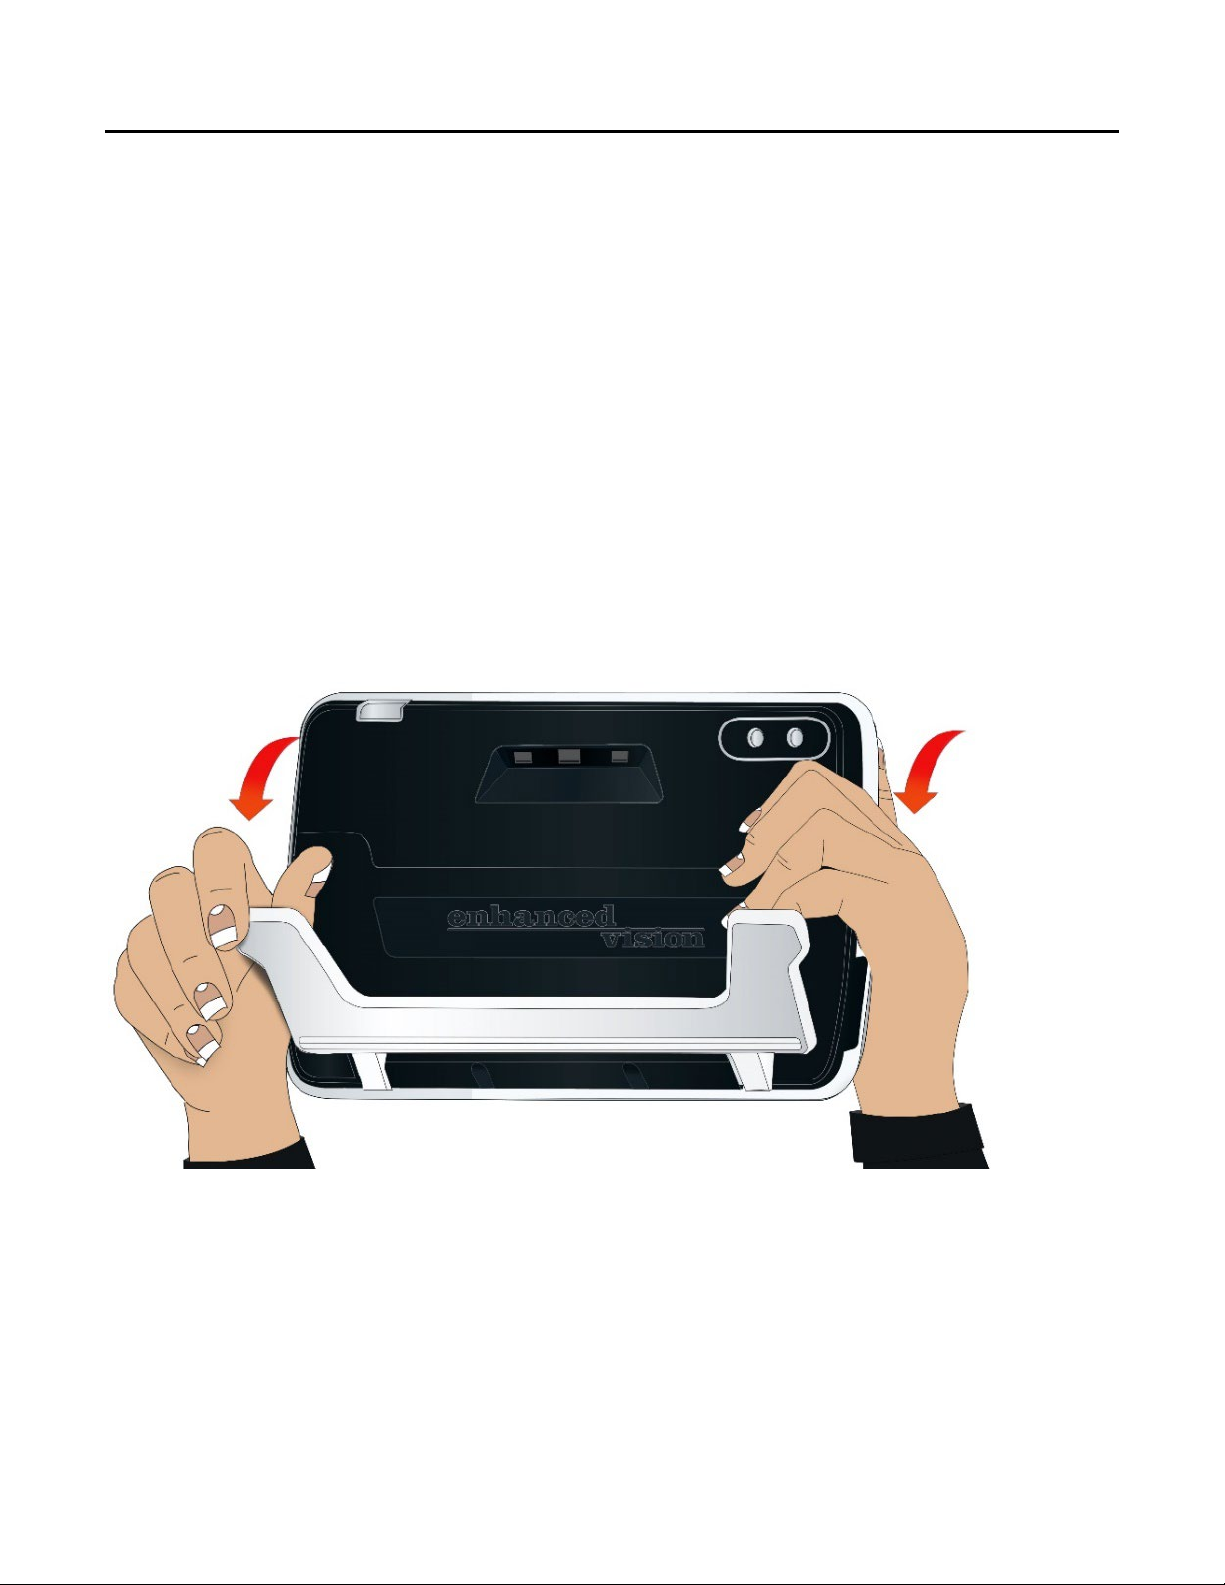
Open the Stand
To open the stand, place each hand on either side of the device and pull out
the stand to extend it.

Enhanced Vision
14 Amigo Advanced Features and Functions
Close the Stand
To close the stand, hold Amigo so the display faces you. Firmly hold the sides
of the device while squeezing the legs into the body until they snap closed.
Note: When closing the stand, ensure your fingers are outside of the
recessed area on the rear of the Amigo to reduce the risk of your fingers
getting pinched.
Reading
You can either read objects while holding the device or you can extend the
stand and place the device on top of the reading material.
When you read with the stand exended, place the paper directly under the
device on a stable, level surface. By default, an illumination LED on the back
of the Amigo shines on the viewing area.
When you read, you can improve the visibility of the text being displayed by
changing the color mode and level of magnification.
Enhanced Vision
Amigo Advanced Features and Functions 15
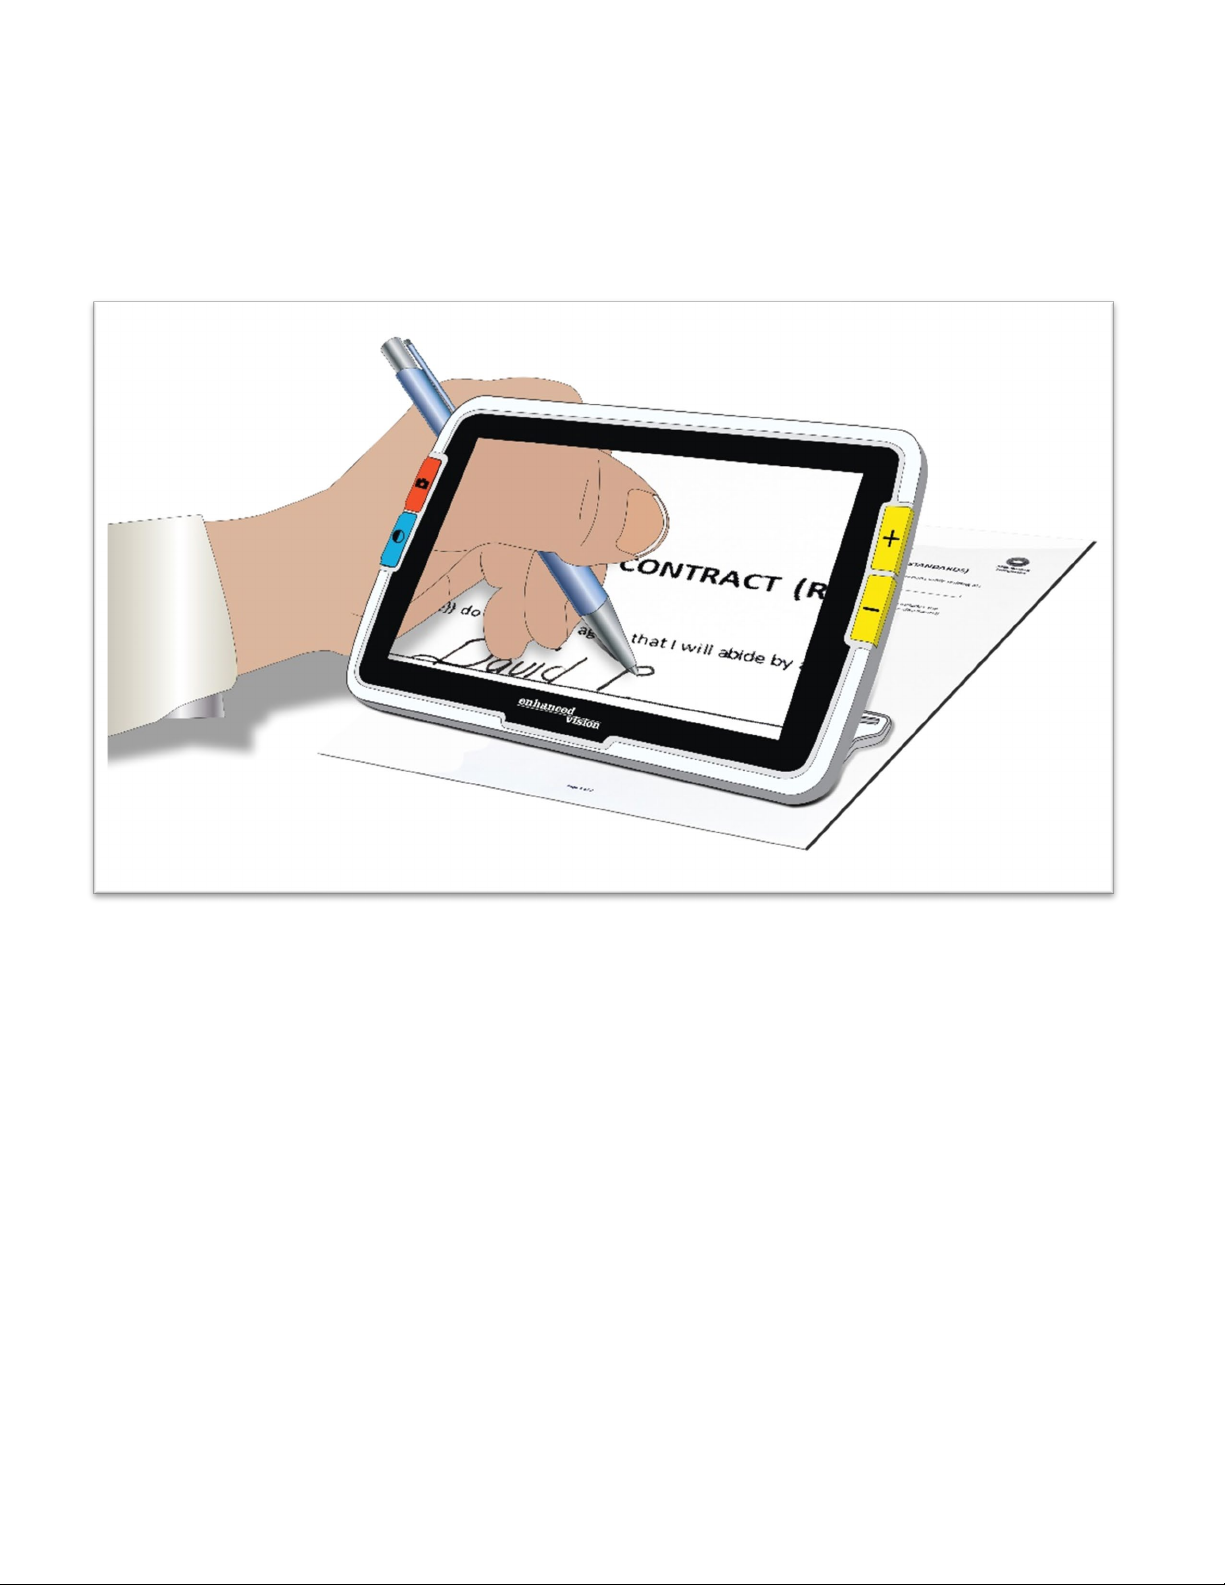
Writing
To write, extend the stand and place the writing paper under the Amigo.
Position the device so you can view your writing on the screen as you write.
Enhanced Vision
16 Amigo Advanced Features and Functions
Distance Viewing
You can hold the Amigo to view objects a short distance away. The distance
camera is ideal for spotting labels, price tags, or receipts while carrying the
device.
Note: You must close the stand to engage the second camera for distance
viewing.
Table of contents


