Vitea Care DRVR0B User manual

1
USER’S MANUAL
Fun Baby
Rehabilitative car seat
DRVR0B
Edition AM 09.2019

2
Table of contents
1. Introduction..................................................................................................................................... 3
2. Product description.......................................................................................................................... 3
3. Indications ....................................................................................................................................... 4
4. Contraindications............................................................................................................................. 5
5. Use................................................................................................................................................... 5
6. Safety of use.................................................................................................................................. 14
7. Everyday use and maintenance ..................................................................................................... 15
8. Symbols......................................................................................................................................... 16
9. Contact details............................................................................................................................... 17
PLEASE READ CAREFULLY BEFORE USING WHOLE OF INSTRUCTIONS

3
1. Introduction
Thank you for choosing our product. We are deeply convinced that it will meet your expectations.
Please read this document before first use. This manual is passed in order to provide the necessary
information for the safe use of the device. The correct application of the recommendations will
contribute significantly to extend the durability and aesthetics of the product. We want to emphasise
that constantly we are trying to improve the quality of our products, which may result in minor
changes that are not included in the manual.
2. Product description
Illustration 1.
1. Headrest adjustment handle
2. Headrest
3. Shoulder sleeve
4. Shoulder strap
5. Reducing insert
6. Belt adjuster flap
7. Front pull belt
8. Seat mount
9. Seat fabric cover
10. Red snap button
11. Crotch Mat
12. Buckle
2
6
7
13
8
14
9
1
3
4
5
10
11
12

4
13. Crotch pad
14. Belt length adjustment button
Illustration 2.
15. Headrest height adjustment button
16. Blue guide slot
17. Upper fastening belt
18. Belt adjuster
19. Metal buckle
20. Rotate the handle
21. FIX button
3. Indications
The rehabilitation children car seat “Fun Baby” is designed for the transport of children with special
needs in vehicles. The child seat is suitable for kids from birth up to 36 kg body weight.
The clinical indications include:
•cerebral palsy
•hypotony syndrome of unspecific genesis
•muscular dystrophy
The car seat is characterized by its design, which provide for additional seating safety, stabilization
of head and pelvis.
15
16
17
18
19
20
21
9

5
4. Contraindications
Conditions requiring stabilization and support of the lower limbs.
5. Use
•After unpacking the box, check if it contains all parts in accordance with the list of elements
set out above.
•Ensure that all components have no visible damage. If any doubts, please contact the
manufacturer.
•Do not use the stroller until all parts are properly connected.
5.1. Installation.
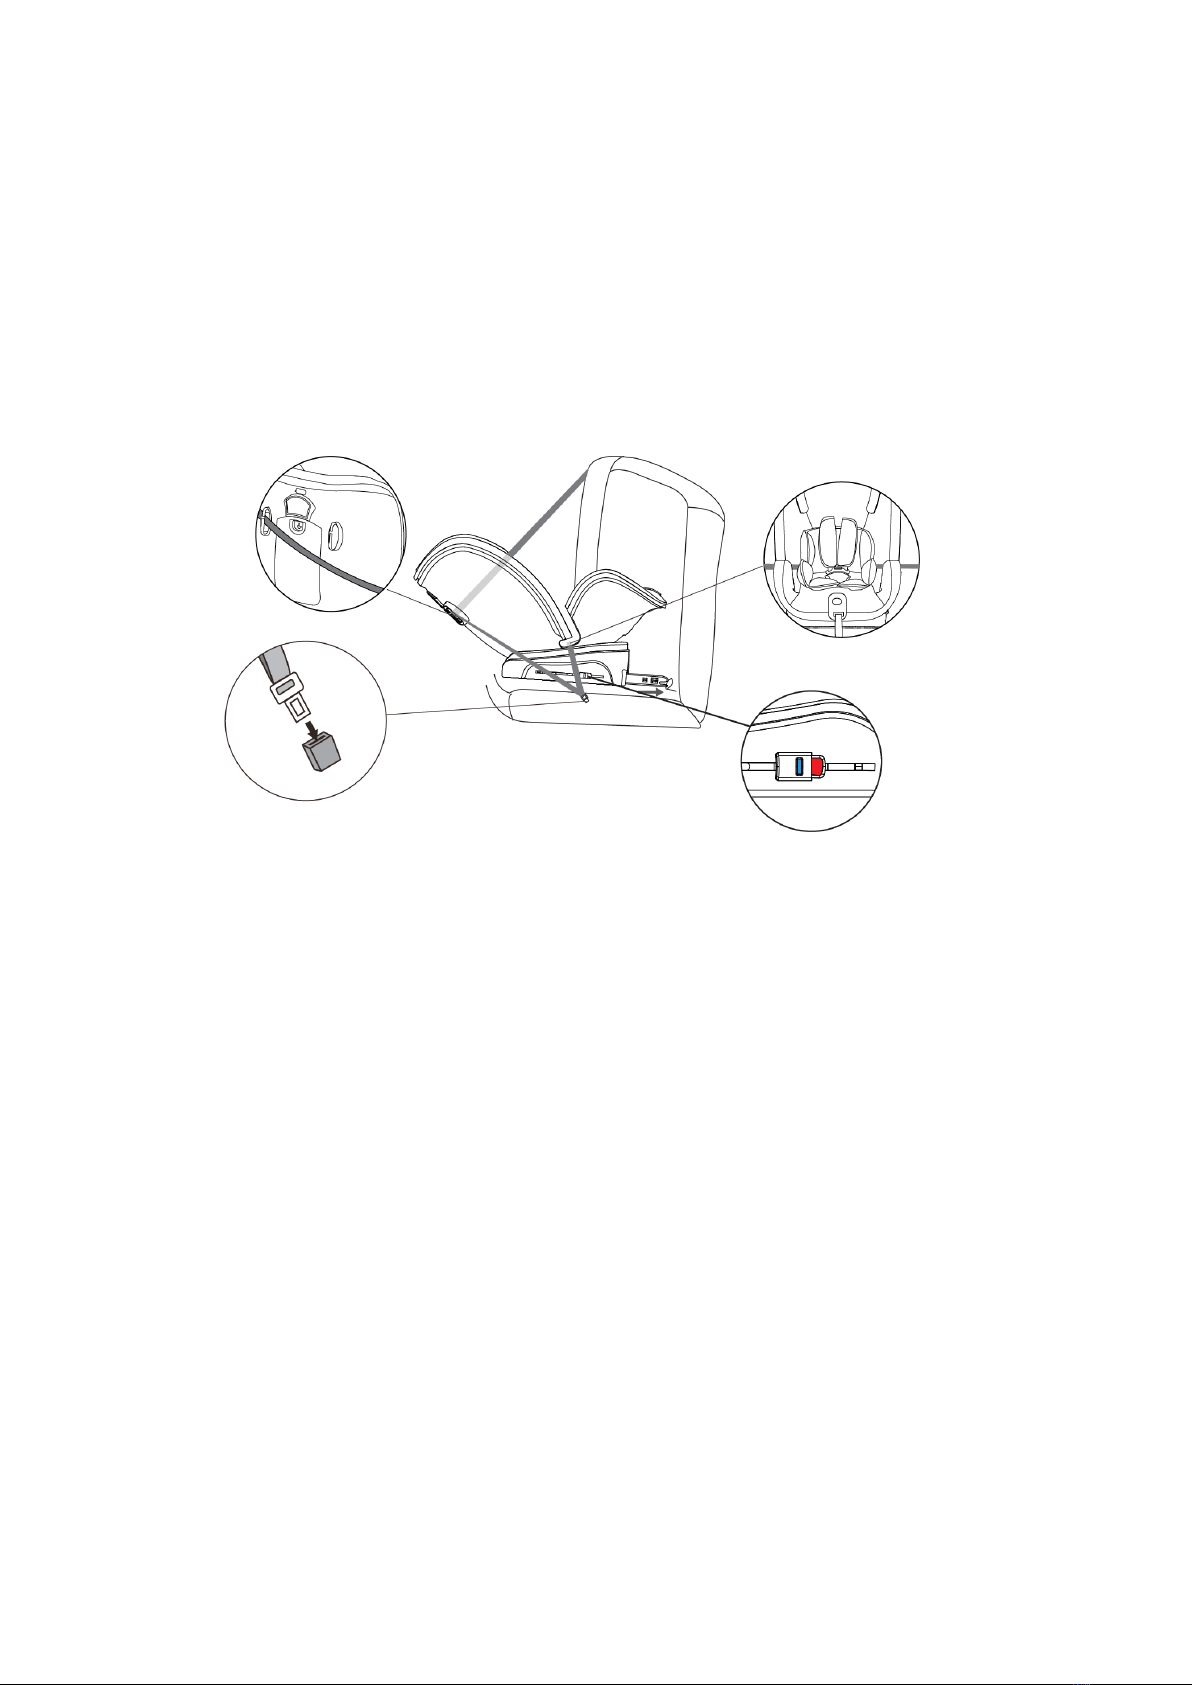
FIX PREPARATION
•If your vehicle is not fitted with a ISOFIX guide sleeve, insert the two-FIX guide sleeve (2)
attached to the child safety seat into the ISOFIX fixing device (1) (Illustration 3.).
•Tip: FIX fixing device is located between the seat and backrest of the vehicle.
•Press FIX red button to pull the FIX release Griphook (3) out to the longest position
(Illustration 4.).
•Align vehicle FIX latch, insert from the guide sleeve, hear snap sound, observe the sign on the
FIX when red turns green indicate installation is successful (Illustration 5.), then push the
safety seat completely fits the car seat.
1
2
3
3
Illustration 3.
Illustration 4.
Illustration 5.
A car seat of this type may be used only in a car equipped
with seat belts with a 3-point tensor and a 3-point rolling-
up element, which complies with UN/ECE Rugulation nr
16 or other equivalent standards.
?1 –do not install the car seat if the airbag for the front
passanger seat is activated.
?2 –Installation of the child seat is forbidden if the
passenger seat is equipped with a 2-point seat belt only.
2-point lap
belt
2-point shoulder
and lap belts

6
5.2. ADJUST THE SHOULDER SSRAP AND HEADREST WHEN THE BABY USING 5-
POINT HARNESS (GROUP 0+, I).
•Press the central adjuster (4) to pull up the two shoulder straps (5) at the same time. Please do
not pull the shoulder pad (6) and release the 5-point belt to a longer position as far as possible
(Illustration 6.).
•Pull up adjusting headrest Griphook (7), while pulling up or pressing the headrest (8) to the
appropriate position of the child and fixed (Illustration 7.).
Properly adjust the headrest (8) to ensure best protection for the children in safe seats.
Headrest (8) height must be adjusted to the same of shoulder strap and child shoulder height
(Illustration 8.).
NOTE: Shoulder straps outlet can not be under the child's shoulder or above the height of the
ear.
5.3. ADJUSTION THE HEADREST WHILE USING 3-POINT VEHICLE SEAT BELT
(GROUP II,Ⅲ)
•Pressing the headrest handle by the direction of the arrow (9), let the headrest (8) in unlock
state, so that headrest can be adjusted (8) up and down to the appropriate position, release the
headrest adjusting handle (9), the headrest will be Automatic locked (Illustration 9.).
•If the position of the headrest (8) is not suitable for kid, you can adjust the headrest by
Griphook (7), and refer to 5.2 chapter.
•Properly adjusting of headrest (8) to ensure that the car seat belt oblique section (10) is in the
best position to provide the best protection for children. Safety Seat Headrest (8) must be
adjusted to make the child's shoulder with the safety seat on the head (8) between
approximately two finger gaps (Illustration 10.).
Illustration 6.
Illustration 7.
Illustration 8.
Illustration 9.
Illustration 10.

7
5.4. BABY CAR SEAT RECLINING ADJUSTMENT (GROUP I, II, III)
•Press the adjustment handle (11) in direction of the arrow. Let the chair body (12) in an
unlocked state so the seat body (12) can be adjusted slide to a suitable position, release the
adjustment handle (11), the chair is automatically locked again (Illustration 10.).
5.5. 360 DEGREE ROTATION ADJUSTMENT FOR BABY CAR SEAT
First adjust the seat to the forward 3 gears (Illustration 12.), and then pressthe adjuster to rotate the
seat reverse 180 degree, (Illustration 13. is seat reverse installation) rotate in place, loosen gear
adjuster, sway the seat, make sure the gear are locked (Illustration 13.).
In the course of vehicle driving, this seat can only be used in front or rear state,the seat must be
in a fixed state after the adjustment completed.
5.6. REVERSE INSTALLATION
0+group Installation (FIX+Vehicle 3-point safety belt)
(Suit for 0 to about 1 and half year old or 0-13KG kids using)
Attention: group 0+(0~13Kg) need to use mount cushion, sleep pad.
1. Please refer to section 5.4 to adjust the Chair body (14) to the most tilted position and confirm
it is in a locked state (cannot slide)
2. Please refer to section 5.5 to adjust the Chair body (14) to the reverse position and confirm
that it is locked (cannot rotate).
3. Please refer to section 5.1 for FIX, insert two FIX connectors into guide sleeve until you hear
Illustration 11.
Illustration 12.
Illustration 13.
Rotate the handle
8
the "tick" sound, the FIX indicator turns green, then push the safety seat completely fits the
car seat.
Attention: FIX connector correct installation only if the FXI indicator is completely turn to green.
4. Please pull out the vehicle three-point seat belt, let vehicle belly strap passes through under the
cushion pad slot (Illustration 14-A), and then pass the car seat belt through the back of two
guide grooves together (Illustration 14-B) then insert into seat belt slot (Illustration 12-C).
5. Tighten vehicle 3-point seat strap to ensure it no loose and twisted knots.
6. Open 5-point buckle then put the baby in, adjust belt to the proper position.
(Please refer to section 5.2 five-point safety belts adjustment.).
5.7. FRONT INSTALLATION
Group Ⅰinstallation (FIX+vehicle 3-point belt+top tether)
1. Group I (fit for about 9 month to 4 years old or 9-18kg weight kid using).
NOTE: Group I (9~18KG) (Illustration 16.) Disassemble sleeping pad.
2.Please refer to section 5.5 to adjust the chair body (14) to the forward position and confirm that it
is locked (cannot rotate).
3.Please refer to section 5.4 to adjust the chair body (14) to the proper position and confirm that it is
in locked state (cannot slide).
4.Please refer to 5.1 section, Align vehicle FIX latch, insert from the guide sleeve, hear snap sound,
observe the sign on the FIX when red turns green indicate installation is successful (Illustration 5.),
then push the safety seat completely fits the car seat (Illustration 15.).
Attention: FIX latch is installed correctly only if the FIX indicator complete turn green.
5. Take out the sleeping pad from baby car seat.(Illustration 16-B).
6. Please pull out the vehicle three-point seat belt, let vehicle belly strap passes through under
the cushion pad slot, then put vehicle 3-point shoulder strap through side of headrest guide
Groove (Illustration 16-A), then insert into seat belt slot. Vehicle belts should pass below
from the left pad (Illustration 16-C).
Illustration 14.
14-B
14-C
14-A

9
7.Press the button of top tether releasing the top tether to the appropriate length (Illustration 17.)
8. Please hook the top tether to the recommended fixing points. Please find the logo out in your vehicle
or Consult to your vehicle vendor.
9.Pull the top tether strap free parts, so that the controls are tightened until the indicator of the top
tether belt adjuster is completely green To ensure the safety of the baby car seat, after each
installation, please pay attention to check the following items:
•Ensure that two FIX connectors are properly connected to the vehicle FIX latch and that
the FIX connection indicator turns green.
•Ensure child safety seats are tightly attached to vehicle seats.
•Make sure the top tether belt tightly and the indicator is green.
•Make sure the five-point seat belt is attached to children, but not to squeeze children.
•Make sure the straps belt adjust are properly, not twisted.
•Ensure that the height of the shoulder pads is the same as the height of the child's shoulders.
•Ensure that five-point snap is locked.
•Make sure that vehicle 3-points safety belt install correctly.
6.2 GROUP II, III INSTALLATION (FIX + 3-POINT SAFETY BELT + TOP TETHER)
1. Group II, III (fit for about 3~12 years old or 15-36 KG baby using)
Note: II, III Group (15~36kg) five-point belt disassemble.
15
16
16-A
16-B
16-C
Illustration 17.
Illustration 18.

10
2.Ensure the 5-point harness is properly disassembled.
3.Refer to section 5.3 to adjust your headrest.
4.Refer to section 5.4 to adjust the chair body and confirm the lock status (can't slide).
5.Refer to section 5.5 to adjust the chair body and confirm the lock status (can’t rotate).
6.Please refer to section 5.1 for FIX, insert two FIX connectors into guide sleeve until you hear the
“tick” sound, the FIX indicator turns green, then push the safety seat completely fits the car seat
(Illustration 19.).
Attention:FIX connector correct installation only if the FIX indicator is completely turn to
green.
7. Place the seat in the driving direction on the vehicle,then put kid into the seat.
8.Pull out the vehicle belt around kid then insert safety belt latch into socket hear “tick”it has been
locked (Illustration 20.).
9.Car 3-point belly strap part through groove where below the armrest on both sides of the seat, To
ensure that the abdominal girdle is worn well to constrain the pelvic position.meanwhile put car
safety belt shoulder strap through the head pillow side of the Red Belt guide hook (Illustration 20-
A),then insert safety belt latch into socket hear “tick”,then Tighten car belt.
Note: Make sure the seat belt is not twisted and knotted.
10.Press the button of top tether releasing the top tether to the appropriate length (Illustration 21.).
11. Please hook the top tether to the recommended fixing points. Please find the logo out in your
vehicle or Consult to your vehicle vendor.
12.Pull the top tether strap free parts, so that the controls are tightened until the indicator of the top
tether belt adjuster is completely green (Illustration 22.).
To ensure the safety of the baby car seat, after each installation, please pay attention to check the
following items:
•Ensure that two FIX connectors are properly connected to the vehicle FIX latch and that the
FIX connection indicator turns green.
•Ensure child safety seats are tightly attached to vehicle seats.
•Make sure the top tether belt tightly and the indicator is green.
•Make sure the five-point seat belt is attached to children, but not to squeeze children.
•Make sure the straps belt adjust are properly, not twisted.
•Ensure that the height of the shoulder pads is the same as the height of the child's shoulders.
•Ensure that five-point snap is locked.
•Make sure that vehicle 3-points safety belt install correctly.
Illustration 19.
Illustration 20.
20-A.

11
5-POINT HARNESS DISASSEMBLY
1.Press the central regulator (4) while pulling down the two shoulder straps (5). Please do not pull
the shoulder pad, Try to release the five-point seat belt to a longer position (Illustration 23.).
2.Pull up headrest adjustable girphook (7),meanwhile pressing headrest (8) to the lowest position
(Illustration 24.).
Rotate the seat to rear facing:
3. Pressing down back button (31) to open the rear cover (32), (Illustration 25.).
4.Pull the shoulder strap loops (42) away from U connector (33), (Illustration 26.).
5.Place U connector (33) in groove (34) and secure it (Illustration 27.).
6.Slide the shoulder pad loops (35) from two side of extensions(36), (Illustration 28.).
7. Cover up the rear cover of the seat.
Rotate the seat to front face:
8.Pull shoulder straps (5)shoulder pads (6) onto the loops (37), (Illustration 29.).
9.Open 5-point harness buckle (19), (Illustration 30.).
10.Remove the shoulder strap from the inside slot of the seat (Illustration 31.).
11.Push 5-point buckle and belt down (Illustration 32.) until pull out the buckle from coupler ,take
off the coupler. Get 5-point slot (Illustration 33.).
Illustration 21.
Illustration 22.

12
5-point harness Installation
1. Note: The seat shoulder straps and the five-point harness are two different holes, one is 0+ group,
the other group I II III. Please select hole according to actual need (Illustration 34A).
2. Lead the buckle ribbon through the slot pad and install the metal buckle (Illustration 35.).
3. Pull the buckle ribbon upwards, making the metal buckle jammed under the gear and the Ribbon
33.
32.
29.
30.
31.
23.
24.
25.
26.
27.
28.

13
cannot be twisted (Illustration 36.).
4. Insert the removed shoulder strap (Illustration 37.) through the fixed slot on each side of the seat.
5. Snap two metal buckles and insert the clip (Illustration 38.).
Attention: Make sure strap can not be twisted.
6. Press the adjusting handle (9) to adjust the headrest (8) to the lowest position. Pull up the loop of
headrest (7) and press the headrest (8) to the lowest position (Illustration 39.).
7.Pass both left and right straps through the shoulder pads. Tighten the two straps of the shoulder straps
and shoulder pad then through to the holes, with the shoulder straps under the straps (Illustration 40.).
Return to the rear facing:
8.Press the back cover button down to open the rear cover (Illustration 41.).
9.Set the two shoulder pads respectively on both ends of the headrest holder (Illustration 42.).
10.Remove metal sheet from the groove of the instruction cover (Illustration 43.).
11.Put two shoulder straps loop into the metal sheet respectively (Illustration 44.).
Attention: Make sure shoulder and belly straps can not twisted.
12.Cover up the rear lid.
34A
35.
36.
37.
38.
39.
40.
41.

14
Assembly and Disassembly fabric cover
The fabric cover of child safety seat can be disassembled and cleaned, please read the contents of the
washing mark on the fabric cover.
Fabric disassembly:
1.Pull upward the headrest to highest position.
2.Take off headrest fabric cover.
3.Take off seat body fabric cover.
Fabric Cover Installation
Reinstall the fabric cover please do it in reverse order.
6. Safety of use.
WARNING!
Do not place the child seat on the passenger seat equipped with an airbag.
a) Do not ever leave your child unattended in the safety seat.
b) Any modifications to the safety seat without the consent of the manufacturer or other competent
authorities are not allowed. Failure to follow the manufacturer’s installation instruction may result in
danger to the child.
c) It is recommended not to expose the safety seat to direct sunlight. Otherwise it may become hot and
cause harm to the child’s skin.
d) Do not place any heavy objects on the vehicle’s rear windscreen shelf or any other places in the
vehicle if the objects are not properly secured. Such an object may affect the safety of the child
during an accident or heavy breaking.
e) Do not use the safety seat without the original pad. Do not replace the cover / pad with the one that is
not recommended by the manufacturer. It is an integral part of the product and it contributes to the
42.
44.
43.

15
safety of the child.
f) The seat can be installed in vehicles approved by the UN/ECE (Regulation No 16) or other relevant
regulations.
g) Rigid items and plastic parts of a child restraint must be located and installed in such a way so that,
under normal operating conditions of the vehicle, they cannot be trapped or jammed by a sliding
seat, a door, etc.
h) During stopovers, ensure that the child does not come out of the safety seat unsupervised. Always
lock the vehicle’s doors.
i) Do not use the safety seat if any of its parts is damaged.
j) When fastening the safety belts or harness always follow the instructions specified by the
manufacturer. All the belts securing the safety seat to the vehicle should be tight. The safety harness
must be adjusted to the physique of the child, and not twisted. Do not use any fixing points other
than those described in the manual and marked on the safety seat.
k) Make sure all the lap straps are run low enough, in order to support the pelvis.
l) Luggage or any other items should be secured so as not to cause damage to the child.
m) The safety seat should be replaced if it has been subjected to violent forces during an accident.
n) Do not install the safety seat in a way other than the one described in the manual.
7. Everyday use and maintenance
Use only natural detergents and warm water (below 30°C). Do not machine wash, tumble dry or bleach.
If there is a slight stain on the outer surface of the chair body or clasp, gently wipe with a sponge with a
neutral cleanser.
5-point safety buckle as an important safety component.
The 5-point safety card is not allowed to soak in the liquid. If the performance of the buckle caused by dirt,
please contact your distributor, with a new safety buckle replacement.
Hand wash
Do not dry-clean
Do not bleach
Do not wring
Iron with low temperature
Repair
•In case of reparation, please contact the producer.
Customer service
•If you have any questions or need help, contact the producer.

16
8. Symbols
Confirmation of compliance with EU standards
Manufacturer
Date of production
Read the user's manual
Warning
Catalog number
Serial number
Protect from humidity
Protect from sunlight
Permitted user weight

17
9. Contact details
mdh sp. z o.o.
22/24 ks. W. Tymienieckiego Street 90-349 Łódź, Poland
tel. +48 42 674 83 84
fax. +48 42 636 52 21
www.mdh.pl www.viteacare.com
This manual suits for next models
1
Table of contents


 instructions")


