Axkid One User manual

UN regulation no. 129
Instruction Manual
Axkid One+
Axkid One car seat 0-23kg, 40-125 cm
car seat 0-23kg, 61-125 cm
Axkid One

3
ISOFIX
1
2

4
5
6

7
8
9

11
1cm
10

0-60 cm 60-100cm 100-125cm
0
-
60
60-100
100-125


8
Sverige/Norge
Axkid AB
www.axkid.com
info@axkid.com
Tel: (+46) 511 760 620
UK/Ireland
Axkid Ltd
www.axkid.com
info@axkid.com
Tel: (+44) 0781 086 7644
France
Axkid AB
www.axkid.com
info@axkid.com
Tel (+33) 06 07 01 87 73
Deutschland
Axkid GmbH
www.axkid.com
kundenservice@axkid.com
Tel: +(49) 60-99 84 89 05
España/Portugal
Independent Marketing
www.infobebe.es
info@infobebe.es
(+34) 952 561 000
Polsce
Junior Andrzej Kwapinski
Horbaczewskiego 4-6
54-130 Wroclaw Dh Astra Sklep
Poland Tel: +(48) 713 549 723
Czech Republic
Domecek pro deti
www.domecekprodeti.cz
info@domecekprodeti.cz
(+42) 0727 981 815
România
SC Baby Car seats
www.axkid.ro
(+40) 0747 35 47 47
New Zealand
Clicksafe
www.clicksafe.co.nz/axkid
axkid@clicksafe.co.nz
Tel: (+64) 212 504 215
Suomi
Lastentarvike
www.lastentarvike.
info@lastentarvike.
(+358) 09 852 05 100
Malaysia
SafenSound
www.safensound.com.my
may@safensound.com.my
(+60) 358 70 22 84
Greece Ελλάδα
Serbia Србија
LETO shop
www.letoshop.gr
christos@letoship.gr
(+30) 211 102 67 30
Eesti
GreenHansa OÜ
www.beebipood.ee
(+372) 5300 8000
Latvia
Muki
www.muki.lv
(+371) 292 828 98
Lietuva
Kotryna Group
www.kotrynagroup.com
kotryna@kotryna.lt
(+370) 521 322 54
South Africa
Quality Imports SA & #Carseatfullstop
www.qualityimportssa.co.za
(+27) 11 789 7119
Ísland
Leiftur
www.leiftur.is
kristmann@leiftur.is
(+354) 821 25 37

10-19
20-29
DE
30-39
ES
40-49
FR
50-59
PL
EN
60-69
SV
70-79
100-109
80-89
110-119
90-99
120-129
NO
LV
DK
PT
FI
RO

10
Thnk you for choosing Axkid One
Read this instruction manual before installing Axkid One car seat in your vehicle.
For more information and installation videos visit www.axkid.com.
Axkid One car seat is a rear-facing car seat approved for children
with a height between 61-125 cm or with a maximum weight of 23 kg.
Axkid One + car seat is a rear-facing car seat approved for children
with a height between 40-125 cm or with a maximum weight of 23 kg.
This is an i-Size Enhanced Child Restraint System. It is approved according to UN Regulation No. 129, for use in, i-Size
compatible vehicle seating positions as indicated by vehicle manufacturers in the vehicle user’s manual. If in doubt,
consult either the Enhanced Child Restraint System manufacturer (www.axkid.com) or the retailer.
Important information
To maximizeyourchild’s safety, itis importantthatyou keep following in mind:
• Always follow the instructions in this manual. An incorrect installation may seriously aect the safety for your child.
If in doubt, contact yourretailer who can demonstrate a correctinstallation.
• Keep this instruction manualforfuturereference.If manual islost,you can findit onlineat www.axkid.com
• Do not use Axkid One car seat in a seating position where an active frontal airbag is fitted. If you still wish to install
AxkidOne car seatinthis locationthe airbagmustbe switchedo according tothe vehiclemanufacturersinstructions.
• Should you have an accident, no matter how small, your car seat should always be replaced. It may have damage that
is nonvisual and could seriously aect the safety of your child. For this reason, Axkid does not recommend purchasing
secondhand carseats.
• IfAxkid Onecar seathasbeenexposedto direct sunlight,makesurethe carseatisnottoo hotbeforeinstallingyourchild.
• Neverleave yourchild unattended in thevehicle.
• Ensurethatanyluggageorlooseobjectsaresecuredinyourvehicleastheymaycauseinjuriestopassengersinthe event
ofan accident.
• EnsurethatAxkid Onecar seatisinstalled ina way whereno partsbecome trappedby movable seats,car doors, etc.
• AxkidOne car seatmayonly be installedrear-facing.
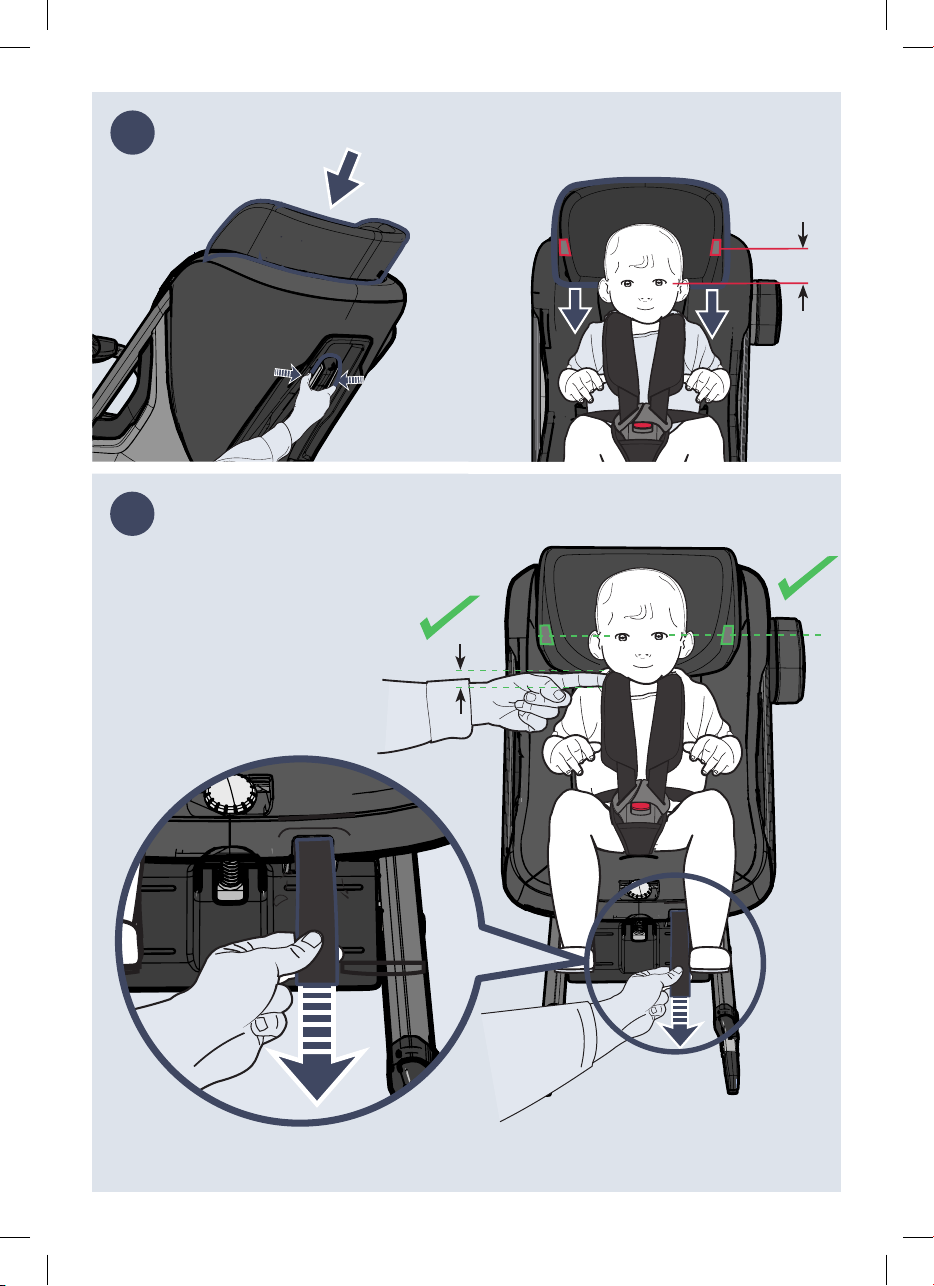
• Always make sure that the harness is adjusted to correctly fit your child’s body. The harness is adjusted by moving the
head support.
• Make sure that thechild’s back is pushedagainst thecar seat when restraining your child with the harness.
• Always make sure that the harness is firmly tightened against your child and that the buckle is completely locked, you
should notbe able topinch the straps.
• Make sure thereis notwist inthe harness.
• Always make surethe support-legis initscorrectposition andhavecontactwith thevehiclefloor.Check thattheindicator
ontop ofthe support-legis greenand thatyou don’t hearany beepingsound fromthe support-legfoot.
• Do not attempt to disassemble nor modify any part of Axkid One car seat. The warranty and the safety performance of
AxkidOne car seatcould beaectedif doingso.
• Never use Axkid One car seat without the seat textile cover. The seat textile cover is a safety feature and may only be
replacedwithan Axkid originalseat textilecover.
• Readthe vehiclehandbook tofind whichseating positionsis suitableforthis seat.
• Axkidrecommends toalwaysuse a seatprotection toprotect your vehicle seatfromscratchesand dirt.
• Ifany doubts,contactthe retailer wherethe carseat waspurchased orcontactinfo@axkid.com

11
Table of content
Parts
Allowed and disallowed positioning of
Axkid One car seat
Installing Axkid One car seat in the vehicle
Restraining your child in Axkid One car seat
Seat adjustments
Adjusting Axkid One car seat
Removing Axkid One car seat from the vehicle
Care and maintenance
Warranty
12
14
15
16
17
17
18
18
19
EN

A
B
C
D
E
I
H
G
F
J
K
L
M
N
O
P
Q
R
S
T
U
V
X
Y
12
Parts

13
Shoulderstraps(A)
Bucklerelease button(B)
Front brace releasebutton(C)
Front brace (D)
Headrest (E)
Eye levelindicator(F)
ASIPpad (G)
Reclineposition knob(H)
Support-legbutton(I)
ASIPconnector (J)
Front brace knob(K)
Sidecover(L)
Headrest adjustmentbuttons(M)
Legroom adjustment button(N)
Backhandle (O)
Support-legposition indicator(P)
Support-legreleasestrap(Q)
Support-leg(R)
Soundindicator(S)
Harnessrelease button(T)
Harnesstension strap (U)
ISOFIXlocking indicators(V)
ISOFIXbuttons(X)
ISOFIXconnectors (Y)
EN

14
Allowed and disallowed positioning of
Axkid One car seat
Axkid One car seat can only be installed rear-facing using ISOFIX. It is approved for use in all i-Size approved
seating positions but may also fit in other non i-Size-approved ISOFIX seating positions. Check your vehicle instruction
manual to find suitable seating positions and check the vehicle list on www.axkid.com
Frontpassengerseat withISOFIX(no activeairbag) YES/NO*
Frontpassengerseat withISOFIX(activeairbag) NO
Rearpassenger seatwithISOFIX YES
Sideand rearfacingseatswithISOFIX NO
SeatswithoutISOFIX NO
IMPORTANT: If you wish to install your Axkid One car seat in a location where a frontal airbag is fitted, the airbag must be
disconnected according to your vehicle manufacturer instruction. Note that some vehicles require an authorized service
center to disconnect the airbag.
* The General Regulation of Trac in Spain, in its article 117, establishes the prohibition of driving with children of stature
equal to or less than 135 centimeters located in the front seats of the vehicle, without exceptions.
Never install a child restraint in a passenger
seat where an active airbag is fitted.

15
Installing Axkid One car seat in
the vehicle
Before installing Axkid One car seat in your vehicle, minimize its size by releasing the legroom
adjustment button (N) and slide the seat towards the front brace (D). Fold down the support-leg (R)
until a click can be heard and the support-leg position indicator (P) turns green.
Release the front brace release button (C) and fold the front brace (D) towards the seat. Keep holding
the front brace (D) with one hand and grab the back handle (O) with the other hand and lift the Axkid
One car seat into your vehicle with the front brace (D) first and then turn it to a rear-facing position.
Push the ISOFIX connectors (Y) into the ISOFIX connection points in the vehicle until you hear a click
and both ISOFIX locking indicators (V) turn green.
Let go of the front brace (D) which will start tensioning itself against the vehicle seat. When it stops,
turn the front brace knob (K) clockwise until you feel and hear a click, the front brace (D) should now
be firmly pressed against the vehicle seat. The front brace knob (K) has a built-in torque limiter and
the click indicates that the front brace (D) is tightened correctly and cannot be tightened any more.
Push the support-leg button (I) and pull the support-leg (R) downwards until it is in contact with the
vehicle floor. Let go of the support-leg button (I) and lift the car seat upwards to further extend the
support-leg (R) until you hear a click. The support-leg (R) should now be locked and firmly pressed
against the vehicle floor. Note: The Axkid One car seat is equipped with a beeping sound indicator (S)
that will keep beeping until the support-leg (R) is firmly pressed against the floor, indicating a correct
installation.
Push the ASIP pad (G) into the slots on the ASIP connector (J) and slide downwards, the ASIP pad
(G) will click into place. If there is a plastic cover on the ASIP connector (J), remove it and place it on
the ASIP connector (J) on the opposite side of the seat before fitting the ASIP pad (G). Make sure the
ASIP pad (G) is attached on the side of Axkid One car seat that is closest to the vehicle door.
1
2
3
4
5
6
EN

Restraining your child in
Axkid One car seat
Before restraining your child in the Axkid One car seat, make sure you have the correct insert installed in the seat. Axkid
One is designed to grow with your child and to ensure a comfortable and safe fit for all children.
Axkid recommends using the relevant insert until it is too tight for your child, but to a minimum length according to table
below (note that the age is just an indication):
Age Height
Infant
0-6month
(AxkidOne +only)
0 – 60 cm
Toddler
0-3years 60 – 100 cm
Child
3-7years 100 – 125 cm
Loosen the harness by pressing the harness release button (T) and pull out both shoulder straps (A)
at the same time. Avoid pulling only one strap at the time since it may cause the shoulder straps (A) to
become uneven.
Unlockthe bucklebypressingthebuckle releasebutton(B)and placethestrapsoutsideofthe seat.
Place your child in the seat and place the shoulder straps (A) over your child’s shoulder. Lock the
harness by first positioning the parts of the buckle that is attached to the shoulder straps (A) together
and then push them into the buckle until you hear a click.
Adjust the headrest (E) until the eye level indicators (F) is in line with your child’s eyes by pushing both
headrest adjustment buttons (M) and slide it upwards or downwards. Note: the eye level indicators (F)
shall not be used when using the infant insert (Axkid One + only). When using Axkid One + for infants,
always make sure that the headrest is in the lowest position.
Check that the shoulder straps (A) is going through the seat straight from your child’s shoulders
or maximum 1 cm above. You might need to adjust the headrest (E) again, even if it makes the eye
level indicator get out of line with your child’s eyes. Now pull on the shoulder straps (A) to tighten
the harness over your child’s hips. While keeping tension in the shoulder straps (A), pull the harness
tension strap (U) until the harness is tightened enough, you should not be able to fit more than one
finger between the shoulder straps (A) and your child’s shoulders.
16

EN
Seat adjustments
After the Axkid One car seat has been installed in your vehicle you can easily adjust both the legroom and the recline
position for your child. This can also be done while your child is restrained in the car seat.
To ensure a good fit in all cars and give the best protection for your child, Axkid strongly recommends that you use the
guided positions marked on the side of the car seat. As your child grows it is important to adjust the recline to a more
upright position to give the best possible protection for your child’s neck in the case of an accident.
The size indication is based on your child’s length. Make sure both arrows points at the correct zone.
Age Adjustment
Infant
0-6month
(AxkidOne +only)
Maximum recline
Minimum legroom
0-60
60-100
i
100-125 cm0-60 cm 60-100 cm
0-60 cm
Toddler
0-3years
All recline positions
Several legroom positions
0-60
60-100
100-125
i
100-125 cm0-60 cm 60-100 cm
60-100 cm
Child
3-7years
Maximum upright position
Maximum legroom
0-60
60-100
100-125
i
100-125 cm0-60 cm 60-100 cm
100-125 cm
Adjusting Axkid One car seat
• The legroom is adjusted by releasing the legroom adjustment button (N) and sliding the seat forward or backwards.
To avoid Axkid One from accidently sliding forward, grab the back handle (O) and gently pull it backwards before
releasing the legroom adjustment button (N).
• The recline position of the car seat can be adjusted by turning the recline position knob (H).
17

18
Removing Axkid One car seat
from your vehicle
• Push the support-leg button (I) and collapse the support-leg (R) to its shortest position.
• Slide the front brace release button (C) and fold the front brace (D) towards the seat to release the tension against the
vehicle seat.
• Disconnect the ISOFIX connectors (Y) bypushing downon the ISOFIX buttons (X) and then slidethem backwards,
away fromthe vehicleseat.
• Keep holding the front brace (D) with one hand and grab the back handle (O) with the other hand and lift Axkid One
car seat out of your vehicle.
• Fold up the support-leg (R) by pulling the support-leg release strap (Q) and folding the support-leg (R) upwards.
Care and maintenance
• The seat textile cover can be machine washed at 30º C on a gentle cycle. Do not put the cover in a dryer as this can
damage the cover and the padding may separate from the fabric. Visit www.axkid.com to find videos explaining how
to remove and attach the cover.
• To remove the textile cover from the seat, pull outwards on the side cover (L) and de-attach the Velcro. Open the
zippers at the backrest and gently remove the cover from the seat. Make note how it is attached around the seat to
make it easier to put back. When reinstalling the side cover (L), insert it under the aluminum frame and simply push
back into the snap attachment. To remove the headrest cover, open the zippers on the bottom of the headrest and
gently remove the cover.
• If the seat cover needs replacing, ensure only original products from Axkid are used. If other products are used, Axkid
One car seat’s safety system may be compromised and could lead to severe injury in case of an accident.
• Any plastic parts of Axkid One car seat can be cleaned with mild detergent and water. Do not use aggressive
chemicals containing solvents or similar, as this can cause damage to the plastic and compromise the safety of the
car seat.
• All materials used in Axkid One car seat are recyclable and should be recycled as per your local legislation. Ask your
local recycling center for advice when recycling this product.
• The sound indicator (S)contains a replaceable CR1632 battery. Please remove andrecycle the batteryaccording to
your local legislation when the Axkid One car seat should no longer be used. Unscrew the two screws at the bottom
of the support-leg (R) and remove the cover to gain access to the battery.
• Do notmakeany modificationsor alterations to Axkid Onecar seat otherthan those described in thisinstruction manual.
• Any repairs must be carried out by the manufacturer or agent.

19
Warranty
Axkid One car seat is covered by a 24-month warranty from date of purchase. Ensure you save your receipt and bring it
to your place of purchase if you have any warranty issues.
The warranty does not cover:
• Normal wear and tear
• Damage due to incorrect use, neglect or accident
• If repairs have been carried out by a third party
• All materials used have a very high UV-resistance rating. However, UV-light is very aggressive and will ultimately lead
to fading of the seat cover. This is not covered by our warranty as it is considered normal wear and tear.
• Handle the seat with care. Note that the backside mesh fabric scratches easily and damages other than factory faulty
mesh, will not be covered by the warranty.
EN

20
Bitte lesen Sie die Anleitung vor der Installation des Axkid Ones in Ihrem Fahrzeug sorgsam durch.
Für weitergehende Informationen und Installationsvideos rufen Sie bitte die Webseite www.axkid.com auf.
Der Axkid One Autokindersitz ist ein rückwärtsgerichteter Kindersitz, der für Kinder von
einer Größe von 61-125cm und einem Maximalgewicht von 23kg zugelassen ist.
Der Axkid One+ Autokindersitz ist ein rückwärtsgerichteter Kindersitz, der für Kinder von
einer Größe von 40-125cm und einem Maximalgewicht von 23kg zugelassen ist.
Der Axkid One ist ein erweiterter i-Size Kindersitz. Er ist nach der UN R129 Richtlinie zur Nutzung auf i-Size kompartiblen
Plätzen im Auto gemäß dem Handbuch des jeweiligen Autoherstellers zugelassen. Im Zweifel wenden Sie sich bitte an
den Kindersitzhe steller (www.axkid.com) oder Ihren Händler.
WichtigeInformtionen
Umdie besteSicherheit fürIhr Kindzu ermöglichen, ist eswichtig, dassSie diefolgendenPunktebeachten:
• Folgen Sie immer der Anleitung. Eine inkorrekte Installation kann die Sicherheit Ihres Kindes gravierend beeinflußen.
Sollten Sie sichunsicher sein, wendenSie sich bitte an IhrenHändler für einen korrekten Einbau undNutzung.
• BehaltenSiedieGebrauchsanleitungfürzukünftigesNachschlagen.SolltenSiedie Anleitungverlorenhaben, könnenSie
sich online unter www.axkid.com finden.
• Nutzen Sie den Axkid One Kindersitz nicht in einer Sitzposition, auf Sitzplätzen, auf denen ein aktiver Frontalairbag
eingebaut ist. Wenn Sie den Axkid One auf einem solchen Sitzplatz installieren möchten, muss der Airbag gemäß den
Instruktionendes Autoherstellerskomplettausgeschaltet sein.
• Sollten Sie einen Unfall haben, egal wie klein, sollten Sie Ihren Kindersitz immer austauschen. Der Sitz könnte nicht
sichtbare Schäden haben, die die Sicherheit Ihres Kindes ernsthaft beeinflußen könnten. Aus diesem Grund rät Axkid
vomKaufvon gebrauchtenKindersitzenab.
• Sollte der Axkid One direktem Sonnenlicht ausgesetzt sein, vergewissern Sie sich bitte, dass der Kindersitz nicht zu heiß ist,
bevorSie IhrKind hineinsetzen.
• LassenSie Ihr Kindniemals unbeaufsichtigt alleinim Auto zurück.
• Vergewissern Sie sich, dass jegliches Gepäck oder lose Gegenstände sicher verstaut sind, da herumfliegende
GegenständePassagiere im Falleeines Unfallsverletzen können.
• Vergewissern Sie sich, dass der Axkid One so installiert ist, dass keine Teile von beweglichen Sitzen, Autotüren usw.
eingeklemmt werden.
• Der Axkid One kann ausschließlich rückwärtsgerichetet installiert werden.
• SorgenSiestetsdafür, dassderSicherheitsgurt korrektan dieStaturIhresKindesangepasstist.Die Gurthöhewirddurch
die Bewegung der Kopfstützeangepasst.
• StellenSiestets sicher,dassderRückenIhresKindesimmerkomplett im Kindersitzanliegt, wennSieIhrKind anschnallen.
• SchnallenSie IhrKindstetsstra an,stellenSiesicher, dassdasGurtschloss geschlossenistund sodassesnichtmöglich
ist,die Gurtezusammenzukneifen.
• Vergewissern Siesich, dassdie Gurtenicht verdrehtsind.
• Der Stützfuß mussimmer in derkorrekten Position sein und Kontakt mit demBoden des Fahrzeugs haben. Prüfen Sie, ob
derIndikatorauf demStützfuß grünanzeigt,und dass SiekeinenPieptonvomStützfuß hören.
• Versuchen Sie niemals einen Teil vom Axkid One abzubauen oder baulich zu verändern. Die Garantie und die
Sicherheitsfunktionendes Kindersitzes könnendavonmaßgeblich beeinflußtwerden.
• BenutzenSieniemalsderAxkidOneKindersitzohnedenKindersitzbezug.DerBezugisteinfesterSicherheitsbestandteil
des Sitzes und kann nur durch einen original Axkid Kindersitzbezugersetzt werden.
• LesenSie dasHandbuchIhresFahrzeugssorgfältigdurch,um zu überprüfen,welcherSitzplatzfürdenKindersitzgeeignetist.
• Axkidempfiehlt stets einenTrittschutzzu nutzen, umden Autositzvor Kratzern undDreck zuschützen.
• SolltenSieFragenhaben, wendenSiesich anIhrenHändler,bei demSieden Kindersitzgekaufthaben, oderkontaktieren
SieAxkid unterinfo@axkid.com.
entschieden hben
Vielen Dnk, dss Sie sich für den Axkid One
This manual suits for next models
1
Table of contents
Languages:
Other Axkid Car Seat manuals

Axkid
Axkid Bigkid 2 User manual

Axkid
Axkid ENVIROBASE User manual

Axkid
Axkid Keezone User manual

Axkid
Axkid Modukid User manual

Axkid
Axkid Duofix User manual

Axkid
Axkid Minikid 3 User manual

Axkid
Axkid GROW ISOFIX BS05-T User manual

Axkid
Axkid ENVIROKID User manual

Axkid
Axkid Nextkid User manual

Axkid
Axkid MODUKID INFANT 2 User manual