Vitec Multimedia sachtler Ace XL User manual
Ace XL Fluid Head
Manual
S2150-0004
Copyright © 2017 Vitec Group plc Publication S2150-4991/1 Specifications are subject to change without notice

Read the General Safety and Operating instructions before using the product.
WARNING! Tripod spike feet can be dangerous, take care when handling.
WARNING! Finger entrapment. Do not place fingers between the platform and body of the fluid head.
Avoid trapping fingers when collapsing and extending the tripod legs.
WARNING! Trip hazard. Set the tripod footprint to suit the shooting environment.
WARNING! Toppling hazard. Do not leave unattended. Keep out of reach of children.
CAUTION! Always lock the vertical and horizontal brakes when (a) the camera is mounted but not in use
(b) levelling the fluid head on the tripod.
CAUTION! Do not over tighten the tripod leg locks. When in use, always lock the tripod leg clamps to
prevent the tripod collapsing.
Hold the camera securely when (a) mounting or dismounting from the fluid head (b) when making
adjustments to the tripod height or footprint.
Always hold the pan bar when making adjustments to the counterbalance or camera position. Do not use
the pan bar to lift or move the tripod and fluid head.
Only attach camera accessories to the pan bar. Do not attach heavy items to the pan bar.
Do not place your foot or heavy weight onto the spreader.
Always remove the camera before transporting.
Clean regularly using a soft cloth and mild detergent.
Dry the product after use in wet conditions.
Only use genuine Sachtler parts. Camera must be mounted using the camera screws and pin supplied with
the fluid head.
Should the product become defective, contact your local Sachter service centre. To find your local service
centre visit www.sachtler.com
When replacing the battery, use only the same or an equivalent type of battery recommended for use with
the product.
Waste Batteries and Accumulators Directive (2006/66/EC)
Waste batteries must be carefully disposed of according to EU and local regulations. Parts of the
electronics within your product are powered by a battery. Always read the instructions on how to safely
replace the battery.
Declaration of Conformity
Vitec Videocom Limited declares that this product has been manufactured in accordance with BS EN ISO
9001:2008 and is in compliance with the essential requirements and other relevant provisions of the
Electromagnetic Compatibility 2004/108/EC. A copy of the Declaration of Conformity is available upon
request.
!
!
EN
The warranty expires if:
(a) The fluid head was operated improperly or not in
line with the specified technical data.
(b) The fluid head housing was opened by
unauthorised personnel.
Sachtler reserve the right to make changes to
product design and performance as technology
advances. Please register your product for an
extended warranty period at www.sachtler.com
EN
A garantia termina se:
(a) A cabeça fluida foi operada inadequadamente ou
não de acordo com os dados técnicos especificados.
(b) O invólucro da cabeça fluida for aberto por
pessoal não autorizado.
A Sachtler se reserva o direito de fazer modificações
no projeto e no desempenho do produto à medida
que a tecnologia avança. Registre seu produto para
um período de garantia mais longo em
www.sachtler.com.
PT
Die Gewährleistung erlischt in folgenden Fällen:
(a) Wenn der Fluidkopf falsch oder nicht gemäß den
angegebenen technischen Daten benutzt wurde.
(b) Wenn das Gehäuse des Fluidkopfes durch nicht
autorisierte Personen geöffnet wird.
Sachtler behält sich das Recht vor, Änderungen am
Produktdesign und der Spezifikation vorzunehmen,
wenn technologische Fortschritte dies ermöglichen.
Bitte registrieren Sie Ihr Produkt für eine
Verlängerung der Garantiedauer unter
www.sachtler.com.
DE
La garantie expire si :
(a) La tête fluide a été utilisée de manière impropre
ou non conforme aux caractéristiques techniques
spécifiées.
(b) Le carter de la tête fluide a été ouvert par une
personne non autorisée.
Sachtler se réserve le droit de modifier la conception
et les performances du produit au gré des progrès
techniques. Veuillez enregistrer votre produit sous
www.sachtler.com pour bénéficier d'une période de
garantie étendue.
FR
La garantía deja de tener validez si:
(a) la cabeza fluida es sometida a un uso indebido o
no conforme a los datos técnicos especificados.
(b) se abre la carcasa de la cabeza fluida por parte
de personal no autorizado.
Sachtler se reserva el derecho de realizar
modificaciones en materia de diseño y rendimiento
del producto a medida que la tecnología avanza.
Registre su producto si desea disfrutar de un período
de garantía ampliada www.sachtler.com.
ES
EN
Brakes
To prevent the fluid head from moving, lock the
vertical and horizontal brakes. Do not use the brakes
to apply drag.
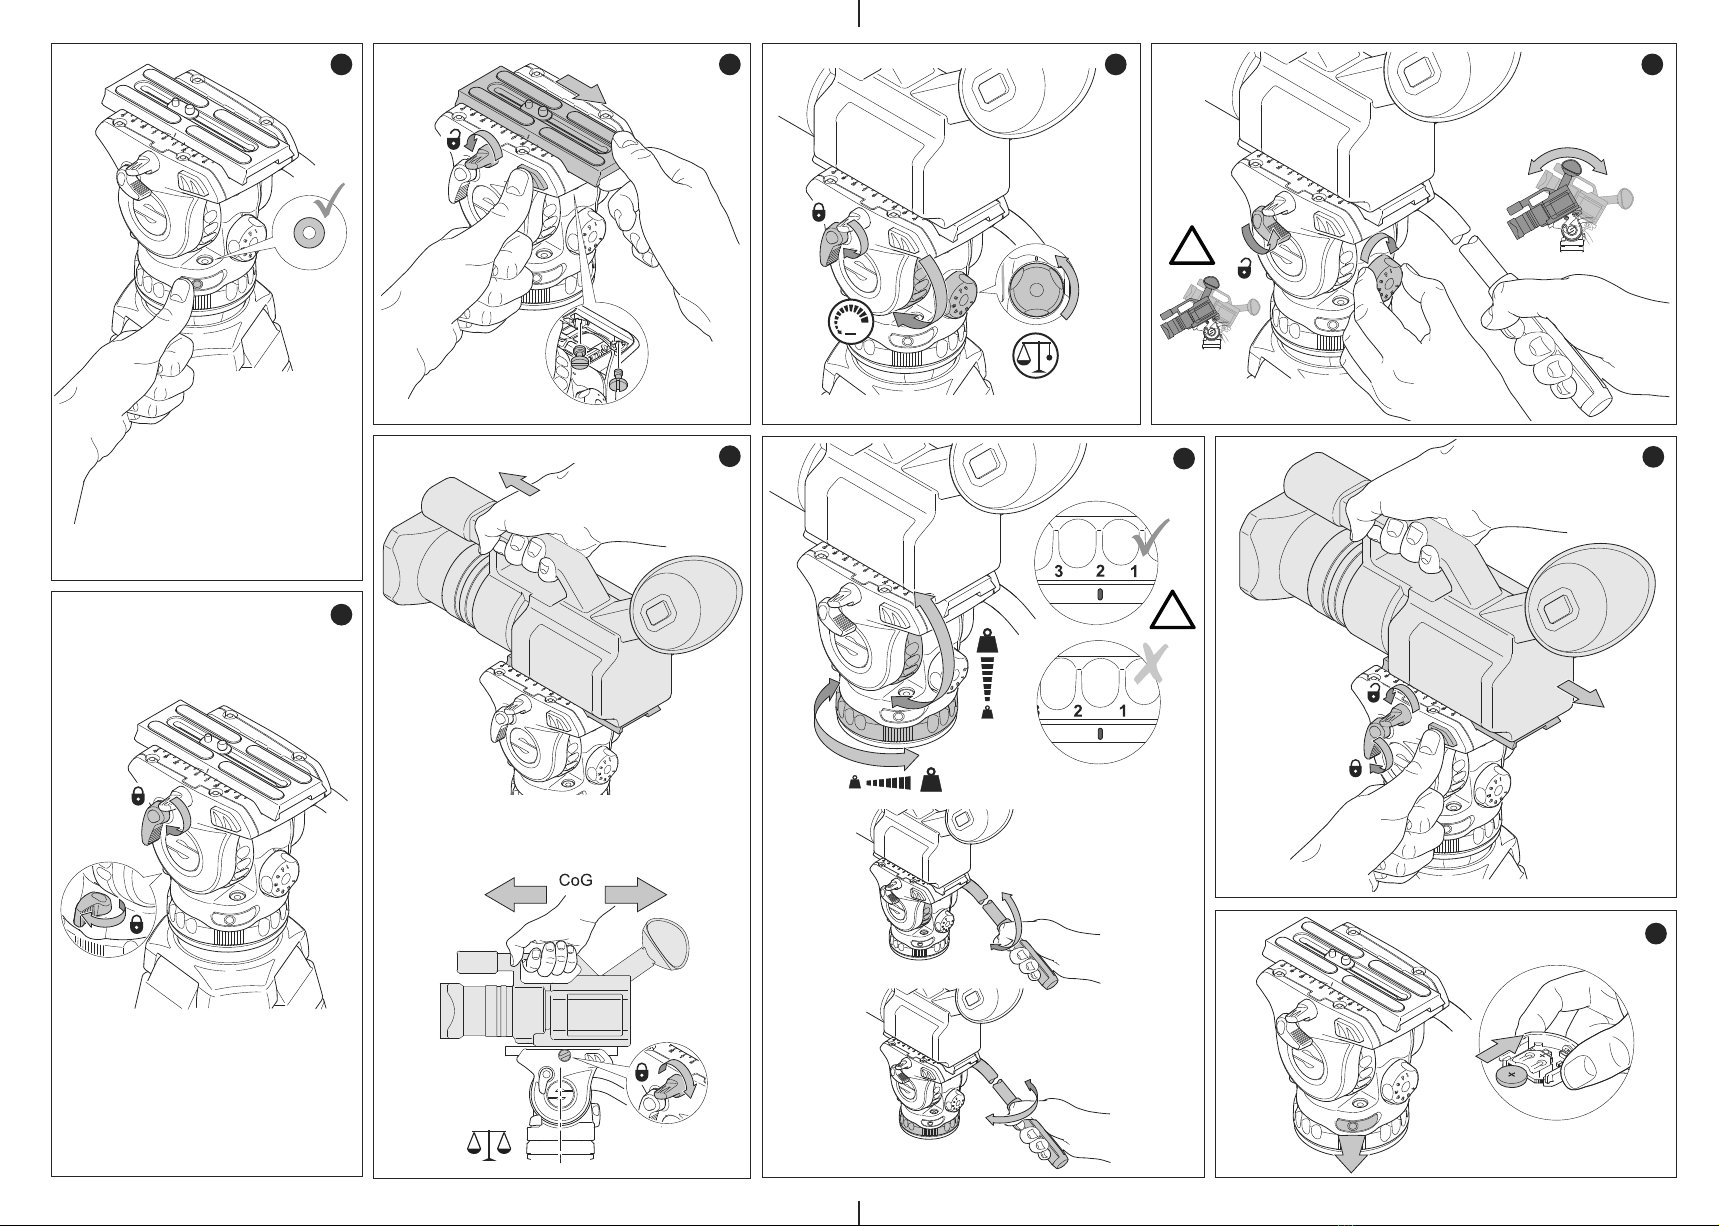
REMOVING THE CAMERA
Lock the brakes. Loosen the camera plate clamping
screw. Press the camera plate release button whilst
sliding the camera to the rear of the head.
TRANSPORT AND STORAGE
Open the vertical and horizontal brakes and set the
balance and drag settings to maximum.
Adjust the position of the pan bar handle.
REPLACING THE BATTERY
To replace the battery, prise out the battery
compartment and remove the old battery from the
battery holder (using tweezers).
Insert the new battery and replace the battery
compartment.
FLUID HEAD SETUP
Levelling
Loosen the bowl clamp. Level the fluid head using
the level bubble. Press the button to illuminate the
level bubble if required.
Tighten the bowl clamp.
Mounting the camera
Lock the horizontal and vertical brakes.
Loosen the camera plate clamping screw. Pull the
camera plate to the rear of the fluid head whilst
pressing the red release button.
Attach the camera plate to the camera using the
camera screws and pin supplied. Spare camera
screws can be stored under the platform.
NOTE: Some cameras, incl. DSLRs, do not require
the pin. Remove the 1/4 in. screw to release the pin
plate.
Hold the camera with one hand. Insert the camera
plate onto the rear of the platform. Slide forwards
until the locking button secures the camera plate
onto the platform.
Position the camera C of G over the axis of the fluid
head. Tighten the clamping screw to secure the
camera.
Setting the counterbalance
CAUTION! Hold the pan bar to prevent the camera
from falling away.
Lock the vertical brake. Set the vertical drag and the
counterbalance to 1.
Open the vertical brake. Holding the pan bar, adjust
the counterbalance setting, until the camera remains
in position hands-free.
Adjust the counterbalance: tilt the fluid head forwards
and backwards through the horizontal position to
engage the spring at the selected step.
NOTE: If the camera does not remain in position
hands-free, lock the vertical brake and adjust the
position of the camera. If the camera falls forward,
reposition the camera to the rear of the head. If the
camera falls backward, reposition the camera to the
front of the head.
Setting drag
The fluid head has 3 drag levels horizontally and
vertically. Drag is turned off when the 0 setting is
selected. To adjust the drag, rotate the drag ring to
the required setting while slowly moving the fluid
head vertically or horizontally until the drag
mechanism engages.
1
8
2 3
7
4
5 6
9
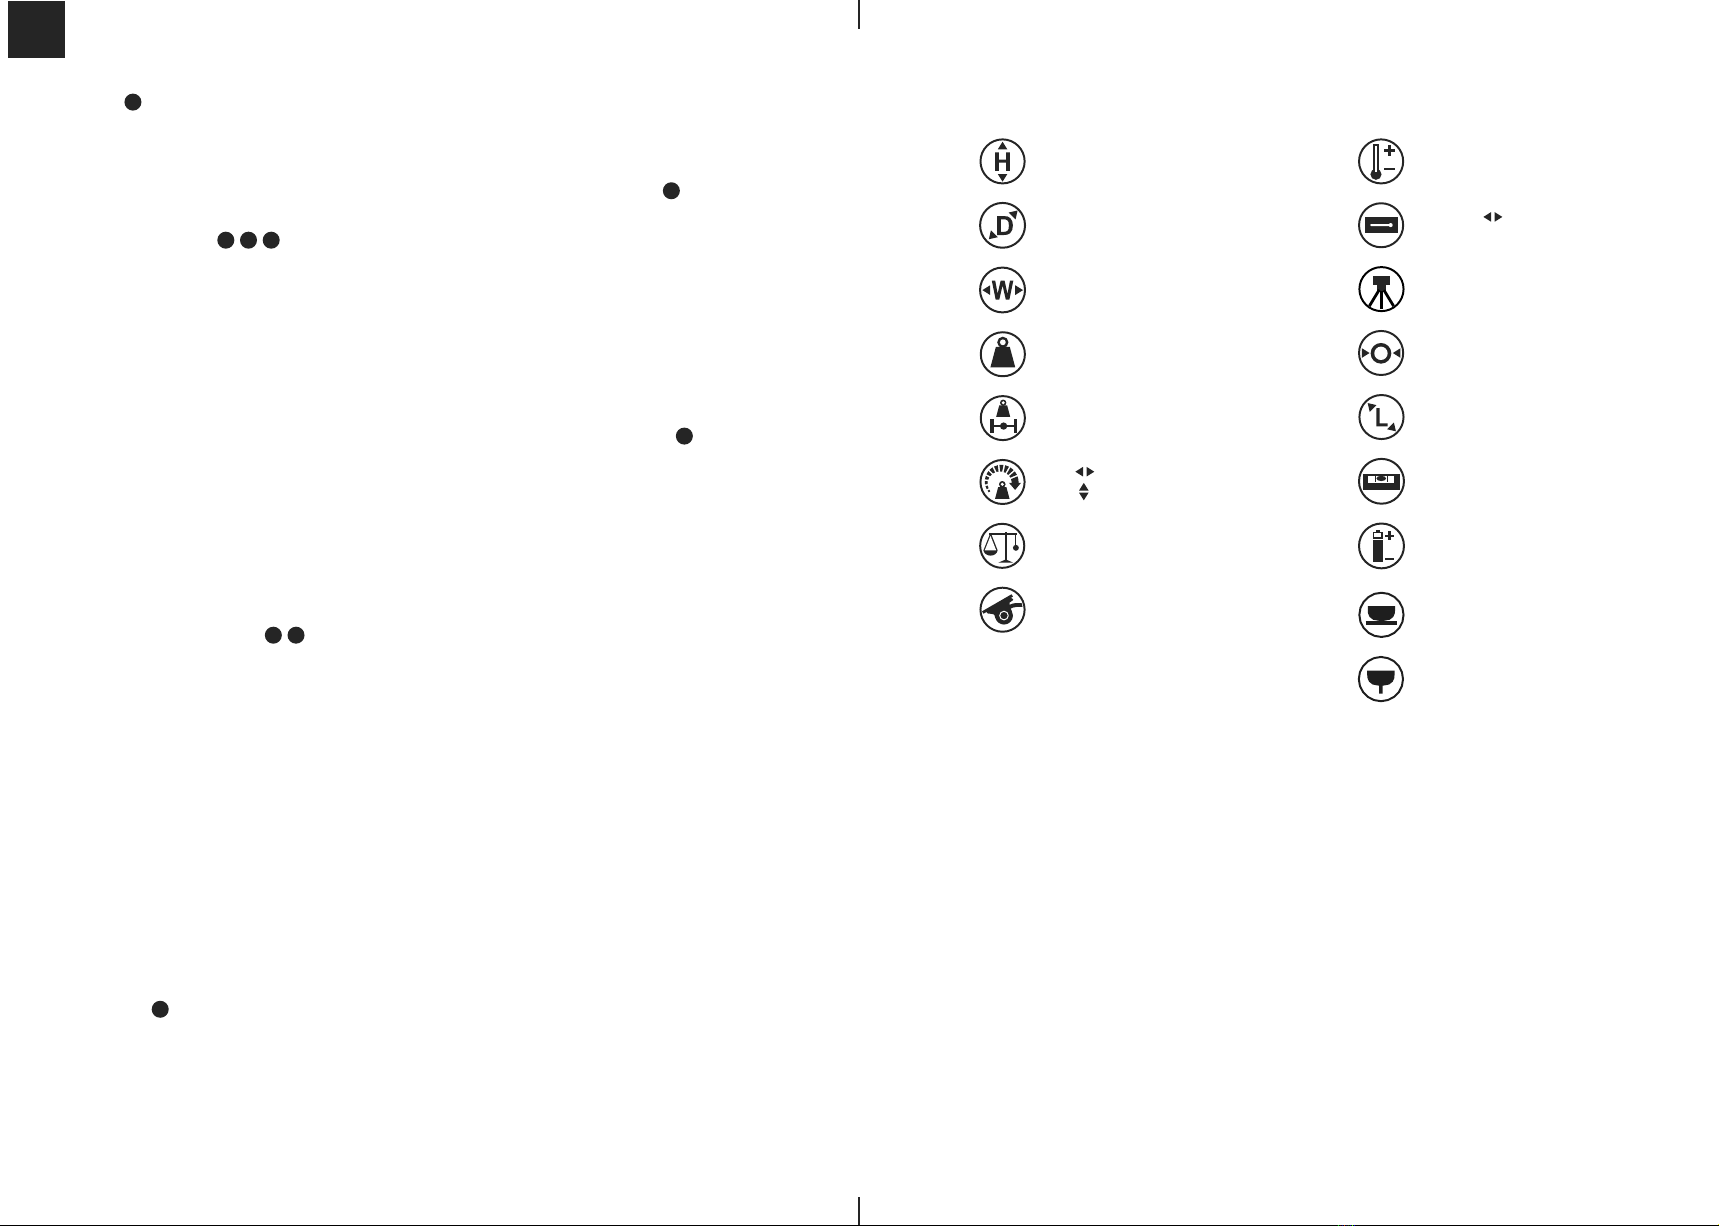
Pan bar
16 mm (0.6 in.)
Pan bar
374 mm (14.7 in.)
Illuminated level bubble
CR1225
139 mm (5.5 in.)
140 mm (5.5 in.)
154 mm (6 in.)
1.7 kg (3.7 lbs)
2 - 8 kg (4.4 - 17.6 lbs)
@ 55 mm (2.1 in.) cog
8
+90°/-75°
-30°C/+60°C
(-22°F to +140°F)
Bowl
75 mm
104 mm
(4.1 in.)
3+0
3+0
TECHNICAL SPECIFICATIONS
Specifications are subject to change without notice
Bowl base
Flat base
13 5 6
7
48
2
!
‘1’
‘CLICK’
9
7
!
‘CLICK’
‘CLICK’
‘1’
2
4
5
6
7
1
3
8
This manual suits for next models
1
Other Vitec Multimedia Camera Accessories manuals


Popular Camera Accessories manuals by other brands

Nauticam
Nauticam NA-D90 instruction manual

Fantasea Line
Fantasea Line FA6500 V2 instruction manual

Canon
Canon Macro Twin Light MT-26EX-RT Basic operation guide

Wewow
Wewow A-LITE Product instructions

Eaton
Eaton 2400 Series Installation & maintenance instructions

Panasonic
Panasonic AVCCAM AG-HMR10 user guide


