VITINNI SM30115-MBP User manual

BLENDER AND MINCER
ACCESSORIES FOR PLANETARY
ACTION STAND MIXER
PLEASE READ AND KEEP THESE INSTRUCTIONS FOR FUTURE USE
MODEL NO: SM30115-MBP
SAP Code: JF07536001
For further assistance, other products and more, join us at:
Website: www.vitinni.co.uk
Instagram: @vitinniuk
Facebook: www.facebook.com/vitinni


General Safety Instructions
•Read this instruction manual carefully before using the Stand Mixer Accessories for
the first time.
•These Blender and Mincer accessories for the Stand Mixer are designed for
personal use and is not suitable for commercial use.
•Do not use outdoors. Keep away from direct sunlight, heat sources and do not use
with wet hands.
•Before removing any accessory and cleaning ensure the Stand Mixer is switched
off and the plug removed from the socket.
Warning
•Before using, please ensure that your output voltage is the same voltage as stated
on the rating label of the Stand Mixer.
•Before use please check accessories, do not use if there is any damage.
•Ensure no obstructions prevent the movement or function of each accessory.
•Failure to follow these instructions can result in damage to the appliance and harm
to the user. No liability is accepted if these instructions are not followed or if
damage results through improper use. Any attempt to alter the appliance or not
follow instructions may result in harm and will also void any warranty.
•When using the accessories, the Stand Mixer should be placed on a stable surface
when in use.
•Do not use the Stand Mixer Accessories for anything other than that specified in the
instructions.
•Do not leave the Stand Mixer unattended when in use.
•After using the Stand Mixer, press the power button to turn off, and then remove
the plug from the socket.
•This appliance can be used by children aged from 8 years and above and persons
with reduced physical, sensory or mental capacities or lack of experience or
knowledge only if they have been given supervision or instruction concerning use
of the appliance in a safe way and understand the hazards involved. Children shall
not play with the appliance. Cleaning and user maintenance shall not be made by
children without supervision.

Caution
•Unplug the Stand Mixer from the wall socket when not in use, removing an
accessory or before cleaning.
•Do not use any accessories other than those provided.
•Ensure the accessories are clean and dry before putting the food inside.
•Keep the Stand Mixer Accessories out of reach of children.
•Do not place the Stand Mixer Accessories above or near lit hob burners or electric
rings, inside an oven or near other heat sources.
•Avoid contact with moving parts. Keep hands, hair, clothing, and cooking utensils
away from beaters during operation to reduce the risk of injury to persons and/or
damage to the mixer/ accessories
•Please turn to "OFF" setting, and unplug the power plug during installation,
removing or cleaning parts, otherwise it may cause injury.
•Care should be taken when handling the sharp cutting blades, emptying the bowl
and during cleaning.
•Be careful if hot liquid is poured into the blender as it can be ejected out of the
appliance due to a sudden steaming.
•When using the meat grinder parts, be sure to use the standard food pusher.
•Please do not use grinder head or glass jar together with mixing functions.
Before First Use
•Remove all packaging materials, stickers and labels.
•Clean with hot soapy water, using a non-abrasive sponge.
•Ensure the inside and outside of the Stand Mixer Accessories are completely dry.

Introduction
This Blender and Mincer accessories pack is to be used only with our 1500W Planetary
Action Stand Mixer.
Features
1. 17 part accessory kit.
2. Glass blending jug for hot and cold foods and liquids.
3. Variable pasta making disks
4. Sausage, mincer and Kibbeh making kit.

Mixer Accessories
1. Food Pusher 8 . Accessory for Mincer A. Fine Pasta Maker
2. Food Tray 9 . T-Tube B. Flat Pasta Maker
3. Fixing Ring 10. Sausage Tube C. Thick Pasta Maker
4. Cutting Blade 11. Plastic Plate Cover D. Hollow Pasta Maker
5. Fine Cutting Plate 12. Plastic Plate
6. Medium Cutting Plate 13. Blending Jug
7. Coarse Cutting Plate
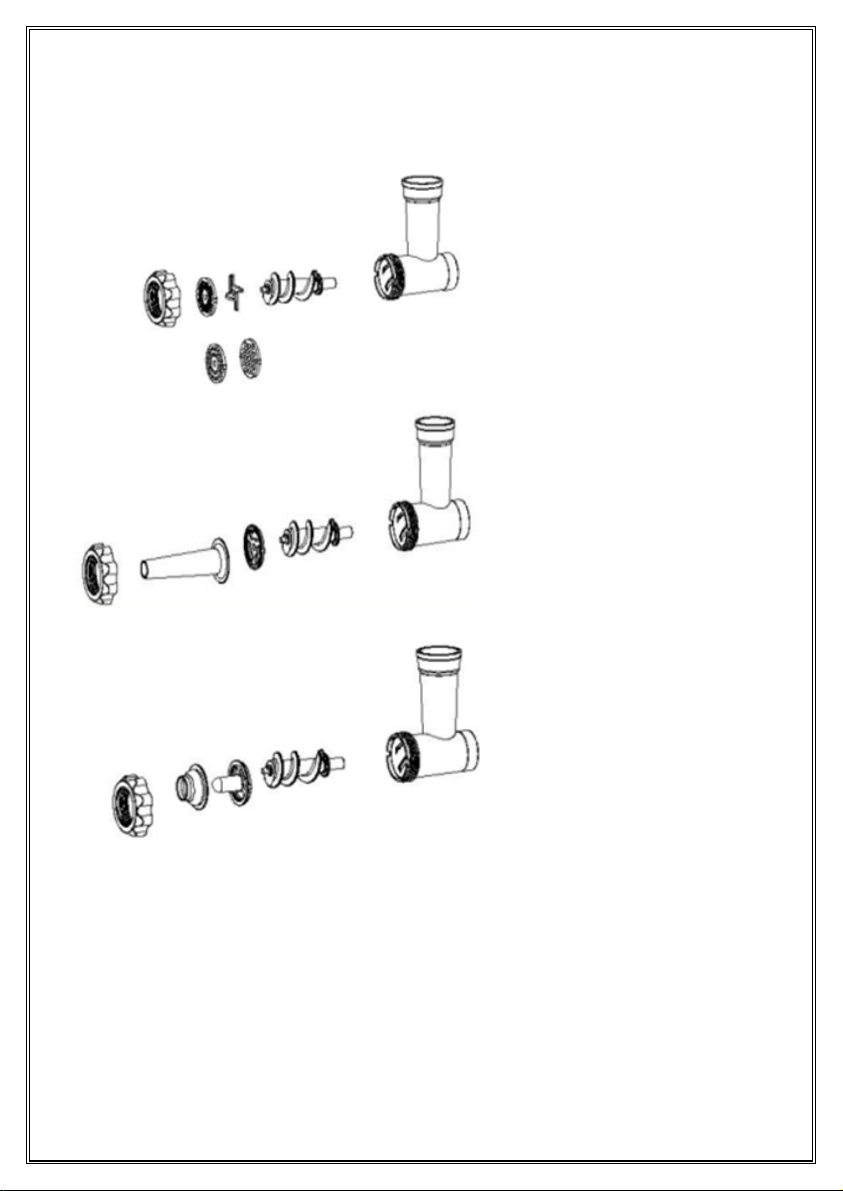
Using the Mincer Accessories
Mincer
Sausage Maker
Kibbeh Maker

Mincer
Insert the feed screw so that it attaches to the coupling inside the mincing chamber.
Carefully attach the cutting blade to the front of the feed screw.
Choose a mincing plate to suit your desired level of mincing – coarse, medium or fine, and
slot that in front of the cutting blade.
Finally, screw on the ring collar to hold everything in place, and you’re ready to mince.
For best results, chop your meat into small cubes so they feed through the food tray more
easily, and ensure you use the pusher – keep fingers and other utensils well away from the
mincing chamber.
Sausage Maker
Insert the feed screw so that it attaches to the coupling inside the mincing chamber.
Slot the separator ring on followed by the sausage nozzle.
Finally, screw on the ring collar to hold everything in place.
If you’re using skins, soak them in warm water for 10 minutes before using.
Pull the sausage skin onto the end of the nozzle and then use the pusher to gently guide the
sausage filling into the mincing chamber.
Ensure the filling isn’t too wet, as otherwise liquid make leak into the machine.
As the sausage fills, gently ease it off the nozzle and twist to form the sausage shapes.
Kibbeh Maker
Kibbeh is a Middle-Eastern dish that involves a spiced meat shell stuffed with a variety of
delicious centres. Check your favourite recipes or browse the internet for some great ideas.
Insert the feed screw so that it attaches to the coupling inside the mincing chamber.
Slot the Kibbeh attachments on – first the protruding rod then the outer ring.
Finally screw on the ring collar to hold everything in place.
Follow your chosen recipe to feed through the required amount of ingredients – this maker
will create the cylindrical kibbe outers.

Pasta Maker
Insert the feed screw so that it attaches to the coupling inside the mincing chamber.
Select the desired pasta plate (coarse/fine round or flat/hollow) that you need on the cutting
blade, then place the cutting blade on the screw with the sharp end upward.
Tighten the Fixing ring.
Open the front cover of the machine and insert the assembled attachments into the
machine's output end.
Place the food tray on the inlet of the meat grinder.
Place a container at the plate outlet, place the dough on the food tray, push the food pusher
and open the machine.
Note Please use food pusher to push food into the feed port, and do not use finger or other
utensils to transport food.
The dough should not be too large that the food pusher will push in.
When using the pasta maker accessory, it is necessary to remove the mixing parts from the
stainless steel bowl.

1.5L Mixing Jug
Hold the mixing jug handle and place into the output connector, rotate it clockwise to lock.
Lower the machine head in a horizontal position, the locking rotary knob will pop up
automatically and lock the head.
Open the head cover.
Place ingredients into the glass jar and cover with the lid.
Insert ingredients into the glass jar and cover with the lid.
After the installation is complete and ingredients have been added, plug in the Stand Mixer
then adjust control knob to sixth level.
Caution
Make sure that the machine is off before installing the mixing jug.
Do not turn on the machine for more than 30 seconds while the glass jar is empty
Do not put food into the glass jar which exceed the capacity
The mixing jug is made from glass, boiling water over 40℃is not allowed.


Guarantee
Our products are guaranteed for a period of 2 years from the date of purchase. Products that
develop a fault within this period are covered by our warranty and we will replace defective
parts, or where not available the whole product. The warranty does not apply to any defect in
the goods arising from fair wear and tear, wilful damage, accident, negligence by you or any
third party, use otherwise than as recommended by us, failure to follow our instructions, any
alteration or repair carried out without our approval or has been the subject of commercial
use. Your statutory rights remain unaffected, in particular any rights you have under the
Consumer Rights Act 2015.
If you have a problem with your product within this warranty period please contact our
customer services team.
In the event of changes to the specification of a product and we are not able to replace
parts, we will replace the whole product within the 2 year guarantee period
For products that fall outside of the 2 year guarantee, we will endeavour to provide spare
parts to purchase for as many of the replaceable parts as possible, but cannot foresee
specification changes or upgrades to products or parts outside of the initial 2 year period.
Customer Services:
If you would like further advice or information on your product, ensure you have the
SAP code ready and please get in touch with us at Vitinni on the contact options
below:
SAP Code: JF07536001
Phone: 01706 716 116 (Mon – Fri 9am to 5pm)
Email: support@vitinni.co.uk
Address: Vitinni, Vale Mill (Rochdale) Ltd, Robinson Street, Rochdale, OL16 1TA
This manual suits for next models
1


