Vitus Audio RC-010 User manual

RC-010
Owner’s Manual

2
RC-010 | Version 1
All rights reserved. No part
of this publication may be
reproduced, stored in or
introduced into a retrieval
system, or transmitted in
any form, or by any means
(electronic, mechanical,
photocopying, recording
or otherwise) without the
prior written permission of
Vitus Audio. Any person who
does any unauthorized act
in relation to this publication
may be liable to criminal
prosecution and civil claims for
damages.
Information contained in this
manual is subject to change
without notice, and whilst it
is checked for accuracy, no
liabilities can be accepted for
errors.

3
RC-010 | Version 1
table of contents
introduction
Foreword . . . . . . . . . . . . . 4
About this manual . . . . . . . . 4
1. getting started
RC-010 System Remote . . . . . 5
2. operation
Shipping mode . . . . . . . . . . 7
RC-010 System Remote
operation modes . . . . . . . . . 8
The menu structure . . . . . . .13
RC-010 Discription of
the elements in the menu.. . . . 14
RC-010 The menu structure . . . 15
3. operation & service
Mains supply voltage . . . . . .16
Maintenance . . . . . . . . . . . 16
4. warranty
Warranty . . . . . . . . . . . . .17
5. specifications
RC-010 specifications . . . . . .20
RC-010 masurements . . . . . .21
RC-010 The functions of
the buttons . . . . . . . . . . . . 22
The RC 5 codes for the remote. . 25
6. examples operation
Examples Signature . . . . . . . 32
Example 1. . . . . . . . . . . . . 32
Example 2.1. . . . . . . . . . . . 33
Example 2.2. . . . . . . . . . . . 34
Example 2.3. . . . . . . . . . . . 35
Example 3. . . . . . . . . . . . . 36
Example 4. . . . . . . . . . . . . 37
Example 5. . . . . . . . . . . . . 38
Example 6. . . . . . . . . . . . . 39
Example 7. . . . . . . . . . . . . 40
Examples Masterpiece. . . . . . 42
Example 1. . . . . . . . . . . . . 43
Example 2. . . . . . . . . . . . . 44
Example 2.1. . . . . . . . . . . . 44
Example 2.2. . . . . . . . . . . . 45
Example 2.3. . . . . . . . . . . . 46
Example 2.4. . . . . . . . . . . . 47
Example 2.5. . . . . . . . . . . . 48
Example 3. . . . . . . . . . . . . 49
Example 4. . . . . . . . . . . . . 50
Example 5. . . . . . . . . . . . . 51
Example 6. . . . . . . . . . . . . 52
Example 7. . . . . . . . . . . . . 53
7. pictures
RC-010 Picture . . . . . . . . . . 55

4
RC-010 | Version 1
Foreword
First of all, thank you for
choosing the Vitus Audio
RC-010 sytem remote.
This is the RC-010. The
RC-010 is the Vitus Audio
System Remote that comes
standard with the SIA-025.
The RC-010 uses an infrared
sensor and communicates
with the products using the
RC5-protocol. It comes with
pre-installed functions for
communication with Vitus
Audio products. With the
RC-010 you can control all
Vitus Audio products in the
Signature and Masterpiece
series.
introduction
About this manual
This is your RC-010 owner’s
manual. The following pages
will describe, as clearly as
possible, how to get your RC-
010 operating fast and simple.
Although some operations are
self-explanatory, we strongly
suggest you read this manual
to avoid any damage to the
unit. The manual is designed
to be helpful. If there are
points you feel we could cover
better, or that we have missed
out – please tell us.
Important
information is
presented like
this. Ignoring this
information may cause
damage to you or the
unit. Damage caused
to the unit by ignoring
this information might
invalidate the warranty.
RC-010 System Remote
This is the RC-010. The
RC-010 is the Vitus Audio
System Remote that comes
standard with the MP-L201.
The RC-010 uses an infrared
sensor and communicates
with the products using the
RC5-protocol. It comes with
pre-installed functions for
communication with Vitus
Audio products. With the
RC-010 you can control all
Vitus Audio products in the
Signature and Masterpiece
series. The RC-010 has an
internal battery, that can
be charged with the loader
that is included. The RC-010
has an automatic standby
function. This is to ensure that
the battery lasts as long as
possible on one charge
The RC-010 has two hotkeys,
buttons 1 and 3. With these
hotkeys you can jump to
another product without
scrolling through the list
of products. The remote
automatically forwards
volume up and volume down
commands to the product
under hotkey 2.
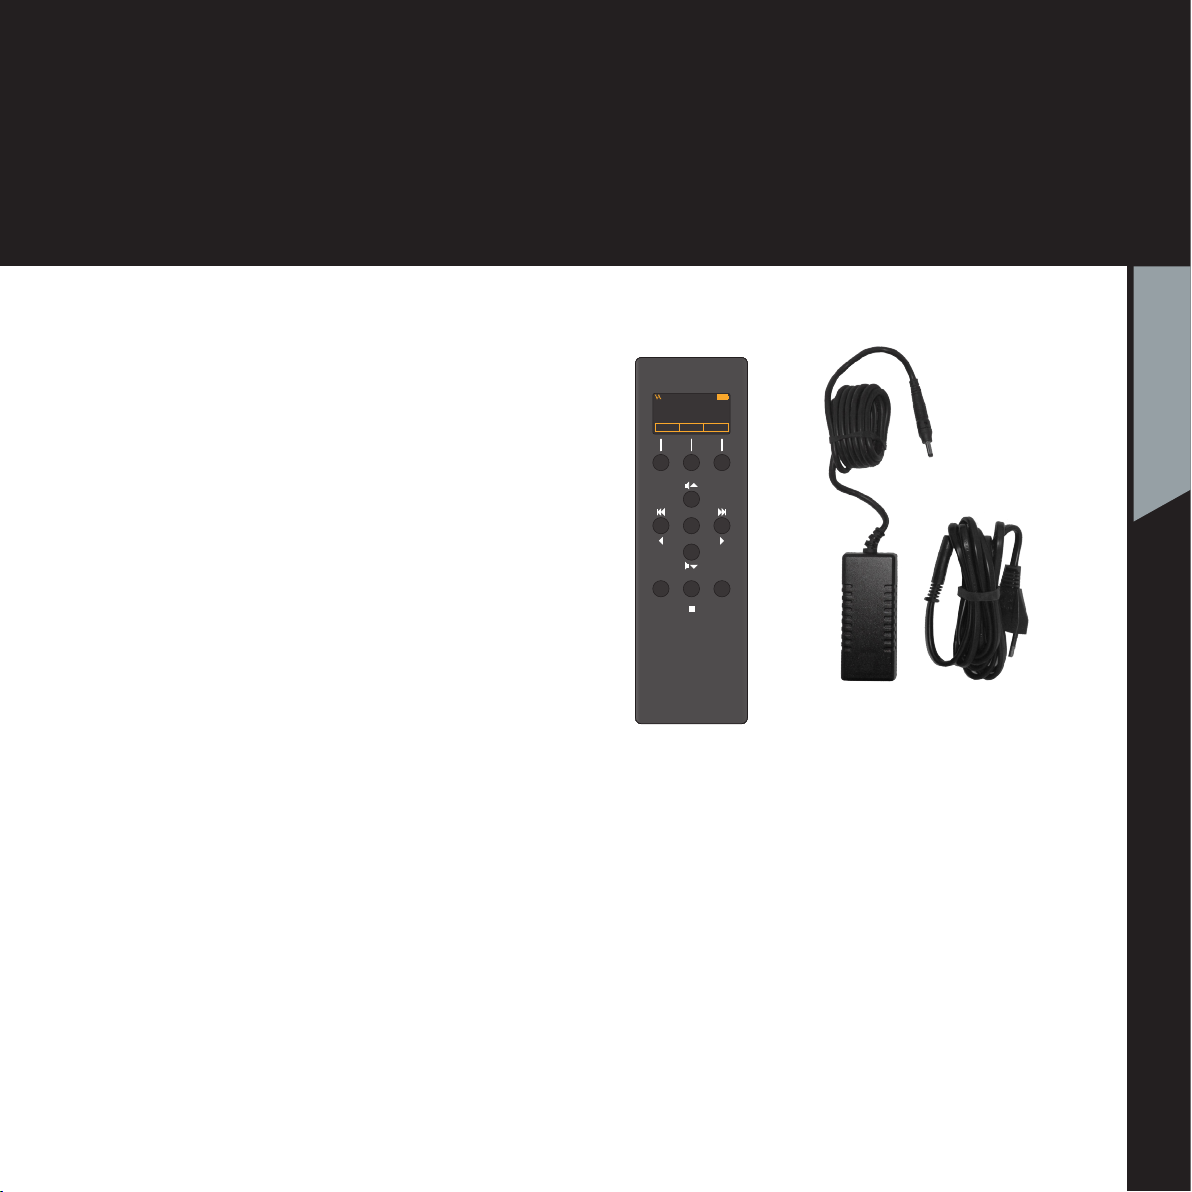
VITUS
REP STBA/AB
SIA-025
AC/DC
Adapter
RC-010
System Remote
Adapter
Power Cord
5
RC-010 | Version 1
1. getting started
1. getting started
The AC/DC Adapter is
a switchmode adapter
that works with every
Voltage between 100
and 240 Volt.

6
RC-010 | Version 1

Shipping mode
The RC-010 is put into shipping
mode before transport. This
means that the motion sensor
is disabled.
Shipping mode is disabled by
pushing any button.
When you are going to
transport the RC-010 you
have to put the RC-010 into
shipping mode.
Putting the RC-010 into
shipping mode.
1.Press and hold buttons
( 2+3 ) + ( 9+10 ).
The display now shows
SHIP MODE and thereafter
LEAVE MENU.
2.Press button 6(select). The
RC-010 is now in shipping
mode.
7
RC-010 | Version 1
2
4
8
5 6
7
10
VITUS
REP STBA/AB
PRODUCTSCD-010 INPUT 2
11
1
9
3
7
2. operation

8
RC-010 | Version 1
2 . operation
RC-010 System Remote
operation modes
The RC-010 has 4
operation modes
1. Normal mode.
This is the mode you use when
listening to music.
2. Menu mode
In this mode you can alter the
settings of the RC-010.
3. Standby mode.
In this mode the controls of
the RC-010 are deactivated.
4. Flight mode
In this mode the controls of the
RC-010 are deactivated. The
motion sensor is deactivated
so the RC-010 cannot be
woken up by movement.
Exit flight mode by pressing
any button.

9
RC-010 | Version 1
2. operation
2. operation
Normal mode
Buttons
In normal mode there are
11 basic functions/buttons
available on the left front.
1. Hotkey*
2. Switch between products.
Enter menu mode.
3. Hotkey.*
4. Volume up
5. Previous input
6. Mute
7. Next input
8. Volume down
9. -
10. Change class
11. Standby
*A hotkey is a button that can
be programmed by the user.
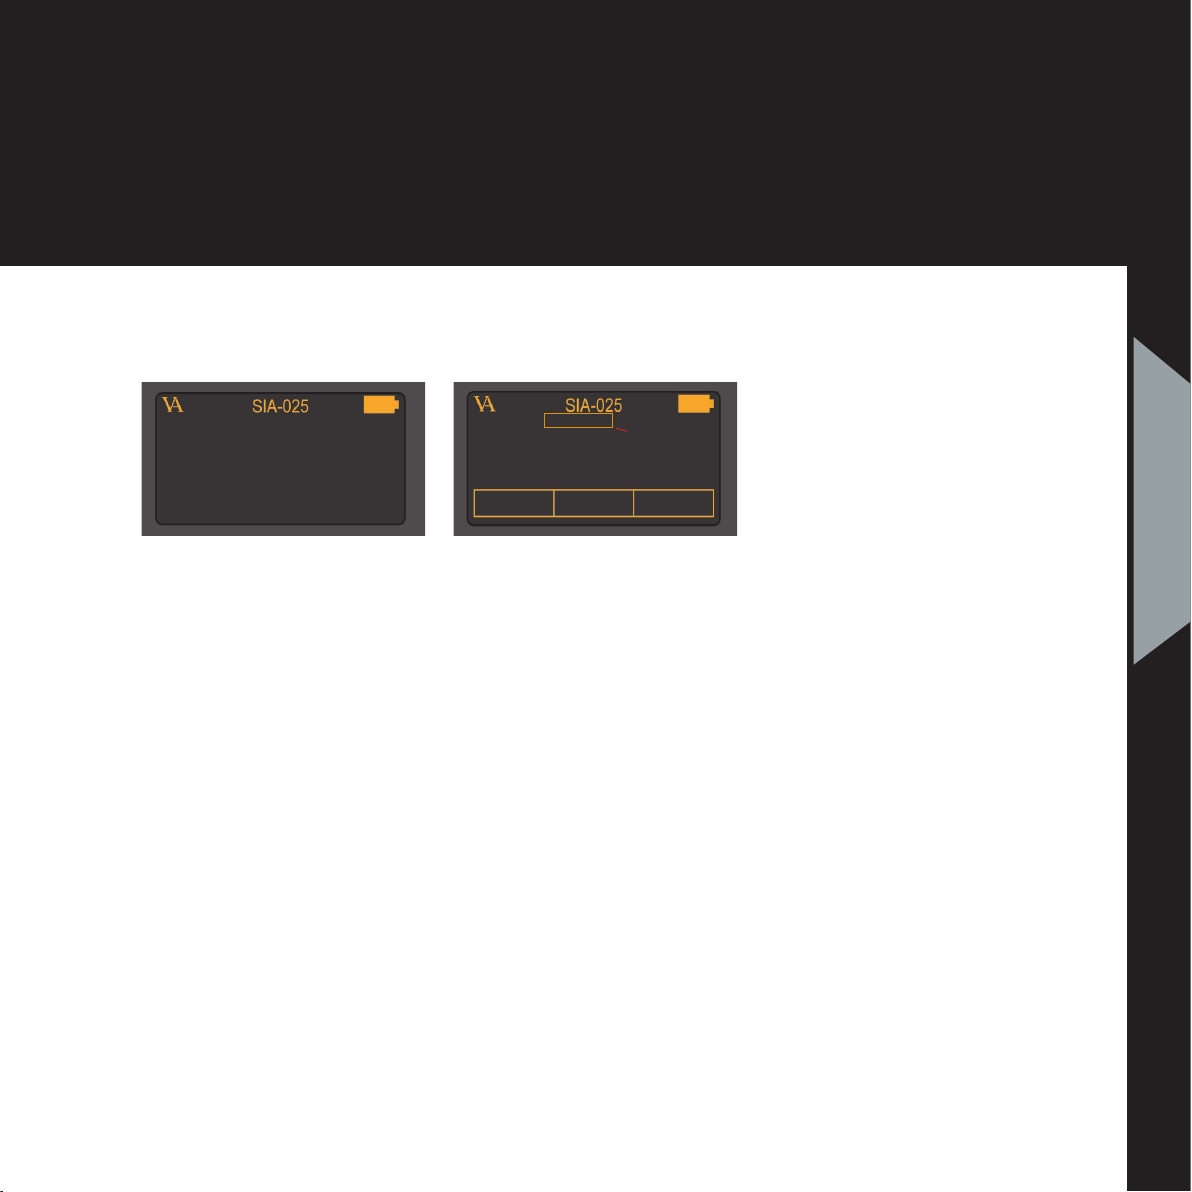
Normal mode
Display
In normal mode the display has
6 information fields.
a. VA logo
b. The device that the RC-010
is controlling now.
c. Battery status
d. Hotkey standard set to be
a shortcut to the MP-T201.
e. Change the device that the
RC-010 has to control.
f. Hotkey standard set to be
a shortcut to INPUT2.
2
4
8
5 6
7
10
VITUS
REP STBA/AB
SIA-025
PRODUCTMP-T201 INPUT 2
11
1
9
3
7
a b c
d fe

10
RC-010 | Version 1
2. operation
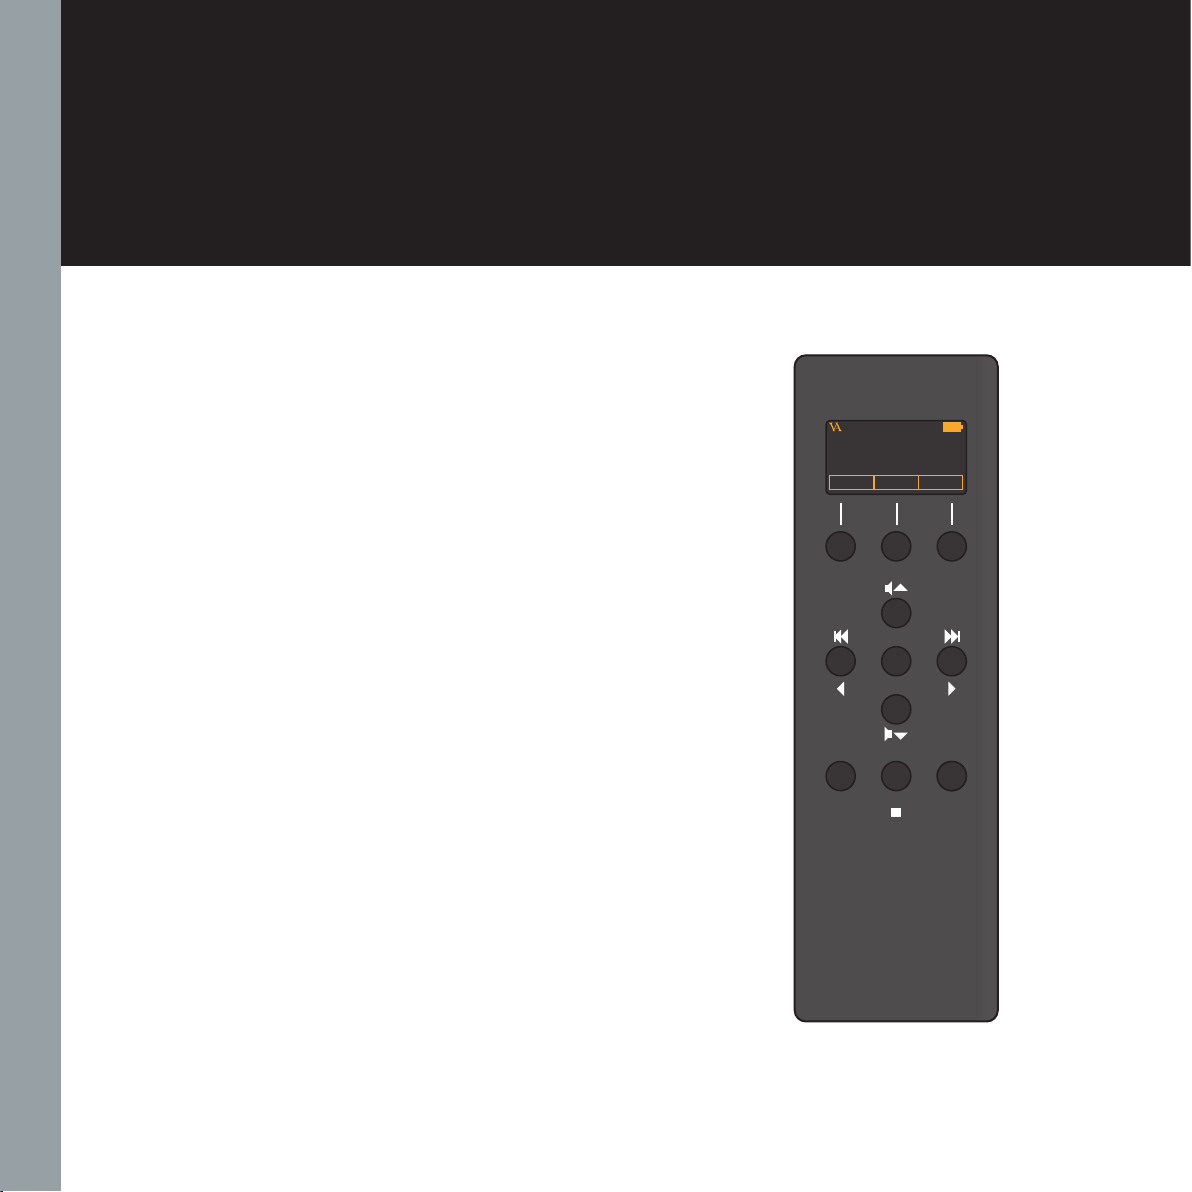
Menu mode
Buttons
You enter menu mode, by
holding button 2 down for
three seconds.
In menu mode there are
8 basic functions/buttons
available on the left front.
1. Edit hotkey *
2. Select between products
3. Edit hotkey *
4. Next/Up
5. Previous/Down
6. Select
7. Next/Up
8. Previous/Down
9. -
10. -
11. -
*only available in the EDIT
PRODUCT sub-menu.
2
4
8
5 6
7
10
VITUS
REP STBA/AB
SIA-025
PRODUCTMP-T201 INPUT 2
11
1
9
3
7
ab c
d fe
DISABLE
KEY 1 : INPUT 1
KEY 3 : INPUT 2
PRODUCTMP-T201 INPUT 2
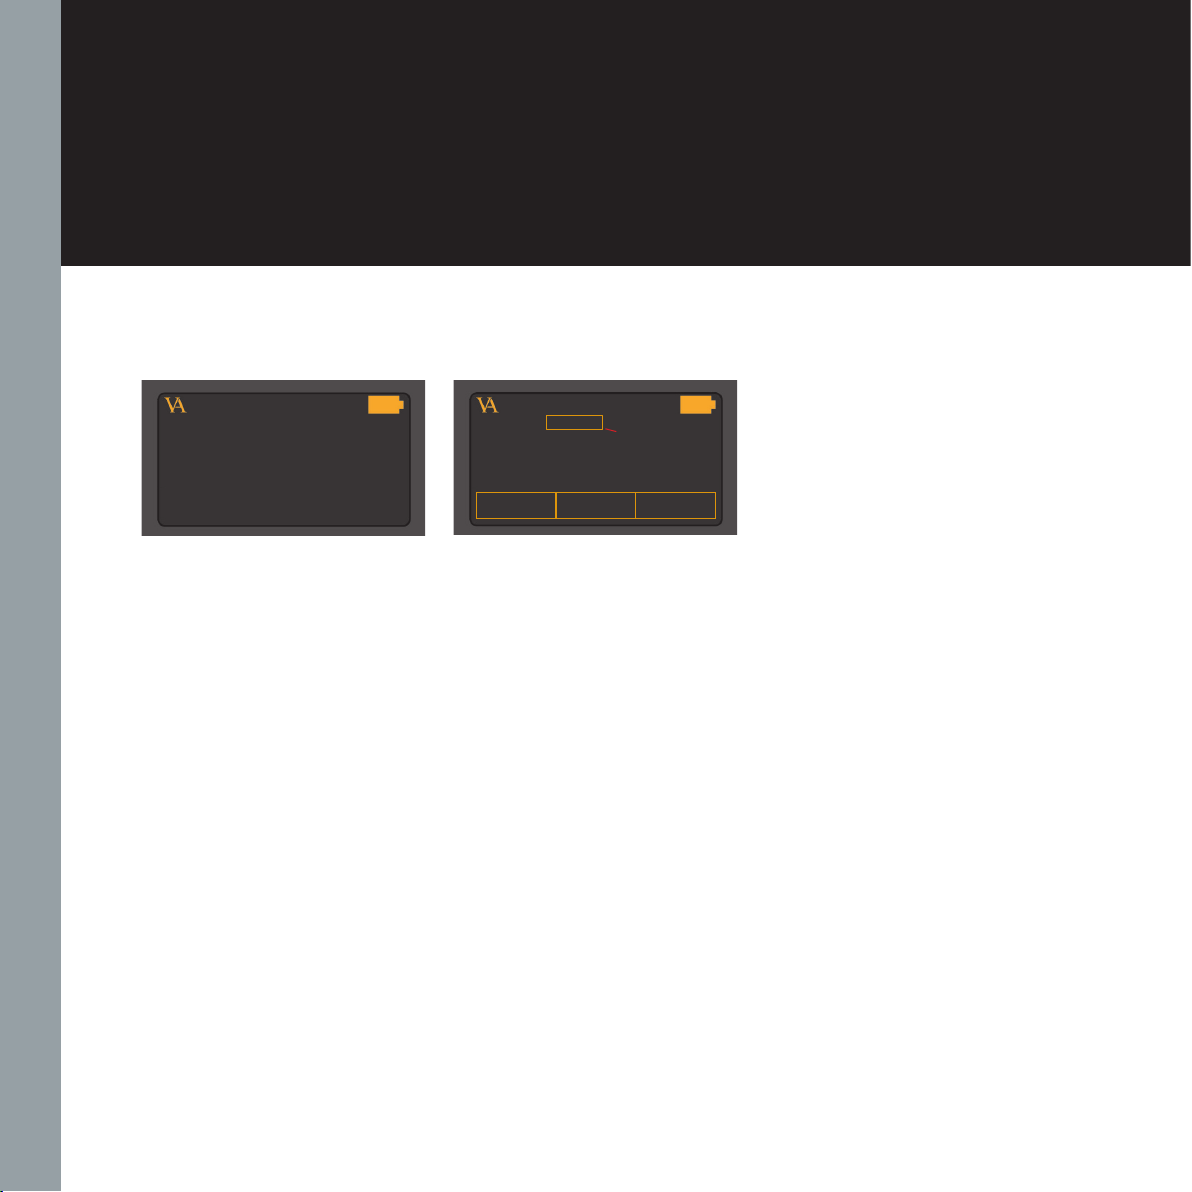
Menu mode
Display
In the menu mode the display
has 2 different layouts and
available.
The display layout for the
sub-menus: LEAVE, FABRIK,
ADD PRODUCT and DISPLAY.
Layout 1
Layout 2
The display layout for the
sub-menu: EDIT PRODUCT.
11
RC-010 | Version 1
2. operation
2. operation
Layout 1 Layout 2
Display layout for sub-menu: EDIT
PRODUCT.
1.
The device that you are
editing now.
2.
Disable or enable the
product. When you disable a
product it will not be available
when you scroll through the list
of devices with button 2, item
1 on the display
3.
Set the input in the
predefined list under button 1,
item 5, to the right number.
4.
Set the input in the
predefined list under button 3,
item 7, to the right number.
1
2
DISABLE
KEY 1 : INPUT 1
KEY 3 : INPUT 2
PRODUCTMP-T201 INPUT 2
1
28
3
4
5 6 7
Display layout for sub-menus: LEAVE,
FABRIK, ADD PRODUCT and DISPLAY.
1.The product that you are
editing now
2 .
The sub-menu item that you
can enter by pressing button 6.
The display layout for the
sub-menu: EDIT PRODUCT.
5.
Set hotkey 1 (button 1) to a
product that you can choose
from in the predefined list. The
predefined list of products is
installed standard on the RC-
010. Scroll through this list with
button 1. Change the product
that you want to edit. Scroll
through the list of products
with button 2.
7.
Set hotkey 2 (button 3) to a
product that you can choose
from in the predefined list. The
predefined list of products is
installed standard on the RC-
010. Scroll through this list with
button 3.
8.
Selection indicator.
Indicates which item on the
display you have selected.
12
RC-010 | Version 1
2. operation
Sub-menu: SELECT KEY.
1 .
The name of the product
that you added in sub-menu
item ADD PRODUCT.
2 .
Select a name for the button
that you selected. This name
will appear in the display every
time you push this button.
3 .
Enter the RC 5 code that the
remote has to send when this
button is pressed.
4 .
Enable / disable this button.
5 .
Delete the settings for this
button. Now you can reinstall
this button.
PRODUCT
1
2
...
NAME : ...
ADDR : OO
ENABLE
DELETE
...
SELECT KEY
1
2
3
4
5
68
7
9
Layout 1 Layout 2
Sub-menu: PROGRAM KEY.
1 .
The name of the product
that you added in sub-menu
item ADD PRODUCT.
2 .
Select a key/button that you
want to program.
6 .
Hotkey 1. Enter this item
by pressing button 1. Scroll
through the list of predefined
products with button 1. Select
a product from the list with
button 1. Change the product
that you want to edit. Scroll
through the list of products
with button 2.
7 .
Hotkey 2. Enter this item
by pressing button 3. Scroll
through the list of predefined
products with button 3. Select
a product from the list with
button 3.
8 .
Selection indicator. Indicates
which item on the display you
have selected.

13
RC-010 | Version 1
2. operation
2. operation
The menu structure
You can modify the settings
of the RC-010. You do this by
entering the menu. On the nex
page you can find a graphical
reproduction of the menu.
The sub-menus are indicated
with a colour. FABRIC, ADD
PRODUCT, DISPLAY, EDIT
PRODUCT and PROGRAM
KEY. On the next page you
can find a discription of the
elements in the menu. In the
Appendix you can find various
examples of how to change
the settings of the RC-010.
FABRIC
Restore the settings of the RC-
010 to factory settings.
ADD PRODUCT
The RC-010 comes has a list
installed of 12 predefined
products. There is room for
14 products on this list. This
means that it is possible to add
2 more products.
DISPLAY
The remote contains a motion
sensor. The RC-010 enters
a power down mode when
the motion sensor has not
registered movement for some
time. You can awake the RC-
010 movement, or by pressing
a key. In this sub-menu, you
can change the power down
time delay, the time it takes
before the RC-010 enters
power down mode.
It is possible to set the delay
to: OFF, 1,2,3,4,5 and 10
seconds.
When you select OFF, the
remote shuts down as soon as
you stop pressing a button.
With OFF selected the motion
sensor is deactivated and
movement will not activate the
RC-010.
EDIT PRODUCT
The products in the list of
predefined products are fully
programmed. You can disable
or delete the products in the
list or you can change the
settings for buttons 1 and 3
(the hotkeys). When you add
a product to the list then you
have to program the buttons.
PROGRAM KEY
This sub-menu only becomes
available when you add a
product to the predefined
product list. In this sub-menu
you can enter the buttons
RC5 code and give the button
a name. You can give each
button 2 functions. One
function for pressing (release),
and one function for press-
and-hold (press).
14
RC-010 | Version 1
2. operation
2
4
8
5 6
7
10
VITUS
REP STBA/AB
SIA-025
PRODUCTMP-T201 INPUT 2
11
1
9
3
7
RC-010 Discription
of the elements in
the menu.
LEAVE MENU
Go back to normal mode.
FABRIC
Restore the settings of the RC-010
to default settings.
ADD PRODUCT
Add a product to the list of
predefined products.
NAME
Give a name to the new
product.
DISPLAY
Set the delay of the display.
EDIT PRODUCT
Change settings of the selected
product.
DISABLE
Disable the selected product
ENABLE
Enable the selected product.
KEY (1 and 3)
Change the settings of the
hotkeys (keys/buttons 1 and 3).
INPUT
Choose the input.
PROGRAM KEY
Program the different keys/
buttons.
PRESS/RELEASE
Program the button for press,
and program the button for
release.
CODE
Enter the RC 5 code belonging to
the button.
TEXT
Give a discription to the button.
PRODUCT
Switch between products.

15
RC-010 | Version 1
2. operation
2. operation
Figure 9 The RC-010 Menu strukture
RESET TO STANDARD? NO / YES
LEAVE MENU
FABRIC
ADD PRODUCT NAME:........
DISPLAY DISPLAY 1/2/3/4/5/10/OFF
EDIT PRODUCT
PROGRAM KEY*SELECT KEY
MP-t201
MP-L201
KEY 1: INPUT 1
ENABLE DISABLE
INPUT 1/2/3/4/5
The same
sequence
as key 1
The INPUT .. in the list of possible de-
vices under button 1 is now updated
with the input that you have chosen.
KEY 3: INPUT 2
2
2
2
6
6
6
6
6
6
56
6
6
1
1
1
8KEY .. PRESS/RELEASE
CODE ..
TEXT ...
6
6
6
8
8
8
8
8
8
8
8
8
7
*This sub-menu becomes
available when you add a
product to the predened
product list.
INPUT 1/2/3/4/5
MP-T201
RC-010 The menu structure

16
RC-010 | Version 1
3. operation & service
Mains supply voltage
Any unit may be set for
operation in 100V, 115V or
230V A.C. Units are shipped
set for the mains supply
voltage according to the
destination. The voltage
setting can be updated later
by your dealer, if necessary.
Maintenance
Vitus Audio products are
designed to run for many years
without the need for regular
maintenance. Should your RC-
010 show signs of malfunction,
please contact your dealer or
Vitus Audio.

17
RC-010 | Version 1
4. warranty
Warranty
Warranty Statement
(modified to fit Vitus Audio)
1. TERMS AND CONDITIONS
LIMITED WARRANTY
Vitus Audio warrants the
product designated herein
to be free of manufacturing
defects in material and
workmanship, subject to the
conditions hereinafter set
forth, for a period of three
(3) years from the date of
purchase by the original
purchaser or no later than
five (5) years from the date of
shipment to the authorized
Vitus Audio cooperating
partner, whichever comes first,
excepting
any cosmetic damage to
chassis parts. (See 6)
2. CONDITIONS
This Warranty is subject to
the following conditions and
limitations. The Warranty
is void and inapplicable
if the product has been
used or handled other than
in accordance with the
instructions in the owner’s
manual, abused, or misused,
damaged by accident
or neglect or in being
transported, or the defect
is due to the product being
repaired or tampered with by
anyone other than Vitus Audio
or authorized Vitus Audio
repair center. The product
must be packed in its original
box and returned to Vitus
Audio or an authorized repair
center by the customer at his
or her sole expense. Vitus
Audio will pay return freight of
its choice.
IMPORTANT!
A returned product MUST
be accompanied by a written
description of the defect
and a photocopy of the
original purchase receipt.
This receipt must clearly list
model and serial number,
date of purchase, the name
and address of the purchaser
and authorized dealer and the
price paid by the purchaser.
Vitus Audio reserves the right
to modify the design of any
product without obligation
to purchasers of previously
manufactured products
and to change the prices or
specifications of any product
without notice or obligation to
any person.
3. REMEDY
In the event the above
product fails to meet the
above Warranty and the above
conditions have been met, the
purchaser’s sole remedy under
this Limited Warranty shall be
to return the product to Vitus
Audio or an authorized Vitus
Audio repair center where the
defect will be rectified without
charge for parts and labor,
except chassis parts. (See 6)
4. LIMITED TO ORIGINAL
PURCHASER
This Warranty is for the
sole benefit of the original
purchaser of the covered
product and shall not be
transferred to a subsequent
purchaser of the product.
5. DURATION OF WARRANTY
This Warranty expires on the
third (3rd) year anniversary
of the date of purchase or
no later than the fifth (5th)
anniversary of the date of
shipment to the authorized
Vitus Audio cooperating
partner, whichever comes first.
3. operation &
service

18
RC-010 | Version 1
4. warranty
6. CHASSIS
Damage or cosmetic defects
are not warranted.
7. DEMONSTRATION
EQUIPMENT
Equipment used by an
authorized cooperating
partner for demonstration
purposes is warranted to be
free of manufacturing defects
in materials and workmanship
for a period of three (3) years
from the date of shipment to
the authorized cooperating
partner. After the first year,
demo equipment needing
warranty service must be
packed in its original box
and returned to Vitus Audio
by the cooperating partner
at his or hers sole expense.
Vitus Audio will pay return
freight of its choice. A returned
product must be accompanied
by a written description
of the defect on a VITUS
AUDIO RETURNED GOODS
AUTHORIZATION form.
Dealer-owned demonstration
equipment sold at retail
within three (3) years of date
from shipment to the dealer
is warranted to the first
retail customer to be free
of manufacturing defects in
materials and workmanship
for the duration of the three
(3) Year Limited Warranty
remaining (as measured
from the date of shipment of
the equipment to the Vitus
Audio partner. In the event
warranty service is needed
under these conditions, the
owner of the equipment
must provide a copy of his
purchase receipt, fulfilling the
requirements described under
”2. Conditions” above. The
product must be packed in its
original box, and returned to
Vitus Audio or an authorized
Vitus Audio repair center by
the customer at his or her sole
expense. Vitus Audio will pay
return freight of its choice.
8. MISCELLANEOUS
Any implied warranties relating
to the above product shall be
limited to the duration of this
warranty. The warranty does
not extend to any incidental
or consequential costs or
damages to the purchaser.
Some countries do not allow
limitation on how long an
implied warranty lasts or
exclusion or limitation of
incidental or consequential
damages, so the above
limitations or exclusions may
not apply to you. This warranty
gives you specific legal rights,
and you may also have other
rights which vary from country
to country.
9. WARRANTOR
Inquiries regarding the above
Limited Warranty may be sent
to the following
address:
AVA Group A/S
Sandgaardsvej 31, Birk
DK7400 Herning
Denmark
Att.: Customer Service

19
RC-010 | Version 1
4. warranty
10. WARRENTY OUTSIDE
DANMARK
Vitus Audio has authorized
distribution in many countries
in the world. In each country,
the authorized importing
retailer or distributor has
accepted the responsibility
for warranty of products sold
by that retailer or distributor.
Warranty service should
normally be obtained from the
importing retailer or distributor
from whom purchased your
product. In the unlikely
event of service required
beyond the capabilities of
the importer, Vitus Audio will
fulfill the conditions of the
warranty. Such products must
be returned at the owner’s
expense to the Vitus Audio
factory, together with a
photocopy of the bill of sale
for that product, a detailed
description of the problem,
and any other information
necessary return shipment. In
many cases the retailer your
purchased the product from,
will handle this for you.
11. FURTHER INFORMATION
Should you have any further
questions related to our
warranty – please contact us
at the following email: info@
vitusaudio.com
4. operation &
service

20
RC-010 | Version 1
5. specications
RC-010 specifications
Remote
Data communication protocol……........................……..………RC5
Battery ………………………….....…………...Lithium Ion 1000 mAh
AC/DC Adapter
Type……………………………….......……FW74010/05 Switchmode
Input………………………..……...100 - 240 V~/ 50-60 Hz / 310 mA
Output……………………...………………………………........5V / 2A
This manual suits for next models
1
Table of contents


