VIVI MT20 User manual

NOTE: Please read the user manual before your first ride!
User Manual of
Electric Bike

Warm
Tips
Thanks for your smart choice and becoming a new member of
VIVI electric bike family.
For easy and safe riding, we specially prepared this manual. Hope it is
helpful for knowing the details of VIVI electric bike.
We create a good image for VIVI electric bike for its unique shape,
advanced and reliable technology as well as good after-sales service.
The body structure that can withstand 100,000 times of vibration,
shock absorber, high-efficiency motor and driving system has
become the leading and unique advantage of this electric bike.
User requirement is our eternal pursuit.
For improving our product, hope you can share with us your riding
feeling and opinions without any reservation.

About
our brand
Green and healthy travel, leading the great future with small
action.
VIVI electric bike has a complete R&D, manufacturing and sales
system, all models are self-developed and have won good praises
from customers.
Our product is environment-friendly, leisure, comfortable, convenient
and practical, thereby becoming a necessary travel product in the
future.
Dear users, for the safety of you and others and to ensure the
good performance, please carefully read this manual before using.
Daily forms and maintenance knowledge in this manual can help
you know well about the bike. Any improper operation may lead
to damage to the product.
Thanks for purchasing “VIVI” electric bike. Due to constant technical
improvement and upgrading, there may be a slight difference
between the real object and manual. Please take the real object as
the standard. Please carefully read and observe the contents marked
with in the manual.

TABLE
OF CONTENTS
1. Precautions for users
2. Structure diagram of electric bike
3. Parameter introduction
4. Product characteristics
5. Installation instructions
6. Instructions for use
7. Precautions for use
8. Maintenance instructions
9. Troubleshooting and solutions
10. Specification of parts
11. After-sales service
12. Packing list
01
04
05
08
09
16
25
29
31
32
33
35

01
1. Precautions for users
For riding safety, please carefully read the Product Manual before riding and check
whether the parts are intact. For any problems, please contact us timely: service.
Please take personal protective measures before riding, and always wear special
protective equipment when riding an electric bike:
Be sure to wear glasses (clear) to keep out dirt, dust and insects.
Be sure to wear tinted spectacles in the sun.
Do not ride at overspeed, because it's the main cause of traffic accident.
1. Precautions for users
This manual contains important safety performance information and service information,
please read the following warnings before using our product.
1.1
1.2
Wear the helmet when riding the electric bike.
Wear fluorescent and reflective stripes when
riding at night.
Always wear shoes with non-slip soles, do not
wear high heels or other ill-fitting shoes and
loose or otherwise ill-fitting clothing.
Please fully charge the electric bike before riding.
Please ensure there are no foreign matters around the charging port when charging
the electric bike. To prevent sparks, connect the charger to the electric bike before
connecting to the AC power supply.
When you don't use the product for a long time, please timely turn off the general
switch and charge the battery periodically (in an interval of about two months
generally). Store the electric bike after fully charging the battery. To prevent serious
power-lossing, please discharge and charge the battery at least once a month.
Do not ride the electric bike when you feel comfortable due to illness and impact of
drug or alcohol.
Please always observe the local laws and regulations on electric bicycles.
Do not ride in humid condition. Electric bike may slip off your feet and cause injury.
Humid environment may cause electronic device damage and warranty failure.
Do not disassemble the parts; if necessary, please contact us for purchasing standard parts.
1.3
1.4
1.5
1.6
1.7
1.8
1.9

02
Please use the pedal assist mode.
Do not brake frequently under the premise of ensuring safety.
Do not overload.
Before riding, please check the tire pressure; the tires shall have enough pressure,
generally between 35PSI-65PSI (280KPA-450KPA).
1. Precautions for users
Avoid exposure to sunlight or rain for a long period, and avoid storing our
electric bicycle at a hot place or a place with corrosive gas to prevent damage to
electroplated parts and painted surfaces.
For the safety of others and avoid bike damage, please do not lend the bike to
someone who cannot ride it.
Frequent braking, driving against the wind, carrying people or objects and
insufficient tire pressure, etc., will consume a lot of power and reduce the endurance
mileage.
To obtain the best endurance mileage, follow the following instructions:
Please keep the two keys properly. You would not be able to start the electric bike or
change the battery if the only key is lost. You shall get more backup keys if necessary
(we do not provide them). Please turn to professional institutions in case of loss and
the user shall bear the whole resposibility.
The electric bicycle is a means of transportation with certain risk factors. Please
be sure to observe the traffic rules. In case of emergencies such as riding too fast,
please brake the rear wheel first and then brake the front wheel. If the front wheel is
suddenly braked, there is a danger of tipping over. Please ride with care.
Do not ride the electric bike on highways.
This electric bike is not suitable for riding on motorway or at any other inappropriate place.
Before riding this electric bike, please carefully check the state of the body. You shall
be responsible for any consequences caused by your improper operation or use.
Your current insurance may not cover the situations that you may encounter while
riding the electric bike, please contact your insurance company or insurance broker
for relevant consultation.
The user shall be solely responsible for the safety problems caused by improper use.
1.12
1.13
1.14
1.15
1.16
1.17
1.18
1.19
1.10
1.11

03
1. Precautions for users
In order to prevent your electric bike from being lost,
please take good care of your electric bike. Please equip
a professional bicycle lock if necessary, and lock the
electric bike when it is not in use. Each bicycle has its own
exclusive frame number, which is located at the position of
the head tube of the frame. When you receive this electric
bike, please record and save the frame number. We have
not put he frame number in record.
Although the operating instructions of this manual are followed, there are still other
factors that may cause danger when using this product. Please pay attention to
safety during riding.
Please comply with local laws and regulations. If the use of the speed regulating
handle (or called rotary handle and accelerator) is not allowed according to local
laws, do not install and use the speed regulating handle on VIVI products; otherwise,
you shall bear all the consequences, and VIVI shall not assume any responsibility.
1.20
1.21
1.22

04
2. Structure diagram of electric bike
Knowing the parts of electric bike is helpful for its assembly, maintenance and
troubleshooting. Color, style and parts may be different. Please take the real object
as the standard.
16 Front disc brake calipers
01
03
05
02
04
06
Meter
Brake handle
Bell
Shift lever
Throttle lever
Waterproof wire
Part name Part name Part name
07
08
Handle stem
Front fork suspension
12
13
14
15
09
10
11
Tire
Wheel rim
Spoke
Front reflector
Headlight
Front fender
Front wheel
23
24
17
18
19
20
21
22
Battery
Battery charging port
Disc
Saddle
Saddle quick release
Seat tube
Saddle quick release
Frame
32
5 4
12
6
8
7
9
10
11
20
21
32
24
12
13
14
1517252728263135 363334 16
18 2229 2330 19

05
3. Parameter introduction
Please confirm the product model and find corresponding parameters.
25
26
28
27
29
30
32
31
33
34
36
35
Drive chain cover
Chain
Right pedal
Right crank
Shelf
Brake lights
Electric machinery
Rear wheel
Protective frame
Cassette
Kickstand
Rear reflector
Part name Part name Part name
Basic
parameters
Performance
parameters
Battery
parameters
Performance
indexes Item MT20 MT20-P FM201
Vehicle dimensions 1600*610*1150MM 1650*610*1350MM 1600*610*1150MM
Wheel dimension 20*1.95inch 20*3.0inch 20*1.95inch
Carbon steel Carbon steel Aluminum alloy
150KG 150kg 150kg
26.7KG 30.5KG 26.7KG
15 degree 15 degree 15 degree
Single-speed Single-speed Single-speed
Speed 7
40-45km
Speed 7
40-45km
Speed 7
40-45km
48V 48V 48V
7.8AH 12.8AH 7.8AH
500 times 500 times 500 times
19.8mph(32km/h) 19.8mph(32km/h) 19.8mph(32km/h)
Frame material
Load
Vehicle weight
Maximum gradient
Rear derailleur
Mileage range
Battery capacity
Operating temperature
Maximum speed
Front derailleur
Service life
Rated voltage
23°F-104°F
(-5℃~40℃)
23°F-104°F
(-5℃~40℃)
23°F-104°F
(-5℃~40℃)
Motor
parameters
500W
35N.m
500W
85N.m
500W
35N.m
Brushless gear motor Brushless gear motor Brushless gear motor
Rated power of motor
Maximum torque
Motor type
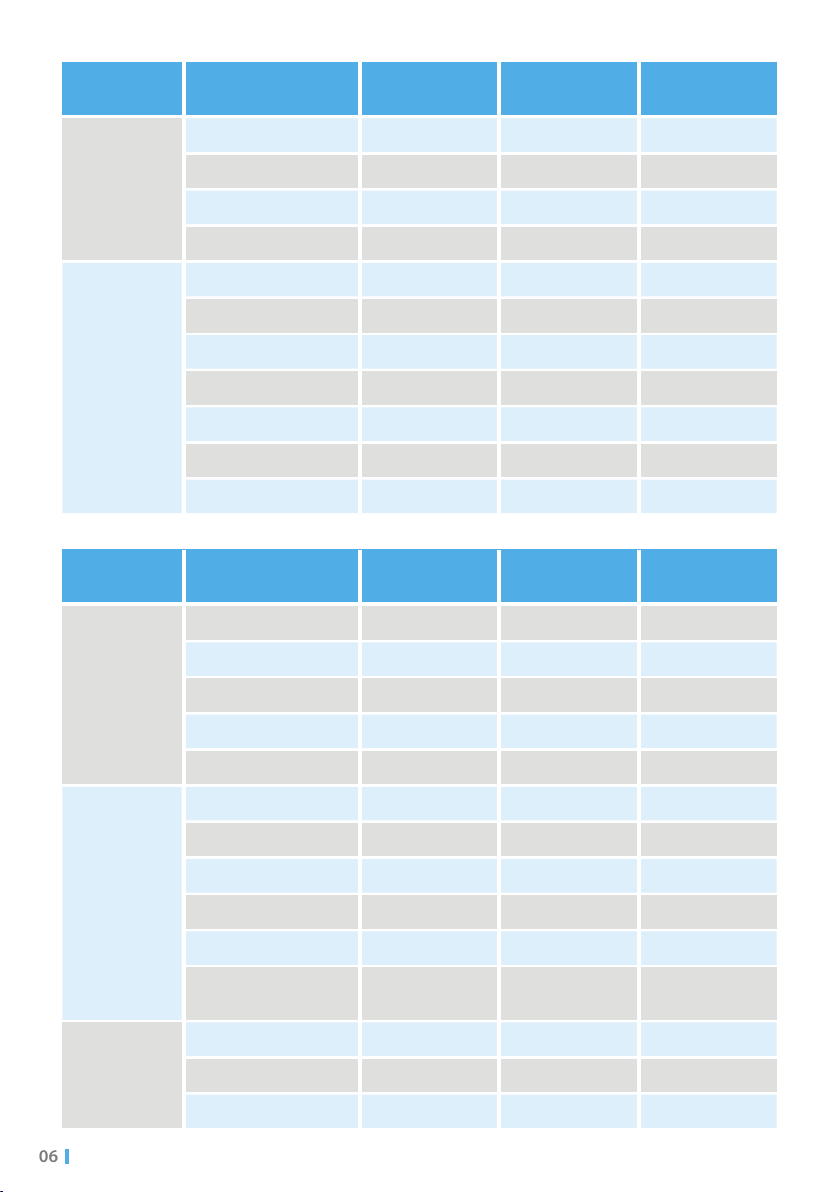
06
Charger
parameters
Other
parameters
100-240V 100-240V 100-240V
1.8A 1.8A 1.8A
DC 54.6V DC 54.6V DC 54.6V
2A 2A 2A
4-6H 6-8H 4-6H
4LED Headlight 4LED Headlight 4LED Headlight
30.7KG 35KG 30.7KG
Yes (equipped with 2
keys) Yes (equipped with 2
keys) Yes (equipped with 2
keys)
Disc type brake Disc type brake Disc type brake
Input current
Instrument
Output current
Suspension
Package weight
Input voltage
Charging time
Output voltage
Brake
Light
Battery lock
Front fork suspension Front fork suspension Front fork suspension
LED instrument LED instrument LED instrument
Performance
indexes Item MT20 MT20-P FM201
Basic
parameters
Performance
parameters
Battery
parameters
Performance
indexes Item FM201-P C26 MT26G
Vehicle dimensions 1650*610*1350MM 1830*630*1140MM 1700*650*1150MM
Wheel dimension 20*3.0inch 20*1.95inch 20*1.95inch
Carbon steel Carbon steel Aluminum alloy
150KG 150kg 150kg
30.5KG 28.5KG 26.5KG
15 degree 15 degree 15 degree
Single-speed Single-speed Single-speed
Speed 7
40-45km
Speed 7
40-45km
Speed 7
40-45km
48V 48V 48V
12.8AH 7.8AH 7.8AH
500 times 500 times 500 times
19.8mph(32km/h) 19.8mph(32km/h) 19.8mph(32km/h)
Frame material
Load
Vehicle weight
Maximum gradient
Rear derailleur
Mileage range
Battery capacity
Operating temperature
Maximum speed
Front derailleur
Service life
Rated voltage
23°F-104°F
(-5℃~40℃)
23°F-104°F
(-5℃~40℃)
23°F-104°F
(-5℃~40℃)

07
Charger
parameters
Other
parameters
100-240V 100-240V 100-240V
1.8A 1.8A 1.8A
DC 54.6V DC 54.6V DC 54.6V
2A 2A 2A
6-8H 4-6H 4-6H
4LED Headlight 4LED Headlight 4LED Headlight
34.5KG 32.5KG 30.5KG
Yes (equipped with 2
keys) Yes (equipped with 2
keys) No (not equipped
with key)
Disc type brake Disc type brake Disc type brake
Input current
Instrument
Output current
Suspension
Package weight
Input voltage
Charging time
Output voltage
Brake
Light
Battery lock
Front fork suspension Front fork suspension Front fork suspension
LED instrument LED instrument LED instrument
Performance
indexes Item FM201-P C26 MT26G
The riding experience will be better for the user lighter than 120kg.
If you want to reach the maximum speed, you need to unlock the speed limit. Please
follow the instructions in 6.5 to complete the operation.
The speed and endurance range vary depending on road conditions, weather and
driver's weight, etc.
Supplementary description:
Motor
parameters
500W
85N.m
500W
35N.m
500W
35N.m
Brushless gear motor Brushless gear motor Brushless gear motor
Rated power of motor
Maximum torque
Motor type

08
4. Product characteristics
Three-dimensional body structure designed according to ergonomics, mechanics of
materials and aesthetics, achieving the best riding effect.
Light and aesthetic appearance and good part material, making the riding safer and
convenient.
For riding safety, the electric safety system will cut off power automatically when
braking.
The bike is designed based on the standard speed limit (rated speed: 25km/h) of
electric bike, making the family more reassured.
This electric bike complies with the local laws and regulations. You can use it safely.
The bike is equipped with a mechanical bell. During the use of the bike, the sound of
the bell and motor does not exceed the A-weighted emission sound pressure level
requirement of 70dB(A) at the workplace.
4.1
4.2
4.3
4.4
4.5
4.6
09
5. Installation Instructions
After receiving the product, please carefully check it against the accessories list (see page
NO.35 for list of accessories), be careful during installation and assemble the bike according
to the following steps. Notice: Installation steps may be slightly different for different
models. Take the real object as the standard. Please find the installation steps for specific
models.
For your safety, please wear protective gloves before installation.
Improper assembly may present a risk of loss of control, bumping or falling. When
assembling the electric bicycle, please note to apply the appropriate force. Too tight or too
loose tightening may cause damage or failure of the electric bike. Special Note: Do not
assemble or repair it under power-on condition.
If you use non-allowable parts, wrong installation may result in damage to the electric bike
or even personal injury. Do not attempt to ride an electric bike that is not properly installed.
Do not disassemble or modify the electric bike by yourself without permission. Otherwise, it
may cause permanent damage to the electric bike and may also cause personal injury.
5.1 Installation of handle stem
Applicable to models MT20 / MT20-P / FM201 / FM201-P5.1.1
Note:
When adjusting the height of stem, please do
not exceed the limit line!
Insert the upper part of stem into its lower part, and lock the fixing structure in the
middle of the stem.
Vertically erect handle stem and lock the folding device at the bottom of handle stem.
Ensure that the stem structure has been fixed and the handlebars are free from shaking.

10
Note: When adjusting the height of stem, please do not exceed the limit line!
Adjust the four screws used for connecting the handlebars to the stem and
adjust the angle of handlebar.
Make sure the handlebars are perpendicular to the front wheels.
5.2 Adjustment of angle of handlebar
Applicable to models C26 / MT26G
Applicable to models MT20 / MT20-P / FM201 / FM201-P / C26 / MT26G
5.1.2
5.2.1
Remove the guard plug, install the handle into the stem, align it to the front fork, and
then tighten the screw.

11
Applicable to models MT20 / MT20-P / FM201 / FM201-P / C26 / MT26G
5.3.1
5.3.2
Release the fixing rod of front fork with the tool No. 8 (M17 wrench) and remove
it (this part is to prevent deformation of front fork during delivery)
Put the front wheel into front fork. Fix the front fork hanger on the axle and put
the brake disc in the middle of brake. Tigthen the screws on both sides with the
tool No.7 (M15 wrench).
5.3 Installation of front wheel
Applicable to C26 model5.2.2
Adjust angle of handle and then tighten the screws.

12
Applicable to models MT20 / MT20-P / FM201 / FM201-P / C26 / MT26G
5.4.1
5.4.2
5.4.3
Loosen the screws at the corresponding position of the front wheel, as shown in
the figure below. Put the fender in this position.
Connect the headlights and fasten loose screws again. Adjust the position of
lights and tighten the screws.
Loosen the screws used for fixing the fender, fix the fender, and then tighten it
again.
5.4 Installation of lights and fender

13
Insert the threads of each pedal into the crank arm completely. Tighten the
pedal completely with the tool No.7 (M15 wrench).
Note: Rotate the pedal marked with “L” into the left crank anticlockwise. Rotate
the pedal marked with “R” into the right crank clockwise.
5.5 Installation of pedal
Applicable to models MT20 / MT20-P / FM201 / FM201-P / C26 / MT26G

14
Connect the seat and seat tube first. Insert the seat rod into rod receiver, and adjust
the position and height according to your riding habit. Tighten the seat with clamps.
Note: Please do not exceed the maximum saddle height. Do not lift the saddle to the
position above the safety line.
Take out the red reflector, install the reflector on the saddle tube, and tighten
the screws with the tool to complete the installation of the rear reflector.
Take out the red reflector, install the reflector on the rack, and tighten the screws
with the tool.
Connect the plug to the tail light cable and bind the cable to the rack with cable ties.
5.6 Installation of Saddle
5.7 Installation of reflector
Applicable to models MT20 / MT20-P / FM201 / FM201-P / C26 / MT26G
Applicable to models MT20 / FM201 / MT26G
Applicable to models MT20-P / FM201-P / C26
5.7.1
5.7.2

15
Insert the battery into the middle of the frame and lock it with the battery key.
Make sure the battery switch is on to enhance your riding experience.
To remove the battery, insert the battery key and turn it to the "unlocked"
position before removing the battery.
First, install the battery bag on the handlebar, then pull out the power line connector
from under the battery bag, find the power line connector, and insert the power line
connector of the battery to complete the installation of the battery.
5.8 Installation of batteries
Applicable to models MT20 / MT20-P / FM201 / FM201-P / C26 / MT26G
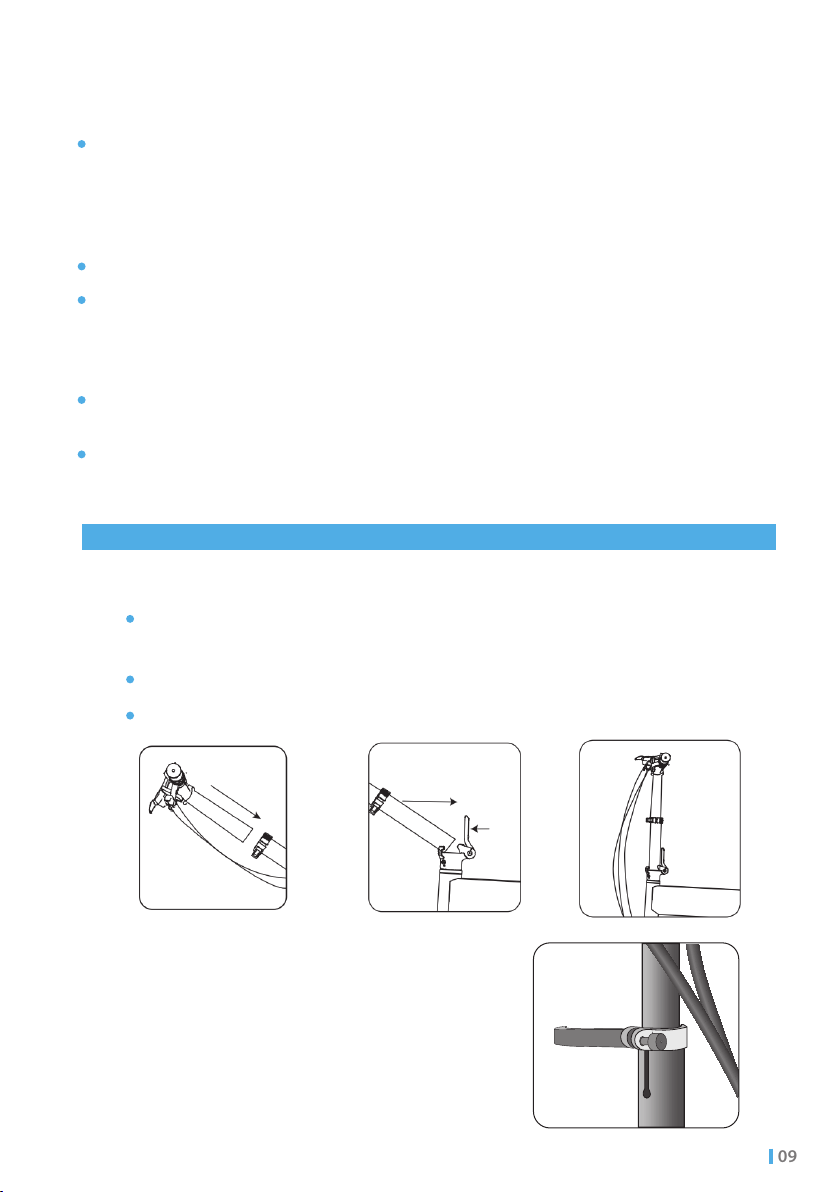
5.9 Adjust the angle of brake rod, Meter, gear lever, accelerator and bell on
the handlebar, and tighten them with tools.
Congratulations! You have assembled the whole electric bike.
Applicable to models MT20 / MT20-P / FM201 / FM201-P / C26
Applicable to model MT26G
5.8.1
5.8.2

16
MODE
POWER
-
+
6. Instructions for use
6.1 Meter
6.1.1 Applicable to models MT20 / FM201 / C26 / MT26G
6.1.1.1 Introduction to Meter interface
6.1.1.2 Introduction to Meter functions
Low speed
Medium speed
High speed
Battery power
Downshift Upshift
Powerswitch
Operation process
Press the button
to power on
in 2 seconds, the
default value is
“low”, indicating
the minimum
electric and pedal
assistance level.
“High” is the
maximum
speed, indicating
the maximum
electric and pedal
assistance level.
Riding mode,
no electric
and pedal
assistance.
To increase the
electric and
pedal assistance
level, press “+”.
“mid” is the
second level.
Other manuals for MT20
1
This manual suits for next models
5
Table of contents
Languages:
Other VIVI Scooter manuals


