VIVI M026TGB User manual

NOTE: Please read the user manual before your first ride!
User Manual of
Electric Bike

Warm
Tips
Thanks for your smart choice and becoming a new member of
VIVI electric bike family.
For easy and safe riding, we specially prepared this manual. Hope it is
helpful for knowing the details of VIVI electric bike.
We create a good image for VIVI electric bike for its unique shape,
advanced and reliable technology as well as good after-sales service.
The body structure that can withstand 100,000 times of vibration,
shock absorber, high-efficiency motor and driving system has
become the leading and unique advantage of this electric bike.
User requirement is our eternal pursuit.
For improving our product, hope you can share with us your riding
feeling and opinions without any reservation.

About
our brand
Green and healthy travel, leading the great future with small
action.
VIVI electric bike has a complete R&D, manufacturing and sales
system, all models are self-developed and have won good praises
from customers.
Our product is environment-friendly, leisure, comfortable, convenient
and practical, thereby becoming a necessary travel product in the
future.
Dear users, for the safety of you and others and to ensure the
good performance, please carefully read this manual before using.
Daily forms and maintenance knowledge in this manual can help
you know well about the bike. Any improper operation may lead
to damage to the product.
Thanks for purchasing “VIVI” electric bike. Due to constant technical
improvement and upgrading, there may be a slight difference
between the real object and manual. Please take the real object as
the standard. Please carefully read and observe the contents marked
with in the manual.

TABLE
OF CONTENTS
1. Precautions for users
2. Structure diagram of electric bike
3. Parameter introduction
4. Product characteristics
5. Installation instructions
6. Instructions for use
7. Precautions for use
8. Maintenance instructions
9. Troubleshooting and solutions
10. Specification of parts
11. After-sales service
12. Packing list
01
04
05
06
06
11
17
21
23
24
25
27

1
1. Precautions for users
For riding safety, please carefully read the Product Manual before riding and check
whether the parts are intact. For any problems, please contact us timely: service.
Please take personal protective measures before riding, and always wear special
protective equipment when riding an electric bike:
Be sure to wear glasses (clear) to keep out dirt, dust and insects.
Be sure to wear tinted spectacles in the sun.
Do not ride at overspeed, because it's the main cause of traffic accident.
1. Precautions for users
This manual contains important safety performance information and service information,
please read the following warnings before using our product.
1.1
1.2
Wear the helmet when riding the electric bike.
Wear fluorescent and reflective stripes when
riding at night.
Always wear shoes with non-slip soles, do not
wear high heels or other ill-fitting shoes and
loose or otherwise ill-fitting clothing.
Please fully charge the electric bike before riding.
Please ensure there are no foreign matters around the charging port when charging
the electric bike. To prevent sparks, connect the charger to the electric bike before
connecting to the AC power supply.
When you don't use the product for a long time, please timely turn off the general
switch and charge the battery periodically (in an interval of about two months
generally). Store the electric bike after fully charging the battery. To prevent serious
power-lossing, please discharge and charge the battery at least once a month.
Do not ride the electric bike when you feel comfortable due to illness and impact of
drug or alcohol.
Please always observe the local laws and regulations on electric bicycles.
Do not ride in humid condition. Electric bike may slip off your feet and cause injury.
Humid environment may cause electronic device damage and warranty failure.
Do not disassemble the parts; if necessary, please contact us for purchasing standard parts.
1.3
1.4
1.5
1.6
1.7
1.8
1.9

2
Please use the pedal assist mode.
Do not brake frequently under the premise of ensuring safety.
Do not overload.
Before riding, please check the tire pressure; the tires shall have enough pressure,
generally between 35PSI-65PSI (280KPA-450KPA).
1. Precautions for users
Avoid exposure to sunlight or rain for a long period, and avoid storing our
electric bicycle at a hot place or a place with corrosive gas to prevent damage to
electroplated parts and painted surfaces.
For the safety of others and avoid bike damage, please do not lend the bike to
someone who cannot ride it.
Frequent braking, driving against the wind, carrying people or objects and
insufficient tire pressure, etc., will consume a lot of power and reduce the endurance
mileage.
To obtain the best endurance mileage, follow the following instructions:
Please keep the two keys properly. You would not be able to start the electric bike or
change the battery if the only key is lost. You shall get more backup keys if necessary
(we do not provide them). Please turn to professional institutions in case of loss and
the user shall bear the whole responsibility.
The electric bicycle is a means of transportation with certain risk factors. Please
be sure to observe the traffic rules. In case of emergencies such as riding too fast,
please brake the rear wheel first and then brake the front wheel. If the front wheel is
suddenly braked, there is a danger of tipping over. Please ride with care.
Do not ride the electric bike on highways.
This electric bike is not suitable for riding on motorway or at any other inappropriate place.
Before riding this electric bike, please carefully check the state of the body. You shall
be responsible for any consequences caused by your improper operation or use.
Your current insurance may not cover the situations that you may encounter while
riding the electric bike, please contact your insurance company or insurance broker
for relevant consultation.
The user shall be solely responsible for the safety problems caused by improper use.
1.12
1.13
1.14
1.15
1.16
1.17
1.18
1.19
1.10
1.11

3
1. Precautions for users
In order to prevent your electric bike from being lost,
please take good care of your electric bike. Please equip
a professional bicycle lock if necessary, and lock the
electric bike when it is not in use. Each bicycle has its own
exclusive frame number, which is located at the position of
the head tube of the frame. When you receive this electric
bike, please record and save the frame number. We have
not put the frame number in record.
Although the operating instructions of this manual are followed, there are still other
factors that may cause danger when using this product. Please pay attention to
safety during riding.
1.20
1.21

4
2. Structure diagram of electric bike
Knowing the parts of electric bike is helpful for its assembly, maintenance and
troubleshooting. Color, style and parts may be different. Please take the real object
as the standard.
16 Front disc brake calipers
01
03
05
02
04
06
Meter
Brake handle
Bell
handlebar
Throttle lever
Waterproof wire
Part name Part name Part name
07
08
Handle stem
Front fork suspension
12
13
14
15
09
10
11
Tire
Wheel rim
Spoke
Front wheel reflector
Headlight
Front fender
Front wheel
23
24
17
18
19
20
21
22
Battery
Battery charging port
Disc
Saddle
Seat tube
Rear reflector
Rear fender
Frame
3
7
2
5 4
6
8
9
11
28
19
21
18
20
31
15
121317142533302932 26
22 23 24
161027
12

5
M026TGB
M026SH
26LGB
MT26H
H6
H7
H8 48V 10.4ah 120KG 24.8KG
6-8h
36V 10.4ah 120KG 23.6KG
4-6h
36V 10.4ah 120KG 23.5KG
4-6h
36V 8ah 120KG 26.1KG
4-6h
36V 8ah 120KG 24.7KG
4-6h
36V 8ah 120KG 23.5KG
4-6h
36V 8ah 120KG 25KG
4-6h
3. Parameter introduction
Please confirm the product model and find corresponding parameters.
Model Battery
capacity
Rated power
of motor
Maximum
speed
Charging
time Load
capacity
Product
weight
25
26
27
28
29
30
31
32
33
Chain
Right crank
Right pedal
Rear wheel
Motor
Protective frame
Cassette
Rear wheel reflector
Kickstand
Part name Part name Part name
The riding experience will be better for the user lighter than 120kg.
If you want to reach the maximum speed, you need to unlock the speed limit. Please
follow the instructions in 6.5 to complete the operation.
The speed and endurance range vary depending on road conditions, weather and
driver's weight, etc.
Supplementary description:
500 W
350 W
350 W
350 W
350 W
350 W
350 W
32km/h
32km/h
32km/h
32km/h
32km/h
32km/h
32km/h

6
4. Product characteristics
Three-dimensional body structure designed according to ergonomics, mechanics of
materials and aesthetics, achieving the best riding effect.
Light and aesthetic appearance and good part material, making the riding safer and
convenient.
For riding safety, the electric safety system will cut off power automatically when
braking.
The bike is designed based on the standard speed limit (rated speed: 25km/h) of
electric bike, making the family more reassured.
This electric bike complies with the local laws and regulations. You can use it safely.
The bike is equipped with a mechanical bell. During the use of the bike, the sound of
the bell and motor does not exceed the A-weighted emission sound pressure level
requirement of 70dB(A) at the workplace.
4.1
4.2
4.3
4.4
4.5
4.6
5. Installation Instructions
After receiving the product, please carefully check it against the accessories list (see Page
No.), be careful during installation and assemble the bike according to the following steps.
Notice: Installation steps may be slightly different for different models. Take the real object as
the standard. Please find the installation steps for specific models.
For your safety, please wear protective gloves before installation.
Improper assembly may present a risk of loss of control, bumping or falling. When assembling
the electric bicycle, please note to apply the appropriate force. Too tight or too loose
tightening may cause damage or failure of the electric bike. Special Note: Do not assemble
or repair it under power-on condition.
If you use non-allowable parts, the wrong installation may result in damage to the electric
bike or even personal injury. Do not attempt to ride an electric bike that is not properly
installed.
Do not disassemble or modify the electric bike by yourself without permission. Otherwise, it
may cause permanent damage to the electric bike and may also cause personal injury.

7
Align and insert the vertical tube into the frame head tube with a depth exceeding
the minimum insertion depth marked on the vertical tube. Install the valve rod and
tighten the screws with the tool No. 4 (M6 wrench).
Rotate the handlebar until it is perpendicular to the bike frame. Then, tighten the
screws with the tool No. 3 (M5 wrench).
5.1.1.1
5.1.1.2
5.1 Installation of handlebar
5.1.1 Applicable to models M026TGB/M026SH/26LGB/MT26H/H6/H7
Rotate the handlebar by 180 degrees until it faces forward. Tighten 2 screws
with the tool No.2 (M4 wrench) to fix the bike appropriately.
5.1.2.1
5.1.2 Applicable to H8 Model

8
5.2 Installation of front wheel
Applicable to models M026TGB/M026SH/26LGB/H6/H7/H8/MT26H
5.2.2
5.2.1 Release the fixing rod of front
fork with the tool No. 8 (M17
wrench) and remove it (this
part is to prevent deformation
of front fork during delivery)
Put the front wheel into front fork. Fix the front fork hanger on the axle and put
the brake disc in
the middle of brake.
Tighten the screws
on both sides with
the tool No.7 (M15
wrench).
Unscrew 4 screws on the valve rod cover with the tool No. 2 (M4 wrench). Rotate
the handlebar until it is perpendicular to the bike frame; attach the valve rod
cover to the handlebar tightly. Then, re-install the valve rod with 4 screws; then
tighten the screws with the tool No. 2 (M4 wrench).
5.1.2.2

9
5.3 Installation of Headlight
5.3.1
Insert the threads of each pedal into the crank arm completely. Tighten the pedal
completely with the tool No.7 (M15 wrench). Note: Rotate the pedal marked with “L”
into the left crank anticlockwise. Rotate the pedal marked with “R” into the right crank
clockwise.
As shown in the figure, install the front
Headlight on the front fork hanger, and tighten
the screws with the tool No. 3 (M5 wrench).
5.4 Installation of pedal
5.4.1
10
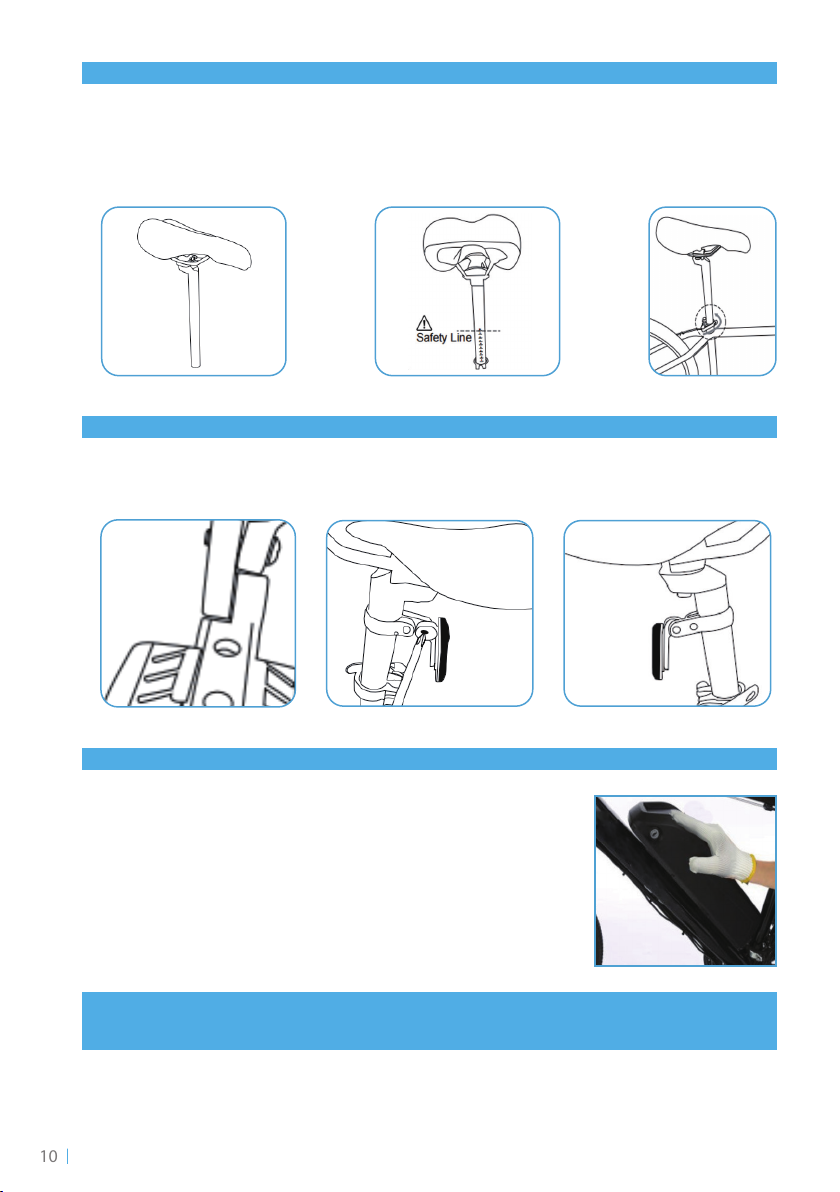
5.5 Installation of saddle
5.6 Installation of rear reflector
5.7 Installation of battery
Connect the seat and seat tube first. Insert the seat tube into rod receiver, and adjust the
position and height according to your riding habit. Tighten the seat with clamps. Notice:
Please do not exceed the maximum saddle height. Do not lift the saddle to the position
above the safety line.
Take out the red reflector, install the reflector on the saddle tube, and tighten the screws
with the tool No. 9 (cross screwdriver) to complete the installation of the rear reflector.
Open the battery box, put the battery in a correct angle, insert
it into the bracket gently, and press it for automatic locking.
Insert the key into the keyhole and rotate to align the key with
the "off" icon. At this time, the battery is locked and cannot be
removed. If you need to remove the battery, please follow the
instructions in 6.3.2 to complete the operation.
Adjust the angle of Brake levers, Meter, gear lever, accelerator and bell on the
handlebar, and tighten them with tools.
Congratulations! You have assembled the whole bike.

11
MODE
POWER
+
-
6. Instructions for use
6.1 Meter
6.1.1 Introduction to Meter interface
6.1.2 Introduction to Meter functions
Low speed
Medium speed
High speed
Battery power
Downshift Upshift
Powerswitch
Operation process
Press the button
for 2 seconds
to turn on. The
default value is
"Low", indicating
the lowest pedal
assisting level.
"high" is the
highest speed,
indicating the
highest pedal
assisting level
Riding mode,
without the
pedal assisting
level.
To add the pedal
subsidiary level,
please press the
button "+". "mid"
is the second
level.
MODE
POWE R
high
+
-
MODE
POWER
+
-
MODE
POWER
+
-
MODE
POWER
+
-
midlow highmidlow highmidlow highmidlow
low
high
mid
Tap position indicator off
Power OFF
√ √
× ×
× ×
√ √
√ √
Speed mode Pure electric bike Pedal assisted bike

12
6.2 Headlight
Long press “+” for two seconds, and the system defaults to turn on the front Headlight.
Long press “+” for two seconds when the front Headlight is ON, and the system
defaults to turn off the front Headlight.
When the input and output end of charger is connected, the red indicator
will be ON. The battery is fully charged if the indicator turns into green.
Standard charging time: Charge according to the time of special charger.
Environment temperature: about 25℃; charging time: 4-6h.
For convenience, VIVI battery can be removed.
Ensure the battery is turned off. Insert the key into key hole, rotate to align the
key to “OFF”and the key hole to “OFF” position.
Slide the battery upward and take it from the framework.
6.3.1.1
6.3.2.1
6.3.1.2
6.3.2.2
6.3 Battery
6.3.1 Instructions for battery charging
6.3.2 Disassembly of battery box
Notice: The weight of battery is about 4.5-8.5 pounds. Please operate carefully.
Know the key port and battery power supply position before riding. As shown
in the picture, the key port aligns to the key position 1 and is consistent with
the small lock icon. At key position 1, the battery is at the "locked" position, the
battery is locked to the frame, and the key is removed so the bike can be ridden.
6.3.3 Key positions of battery
6.3.3.1

13
When the battery is at the key position 2, the
battery will be "unlocked" and the battery can
be removed from the frame. Before moving or
riding, remove the battery from bike, hold the
key and slide down the battery from base.
When the battery is locked on the frame, turn on the battery switch. Then, long
press the button of the Meter panel for 2 seconds to power it on. At this time,
the electric bike is at the power-on state.
Pure electric bike (pure electric mode): Rotate the Throttle lever (right handlebar)
inward (anticlockwise), start the bike, adjust the rotating angle of speed control
handlebar from small to large, and the speed is changed from slow to fast. The
speed can be adjusted by adjusting the tap position.
Bike assisted by pedal (boost mode): Step on the pedal. As the dish of chain
wheel rotates, the motor will be started.
Long press the "M" button of the Meter panel for two seconds to power on, and
adjust the speed to the "high" position;
Long press“+” and “-”for 3-5 seconds simultaneously to release the speed limit;
To restore the factory configuration after releasing speed limit, repeat Step 1 and
2.
6.3.3.2
6.4.1
6.4.2
6.4.3
6.5.1
6.5.2
6.5.3
6.4 Bike startup
6.5 Speed
2
1
0km/h
Default mode (speed limit)
Customer mode (speed limit
release)
0km/h
15km/h
15km/h
20km/h
20km/h
25km/h
32 km/h
Indicator off lowMode mid high

14
6.6 Adjustment and Use of Brake
Before aligning the mechanical disc brake, make sure that the brake cable is properly
inserted into the brake lever. If the disc rotor is bent or damaged, replace the rotor first.
The brake is used to control the speed, not just to stop the bike. The maximum braking
force of the wheel is available before the wheel "lock" (standstill) and subsequent
slip. Once the tires skid, you will lose most of your braking power and any control of
the bike. You must practice braking and stop gently, without jamming the wheel. This
technique is called progressive brake modulation.
If the brake is not sensitive, loosen the
fixing bolt of the brake cable, shorten the
braking distance of the brake cable, and
then tighten the bolt. Or, when the brake
is too sensitive, increase the distance of
the brake cable.
If the rotor is always rubbing against the
brake pad or has excessive clearance,
loosen the two centering adjustment
screws, but do not remove them. Turn
the wheel slowly and check the space
between the rotor and the brake pad;
adjust the position of the brake pad and
rotor to avoid friction between the the
rotor and pad. After the adjustment,
tighten the screws.
Leave the same clearance on
both sides of the disc rotor
Brake pad
Disc rotor
Adjust caliper to
center the rotor
Centering
adjustment screws
6.6.1 Adjustment of Brake
6.6.1 Adjustment of Brake
Push the brake lever towards the handlebar to gradually increase the braking force.
If you feel the wheels get stuck, reduce the braking force so the wheels can continue
to spin without being stuck.

15
6.7 Standing height
6.8 Charging: Safe operation guide
For safe and comfortable riding, the distance from the ground to the rider's crotch
shall be 76 cm/30 inches when the rider is standing on the ground. In addition, there
should be at least 3-8 cm/1-3 inches between the crotch and the bike's top tube.
76cm
30
in
Please follow the instructions for use. Otherwise you will be responsible for the
consequences thereof.
Please use the original special charger, and do not use other chargers.
Note the chargeable battery type and applicable voltage. Do not use different
types of battery in mixture. The charging time shall not exceed 12 hours and the
charging current shall not exceed 3A.
Charging port
Insert the charger probe into the charger port on the electric bike battery as
shown in the figure.
Insert the tip of the wire into the battery
charger.
Insert the AC power plug into the AC power
socket.
The red indicator will then on and stay red
until the battery is fully charged. After the
battery is fully charged, the indicator will
become green.
6.8.1
6.8.2
6.8.2
6.8.2

16
6.9 Instructions for Use of Shift Lever
The shift lever shall be used during riding. When the bike is stationary, do not turn
the shift lever to avoid damaging your bike.
6.9.1 Use of Left Shift Lever
6.9.2 Use of Right Shift Lever
When the left shift lever is shifted forward, the front shift lever will move outward,
and the shift chain will move from the small piece of the fluted disc to the large
piece, which will increase the riding speed and increase the pedaling strength;
When the lever is turned back at the maximum position, the front shift lever will
move from outside to inside, and the shift chain will move from the large piece of
the fluted disc to the small piece at the same time, which will reduce the speed of
riding and the pedaling strength of riding, so as to realize the shifting process of
the front shift lever.
When the right shift lever is shifted forward (the tap position is changed from
position 7 to position 1), the rear shift lever will move inwards, and the shifting
chain will move from the small piece of the rear Cassette to the large piece at the
same time, which will reduce the riding speed while reducing the pedaling strength
of riding;
When the lever is at the maximum position (tap position 1), press the acceleration
button on the right shift lever. The rear shift lever will move from the inside to the
outside, and the shift chain will move from the large piece of the Cassette to the
small piece position, which will increase the speed of riding and will also increase
the pedaling strength of the riding, so as to realize the shifting process of the rear
shift lever.
This manual suits for next models
6
Table of contents
Languages:
Other VIVI Scooter manuals


