Vocera B1000 User manual

Vocera User Guide

ii ··· Copyrights and Trademarks
© 2002 Vocera Communications, Inc. All rights reserved.
Vocera Communications is a trademark of Vocera Communications, Inc.
All other trademarks, service marks, registered trademarks, or registered
service marks are the property of their respective owners.
Vocera Communications, Inc.
www.vocera.com
tel :: +1 408 790 4100
fax :: +1 408 790 4101
Part No. :: 930-00529 rev B, 11.21.02

Important Safety Instructions ··· iii
Important Safety Instructions
The Vocera badge (including its battery component) and the
Vocera battery charger are electronic devices. Care appropriate to
the use of any electronic device should be taken in using the
badge and the battery charger in order to avoid possible injury
(such as from shock) and damage (such as from fire).
In addition, the Vocera badge is a wireless communication device
and works by generating radio frequency (RF) signals. These sig-
nals, although generally lower in strength than a typical cell
phone, can interfere with other electronic devices that are not
appropriately shielded against RF. If the Vocera badge will be
used in proximity to sensitive electronic devices for which inter-
ference could result in serious consequences (for example, a
heart pacemaker), you must consult with the manufacturer of
that device in order to determine the operating safety of the
Vocera badge.
In order to foster comfortable use of the badge and avoid
damage to hearing, do not bring the speaker within close
proximity of the ear while the badge is powered on.
References below to the “badge” refer to the Vocera badge,
including its battery component. References to the “product”
refer to the badge and the Vocera battery charger.
In addition to other basic safety precautions appropriate to the
use of electronic, wireless devices, please follow the safety and
use instructions below.
Badge and Battery Charger Safety
1. Read, understand, and follow all warnings and instructions in the
product documentation and on the product itself.
2. To reduce the risk of electric shock, do not disassemble any part of
the product. Take the badge or charger to qualified service person-
nel when service or repair work is required. Opening or removing
covers may expose you to dangerous voltages or other risks. Incor-
rect reassembly can cause electric shock when you use the product
again.

iv ··· Vocera User Guide
3. Do not put anything other than a Vocera badge or Vocera battery
into a charger slot, as other objects may touch dangerous voltage
points or short out parts, which could result in fire or electric shock.
4. Do not place the product on an unstable surface, as a fall may cause
serious damage to the product.
5. Never place the badge or charger near or over a radiator or heat
register. Do not operate the charger in a cabinet or other enclosure
unless proper ventilation is provided.
6. Do not position the badge or battery charger near water; for exam-
ple, near a sink, wash bowl, or toilet. Do not spill liquid of any kind
on the product. Doing so may short out parts, causing damage to
the product and creating the risk of fire or electric shock.
7. Take the badge or charger to a qualified service provider in these
circumstances:
• If liquid has been spilled into the badge or charger, or if rain or
water have touched the badge or charger.
• If the badge or charger does not operate normally after you fol-
low the operating instructions.
• If the badge or charger has been dropped or damaged.
• If the badge or charger exhibits a distinct degradation in perfor-
mance.
• If the power cord or plug on the charger is damaged or frayed.
8. Unplug the charger from the wall outlet before cleaning. To clean
the badge or charger, wipe with a damp cloth. Do not use liquid
cleaners or aerosol cleaners.
9. Use the battery charger indoors only.
10. Do not allow anything to rest on the charger's power cord. Do not
locate the charger where the cord may be damaged or where the
cord may cause someone to trip. Keep the power cord away from
operating machinery.
11. Do not overload outlets or extension cords, because this may cause
a fire or electrical shock.

Important Safety Instructions ··· v
12. Operate the charger only with the following power adapters:
• For the single-bay charger, use the power adapter model
OH-41033DT, manufactured by Oriental Hero, or a Vocera-
approved replacement.
• For the eight-bay charger, use power adapter model
MWS1248UC, manufactured by Minwa Canada, Inc., or a
Vocera-approved replacement.
Actionnez le chargeur seulement avec les adapteurs suivants de
puissance:
• Pour le chargeur de simple-compartiment, employez le modèle
Oh-41033DT d'adapteur de puissance, construit par Oriental
Hero, ou un remplacement Vocera-approuvé.
• Pour le chargeur de huit-compartiment, employez le modèle
MWS1248UC d'adapteur de puissance, construit par Minwa
Canada, Inc., ou un remplacement Vocera-approuvé.
Additional Instructions Related to Battery Safety
1. Use only the batteries supplied with the product or Vocera-
approved replacements.
2. Do not use the battery to power any device other than a Vocera
badge.
3. Charge the battery only in a Vocera charger and according to the
instructions in Charging the Battery on page 31. These instructions
are also included with the charger.
4. Do not charge the battery in a place where static electricity is gener-
ated nor let the battery touch something that is statically charged.
5. The battery can be stored at temperatures between –4° F and 104°
F (between –20° C and 40° C), and can be charged or operated at
temperatures between 32° F and 104° F (between 0° C and 40° C).
6. Do not put the battery into a microwave oven, conventional oven,
dryer, or high-pressure container, nor dispose of the battery in a fire.
Under these conditions, the battery may explode.
7. Do not open or puncture the battery nor subject the battery to
strong physical shock.

vi ··· Vocera User Guide
8. Stop using the battery if it exhibits abnormal heat, odor, color,
deformation, or is in an abnormal condition.
9. If you detect leakage or a foul odor, it is especially important to
keep the battery away from fire. If battery liquid leaks onto your
skin or clothes, wash well with clean water immediately. If liquid
leaking from the battery gets into your eyes, do not rub your eyes.
Rinse your eyes well with clean water, and consult a doctor
immediately.
10. Handle batteries with care to avoid shorting the battery with con-
ducting materials, such as rings, bracelets, and keys. The battery
may overheat and could burn you.
11. After the battery has reached the end of its useful life, we recom-
mend recycling the materials at a recycling center in your commu-
nity. If you choose to dispose of the batteries, consult the
regulations that are in force in your locale.
12. When recycling or discarding the battery, make it nonconductive
by applying vinyl tape to the terminals located on the edges of the
battery, at the sides.
ATTENTION: IL Y A DANGER D'EXPLOSION S'IL Y A REMPLACE-
MENT INCORRECT DE LA BATTERIE, REMPLACER UNIQUEMENT
AVEC UNE BATTERIE DU MÊME TYPE OU D'UN TYPE ÉQUIVALENT
RECOMMANDÉ PAR LE CONSTRUCTEUR. METTRE AU REBUT LES
BATTERIES USAGÉES CONFORMÉMENT AUX INSTRUCTIONS DU
FABRICANT.
Important Information About Use in Certain Areas
1. Turn your badge OFF in facilities when any posted notices instruct
you to turn off all devices that emit a radio frequency.In parts of
certain facilities, such as hospitals or health care facilities, equip-
ment may be in use that could be sensitive to external RF energy.
2. If you have any reason to suspect that the badge is interfering with
sensitive equipment, turn the badge OFF immediately. To turn the
badge OFF, depress the Call button for 5 seconds or remove the
battery.
3. Turn your badge OFF and do not use the charger when you are in
any area with potentially explosive materials in the atmosphere.

Important Safety Instructions ··· vii
Sparks in such areas could cause an explosion or fire, resulting in
bodily injury or death. Areas with potentially explosive atmospheres
include, for example: fueling areas; transfer or storage facilities for
fuel or chemicals; facilities with equipment using liquefied petro-
leum gas, such as propane or butane; and areas where the air con-
tains chemicals or particles, such as grain, dust, or metal powders.

viii ··· Vocera User Guide

Table of Contents ··· ix
Table of Contents
Important Safety Instructions . . . . . . . . . . . . . . . . . . . . . . iii
Badge and Battery Charger Safety . . . . . . . . . . . . . . . . . . iii
Additional Instructions Related to Battery Safety . . . . . . . . .v
Important Information About Use in Certain Areas . . . . . . vi
Welcome to Vocera . . . . . . . . . . . . . . . . . . . . . . . . . . . . . . . .1
Getting Started . . . . . . . . . . . . . . . . . . . . . . . . . . . . . . . . . . .3
Features of Your Badge . . . . . . . . . . . . . . . . . . . . . . . . . . . . .5
Call Button . . . . . . . . . . . . . . . . . . . . . . . . . . . . . . . . . . . . 5
Hold/DND Button . . . . . . . . . . . . . . . . . . . . . . . . . . . . . . . 6
Microphone and Speaker . . . . . . . . . . . . . . . . . . . . . . . . . 7
Headset Jack . . . . . . . . . . . . . . . . . . . . . . . . . . . . . . . . . . 7
Menu Selection Buttons . . . . . . . . . . . . . . . . . . . . . . . . . . 7
Volume Adjustment . . . . . . . . . . . . . . . . . . . . . . . . . . . . 10
Indicator Lights . . . . . . . . . . . . . . . . . . . . . . . . . . . . . . . . 11
Alert Tones . . . . . . . . . . . . . . . . . . . . . . . . . . . . . . . . . . . 12
Basic Calling . . . . . . . . . . . . . . . . . . . . . . . . . . . . . . . . . . . . .13
Logging In and Out . . . . . . . . . . . . . . . . . . . . . . . . . . . . 13
Recording Names and Greetings . . . . . . . . . . . . . . . . . . . 14
Calling Other Badge Users . . . . . . . . . . . . . . . . . . . . . . . 14
Calling Groups . . . . . . . . . . . . . . . . . . . . . . . . . . . . . . . . 15
Training the Genie . . . . . . . . . . . . . . . . . . . . . . . . . . . . . 15
Answering a Call . . . . . . . . . . . . . . . . . . . . . . . . . . . . . . 16
Ending a Call . . . . . . . . . . . . . . . . . . . . . . . . . . . . . . . . . 16
Using Buttons to Answer “Yes” or “No” . . . . . . . . . . . . 17
Call Waiting . . . . . . . . . . . . . . . . . . . . . . . . . . . . . . . . . . 17
Putting a Caller on Hold and Releasing the Hold . . . . . . . 17
Using Do Not Disturb . . . . . . . . . . . . . . . . . . . . . . . . . . . 17
Recording a Message . . . . . . . . . . . . . . . . . . . . . . . . . . . 18
Playing, Saving, and Deleting Voice Messages . . . . . . . . . 19
Advanced Commands . . . . . . . . . . . . . . . . . . . . . . . . . . . . .21
Blocking and Accepting Calls . . . . . . . . . . . . . . . . . . . . . 21
Forwarding Calls . . . . . . . . . . . . . . . . . . . . . . . . . . . . . . . 22
Making a Conference Call . . . . . . . . . . . . . . . . . . . . . . . 23
Joining or Leaving a Group . . . . . . . . . . . . . . . . . . . . . . . 25
Recording Names for Groups . . . . . . . . . . . . . . . . . . . . . 26

x ··· Vocera User Guide
Locating a Badge User or Group Member . . . . . . . . . . . . .26
Getting Information . . . . . . . . . . . . . . . . . . . . . . . . . . . . .27
Maintaining Your Badge . . . . . . . . . . . . . . . . . . . . . . . . . . . 29
When to Charge the Battery . . . . . . . . . . . . . . . . . . . . . .29
Preparing the Charger . . . . . . . . . . . . . . . . . . . . . . . . . . .29
Charging the Battery . . . . . . . . . . . . . . . . . . . . . . . . . . . .31
Cleaning the Badge . . . . . . . . . . . . . . . . . . . . . . . . . . . . .33
Voice and Text Email Messages . . . . . . . . . . . . . . . . . . . . . 35
Sending a Voice Email From a Badge . . . . . . . . . . . . . . . .35
Sending a Text Email to a Badge . . . . . . . . . . . . . . . . . . .36
Reading Text Messages . . . . . . . . . . . . . . . . . . . . . . . . . .37
The User Console . . . . . . . . . . . . . . . . . . . . . . . . . . . . . . . . . 39
Frequently Asked Questions . . . . . . . . . . . . . . . . . . . . . . . . 41
License and Sales Agreement . . . . . . . . . . . . . . . . . . . . . . . 45
Specifications and Compliance Statements . . . . . . . . . . . 47
System Specifications . . . . . . . . . . . . . . . . . . . . . . . . . . . .47
Regulatory Notices . . . . . . . . . . . . . . . . . . . . . . . . . . . . . .49
Command Reference . . . . . . . . . . . . . . . . . . . . . . . . . . . . . . 51
Summon and Dismiss the Genie . . . . . . . . . . . . . . . . . . . .51
Log In and Log Out . . . . . . . . . . . . . . . . . . . . . . . . . . . . .51
Record Your Name and Greeting . . . . . . . . . . . . . . . . . . .51
Call a User or Group . . . . . . . . . . . . . . . . . . . . . . . . . . . .51
Listen to and Leave Voice Messages . . . . . . . . . . . . . . . . .52
Accept and Block Calls . . . . . . . . . . . . . . . . . . . . . . . . . . .52
Index . . . . . . . . . . . . . . . . . . . . . . . . . . . . . . . . . . . . . . . . . . . 53

Welcome to Vocera ··· 1
Welcome to Vocera
Your new Vocera badge provides fast, simple, person-to-person
communication over your company’s wireless network. You don’t need
to memorize a number, and you don’t need to page someone and wait
for a response. Using voice commands, Vocera instantly connects you to
the people you need to reach, reducing phone tag, overhead paging,
and physically searching for a person. It also gives you the freedom to be
mobile, even when you are expecting an important call.
Your badge has a built-in speaker, microphone, and radio, plus a display
that shows caller ID and messages. Attachment options included with
the badge allow hands-free operation.
Vocera badges communicate through your in-house wireless local area
network (LAN). This design permits people to reach you even in areas
where cellular phones experience what people call dead spots. Also,
since badges transmit and receive calls in a different frequency range
than cellular phones, you can use a Vocera badge in areas where cellular
phones are prohibited because of concerns about interference with
other equipment.
A central computer, the Vocera server, controls all badge communica-
tions. As you use your badge, you are prompted by the Genie, which is
the voice interface to the server. The Genie recognizes simple com-
mands in verb-noun format. For example:
“Call Charles Jones.”
“Record a message for Tech Support.”
“Block all calls.”
Because you can use voice commands, the Vocera system is easy to
learn and easy to use, so you can start using your badge immediately.
This guide describes how to use and care for your badge:
• Before you use your badge for the first time, read Important
Safety Instructions on page iii.
•Getting Started on page 3 tells you how to attach the lanyard,
pocket clip, or universal clip; install the battery; log in; and adjust
the volume on your badge.

2 ··· Vocera User Guide
•Features of Your Badge on page 5 describes the features of your
badge and explains how to use the buttons and badge display
menus.
•Basic Calling on page 13 gives you instructions for using the most
common calling and message features.
•Advanced Commands on page 21 describes more complex
operations, such as conference calls, and explains commands that
are available only if your system administrator grants certain
permissions on the Vocera server.
•Voice and Text Email Messages on page 35 tells you how to send
email messages to and from a badge. It also gives instructions on
how to view text messages on the badge display.
•Maintaining Your Badge on page 29 describes how to charge the
battery and clean the badge.
•The User Console on page 39 provides a brief introduction to the
User Console, which is a browser-based application you can use to
customize the features of your badge, send text messages, and
forward your calls.
•Frequently Asked Questions on page 41 tells you how to
diagnose and correct simple problems.
•Specifications and Compliance Statements on page 47 gives
badge specifications and regulatory information.
•License and Sales Agreement on page 45 defines the terms
under which this badge and its associated software may be used.
•Index on page 53 helps you find information quickly.
•Command Reference, at the back of this guide, lists the most
commonly used commands.

Getting Started ··· 3
Getting Started
If this is the first time you are using a Vocera badge, you can get started
right away by following these simple steps:
1. Charge the battery, if necessary.
New batteries must be charged before use. If the badge has already
been used by someone else, check the battery level indicator on the
badge display to make sure the battery has sufficient power.
See Maintaining Your Badge on page 29 for other ways to
determine whether the battery needs charging and for instructions
on how to charge the battery with or without the badge.
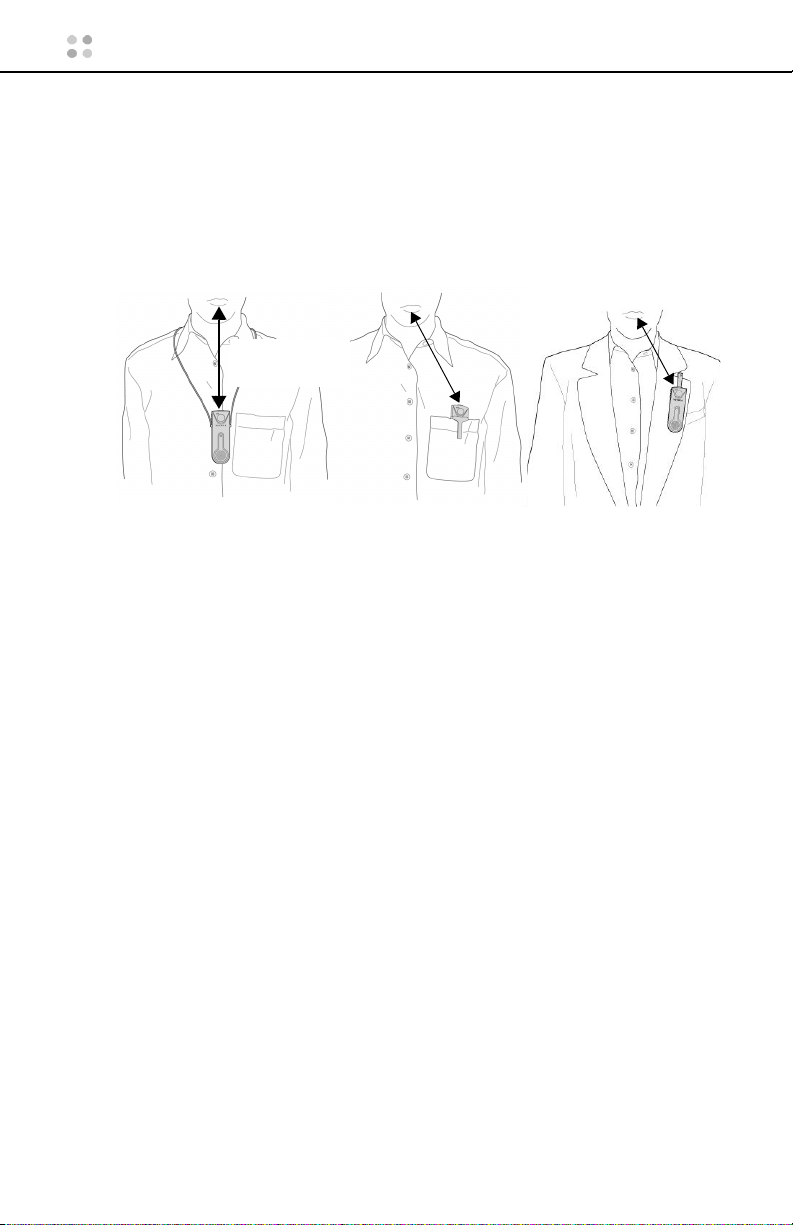
2. Choose the lanyard, pocket clip, or universal clip attachment, and
connect it to the badge. You must connect an attachment before
you install the battery.
3. Install the battery. To do this, slide the holes in the top of the battery
over the small pegs at the top of the badge’s battery compartment,
and then press down gently to seat the battery.
Lanyard Pocket Clip Universal Clip
Lanyard Pocket Clip Universal Clip
4 ··· Vocera User Guide
The badge will begin a startup sequence. Wait until the badge
display reads Logged Out or shows someone’s name.
4. Put the badge on, and make sure it is in the proper position.
To get the best possible speech recognition, the microphone on the
top of the badge should point toward your mouth and should be 6
to 12 inches (15 to 30 centimeters) from your mouth.
5. Log in: Press the Call button and wait for the Genie to answer.
If the Genie asks for your name, say your first and last names.
If the Genie answers by saying “Vocera” or by playing a tone,
say “Log me in as your first and last name” (for example, “Log me
in as John Smith”).
6. Record your name: Press the Call button, wait for the Genie to
answer, and then say “Record my name.”
The Genie will prompt you to record your name. If you do not
record your name, the Vocera system uses speech synthesis to say
your name.
7. Adjust the volume on the badge, if necessary. (See Volume Adjust-
ment on page 10).
Your badge is now ready to use. You can press the Call button at any
time, wait for the Genie to answer, and then give the Genie a voice
command, such as:
“Call Jim Olsen.”
“Record my greeting.”
“Play my messages.”
See Basic Calling on page 13 and Advanced Commands on page 21 for
more information about Vocera commands.
Lanyard Pocket Clip Universal Clip
6 to 12 inches
(15 to 30 cm)
Features of Your Badge ··· 5
Features of Your Badge
The design of the Vocera badge is simple, so you can communicate
quickly and easily and keep your hands free to do other tasks. The infor-
mation in this chapter will help you become familiar with the features of
your badge.
Call Button
Press the Call button to begin and end all voice communications, such
as making calls, sending and listening to messages, and recording your
name and greeting. The Call button also has these other uses:
• The Call button turns the badge on and off. Press and hold the Call
button for at least 5 seconds to turn the badge power off. To turn
the badge on, press the Call button again.
Speaker
Call Button
Headset Jack
Front View
Hold/DND Button
Indicator Light
Microphone
Top View
Battery
Battery Latch
Up Button
Badge Display
Select Button
Down Button
Back View

6 ··· Vocera User Guide
• If the Genie asks you a question that requires a yes or no response,
you can press the Call button to answer “yes.”
• If you are on a call and you hear a Call Waiting tone, press the Call
button to put the current call on hold and connect to the new call.
To disconnect from the second call and return to the call on hold,
press the Call button again.
Hold/DND Button
The Hold/DND button places calls on hold and puts the badge in Do Not
Disturb (DND) mode:
• To hold a call, press the Hold/DND button while the call is in
progress. To release the hold, press the button again.
While a call is on hold, you can press the Call button to summon
the Genie. When the Genie answers, you can call another badge
user, check for new messages, or issue any other command. Once
the command has been carried out and the operation is finished,
the Genie automatically reconnects you with the person on hold.
• To put the badge in Do Not Disturb mode, press the Hold/DND but-
ton when no call is in progress. Callers are told that you are unavail-
able, and they are invited to leave a message, or else their call is
forwarded to another destination if forwarding is active for your
badge. (See Forwarding Calls on page 22.)
A small yellow indicator light on the Hold/DND button blinks when the
badge is in Hold or Do Not Disturb mode.
The Hold/DND button also has these other uses:
• Press the Hold/DND button to cancel a command. For example, if
you are calling someone, leaving a message, or recording your
name and you change your mind, press Hold/DND to cancel the
action.
• If the Genie asks you a question that requires a yes or no response,
press the Hold/DND button to answer “no.” (To answer “yes,” use
the Call button.)
Features of Your Badge ··· 7
Microphone and Speaker
The unidirectional design of the microphone enables it to gather and
transmit speech, yet minimizes the amount of background noise that is
picked up.
You can adjust the speaker volume by using the buttons on the left side
of the badge. (See Volume Adjustment on page 10.)
Headset Jack
The headset jack accepts an earphone/microphone-style headset (sold
separately) for times when you want more privacy or are working in a
noisy environment. The badge’s microphone and speaker operations are
suppressed when you attach a headset.
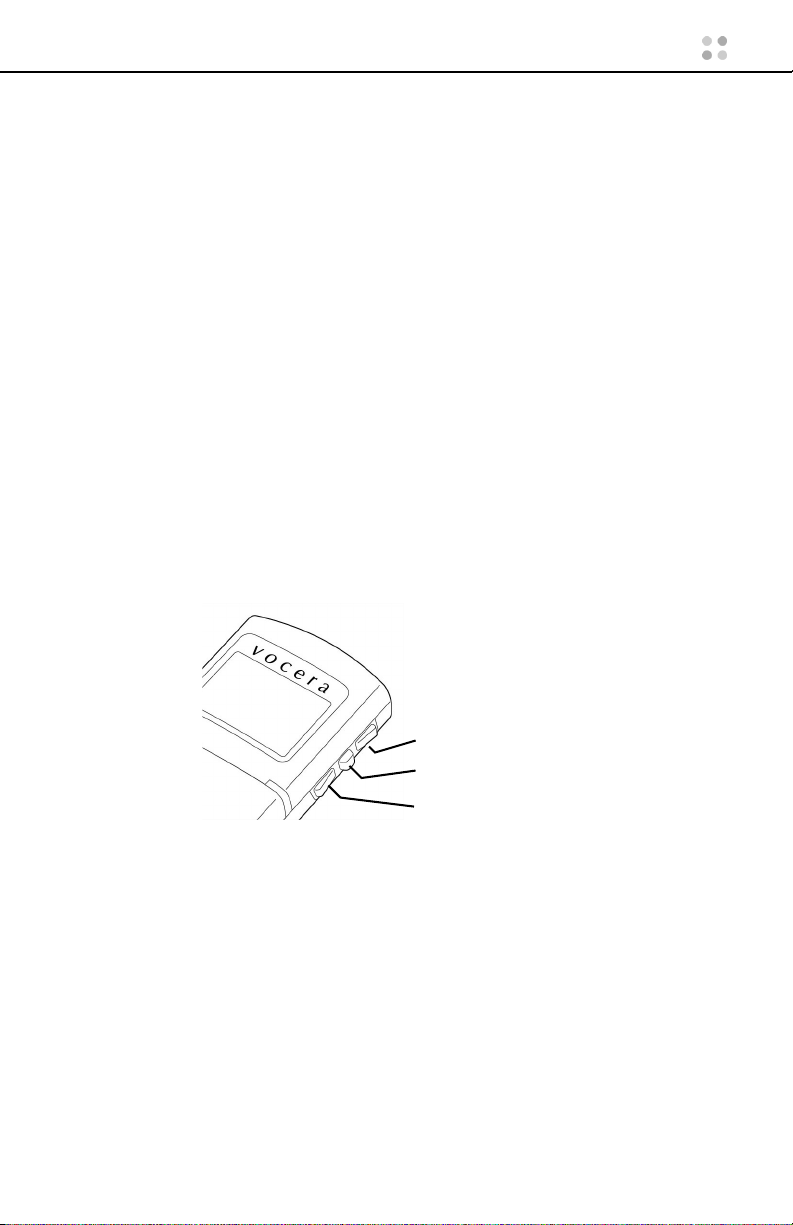
Menu Selection Buttons
The display on the back of the badge shows a series of screens that are
the top level of a menu system. To navigate through the menu system,
you use the Up, Select, and Down buttons on the side of the badge:
When a screen is displayed, press the Select button to view the next
screen in the menu system. To return to the main screen at any time,
press and hold the Select button until the badge beeps.
Badge Display Menus
If you press the Up button to scroll through the top-level menu, you see
the following choices: Messages, Volume, Power Off, and Info. If you
press the Up button once more, the display returns to the main screen.
Press the Down button to reverse the order.
The following sections describe your badge display menu choices.
Up
Select
Down

8 ··· Vocera User Guide
Main Screen
The main screen appears when you turn on the badge. This screen has a
status message area with symbols that show you the wireless network
signal strength and the battery charge level.
In addition, when you have unread text messages, the envelope symbol
appears, and when you have unplayed voice messages, the telephone
symbol appears, as this illustration shows:
The status message area may show one of the following alerts:
Status Message Meaning
Name — not blinking The name of the person who is currently logged in
to the Vocera system using this badge.
Name — blinking If someone is trying to call you, this shows you the
name of the person who is calling.
If you are already on a call, this shows the name of
the person with whom you are currently speaking.
If you are already on a call and you hear the Call
Waiting tone, this displays the name of the person
who is trying to call you.
Vocera Your badge is communicating with the Genie.
Logged out No one is logged in with this badge.
Signal Strength
Battery Level
Status Message Area
Unplayed Voice Message
Unplayed Text Message
Features of Your Badge ··· 9
Messages
Your badge can display text messages that were sent
from email accounts or from the Vocera User Console.
When you select Messages, the display shows one subject
line for each text message. A closed envelope symbol
next to a subject means you have not yet read that message; an open
envelope means you have already read that message. See Reading Text
Messages on page 37 for more information.
Volume
The Volume control adjusts the sound level of the speaker
on your badge. See Volume Adjustment on page 10 for
instructions.
Power Off
Power Off turns off all power to the badge and the badge
display to preserve the battery charge when you are away
from the network. (Press the Call button to turn the
power on again.)
Info
The Info feature gives you information about the badge
you are using and how it is connected to the network.
Most of this information is intended to be used by your
system administrator for diagnostic purposes.
The Info menu provides the following information:
Searching for Access
Points
The badge is out of network range or is not able to
connect with the network. If you are sure you are
within range of your network, contact your system
administrator.
Searching for Server The badge is within network range, but it is not
communicating with the Vocera server. See Why
does my badge display say “Searching for Server”?
on page 43.
Status Message Meaning

10 ··· Vocera User Guide
Battery
The battery strength is given in volts (V). The badge operates cor-
rectly when the battery level is 3.5 V or greater.
Badge MAC
The MAC address is a unique identifier for your badge that the
Vocera server uses as the Badge ID.
Location
The name of the location or the physical network address of the
access point with which your badge is currently communicating.
Badge IP
The Internet Protocol (IP) network address of the badge.
Server IP
The IP network address of the Vocera server.
Version
The version of the firmware (internal control programs) that your
badge is using.
SSID
The network’s name for the group of access points to which your
badge is authorized to connect.
AP MAC
The physical network address assigned to the access point to which
the badge is currently connected.
User
The name of the person who is currently logged in to your network
with this badge.
Volume Adjustment
To adjust the volume when you are on a call:
Press the Up button as many times as necessary to increase the volume
to the level you want. To decrease the volume, use the Down button.
To adjust the volume when the badge is idle:
1. Turn the badge over, so you can see the display.
Table of contents
Other Vocera Conference System manuals


