Vogue PC7015 Operation instructions

User Operating Manual
Tablet PC
Model:PC7015

Contents
Contents ....................................................................................................................................... - 2 -
1Introduction................................................................................................................................1
1.1Acknowledgements..........................................................................................................1
1.2Precautions.......................................................................................................................1
1.3Safety Notice....................................................................................................................2
1.4Abbreviation/term............................................................................................................3
2Brief introduction for MID product ...........................................................................................3
2.1Diagram for MID complete machine ...............................................................................3
2.2Introduction to accessories of MID..................................................................................5
2.3Use and preparation of MID ............................................................................................6
2.4MID state and notice........................................................................................................6
3Quick start ..................................................................................................................................7
3.1Key function.....................................................................................................................7
3.2Starting up and turning off...............................................................................................7
3.3Unlocking and closing of the screen ................................................................................8
3.4Use of touch screen..........................................................................................................9
3.5Homepage interface .........................................................................................................9
3.6Access to application program.......................................................................................13
3.7USB connection .............................................................................................................14
3.8Memory card..................................................................................................................15
3.9Character input...............................................................................................................15
3.10Application Technique...................................................................................................17
4Connection Establishment........................................................................................................18
4.1WIFI Connection ...........................................................................................................18
5Communication........................................................................................................................20
5.1E-mail.............................................................................................................................20
6Multi-media..............................................................................................................................22
6.1Supported File Format ...................................................................................................22
6.2Music .............................................................................................................................22
6.3Camera ...........................................................................................................................24
6.4Media Browser...............................................................................................................25
7Internet .....................................................................................................................................27
7.1Browser..........................................................................................................................27
8Other Applications ...................................................................................................................31
8.1Alarm clock....................................................................................................................31
8.2Calculator.......................................................................................................................31
8.3File Management ...........................................................................................................32
9Basic Settings...........................................................................................................................34
9.1Sound and Display .........................................................................................................34
9.2Security and Location ....................................................................................................35

9.3Storage ...........................................................................................................................36
9.4Date and Time................................................................................................................37
9.5Language and Input Method ..........................................................................................37
9.6About Tablet PC ............................................................................................................37
10Installation and Management of Program ................................................................................38
10.1Installation .....................................................................................................................38
10.2Management and Uninstall ............................................................................................39
10.3Update Approach ...........................................................................................................39
11System Upgrade .......................................................................................................................39
11.1System Upgrade Preparation..........................................................................................39
11.2Restore Factory Settings ................................................................................................40
11.3System Upgrade .............................................................................................................40
12Troubleshooting .......................................................................................................................41
Appendix……………………………………………………………………………………..36

1
1Introduction
1.1 Acknowledgements
Many thanks for you choosing this product. The product belongs to MID(Mobile Internet
Device), which is a kind of mobile internet device, delicate, small and exquisite, and
also portable. It is also equipped with a piece of touch LCD of high definition, which
can be used to watch vedios and pictures of high definition. It supports installation of
multiple application programs on office and entertainment. The fantastic operation
interface will give you a brand-new user experience.
This manual systematically introduces diversified functions, using skills and matters needing
attention of this MID, please read this manual carefully before using it.
1.2 Precautions
Maintenance and Curing
Please keep the device dry. Please don’t let the device, battery and charger contact water
and water vapor or operate device or charger with wet hand, so as not to result in short
circuit of the device, breakdown caused by corrosion and electric shock of personnel.
Please don’t let the device, battery and charger receive strong impact or shock, for fear
of bringing about breakdown, catching fire or explosion of device, battery and charger.
Please don’t place the device, battery and charger in regions with too high or too low
temperature, otherwise, breakdown, catching fire or explosion of device, battery and
charger may be led to.
Please don’t strike, throw or pinprick the MID, and falling, extrusion and bending of
MID must be avoided.

2
Please don’t dismantle the device and its accessories on yourself, otherwise, the device
and its accessories will be out of warranty scope by our company.
1.3 Safety Notice
Before using MID, please read information in this section, and make your children learn
about the information. About more detailed information, please refer to safety instructions
and matters needing attention.
Please don’t use MID when you are driving, for fear of hindering safe driving.
In medical places, please observe relevant stipulations and regulations. And in regions
near the medical devices, please shut down MID.
Please shut down MID or enable the airplane mode when boarding, so that the wireless
signals will not interfere control signal of the airplane.
Please shut down MID neighboring electronic equipments with high accuracy, otherwise,
breakdown of electronic equipments may be brought about.
Please don’t dismantle the MID and its accessories on yourself, and only the authorized
agency can maintain this MID.
Please keep MID far away from magnetic equipment, radiation from MID will erase
information stored on the magnetic equipment.
Please don’t use MID in places with high temperature and inflammable gas (such as
nearby gas station).
Please put MID and its accessories in places beyond children’s touch, please don’t let
children use MID without supervision.
During using of this MID, please observe related laws and regulations, respect privacy
and legitimate rights of others.

3
Please strictly abide by relevant explanations in this manual when using USB data line,
otherwise, MID or personal computer may be damaged.
Please don’t use the MID in humid environment such as bathroom, etc., and the MID
being soaked or rinsed by liquid must be avoided.
1.4 Abbreviation/term
Abbreviation/term Full name Explanations
MID Mobile Internet Device Mobile internet terminal
WIFI Wireless Fidelity
Wireless Local Area Network
based on IEEE 802.11b
standard
TF TransFlash
Alternate name Micro SD,
superminiature storage card
2Brief introduction for MID product
2.1 Diagram for MID complete machine
EM62N front view:
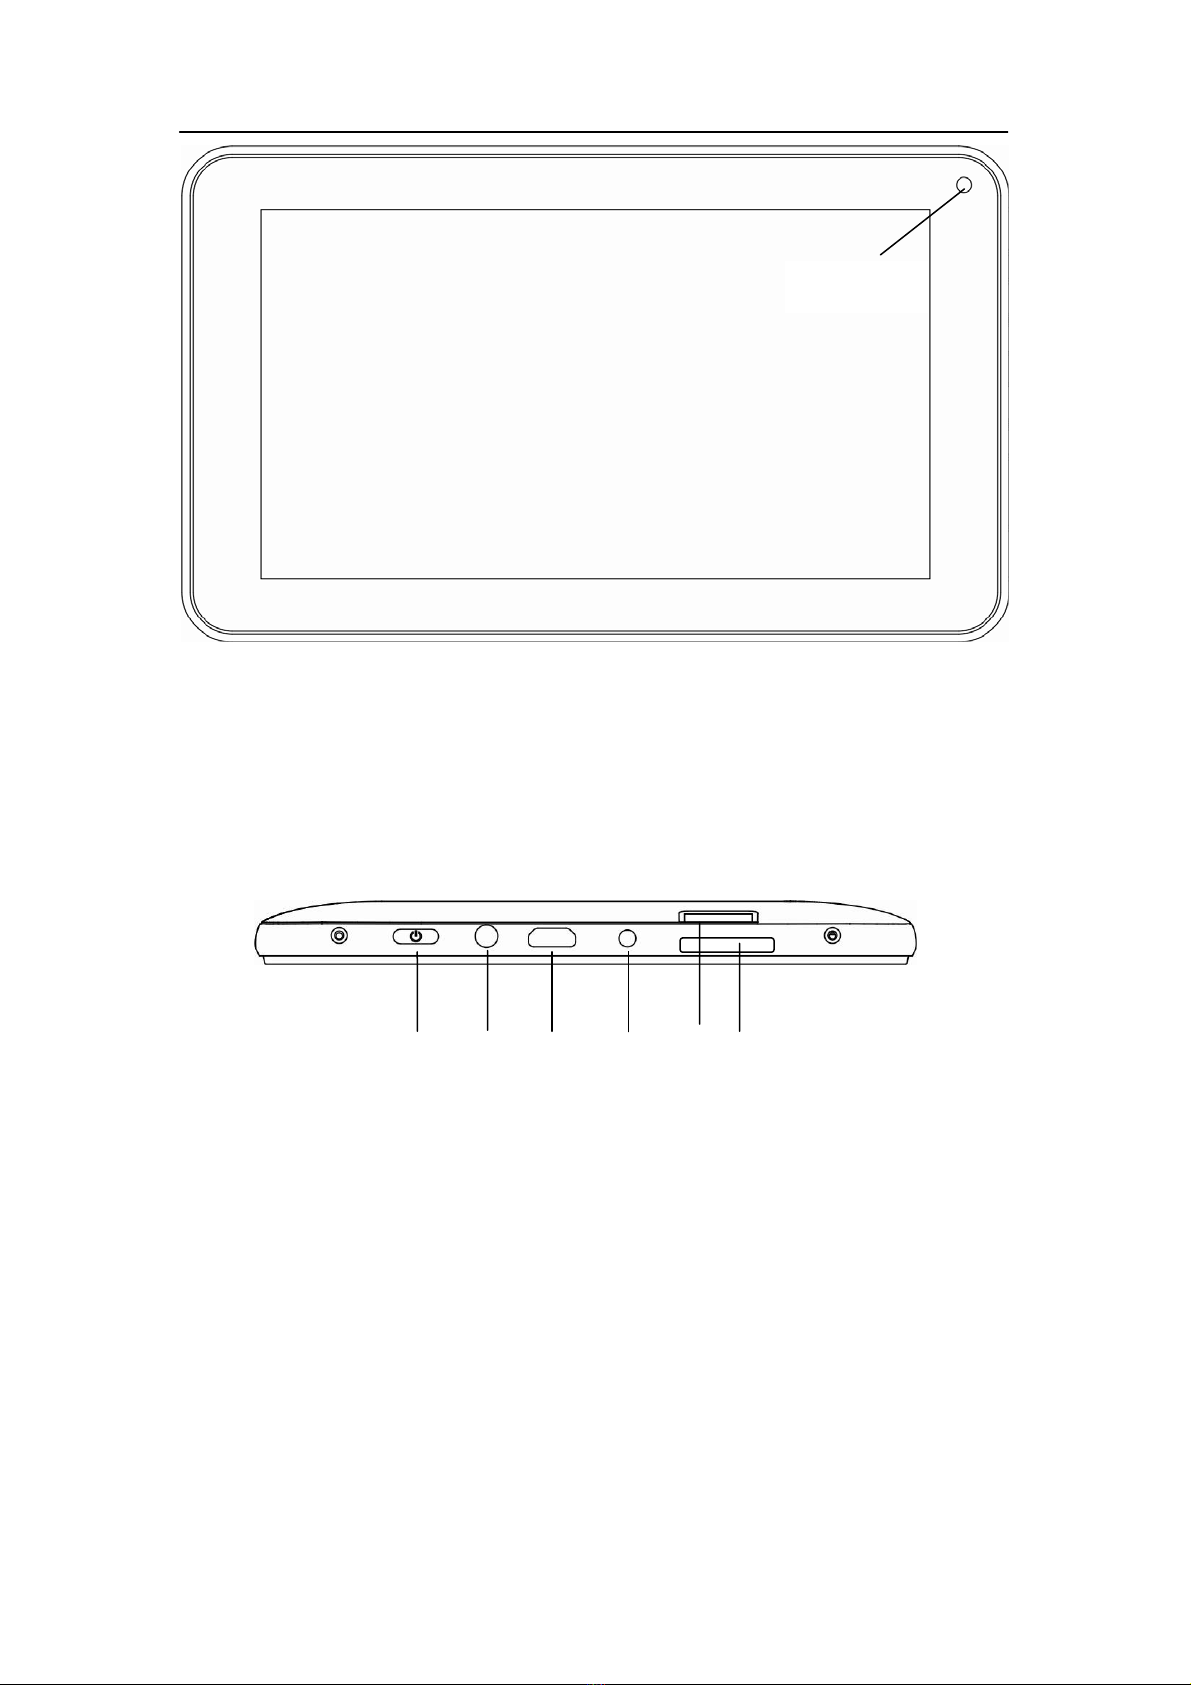
4
Figure 2-1
side view;
Figure 2-2
underside view
Front camera
Power on/off
Volume key
TF
DC
MIC
Headphone

5
Figure 2-3
2.2 Introduction to accessories of MID
Packing list
The following articles are included in your packing box of MID:
Complete machine of MID
Power adaptor
USB connecting line
Mini USB tieline
4G TF card (selective pairing)
Earphone (selective pairing)
User’s manual
Optical disk (selective pairing)
USBkeyboard (selective pairing)
Speaker
TF
Reset

6
2.3 UseandpreparationofMID
Battery charging
Before using MID for the first time, the battery must be charged firstly.
Use power adaptor to charge MID.
In order to guarantee full battery, please charge for over 4 hours.
2.4 MID state and notice
Iconograph for notification
When a prompt message shows on your notice panel, please click the column box and slide
on the screen with your finger to open the notice list. Click options needing to check to see
detailed information. Then you may click the message box and slide upwards to close the
message window. The following are iconography for icons in status bar:
Mail notice Mute
Gmail notice
Without SD card
Computer and MID are
connected through USB line
Uploading/Downloading
Events waiting to be done Downloading finished
Alarm clock opening
General notice (for example:
synchronous error)
Playing music
SIM card information,
wandering, no signal
In data synchronism
Connecting 3G service, data
exchanging
Insufficient space of SD card
More
WIFI service is connected,
netwrk is available
Battery symbol

7
Airplane mode
Charging
Notice panel
Notice iconograph will show when receiving new message, setting the alarm clock and
hodometer as well as inserting SD card, you can open the notice panel to check detailed
information
Unlock notice panel
When new notice iconograph shows on the notice column, please press the notice column
with your finger, then slide downwards to unlock the notice panel.
3Quick start
3.1 Key function
Descriptions for key function:
Power key Press this key for a long time to start up
Under starting up state, press this key for a long time to pop up
shutdown option
Under starting up state, press this key to close the screen
Under starting up state or when breakdown appears, press the
power key for 7 seconds to make your device enter into shutdown
state
Menu key Press this key to open menu of the current interface
Return key Press this key to return the last operating step or the previous
operating interface
Homepage
key
Press this key to return back main function interface from any
interface
3.2 Starting up and turning off
Starting up
Table of contents
Popular Tablet manuals by other brands

Laser
Laser MID-1060 Quick operation guide

MUNBYN
MUNBYN IRT09J Easy setup guide

Motorola
Motorola MC3090R - Win CE 5.0 Professional 520 MHz quick start guide

Dell
Dell Latitude ST Setup and features information

Lenovo
Lenovo IdeaTab S6000L Hardware Maintenance Manual

Venturer
Venturer WT9L11 quick start guide


