VOH Wheeltest I User manual

Wheeltest I
USER’S MANUAL
TRANSLATED FROM FRENCH

Mecatronic solution
EN_Wheeltest1_guid
e
Created 24.02.2010
Page 2
User’s manual
S.G
1General information....................................................................................................................................3
1.1 Warranty....................................................................................................................................................3
1.2 Safety information .....................................................................................................................................4
1.3 Transportation...........................................................................................................................................4
1.4 Storage......................................................................................................................................................4
2Parts of the machine ..................................................................................................................................5
3Use ...............................................................................................................................................................6
3.1 Start-up......................................................................................................................................................6
3.2 Use............................................................................................................................................................6
3.2.1 Placing the component on the Wheeltest 1.......................................................................................... 6
3.2.2 Adjustments.......................................................................................................................................... 6
4Resolution of common problem................................................................................................................9
5Exclusion of responsibility/warranty........................................................................................................9
6Maintenance and care ................................................................................................................................9
7Technical data.............................................................................................................................................9
8Representation/distribution.....................................................................................................................10

Mecatronic solution
EN_Wheeltest1_guid
e
Created 24.02.2010
Page 3
User’s manual
S.G
1 General information
1.1 Warranty
VOH Ltd guarantees this product against faulty manufacture or material in normal conditions of use and service,
for one year from the commissioning at the client’s place of business. If at any time during the length of the
warranty, the product shall be deemed faulty or break down, VOH Ltd. shall repair or replace it (choice to be
made by VOH Ltd.).
If the product is defective, please call the customer service of VOH on +41(32) 945 17 45.
Said warranty shall not apply if VOH Ltd proves that the fault or failure arises from damages which occurred while
the product was in the possession of a buyer.
VOH Ltd.’s responsibility is limited to the repair or replacement of the product under the conditions listed
hereabove.
VOH LTD. SHALL NOT BE RESPONSIBLE FOR LOSS OR ANY DAMAGES WHATSOEVER, INCLUDING
CONSECUTIVE OR ACCESSORY DAMAGES, ARISING DIRECTLY OR INDIRECTLY FROM AN EXPLICIT OR
IMPLICIT VIOLATION OF THE WARRANTY, OR FROM ANY OTHER FAULT OF THIS PRODUCT. THIS
WARRANTY IS THE ONLY EXPLICIT WARRANTY THAT VOH GRANTS ON THIS PRODUCT.
This warranty only covers the initial buyer and is not transferable.
Should you have questions concerning this warranty, please write to VOH Ltd.:
VOH Ltd.
La Praye 5a
CH-2608 Courtelary
Phone : +41(32) 945 17 45
Fax : +41(32) 945 17 55
Internet : http://www.voh.ch

Mecatronic solution
EN_Wheeltest1_guid
e
Created 24.02.2010
Page 4
User’s manual
S.G
1.2 Safety information
Warning
Do not use the Wheeltest 1 if it is damaged. Before using the Wheeltest 1, inspect its casing and its
electrical connections.
The Wheeltest 1 must be used in the way specified by the manufacturer.
Do not use the Wheeltest 1 near dust.
The Wheeltest 1 must only be used by people who have been trained to do so.
Beware!!!
Please read the information included in this manual before using this apparatus. Incorrect use may
damage the system or cause measurement errors.
Before connecting the machine for the first time, verify that the supply voltage of the power grid
corresponds to that required by the machine.
In case of prolonged non-use, disconnect the electrical supply cable.
Do not dismantle the machine. Only the manufacturer is entitled to replace or repair a faulty component.
Use this machine at a temperature between 10°C and 40°C (140 °F)
Never place objects other than watch wheels in the device.
1.3 Transportation
If the apparatus is moved, take care not to cause any shocks that could damage its mechanisms. In case of
transport over a long distance, it is preferable to use anti-shock packaging.
1.4 Storage
The Wheeltest 1 must be stored in a dry and dust-free place. The storage temperature must be between 10°C
and 40°C. It is advisable to wrap up the machine to protect it from dust and humidity.
Mecatronic solution
EN_Wheeltest1_guid
e
Created 24.02.2010
Page 5
User’s manual
S.G
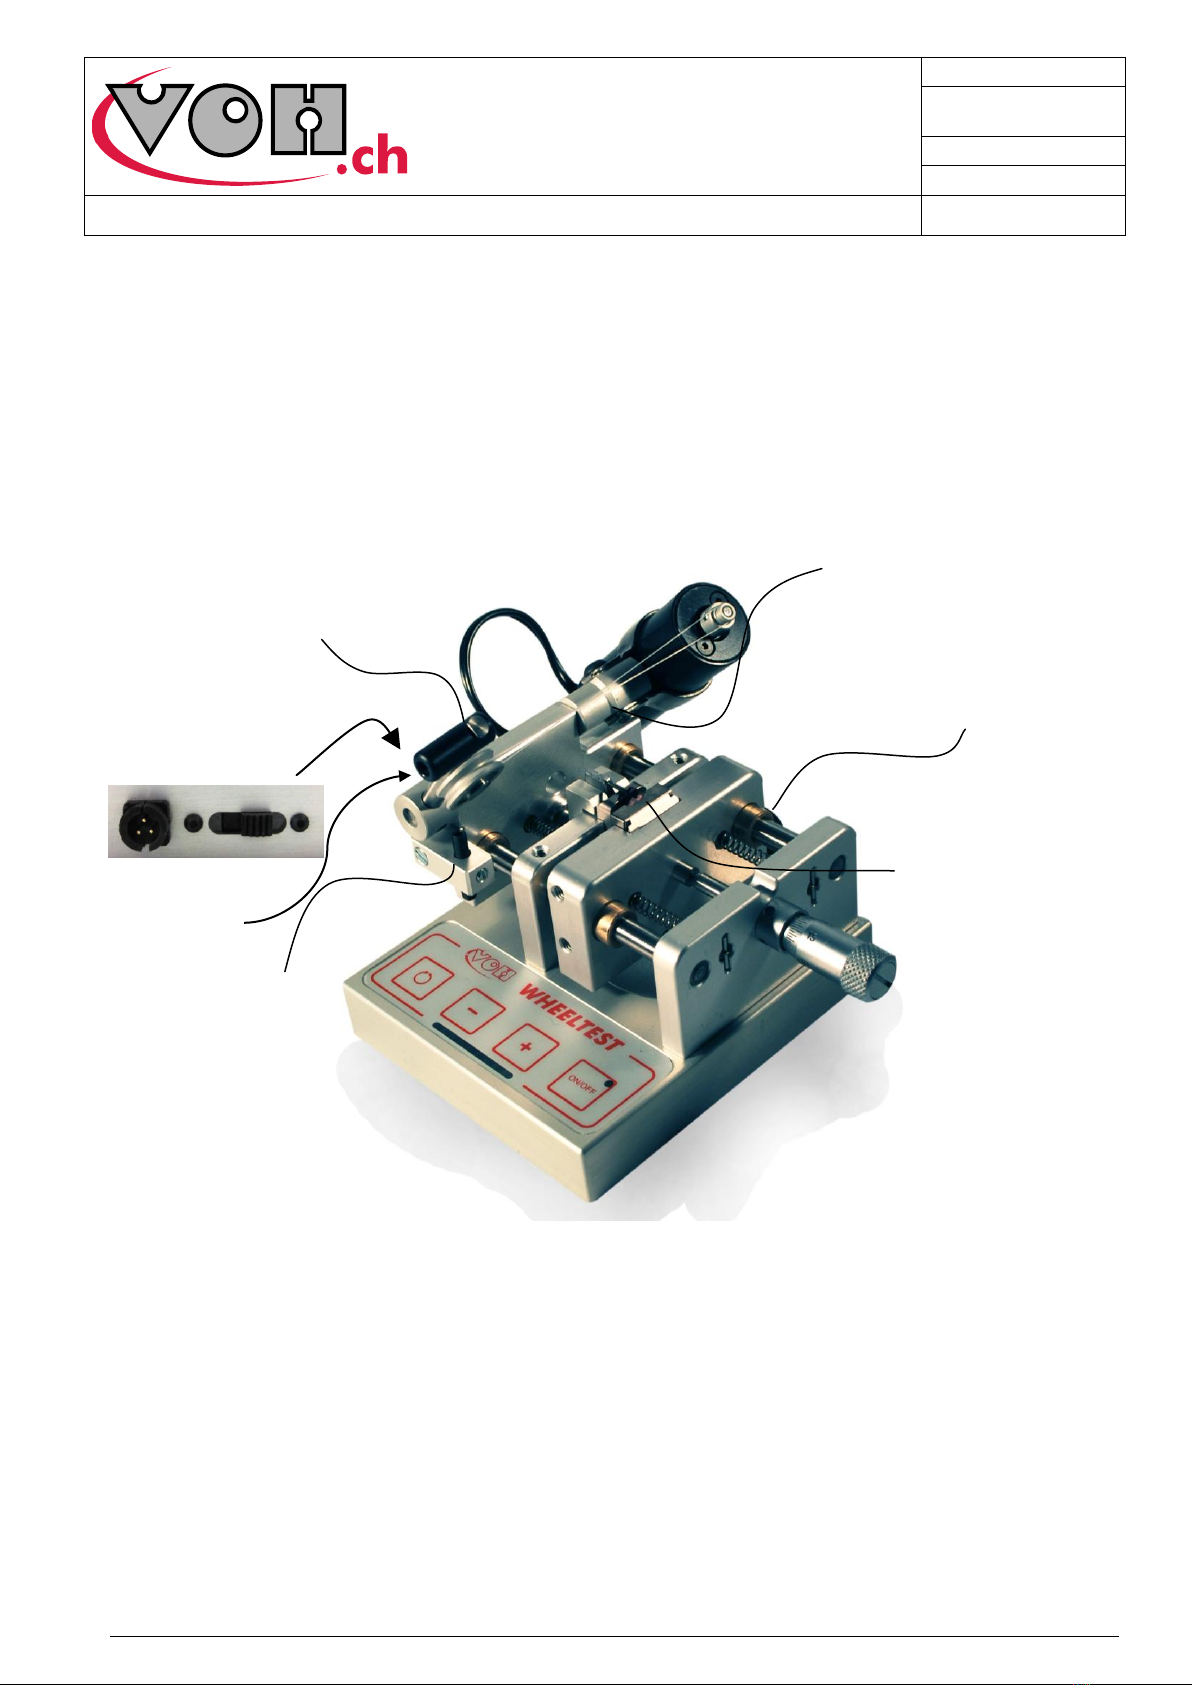
2 Parts of the machine
A wheel is positioned between the ruby Vs and set to revolve by a belt. The Wheeltest 1 comprises a series of
control knobs for the motor, and four screws to adjust the position of the Vs and of the drive.
Figure 1: General view of the Wheeltest 1
Control panel
Motor
Micrometric screw to adjust the
distance between Vs
Micrometric screw to adjust the
position of the bow
Space between Vs
« V » height
adjustment
5V connection and
switch
Belt
Bow buffer
Bow

Mecatronic solution
EN_Wheeltest1_guid
e
Created 24.02.2010
Page 6
User’s manual
S.G
3 Use
3.1 Start-up
The machine is started by the slide switch next to the power connection. When it is turned on, the motor will not
turn, but the last parameters used (speed and direction of rotation) will be restored.
3.2 Use
3.2.1Placing the component on the Wheeltest 1
The component to be measured must be placed between the two Vs of the Wheeltest.
3.2.2 Adjustments
1. Adjust the spacing of the two Vs by means of the micrometric buffer, in order for the wheel to be held in
the manner closest to its function once mounted in a watch.
2. The height adjustment of the V closest to the user is made by means of the black knob placed on the
right of the Wheeltest. The precise adjustment may be visualised by checking that the part displayed on
the screen is seen exclusively from above.

Mecatronic solution
EN_Wheeltest1_guid
e
Created 24.02.2010
Page 7
User’s manual
S.G
3. The wheel is now correctly placed, and must now be driven. The wheel should rotate at a maximum
speed of a one or two revolutions per second, or three teeth per second for slightly toothed wheels.
With buffer option:
The buffer allows the spindle of the wheel to be supported.
The buffer support pin is adjusted by means of the adjustment screw placed on the side of the buffer.
Drive adjustment is thus made by lowering the belt on a part of the wheel without visual measurement. The
position of the belt is adjustable, as to depth, by the screw placed at the back of the apparatus; it should be
placed on the spindle of the wheel or any other part of the wheel outside of the part to be measured. A height
buffer allows the bow to be positioned with a repeatable pressure.
V height adjustment
Adjustment screw
buffer

Mecatronic solution
EN_Wheeltest1_guid
e
Created 24.02.2010
Page 8
User’s manual
S.G
Figure 2 : height buffer bow
Rotation speed is adjusted by the « + » and « - » buttons on the control panel; a lighted bar comprising 8 LEDs
allows the speed chosen to be visualised. Rotation is launched by pressing on the « on/ off » for 2 seconds; the
LED will turn on at the top of the button. Brief pressure on the « on/ off » button allows step-by-step rotations.
The wheel rotation direction is alternated by pressing the button at the far left.
Figure 3 : control panel
Change of
direction

Mecatronic solution
EN_Wheeltest1_guid
e
Created 24.02.2010
Page 9
User’s manual
S.G
4 Resolution of common problems
Type of error
Cause
Resolution
No LED turns on
when powered up
Speed was set at minimum during
last use
Increase speed to confirm that the
Wheeltest 1 is being supplied with
power
The wheel is not
driven
The bow is badly placed or damaged.
The wheel is squeezed against the
two Vs
Reposition, or replace the belt
Increase space between Vs
The wheel has an
abnormal axial beat
Too-wide space between the Vs
Tighten the Vs
5 Exclusion of responsibility/warranty
Damages caused by use, transportation or storage that do not comply with those described in this manual are
not taken care of by the manufacturer. Modifications to the machine and opening the casing are forbidden and
entail an exclusion of responsibility. The right to a warranty expires when these are demonstrated or if the faults
noted cannot be original. Consumables (belts) are not subject to warranty.
6 Maintenance and care
No special care is necessary for the Wheeltest 1, if it is used in a laboratory, except classic cleaning with a dry
cloth. The belt is a consumable to be replaced when the user deems necessary.
7 Technical data
Parameter
Value
Supply voltage
5V DC
Power
850 mW
Dimensions
Depth : 80 mm
Width : 70 mm
Height : 60 mm

Mecatronic solution
EN_Wheeltest1_guid
e
Created 24.02.2010
Page 10
User’s manual
S.G
8 Representation/distribution
Table of contents
Popular Industrial Equipment manuals by other brands


PCB Piezotronics
PCB Piezotronics J353B32 Installation and operating manual

Preferred Instruments
Preferred Instruments JC-FWC-ND-OIT quick start guide

ABB
ABB HT570285 Operation manual

Rexel
Rexel CONNECTIS GIGAMEDIA GGM CBOX installation guide

Reflex
Reflex Servitec 35-95 operating manual

Meler
Meler Micron PUR LC instruction manual

PHD
PHD GRF Series REPAIR PROCEDURES

SkyAzúl
SkyAzúl 210 Installation & operation manual

ConSenses
ConSenses Accelerometer BA Series Assembly instructions

Eaton
Eaton Power XL SmartWire-DT DX-NET-SWD3 Instruction leaflet

Bosch
Bosch Rexroth HQ 2/C-H Assembly instructions

Siemens
Siemens 3VA9138-0DK72 operating instructions