Volvo V60 User manual

WELCOME TO YOUR NEW VOLVO!
Getting to know your new car is an exciting experience.
Take a look at this Quick Guide to learn some of the most common functions
quickly and easily.
All warning texts, and other important and detailed information, are only
available in the owner's manual – this folder only contains a small selection.
In addition, the owner's manual contains the latest and most current
information.
Options are marked with an asterisk (*).
There is further information concerning your car at www.volvocars.com
VOLVO V60
QUICK GUIDE WEB EDITION

– Briefly press the button to
start the engine.
STARTTHE ENGINE
- Insert the remote control key in the ignition
switch and push in the key to its end position.
– Depress the clutch or brake pedal.
COLD START
NB
After a cold start the idling speed is high irre-
spective of outside temperature. A period of
raised idling speed is part of Volvo's efficient
emissions system.
During cold starts diesel engines have a cer-
tain delay in starting because the combustion
chambers have to be preheated.
Locks doors and tailgate and arms the
alarm*.
Unlocks the doorsAand tailgate and
disarms the alarm.
Unlocks the tailgate – pressing twice
opens the tailgate by a few cm.
Approach light duration. Switches on the
lamps in the side mirrors*, the direction
indicators and parking lamps, at the
number plate, passenger compartment
and floor.
Panic function. Held down for approx. 3
seconds in an emergency to trigger the
alarm.
Information on the car can be obtained
within a radius of 100 metres.
– Press the button and wait 7 seconds.
Pressing the button out of range shows
the last status stored in the memory.
A Automatic relocking takes place if a door/tailgate
has not been opened within 2 minutes after unlock-
ing.
REMOTE CONTROL KEY WITH PCC* – PERSONAL CAR COMMUNICATOR
PCC*
1Green light: The car is locked.
2Yellow light: The car is unlocked.
3Red light: The alarm has been triggered.
4Flashing alternating red light: Alarm trig-
gered less than 5 minutes ago.

Briefly press the button
– the engine stops.
Pull the remote control
key out from the ignition
switch.
1.
2.
BLIS – BLIND SPOT INFORMATION
SYSTEM*
If the BLIS indication lamp illuminates despite
no vehicle being in the blind spot, the cause
could be reflection from wet road surface or
low sun shining into the camera for example.
In the event of a direct fault in the system the
display shows the text Blind spot syst. Serv-
ice required.
The key can remain in a pocket, for example, the
whole time.
LOCK & ARM THE CAR ALARM
- Touch the rear section of one of the outer door
handles (see illustration) or press lightly on the
smaller of the tailgate's two rubberised buttons.
UNLOCK & DISARM THE ALARM
- Grip a door handle and open the door in the
usual way (a glove may prevent the function) or
press lightly on the larger of the tailgate's two
rubberised buttons.
START THE ENGINE
– Depress the brake/clutch pedal and briefly
press the START STOP ENGINE button.
SWITCH OFF THE ENGINE
– Briefly press the START STOP ENGINE but-
ton.
See the owner's manual, section "Locks and
alarm", for more information.
In order to reach the following key positions
without the engine starting: Do not depress the
brake/clutch pedal.
Remote control key not inserted – Audio
system and passenger compartment light-
ing.
Remote control key inserted - Instrument/
clock lighting, steering lock off.
Inserted key and short press on the START
STOP ENGINE button – sunroof*, power
windows, fan, ECC, windscreen wipers, 12
V socket, RTI*.
To exit key position 0/Iand switch off all power
consumers: Pull the key from the ignition
switch.
SWITCH OFFTHE ENGINE AND
REMOVETHE REMOTE CONTROL KEY
KEY POSITIONS
KEYLESS* KEY SYSTEM

1Turn to adjust the volume.
2Long press for ON/OFF. Short press for
audio off/on
3Press to select AM, FM1, FM2, DAB1*,
DAB2*.
4Press to select Disc, USB*, iPod®*, AUXA,
Bluetooth*, TV*.
RADIO
6Turn to select station.
7Search station with left/right arrow. Long
press scrolls between strong stations, short
press scrolls between stored stations. Store
the station by pressing in one of the numeric
keys 0–9until the display confirms storage.
8Press to select sound pattern, such as
Bass, Treble or Surround* - Turn VOL (1) to
adjust.
CD/DVD* player
5Press to eject the disc.
6Turn to change CD track from the track list.
7Change CD track using left/right arrow, fast
forward/rewind with a long press.
An iPod®B or MP3 player can be connected to
the audio system via the centre console's AUX
connection or USB port. An iPod®connected to
the USB port will also be charged.
RADIO SYSTEM DAB*
The digital broadcasting system, Digital Audio
Broadcasting, offers High Quality radio and even
more channels.
AUDIO SYSTEM
AAUX input for e.g. MP3 player (set volume to medium
for optimum audio reproduction). AUX audio source
volume is adjusted with TUNE (6).
BThe iPod®trademark belongs to Apple Computer Inc.
WINDSCREEN WIPERS AND RAIN SENSOR*
1Rain sensor On/Off, with the lever in posi-
tion 0.
2Regulates the sensor sensitivity or the inter-
mittent delay.
3Wiper, rear window - intermittent/normal.
ASingle sweep
0Off
BIntermittent wiper, see also (2).
CNormal sweep speed.
DHigh sweep speed.
EWasher, windscreen and headlamps.
FWasher, rear window.
Illuminates when the rain sensor is
active.

ELECTRONIC CLIMATE CONTROL – ECC*
STORAGE SPACES, 12 V SOCKET & AUX/USB*
AUTOMATIC CONTROL
In AUTO mode the ECC system controls all
functions automatically, making driving simpler
with optimum air quality.
1Turn for the individual temperature on the
left/right-hand side of the passenger com-
partment. The display shows the selected
temperature.
8Press for automatic control of selected
temperature and other functions.
MANUAL CONTROL
2Heating, left/right-hand seat.
3Max. defroster. Directs all air towards the
windscreen and side windows, with maxi-
mum air flow.
4Turn to change the fan speed.
5Air distribution.
6Rear window and side mirror defrosters
On/Off.
7Recirculation.
9AC – Air conditioning On/Off. Cools the
passenger compartment and demists the
windows.
The 12 V sockets in the passenger compart-
ment work in key position
0
or I. The 12 V
socket* in the cargo area is always active.
The car's audio system can playback music
from an MP3 player etc. using the AUX/USB*
output.
IMPORTANT
Using the 12 V socket in the cargo area
when the engine is switched off could
discharge the battery.
ECO DRIVe*
The function
Eco DRIVe
activates
a program that helps the driver to
reduce fuel consumption and emis-
sions.
With Eco Cruise DRIVe (automatic gearbox) and
with the engine running at idling speed, the car
can be run for long distances without engine
braking.
With Eco Start/Stop DRIVe (manual gearbox) the
engine can be set to stop/start automatically in
stationary traffic.
Eco DRIVe can be switched off. Illuminated but-
ton lamp indicates that the function is active.

8 9
7
1Low fuel level. When the lamp is illuminat-
ed, fill with fuel as soon as possible.
2T1 & T2 – independent trip meters, which
are always active.
3Fuel gauge. The symbol's arrow points out
the side on which the fuel cap is located.
4Display, trip computer. Select function with
(8).
5Clock. Adjusted in the MY CAR menu
system or with (6).
6One short press switches between T1 & T2.
One long press resets the current meter.
Setting the clock: turn to the end position
and then turn past the end position with a
"click".
7Press to show/clear message.
8Turn to see the trip computer's options.
TRIP COMPUTER ANDTRIP METERS
9One short press resets the trip computer's
current function.
One long press resets all trip computer
functions.
NB
Display text _ _ _ km to empty tank is an
estimate of the possible distance left to drive,
based on earlier driving conditions.
ADJUSTINGTHE STEERING WHEEL BLUETOOTH*
WARNING
Adjust the steering wheel before starting to
drive – never do this while driving.
1. Release the catch.
2. Adjust.
Makes mobile phone searchable/visible.
Hold in the audio system's TEL key.
Select Add phone from the audio system
display.
Select the phone to be connected.
Input the digits shown in the audio system
display using the mobile phone's keypad.
1.
2.
3.
4.
5.

EBA – EMERGENCY BRAKE ASSIST
Emergency Brake Assistance helps to increase
brake force and so reduce braking distance.
EBA is activated when the driver brakes sud-
denly. When EBA is activated the brake pedal
depresses a little more than usual.
– Press (hold) down the brake pedal for as long
as necessary – all braking ceases if the pedal
is released.
CAR CARE
Handwashing is gentler on the paintwork than
an automatic car wash. The paintwork is also
more sensitive when it is new. For this reason,
handwashing is recommended during the first
few months with a new car.
Use clean water and a washing sponge.
Remember that dirt ad grit can scratch the
paintwork.
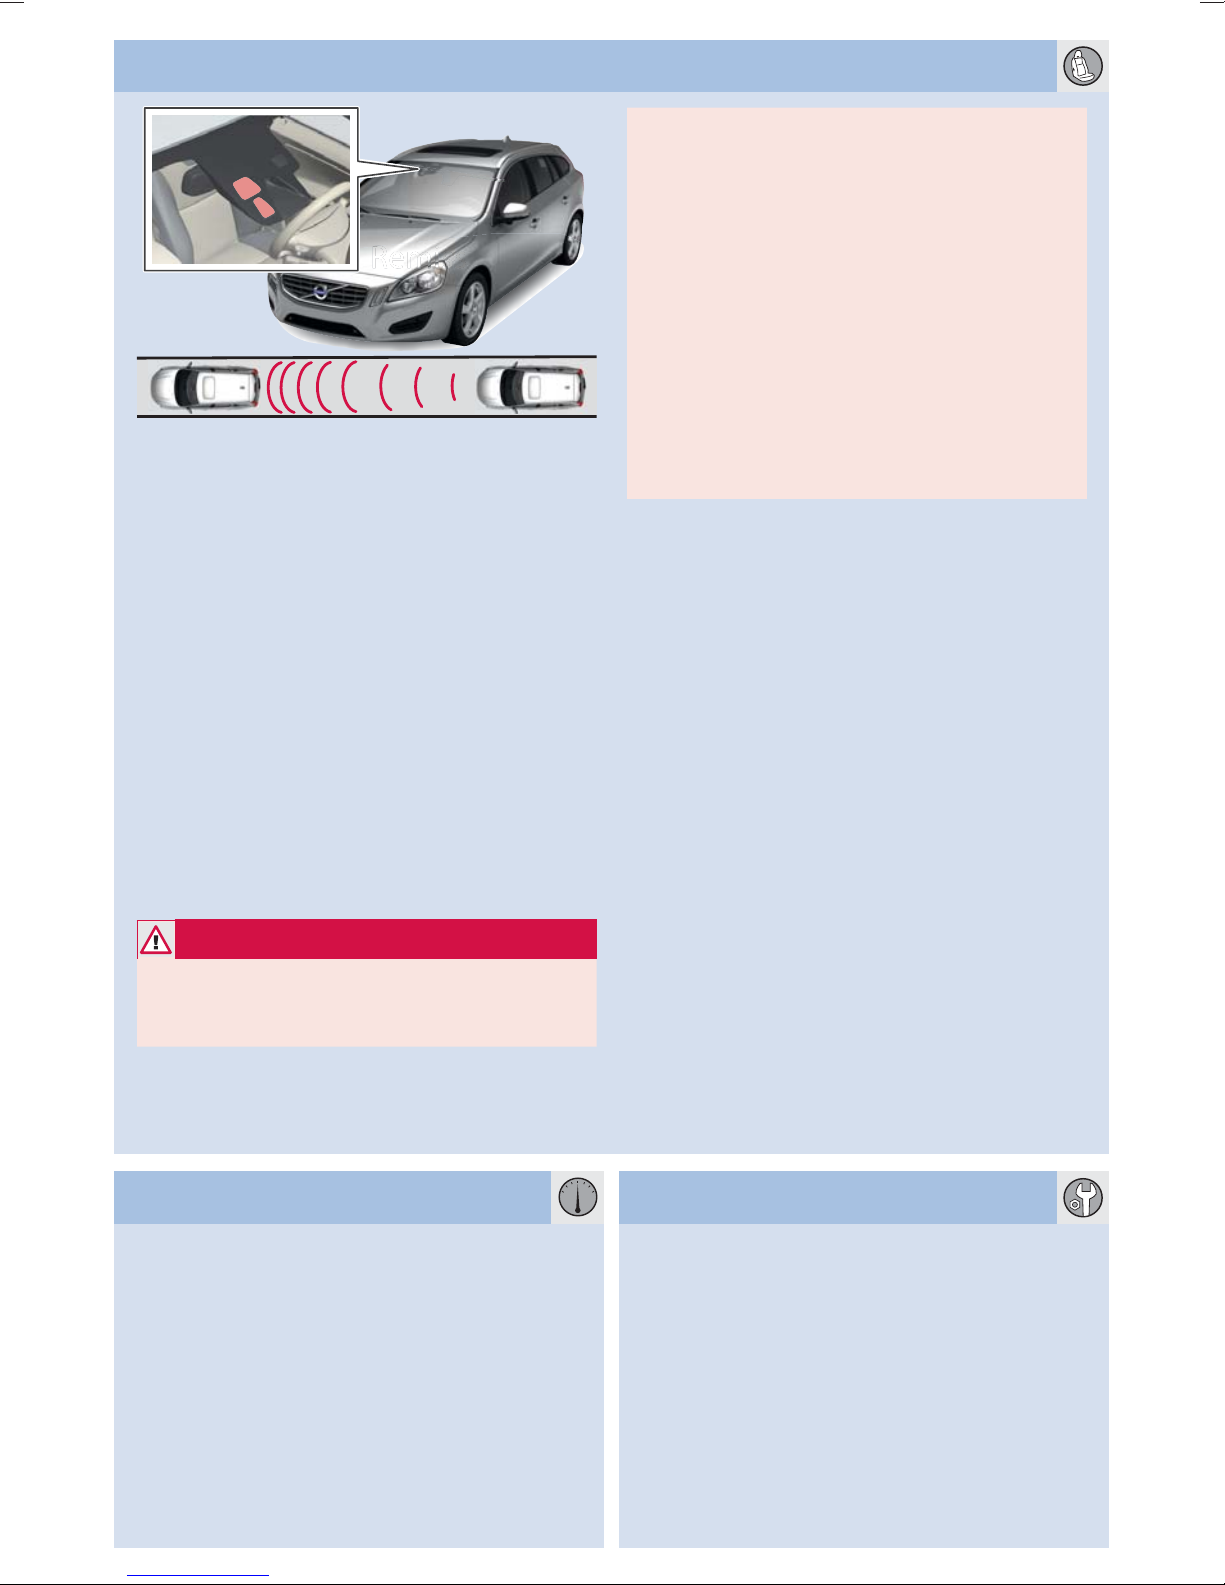
DRIVER SUPPORT SYSTEM
City Safety™ and Collision Warning with
Auto-Brake & Pedestrian detection*
These functions help the driver to avoid a col-
lision in situations when changes in the traffic
ahead, combined with a lapse in attention, could
lead to an incident.
The function is active at speeds below 30 km/h
and helps the driver by monitoring the traffic
ahead with a laser sensor fitted in the upper part
of the windscreen.
City Safety™ can help avoid a collision if the
speed difference between your car and the
vehicle in front is less than 15 km/h.
If the speed difference is greater then a collision
cannot be avoided, but the speed of the initial
impact is reduced. City Safety™ is designed to
be activated as late as possible in order to avoid
unnecessary interventions.
WARNING
The driver is always responsible that the
vehicle is driven in a correct manner and with
a safety distance adapted to the speed.
City Safety™ is a driver tool and can never
replace the driver's attention to the traffic or
the responsibility to drive the vehicle in a safe
manner.
Pedestrian detection (detector for pedestri-
ans in front of the car) gives no warning or
brake intervention at vehicle speeds above
80 km/h, and it does not work in the dark or
in tunnels.
The function cannot detect a pedestrian who:
is partially obscured
is shorter than 80 cm tall
is wearing clothing that conceals the
contours of the body.
•
•
•
Other driver support systems
In order to help the driver to e.g. brake in time,
maintain a safe distance to other vehicles and to
notice vehicles moving in the same direction as
the car, in the so-called blind spot, or to main-
tain a good position on the carriageway, the car
can be equipped with a number of systems:
Adaptive cruise control (man)*
Adaptive cruise control with Queue Assist
(aut)*
Distance Alert*
BLIS – (Blind Spot Information System)*
Driver Alert Control*
Lane Departure Warning*.
See the owner's manual, section "Comfort and
driving pleasure", for more information about the
functions and their limitations.
•
•
•
•
•
•

TP 13602 (English). AT 1120. Printed in Sweden, Göteborg 2011. Copyright © 2000-2011 Volvo Car Corporation.
ADJUSTINGTHE FRONT SEAT
PARKING BRAKE
1Lumbar support
2Backrest rake.
3Raise/lower seat.
4Raise/lower the front of the seat cushion.
5Forwards/backwards.
6Lowering the passenger seat backrest.
To apply
– Press the button. The warning lamp flashes
until the parking brake is fully applied – after
which the lamp stays on.
To disengage
Key position 0or I.
Depress the brake pedal and pull the button
gently.
Disengage automatically
– Drive away. (For cars with automatic trans-
mission, the seatbelt must be buckled).
1.
2.
A
Main beam flash
B
Main/dipped beam switching and
Home safe light duration
Display and instrument lighting
Rear fog lamp, the light only illuminates
on the driver's side
Automatic (certain markets)/deacti-
vated dipped beam. Main beam flash
working but not fixed main beam
Parking lamps
Dipped beam. Switches off when the
engine is switched off. Main beam can
be activated
Opens petrol tank cap
Manual headlamp levelling (automatic
for Xenon lights*)
Unlocking of tailgate
HEADLAMP CONTROL
Other manuals for V60
23
Table of contents
Other Volvo Automobile manuals

Volvo
Volvo XC90 - ANNEXE 951 User manual

Volvo
Volvo XC 70 User manual

Volvo
Volvo S 90 User manual

Volvo
Volvo 2012 S80 User manual

Volvo
Volvo V70 SPORT User manual

Volvo
Volvo V40 User manual

Volvo
Volvo C70 User manual

Volvo
Volvo 2010 V50 User manual

Volvo
Volvo V70 SPORT User manual

Volvo
Volvo S60 - ANNEXE 931 User manual

Volvo
Volvo V90 CROSS COUNTRY User manual

Volvo
Volvo S90 RECHARGE 2017 User manual

Volvo
Volvo V90 2019 User manual

Volvo
Volvo XC60 - ANNEXE 541 User manual

Volvo
Volvo C30 - ANNEXE 798 User manual

Volvo
Volvo XC70 2011 User manual

Volvo
Volvo V60 User manual

Volvo
Volvo S40 - ANNEXE 244 User manual

Volvo
Volvo 780 User manual

Volvo
Volvo XC60 2013 Manual