Von Racer 9015-2 User manual

Model:9015-2

English 3
Deutsche 17

ASSEMBLY GUIDE
Congratulations, you are now the owner of a brand new Vonracer chair!
Before enjoy the comfort chair, you have to put it together.This Assembly
Guide will take you through the basic assembly process. To make sure
your assembly goes smoothly, please follow the assembly instructions,
and especially the important safety information.
Also, while it is possible to assemble the chair on your own, having a
second person to help you makes it even easier.
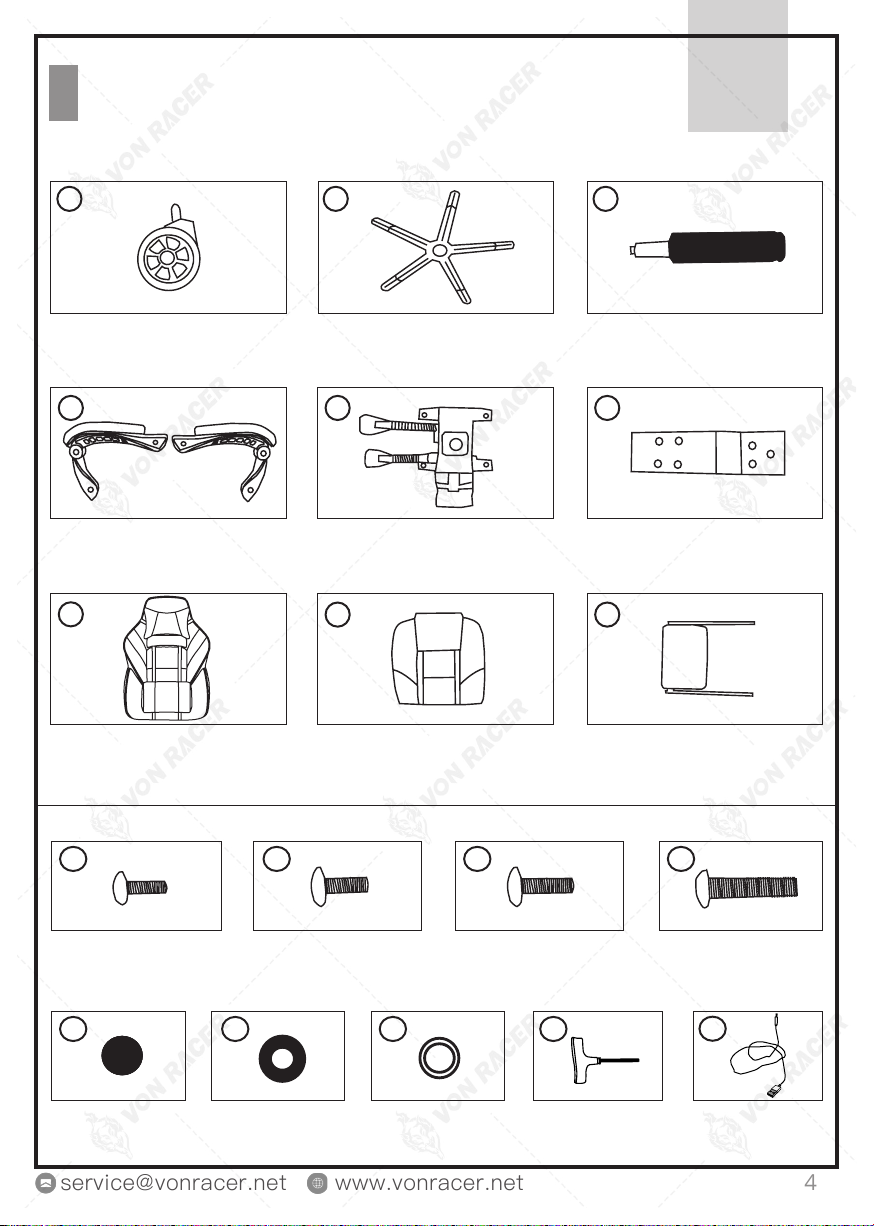
Before you begin, please check if there are any missing parts from the
package. Should there be any issues, please don't hesitate to drop us an
email and we'll help you out ASAP.
If you run into any diculty during the assembly, remember to check out
the Assembly Video to see if you've missed anything. If you're unable to
resolve your problems, drop us an email as well and our support team
will assist you.
.01

PACKAGE LIST .02
Quantity: 1
Cable
Quantity: 5
Quantity: 2
Quantity: 1
Quantity: 4 Quantity: 3 Quantity: 4 Quantity: 4
Quantity: 1 Quantity: 1
Quantity: 4 Quantity: 4 Quantity: 2 Quantity: 1
Quantity: 1
Quantity: 1
Quantity: 1
Quantity: 1
Casters
Armrests
Back Cushion
Bolts M6*20mm Bolts M8*20mm Bolts M8*25mm Bolts M8*45mm
Seat Cushion Footrest
Plastic Caps Spacer Rubber Rings Wrench
Star Base
Seat Plate
Gas Lift
Steel Plate
A
D
GH I
5
1
6
2
7
3
89
4
B
E
C
F
(spare)

ASSEMBLY INSTRUCTION .03
STEP 1 : Turn the Star Base upside down, then press the Casters into
the holes at the end of each base leg.
STEP 2 : Turn the Star Base upright and insert the Lift into the center
hole of the Star Base.
A
C
B

STEP 4: Turn the seat cushion upright and align the center hole of the
seat plate over the lift, then push the seat cushion down onto the lift
rmly until the connection is secure.
H
C
ASSEMBLY INSTRUCTION .03
STEP 3 : Align the seat plate to the bottom of the seat cushion, make
sure that the front of the seat plate is facing the front of the seat cushion.
Attach the seat plate to the seat cushion using four M6X20mm bolts,
tighten all the bolts with the wrench.
H
E
816

STEP 6: Attach Seat Cushion and Back Cushion, align the Steel Plate
over the pre-drilled holes underneath the back cushion with three
M8x20mm Bolts, tighten all the bolts with the wrench.
G
H
F
28
STEP 5 : Attach the Steel Plate to the back cushion with four M8x25mm
Bolts.
G
F
38
ASSEMBLY INSTRUCTION .03

STEP 8: Lay the back cushion on the seat of the chair with the top of the
cushion toward the front.
Attach the back cushion to the arms by inserting two M8x45mm bolts in
the hole with the wrench .
48
D
Note: Do not tighten the bolts fully.
STEP 7: Attach the arms to the seat cushion with four M8X45mm bolts,
using the Wrench.
Note: Arm rests are labeled with an “L”(left) or “R”(right) to show which
sides they should be placed on.
D
48
ASSEMBLY INSTRUCTION .03

STEP 9: Adjust the balance, then fully tighten all the bolts on each
side of adjusters.
STEP 10: Press the plastic caps into the adjuster holes to cover the
bolts.
5
D
ASSEMBLY INSTRUCTION .03

If you have any problems during installation or other issues, please contact us
service@vonracer.net, we will reply your email in 24 hours.
9
CAUTION! Do not pull
the cable during using.
Congratulations!You’ve assembled your
Von racer chair.
ASSEMBLY INSTRUCTION .03

1Seat Height: Paddle-First lever on right side
To raise:
To lower:
While seated, lift lever up.
At the proper height, your feet should rest flat on the floor.
While taking your weight
off chair, lift lever up.
*
*
2Operating the tilt lockout- the second lever on right side
Push down to lock the tilt
mechanism.
Pull up to unlock the tilt
mechanism.
INSTRUCTIONS
FOR USE
.04

3Relax with footrest
Pull out the pole of the footrest,
and turn the footrest to the
front.
INSTRUCTIONS
FOR USE
.04

SAFETY INFORMATION
Sit in the center of the
chair,with your back to
the backrest
Do not push the chair
around when a person
is sitting in it
Do not sit at the front
edge of the chair
Do not push down on
the backrest when a
person is reclined
Do not stand on the
chair
Do not place all your
weight on the backrest
only
Do not use the chair
with more than one
person
Do not stand on the chair, Do Not use the chair as stepladder.
Use this product for seating one person at a time.
Do not use the chair unless all bolts and screws are rmly secured.
Avoid contact with sharp objects to prevent puncturing the fabric.
Every 6 months, check all bolts and screws to ensure they are tight.
To clean, spot clean only using a damp towel and mild cleaner, first
test on a small,, obscure area of fabric.
Chair weight limit not to exceed 250 lbs.
SAFETY
AND MAINTENANCE
.05

.06
LIMITED WARRANTY
Von racer promises to repair or replace any Von racer chair that is found to
be defective in material or workmanship within one (1) and year from the
date of original purchase so long as you, the original purchaser, still owns
it. This is your sole and exclusive remedy. This warranty is subject to the
provisions below.
Seating Usage: Normal use for seating is identied as the equivalent of a
single shift, forty- (40) hour workweek. To the extent that a seating product
is used in a manner exceeding this, the applicable warranty period will be
reduced in a pro-rata manner.
Some retailers might have custom models imported direct from the factory
and therefore are not supported by our local service team because we don’t
have the correct parts, please contact your retailer directly for support. If
you have any questions about that we will be happy to assist and identify
those items.
This warranty does not apply and no other warranty applies to:
EXCLUSIONS:
Normal wear and tear, which are to be expected over the course of ownership.
Misuse, abuse or excessive use of the product.
Modications or attachments to the product that are not approved by Von racer.
Products that were not installed, used, or maintained in accordance with
product instructions and warnings.
Products used for rental or commercial purposes.
Damage caused by the carrier in-transit is handled under separate terms.
We adopt a 30 days return policy which means that all products purchased on
this website may be returned to us within the timeframe. You need to contact
us within 30 days after the product(s) came into your possession and the
product(s) must be returned to us without any undue delays.
RETURN POLICY:

.06
LIMITED WARRANTY
Contact us through the contact form on our website and attach the invoice
to the message as a proof of purchase. And please also write the reason for
return.
Returned products must be returned in the same condition as they were
sent and they must be sent in its original packaging.
We will then get back to you as soon as possible with information on where
to send the product(s).
If the product is not faulty, (i.e. if you changed your mind or if you are
unhappy with the product for some other reason), the cost of shipping will
fall on you. And it is your responsibility that the package arrives safely to
us so we recommend that you use a courier service where it is possible to
track the shipment.
As soon as we have received the product(s) and made an inspection we
will inform you of our decision.
If the product is faulty when you receive it please contact us and we will
help you out (see more information under Manufacturer Warranty).
We reserve the right to give a partial refund in cases when the product(s)
is not in an unused condition, is damaged or have missing parts not due to
our error.
HOW RETURNS WORK:
If a refund is approved we will automatically credit the purchase to your
credit card or original method of payment.
If the product(s) is damaged, not in its original condition or missing parts we
will inform you if you are eligible for a partial refund. This is decided from
case to case depending on the severity of the damages or what parts are
missing.


MONTAGEANLEITUNG .01
Herzlichen Glückwunsch!Sie sind jetzt Inhaber eines Markenstuhls Von
racer!
Bevor Sie den Komfortstuhl genießen, müssen Sie ihn zusammenbauen.
Diese Montageanleitung führt Sie durch den grundlegenden
Montageprozess. Um sicherzustellen, dass Ihre Montage reibungslos
funktioniert, bitte folgen Sie die Montageanweisungen und insbesondere
die wichtigen Sicherheitsinformationen.
Für mehr detailliertere und visuellere Anweisungen haben wir ein
Montagevideo, das Ihnen hilft, den Montageprozess viel besser zu
verstehen.
Obwohl es möglich ist, den Stuhl selbst zusammenzubauen, macht es
mit Hilfe einer zweiten Person den Zusammenbau noch einfacher.
Bevor Sie beginnen, prüfen Sie bitte, ob Teile der Verpackung fehlen. Bei
Problemen zögern Sie bitte nicht, uns eine E-Mail zu schreiben, damit wir
Ihnen so schnell wie möglich unterstützen können.
Wenn Sie während der Montage auf Schwierigkeiten stoßen, sollten Sie
das Montagevideo ansehen, um auszunden, ob Sie etwas verpasst haben.
Wenn Sie Ihre Probleme immer noch nicht lösen können, bitte senden
Sie uns auch eine E-Mail. Unser Support-Team steht Ihnen gerne zur
Verfügung.

VERPACKUNGSLISTE .02
quantität: 1
Kabel
quantität: 5
quantität: 2
quantität: 1
quantität: 4 quantität: 3 quantität: 4 quantität: 4
quantität: 1 quantität: 1
quantität: 4 quantität: 4 quantität: 2 quantität: 1
quantität: 1
quantität: 1
quantität: 1
quantität: 1
Rollen
Armlehnen
Rückenkissen
Schrauben M6*20mm Schrauben M8*20mm Schrauben M8*25mm Schrauben M8*45mm
Sitzkissen Fußstütze
Kunststoffkappen Abstandshalter Gummiringe
(schonen)
Schlüssel
Sternbasis
Sitzplatte
Gasheber
Stahlplatte
A
D
GH I
5
1
6
2
7
3
89
4
B
E
C
F

INSTALLATIONSSCHRITTE .03
Schritt 1 : Drehen Sie die Star Base um und drücken Sie die Rollen in
die Löcher am Ende jedes Basisbeines.
Schritt 2 : Drehen Sie die Star Base aufrecht und setzen Sie den Lifter
in das mittlere Loch der Star Base ein.
A
C
B

Schritt 4: Drehen Sie das Sitzkissen aufrecht und richten Sie das
Mittelloch der Sitzplatte über der Hebebühne aus. Drücken Sie dann das
Sitzkissen fest auf die Hebebühne, bis die Verbindung sicher ist.
H
C
INSTALLATIONSSCHRITTE .03
Schritt 3 : Richten Sie die Sitzplatte an der Unterseite des Sitzkissens aus
und achten Sie darauf, dass die Vorderseite der Sitzplatte zur Vorderseite des
Sitzkissens zeigt.Befestigen Sie die Sitzplatte mit vier M6X20mm Schrauben
am Sitzkissen und ziehen Sie alle Schrauben mit dem Schraubenschlüssel fest.
H
E
816
Table of contents
Languages:
Other Von Racer Indoor Furnishing manuals
Popular Indoor Furnishing manuals by other brands

Forever Redwood
Forever Redwood LIGHTHOUSE WOODEN SHOWER BENCH Assembly instructions

Sodura
Sodura Aero Toddler Bed Assembly instructions

Baumax
Baumax Canmore CNMK211 Assembling Instruction

on24
on24 5001727 Assembly instruction

Naterial
Naterial ORION ALPHA II 3276007278811 Assembly manual

Baker Furniture
Baker Furniture BB14 Assembly instructions