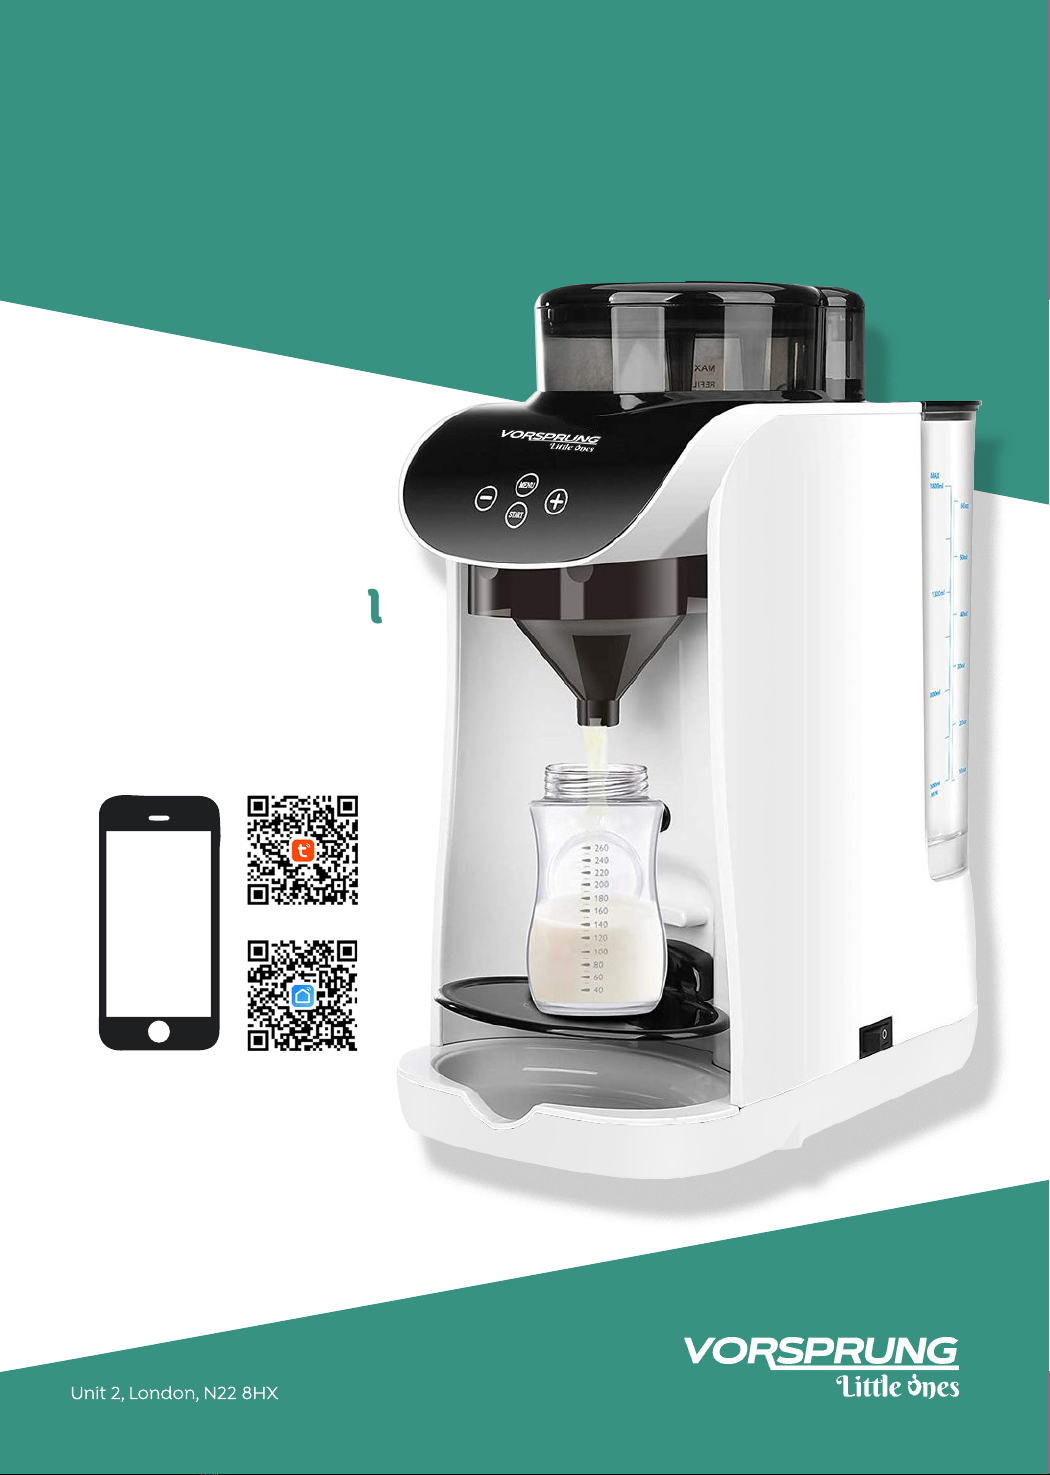
Vorsprung Instant Smart 20050 User manual

1
Instant Smart
Baby Formula Maker
User Manual
to set-up, use & clean
Scan to download app
SPECIFICATIONS:
Voltage/Power: 220/240V - 50/60Hz
Heater Power: 550W
Motor Power: 20W
Model: 20050/FRP0046
Current: 2.5A
Standby Power: 1W
Water Tank: 1.8L

2
Safety Measures
Important Information for the Health of your Baby
• The correct temperature must be used as recommended by Health Ocials to ensure proper nutrition.
• This machine does heat the water to 70°C, the safe temperature as recommended by the NHS guidelines.
• Only boiled water and sterilised bottles to be used to avoid potential adverse eects to the health of your
baby.
• Bottled water should only be used if suitable for infant formula preparation i.e., sterile, and not containing
too many salts or sulphate.
• Always wash your hands thoroughly with warm soapy water before handling the Instant Smart Baby
Formula Maker and any of its parts or your baby’s bottle.
• Sanitise any surfaces that your Instant Smart Baby Formula Maker or any of its parts are likely to meet.
• Always use sterile or boiled water cooled to room temperature.
• Make sure formula mixture is at a safe temperature for your baby before feeding.
• Consult a medical expert before use; if your child was born premature, with low birthweight or is immune
decient.
• Set-up and cleaning are essential to the function of your Instant Smart Baby Formula Maker. Please follow
all instructions carefully.
When using electrical appliances, basic safety precautions should be followed, including the following:
1. This appliance is not intended for use by persons (including children) with reduced physical, sensory, or
mental capabilities, or lack of experience and knowledge, unless they are closely supervised and instructed
concerning use of the appliance by a person responsible for their safety. Close supervision is necessary
when any appliance is used by or near children. Children should be supervised to ensure that they do not
play with the appliance. Keep out of reach of small children.
2. Before serving make sure formula mixer is at safe temperature for your baby.
3. To protect against electric shock and injury to persons, do not submerge cord, plug or appliance in water
or other liquid.
4. The use of accessory attachments is not recommended by the appliance manufacturer as this may cause
re, electric shock or injury and make the appliance defective.
5. Use on a level surface and be sure there is no debris under the unit.
6. Do not let cord hang over the edge of the table or counter or touch any hot surfaces.
7. Do not place the Instant Smart Baby Formula Maker on or near a hot gas or electric burner, or in a heated
oven.
8. Do not use appliance for anything other than its intended use.
9. Do not attempt to use the machine without water in the tank.
10. A short power-supply cord is provided to reduce risks of becoming entangled in or tripping over a longer
cord. Longer detachable power-supply cords or extension cords are available and may be used if care
is exercised in their use. If using the machine with an extension cord, make sure the cord is the proper
electrical rating for the machine. The extension cord should be arranged so that it does not drape over a
counter-top or tabletop, where it can be pulled on by children or tripped over unintentionally.
11. Avoid contacts with moving parts. Never remove the Powder Container, Powder Container Lid, Funnel,
Water Tank, or any other parts of the Instant Smart Baby Formula Maker while the appliance is in use.
12. Turn o and unplug the appliance from the outlet when not in use, before assembling or dismantling parts
and before cleaning. To unplug, grasp the plug and pull from the outlet. Never pull from the power cord.
13. Do not operate any appliance with a damaged cord or plug or after the appliance malfunctions, is dropped
or damaged in any manner. Contact the manufacturer at their customer service telephone number for
information on examination, repair, or adjustment.
14. Do not dismantle or open base of machine.
15. Do not use outdoors, for indoor use only.
Safety Precautions

3
Parts List

4
Preparation before use
You must clean and dry the following parts before
use.
WARNING: Powder Container, Powder Cover, Water Tank, Water Tank Cover,
Adjustment Tray and Drip Tray prohibits steam sterilisation of high temperature
water boiler to prevent deformation.
Please use 50-70°C warm water for cleaning and disinfecting, dry and use. Never
wash any of the parts in a dishwasher, steriliser or microwave.

5
Setting Up your Appliance
A. Install the Milk Powder Container
When installing, the milk powder
container must be aligned with the rails
on the main body.
1
Install the powder measuring wheel.
2
Assemble as illustrated

6
Setting Up your Appliance
A. Install the Milk Powder Container
When installing the locking cover, align
the arrow with the slot in the container
and x the two ends into the slot of the
container.
Attach the powder stirring wheel.
34
Pay attention to the buckle of the lid and the
powder container, screw it clockwise.
B. Install the Powder Container Lid
5

7
Setting Up your Appliance
C. Install the Water Tank
Install the boiler cover and press down
rmly.
Secure the water tank in the connecting
slot of the appliance to stabilise the
water tank.
6 7
7
Assemble as illustrated

8
Setting Up your Appliance
D. Install the Mixing Funnel
Assemble as illustrated

9
Setting Up your Appliance
D. Install the Mixing Funnel
Combine the Funnel and Funnel Cover
as shown.
Slide into place as shown.
Align the small groove on the top of the
funnel with the overhang located below
the control panel.
After the mixing funnel is docked, use
both thumbs to push it backwards. This
ensures the funnel and the appliance
are stable.
98
10 11

10
Setting Up your Appliance
E. Install the Drip Tray and Adjustment Tray
Click drip tray in place as illustrated by
the above diagram.
Slot tray into the desired position.
12 13
Adjust as illustrated

11
Digital Easy-Touch Panel
Milk Temperature
Milking Indicator Water Volume
Water Level
Warning Indicator
Temperature
Warning Indicator
Motor Warning
Indicator
Milk Bottle
Warning indicator
Powder Container
Warning Indicator
Mixing Funnel
Warning Indicator
Warm Water
Drinking Indicator
High Temperature
Cleaning Indicator
Wi-Fi Indicator

12
Warning Indicators
When the water level warning indicator is on, there is no
water in the boiler. Please check whether the water tank
is short of water; it will light up briey after making milk
each time.
When the powder container warning indicator is on during
use, it means that the powder container or the powder
cover is not installed correctly.
When the mixed funnel warning indicator is on during use,
check if it is in place correctly.
When the temperature warning indicator is on during use,
the water temperature in the boiler is higher than the set
milking temperature.
When the milk bottle warning indicator is on, the bottle is
not positioned correctly.
Water Level Warning Indicator
Milk Bottle Warning Indicator
Powder Container Warning Indicator
Mixing Funnel Warning Indicator
Temperature Warning Indicator
Check and then continue to use.
Position the bottle correctly and then make the milk.
Wait for the temperature to cool down.

13
Operating Instructions
Brewing Milk Powder Mode
The default setting for the appliance is
the “Brew Milk” mode. Before starting,
check to assess the status of the Milking
Indicator (shown above).
FLASHING - The water has not reached
the required temperature and is still
heating up, please wait a few minutes.
SOLID - The appliance is ready for use
and you can continue. Click the -/+
button to adjust the amount of milk,
the number on the right is the current
amount.
Press START to brew milk.
NOTE: The appliance is equipped with a bottle
sensor switch to prevent any unintentional
touch of the button after brewing, which can
cause milk to overow. For direct use after,
please remove and reposition the bottle before
the appliance can be activated.
When the sensor cannot detect the
bottle, you can turn o the sensor as
follows:
Press the MENU, START and +buttons
at the same time, this will prompt a
long beep. A white light will appear
(illustrated below), this indicates the
sensor is o and you can start brewing
the milk powder.
Milking
Indicator

14
Operating Instructions
Warm Water Mode & Temperature Adjustment Mode
Press the MENU button twice to enter
the temperature adjustment mode.
When the temperature light ashes,
this indicates that the temperature
adjustment mode has been successfully
entered.
Click the -/+button to adjust the
temperature, the set temperature will
be shown on the display. Click the MENU
button to return to the brewing mode.
Press the MENU button to switch to the
warm water mode. The indicator shown
above lights up to conrm successful
switch to this mode.
FLASHING - The water is heating up.
Click the -/+ button to adjust the amount
of water, the number on the right is the
current amount.
SOLID - Press START to dispense warm
water.
Click the MENU button to return to
brewing mode.
Warm Water
Drinking
Indicator
Temperature
Indicator

15
Operating Instructions
High Temperature Cleaning Mode
ATTENTION: High temperature cleaning mode
is to be used after brewing milk, it CANNOT be
used before brewing milk.
Press and hold the MENU button
for three seconds to enter the High
Temperature Cleaning mode. As shown
above, the indicator light will turn on,
the temperature indicator will appear
at 95°C and the water level indicator at
220ml.
FLASHING - The water is heating
SOLID - Heating is completed.
Click START to clean and disinfect.
Before cleaning the boiler, in order
to prevent access to the inside of the
appliance while pouring out the boiler
water, you must drain the boiler as
follows:
1. When in brewing mode, remove the
water tank.
2. Put the bottle on the tray.
3. Press the +and - buttons at the same
time
The appliance will automatically pour
out the water, press any key to stop.
High
Temperature
Cleaning
Indicator
ATTENTION: Unplug the appliance before
disposing water from the boiler.

16
3
5
4
Making your first bottle
How to prepare Baby Formula
Add water to the tank.
Press the MENU button and set the water
and temperature to your preference.
NOTE: As it is the rst use, it may take a
few minutes for the water to get to the set
temperature.
Add the powder into the powder
container and turn on the machine.
After you set the formula concentration;
just press the START button.
2.
1.
Check the formula information on the packaging.

17
Calibration Settings
To Adjust Concentration
Press the MENU button three times to
display C2 45 (indicates concentration
of 30ml water with 4.5g milk formula).
Increase or decrease the concentration
however you prefer, for example if your
milk powder uses 6g powder for 30ml
water, press +to 6, turn o the appliance,
the settings will save automatically.
Correcting Water Volume
Do not remove the milk bottle, pull out the mixing tank, press and hold the START
button to display C3 15, then press the MENU button to display the number between
C1 100-110.
Install the mixing tank, place the bottle, press the START button to pour out the rst
water, enter the rst weight into the screen and pour out the second water.
If the second is only dierent from the screen by ±0.4g, the calibration is complete. If
the dierence exceed ±0.5g, enter the weight of grams on the screen and continue
the calibration. After the calibration is completed, turn o the appliance, the setting
will save automatically.
To Adjust the Amount of Powder
Do not put formula directly in the bottle,
pull out the mixing tank, press and hold
the START button to display C3 15, install
the mixing tank, put the clean and dry
bottle in place.
Press the START button to pour out
the rst milk powder, enter the rst
weight into the screen, and then pour
out the second milk powder. If the
second is dierent from the screen by
±0.4g, then the calibration is complete.
If the dierence exceeds ±0.5g, enter
the weight of grams in the screen and
continue the calibration.
After the calibration is completed, turn
o the appliance, the setting will save
automatically.
The appliance’s factory setting is at a concentration ratio of 30ml with 4.5g
milk powder. This can be adjusted.

18
Cleaning & Care
Remove Funnel and Funnel Cover by
pulling out and down. Wash Funnel and
Funnel Cover with warm, soapy water
and rinse well.
NOTE: Dry completely before re-installing.
Once all the formula powder in the
powder container has been used up,
remove and clean powder container.
Wipe the powder-dispensing unit on the
underside of the powder container using
a dry paper towel or soft dry cloth.
NOTE: You do not have to remove the container
or the container parts for daily cleaning.
The overowing water or condensation
from the boiler will drain to the front
base. Please remove the bottom cover
and clean the water weekly.
Daily Weekly
VERY IMPORTANT
NOTE: When reassembling, if you nd it difcult to close the lid, it means that the powder
container has not been installed correctly.
NOTE: To remove the container, use both
hands to pull out.

19
App Compatibility
Download and Connect to our App
Download and register to the Tuya
Smart app or the Smart Life - Smart
Living app through your smart device’s
app store or directly scan the QR code
on the front of this manual.
Turn on the appliance. Enable Bluetooth
on your smart device and open the
app, your appliance will show up on the
screen; select it and click to add. Enter
your Wi-Fi password and wait for it to
connect, then it is ready to use.
If your appliance cannot connect to the app,
restart it, press and hold the + button until the
ashing number 01 appears on the left screen
and then connect again.
If EZ Mode (default mode) cannot connect, you can use AP Mode. Turn on the
appliance, press and hold the ‘-’button until a 02 appears on the left screen. Open
the app, select the ‘+’in the upper right corner, choose Small Home Appliances,
select Milk Dispenser. Enter Wi-Fi password, select the AP Mode in the upper right
corner, then follow the prompts to connect.
1
2

20
Troubleshooting
Frequently Asked Questions
Can I use the machine without the app?
Yes, you can use the machine independently to make the formula, adjust the
temperature and water volume.
If I have two smart devices, can I connect the machine at the same time?
Yes. Please log into the same account for the second device, but the rst device will
automatically log out for safety purposes.
How far can I control the forumla maker with my mobile phone?
We use Wi-Fi connection, so you can control the machine from anywhere as long
as this machine and your smart device are connected to the same network.
What if the app connection fails?
1. Make sure the app is connected to the same Wi-Fi as your smart device.
2. Please check if the network environment is good.
3. Turn o the router for 1 minute, restart then reconnect.
What if I press the START button but the formula doesn’t dispense?
1. The formula indicator is ashing - heating is not completed.
2. The milk machine is equipped with a bottle sensor to prevent milk spillage
caused by unintentional touching of the START button after dispensing.
During the second dispensing, please remove and reposition the bottle before the
machine can be started.
How should I clean the funnel and powder container?
We advise you clean the funnel and powder container every day. Remove and
clean the powder container once all the formula powder in the powder container
has been used up (please refer to p.18 CLEANING & CARE).
Why does it dispense more milk volume than shown on the display?
The volume on the display is the water only, the actual volume of milk after mixing
will be greater than the volume of water.
This manual suits for next models
1
Table of contents
Popular Baby Accessories manuals by other brands

asalvo
asalvo ANDADOR F1 instruction manual

Thomashilfen
Thomashilfen tGo user manual

Philips AVENT
Philips AVENT IQ24 ELECTRONIC STEAM STERILISER manual

Nova
Nova Classic Full Buckle Instructions and Safety Guidelines

miniland
miniland cosy dreamer manual

Chicco
Chicco KeyFit 35 Zip ClearTex Canopy instructions