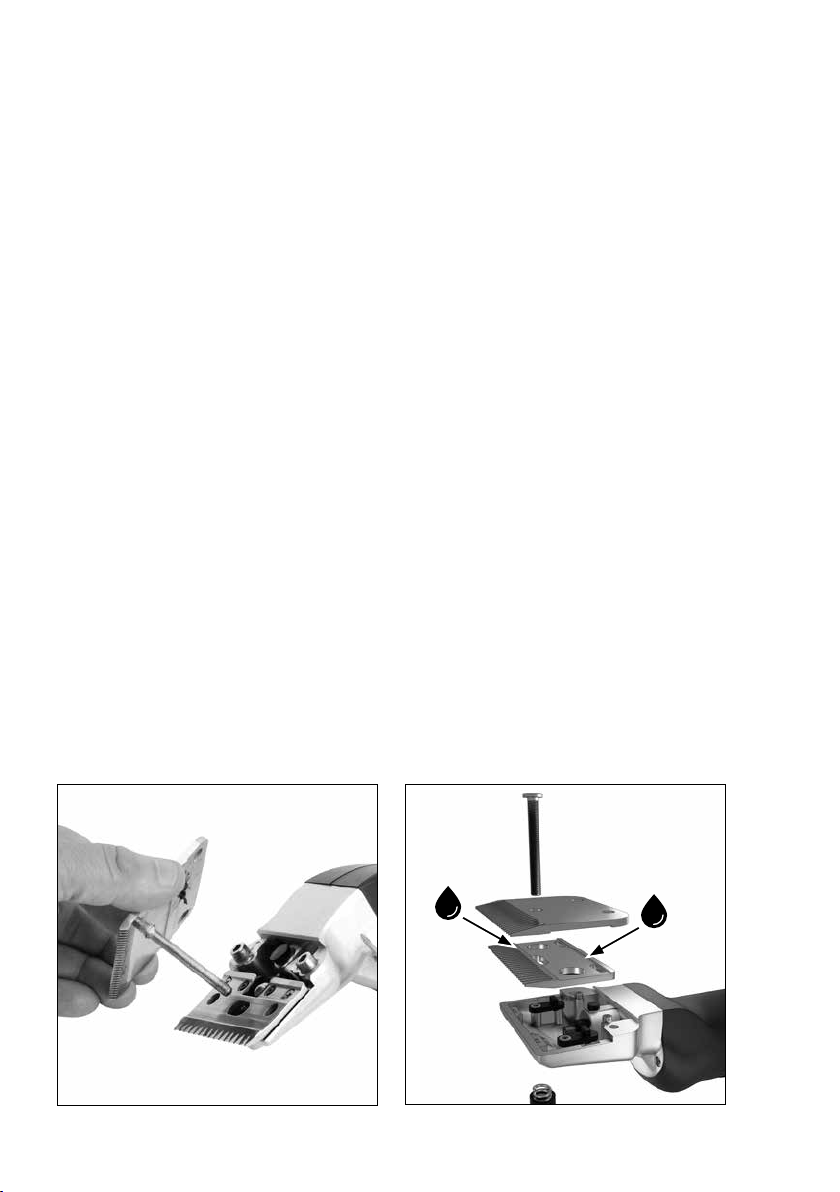
VOSS.farming easyCUT User manual

VOSS.farming
easyCUT
Schermaschine
Clipper
Tondeuse
Scheermachine
DE EN FR NL

Head oce : VOSS GmbH & Co. KG, Ohrstedt-Bhf. Nord 5, 25885 Wester-Ohrstedt, Germany
Service center : VOSS GmbH & Co. KG, Ole Bahndamm 2, 25884 Viöl, Germany

DE EN FR NL
DE Bedienungsanleitung Schermaschine
EN Instruction Manual Clipper
FR Notice d’utilisation tondeuse
NL Gebruiksaanwijzing scheermachine
VOSS.farming easyCUT
Art. 85285 pink | Art. 85286 blue
Table of contents
1. CONTENTS
2. SAFETY INSTRUCTIONS
3. LUBRICATION
4. BLADES
A. ADJUST CLIPPING BLADES CORRECTLY
B. REPLACE CLIPPING BLADES
5. INITIAL SET UP AND OPERATION
A. IMPORTANT OPERATING INSTRUCTIONS
B. POWER LEVEL SWITCH
6. ATTACHMENT COMB ASSEMBLY
7. CLEANING THE AIR FILTER
8. MAINTENANCE
9. TROUBLESHOOTING
10. TECHNICAL DATA
11. LEGAL CONTENT

1. CONTENTS
A hard shell carry case for transport and storage with:
- 1 x clipper
- 1 x set of blades 3 mm
- 2 x attachment comb 3mm + 5mm
- 1 x bottle of special clipping machine oil
- 1 x universal wrench
- 1 x cleaning brush
- 1 x manual
2. SAFETY INSTRUCTIONS
This section describes the mandatory safety regulations which must be observed when
using the clipper. Prior to using the product please read the operating instructions ca-
refully and operate the product in accordance with the instructions so that the product
can serve you for a long time.
The operational safety and function of the device can only be guaranteed if both gene-
ral safety and state accident prevention regulations as well as the safety instructions in
this operating manual are observed. We accept no liability for damage resulting from
improper use or incorrect operation.
Please keep the operating instructions in a safe place so that you can consult them at
any time. In the event that the device is passed on, it is important to provide the opera-
ting instructions so that the new owner is also aware of the safety instructions.
Notes on avoiding hazards and misuse
Only plug the clipper into a properly installed socket, otherwise it may result in a short
circuit or electric shock. The socket used should be equipped with a residual current
circuit breaker (RCCB).
Maintenance and cleaning may only be carried out when the plug is disconnected. Ne-
ver leave the machine unattended. Never use a damaged machine. If there is a defect,
it may only be repaired by authorised specialist technicians.
Operators of the clipper must have experience in handling the animals that are to be
clipped. Children must not operate the clipper, frail persons only under supervision.

Use this clipper only for clipping horses and other equine breeds. Especially the use on
humans is strictly forbidden. The clipping machine should be inaccessible to children.
Other hazards
If there are dangers and risks during operation which are not linked directly to the
clipping of the animals, please let us know. This also applies to technical defects which
cause danger.
3. LUBRICATION
Lubrication is essential for a good result.
It also prevents overheating and signi-
cantly prolongs the life of the machine
and the blades. For this purpose, a thin
lm of oil must always be present on the
moving parts of the head.
Drip the oil every 10 minutes onto the bla-
des and into the opening as shown in the
pictures. Make sure that both elements
do not run dry under any circumstances.
Please only use special clipping machine
oil for this purpose.
4. Blades
Caution: Before making any adjustments
to the blades, make sure that your machi-
ne is switched o and disconnected from
the power supply. Always pull the plug of
your clipper out of the socket.
4a. Adjusting the blades correctly
Before clipping: Adjust the tension nut
(see picture) while the clipper is switched
o. Turn the nut until rst resistance is
felt. Afterwards, rotate another ¼ of a turn at most and start clipping. If the result is not
satisfactory, adjust the tension between the blades slightly. If the following result is still
not good, your blades are probably dull.
DE EN FR NL
Note:
every
10 min
tighten Loosen

If the tension between the blades is too low then hairs accumulate between them,
which results in a considerably bad cut. In this case, remove the blades, clean them and
reattach them as described above. Do not forget to oil them.
During clipping: Since the tension between the blades loosens during clipping, turn
the screw approx. ¼ turn as soon as the clipping result deteriorates. If the result does
not improve after retightening, your blades must be sharpened.
Make sure that tension is not too high.
4b. Fitting blades
A blade set consists of an upper and a larger, lower blade, the sharpened sides of which
should always lie on top of each other, as shown in the picture.
To remove the blades, rst release the tension by turning the tensioning nut. If the bla-
des are loose, place the machine on a hard, stable surface with the xing screws of the
lower blade pointing upwards and loosen the screws. You can now remove the blades.
Before you insert the new blades, check that they are clean and that the grinding surfa-
ces are particularly free of all dirt.
Now insert the upper blade into the guide points of the oscillating head and then drip
oil onto the grinding surfaces. Slide the lower blade between the loosened screws.
Make sure that the grinding surface of the lower blade protrudes approx. 1.5 to 2 mm
beyond the edge of the upper blade. You can now tighten the xing screws.

5. Initial set up and operation
5a. Important operating instructions
The following measures serve to avoid
problems and accidents and should
always be followed:
- Use the clipper for approx. 30 minutes
and then let it rest for 10 minutes. This
protects the machine and blades and
increases service life.
- The voltage on the nameplate and in the
mains must match. Additionally, only alternating current may be used.
- Blades must be properly installed. The clipper must not be operated without them.
- Avoid any contact with the moving blades. Even when the clipping machine is swit-
ched o, the blades must not be touched until the clipper is completely disconnected
from the power supply.
- Avoid any contact of the machine with liquids during storage or clipping. Do not clip
wet animals. Liquid and moisture in the machine reduces electrical insulation and in-
creases the risk of electric shock or short circuit. The machine should only be cleaned
with a dry cloth or brush.
- Cables can also be dangerous. Lay them securely so that neither humans nor animals
can trip over them or step on them. Keep the cables away from heat sources.
- Do not wrap the cable around the machine as it may cause insulation breakage and
cable damage. Check the cable regularly for damage.
- Before unplugging the clipper make sure it is switched o.
- Never shear with damaged or blunt blades. Only use original blades.
- The sound of the clipper can unsettle animals. They may kick or injure themselves, so
secure the animal suciently beforehand.
- Make sure that unauthorised persons are not present in the clipping area.
- Choose well ventilated rooms and never near objects or gases likely to explode.
- Do not insert foreign objects into openings on the machine.
5b. Power level switch
The clipper has 2 power levels. We recommend the rst stage for sensitive, frightened
animals or sensitive areas. The second stage is suitable for regular shearing.
Before plugging the machine into a power outlet, make sure that the switch is set to 0
(switched o).
DE EN FR NL
ca 1,5 to 2 mm

6. Attachment comb assembly
With the attachment comb you can regulate
the cutting length. Recommended for horses
with Cushing‘s syndrome.
The lower blade must be removed before
assembly. The attachment comb is pushed
onto the lower blade and then secured with
an tensioning nut.
7. Cleaning air lter
The air lter is located at the rear end of
the machine and must be cleaned regu-
larly. The lter can be pushed out without
tools. Ensure that no foreign matter or dirt
enters the housing. After cleaning, reinstall
the lter. Do not use the clipper without
an air lter!

8. Maintenance
Prior to performing maintenance make sure the clipper is switched o and completely
disconnected from the power supply.
Cleaning:
After clipping, remove the oil from the machine, head and blades with a dry cloth and
remove hair with a brush. Then lightly oil all parts to prevent rust build-up. Even the
smallest rust spots can impair the clipping result. The assembly of the blades is descri-
bed in point 2.b. Fitting blades.
Blade sharpening:
Sharpening can only be done on special machines and by specialist dealers. Work only
with sharp knives, never with blunt or damaged knives.
Storage:
The clipper must be kept well cleaned and oiled. Place the case out of the reach of child-
ren and animals and in a moisture-free environment. If there is
a suspicion of ingress of moisture, do not use the machine any more. Bring them for
inspection as there is a risk of a short circuit or electric shock.
Cleaning the clipper head:
The clipper head must also be cleaned regularly. First, remove the blades. Then loosen
the two screws and remove the head from the drive. Now you can thoroughly clean the
head inside as well as all individual parts. If you reassemble it afterwards, you should
oil it again (lubrication is described in section 3).
9. Troubleshooting
Motor
Problem Cause Solution
Motor does not run · no current
· cable defective
· switch or motor defective
· check socket and fuse
· have checked /replaced by a specialist
· have it replaced by a specialist workshop
Motor gets hot · air lter is blocked
· blade tension is too high
· defective ball bearing
· blades or clipper head run dry
· clean or replace air lter
· slightly loosen the tensioning nut; if the blades still
do not cut please sharpen them
· have replaced by a specialist workshop
· lubricate
Motor vibrates · rotor runs out of round
· bearings are worn out
· fan wheel broken
· have it replaced by a specialist workshop
Motor has a very loud
running noise
· jammed bearing have it replaced by a specialist workshop
DE EN FR NL

Clipper head
Problem Cause Solution
Upper blade does not move · defective reduction drive · have it replaced by a specialist workshop
Upper blade does not move
over the entire running
surface
· eccentric knocked out
· eccentric shaft defective
· have it replaced by a specialist workshop
Clipper head gets very hot · blade tension too high
· blades and/or eccentric run dry
· have it replaced by a specialist workshop
Blades cut badly · blades are blunt
· blades are badly sharpened
· blade tension too low
· blades have rust
· have blades sharpened by a specialist workshop
· increase tension by tightening the tensioning nut
· have blades sharpened by a specialist workshop or if
too much rust replace the blades
Blades do not cut · eccentric defective
· defective reduction drive
· clipper head knocked out
· have it replaced by a specialist workshop
If your problem is not listed here, or continues to exist, please feel free to contact our
customer service.
10. Technical data
Device type/Model VOSS.farming easyCUT Horse Clipper
Supply voltage 230-240 V/AC
Motor power 150 W
Strokes: Power level 1 / 2 1 = ca. 2200/min, 2 = ca. 2600/min
Max. ambient temperature 0° - 40° C
Max. air humidity 10% - 90% (relative)
Spare parts
Only spare parts expressly approved or oered by the manufacturer may be used.
If necessary, please contact your specialist dealer.
Attention:
Unauthorized modications or alterations to the clipper are not permitted!
Disposal
The user is responsible for the proper disposal of the clipping blades and the clipping
machine at the end of their service lives. Observe the relevant regulations in your coun-
try. Do not dispose of the clipper in household waste. Proper disposal preserves the
environment and prevents possible harmful eects. In accordance with the EU directi-
ves 2012/19/EU on disposal of electrical and electronic equipment, your device will be

accepted free of charge at municipal collection points or recycling centres, or you can
take it to specialist dealers who oer a take-back service. If you cannot nd a collection
point in your area, we oer you, as a manufacturer or online retailer and member of a
recycling system, a return service in accordance with the requirements of the European
Directives. Please contact us at info@voss-group.eu
11. Legal content
CE-CONFORMITY DECLARATION
VOSS GmbH & Co. KG hereby declares that the product / device described in these
instructions complies with the fundamental requirements and other relevant
stipulations and regulations. The CE mark conrms compliance with the
Directives of the European Union.
DE EN FR NL

Version 2019 - 07
Head oce : VOSS GmbH & Co. KG, Ohrstedt-Bhf. Nord 5, 25885 Wester-Ohrstedt, Germany
Service center : VOSS GmbH & Co. KG, Ole Bahndamm 2, 25884 Viöl, Germany
This manual suits for next models
5
Table of contents
Other VOSS.farming Commercial Food Equipment manuals
Popular Commercial Food Equipment manuals by other brands

Taylor
Taylor QS Series Service manual

Vollrath
Vollrath STOELTING Flavor Burst STL-80BLD Operator's manual

Mobile Sink Company
Mobile Sink Company Odyssey Troubleshooting and caring

Cuppone
Cuppone Dough Rounder quick guide

Viessmann
Viessmann Tecto MD5 user guide

Diamond
Diamond ORLANDO LINE installation guide