Vox KERRADECO User manual

Installation manual
www.kerradeco.com
INNOVATIVE WALL SYSTEM

- 2 -
General guidelines
1. General information about the product and installation
• KERRADECO panels may be installed on a wooden frame or using a glue
• the panels can be installed horizontally or vertically, depending on the decor
• the person installing the panels should have basic technical knowledge and be familiar with safety
precautions
• after unpacking, each panel's quality should be checked (for scratches, pattern print errors, discolorations)
• prior to the installation, the panels should be stored in the room where they are to be installed – to adjust to
the ambient temperature
• the panels should be assembled in the sequence specified by the numbers on their backsides
• the panels may be finished with trim or without trim
• the product can be installed in damp areas (kitchen, bathroom), providing it has been sealed with silicon
• it must not be installed in areas of increased temperatures (above 60° C), like a sauna, on a chimney, next to
a cooker
• the product is only suitable for indoor applications
• 100% recyclable
• any non-compliance with the instructions will void the product's warranty
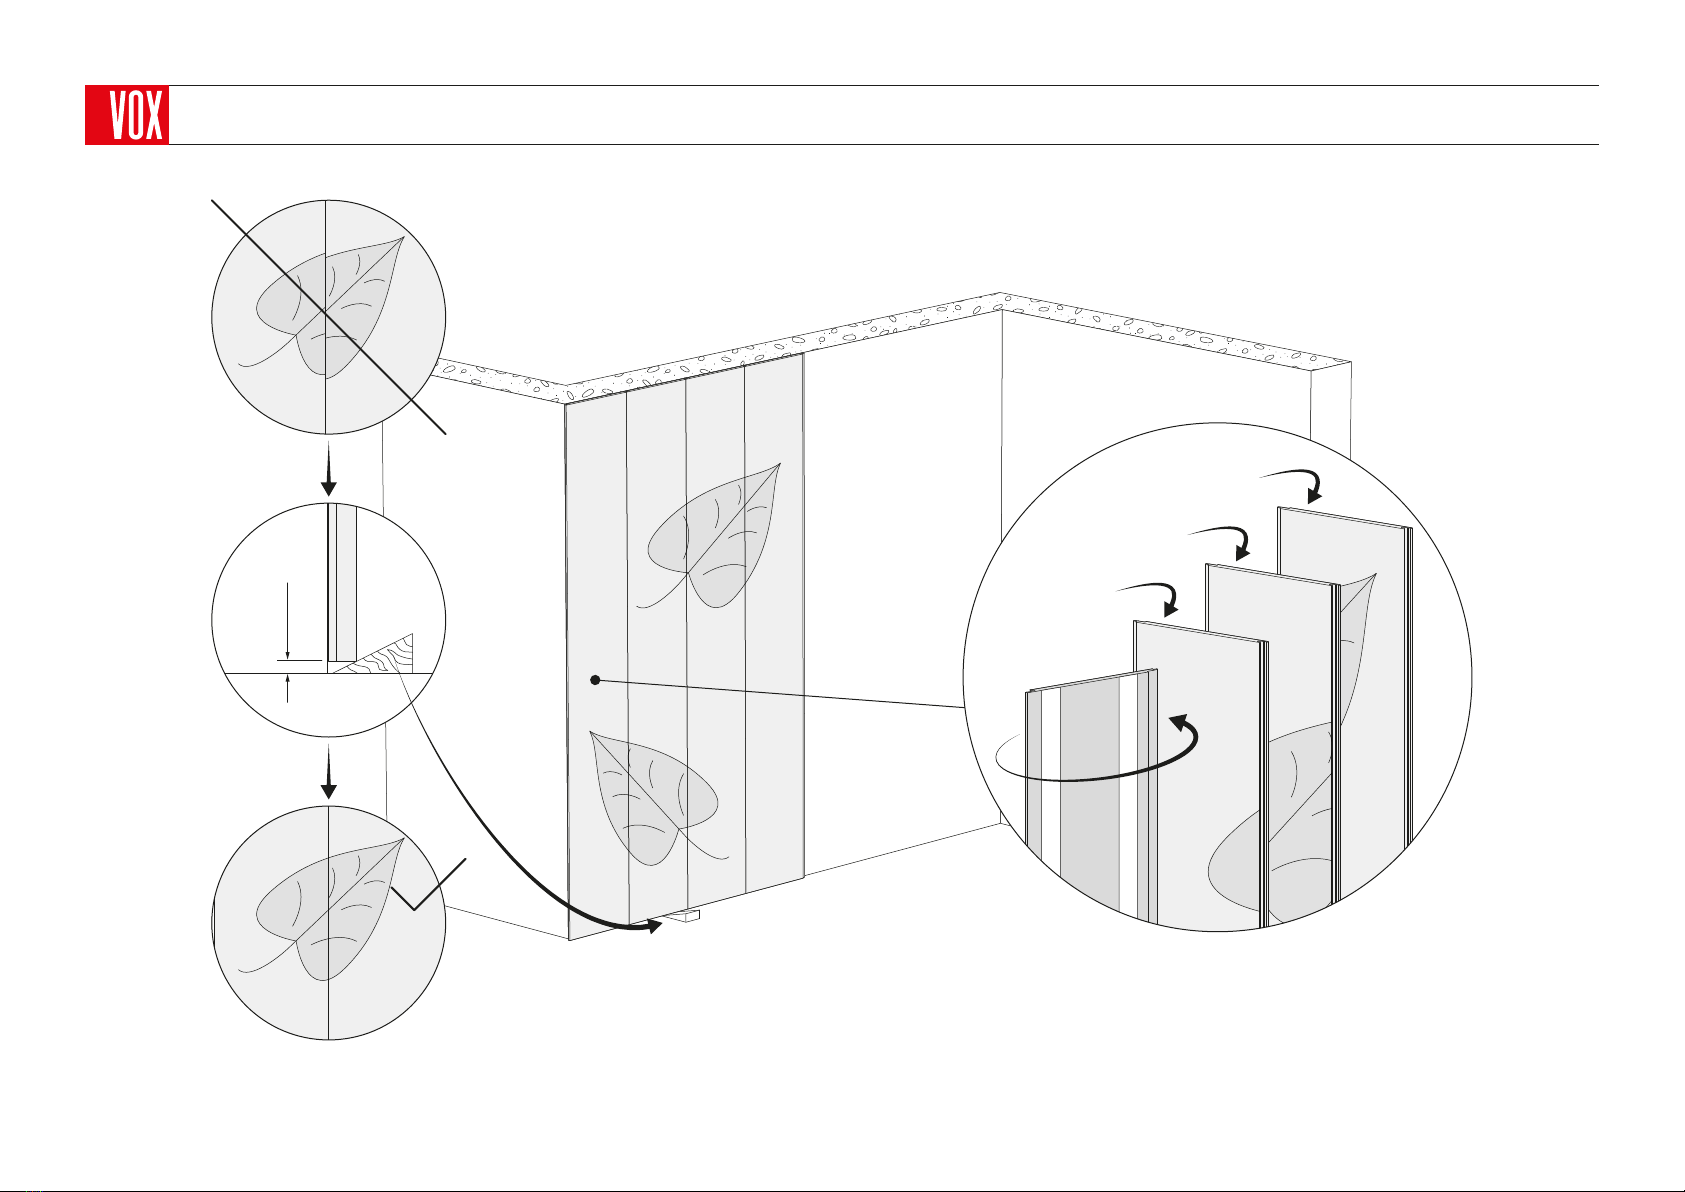
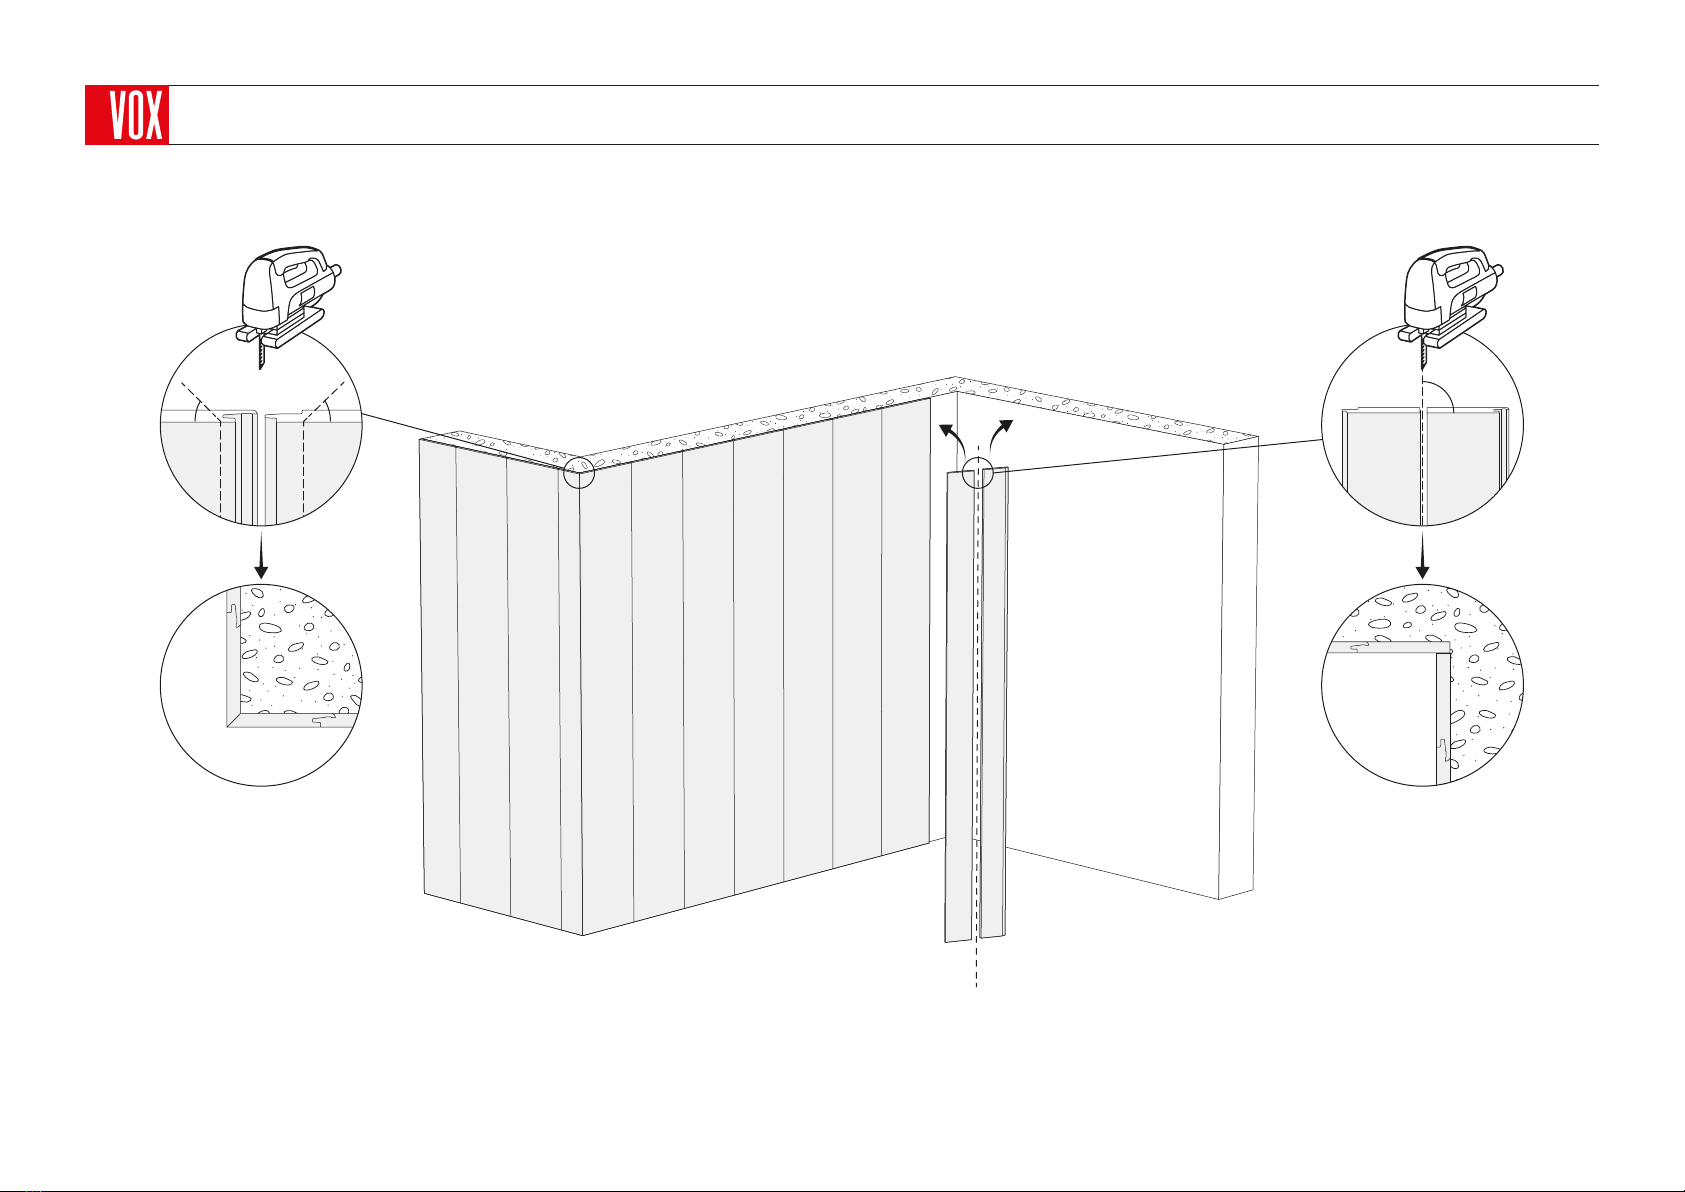
2. Installation of the panels
• the installation should always be done from the left to the right and from the bottom to the top
• after placement of the first panel, you need to verify its vertical / horizontal alignment and fasten it, then
you slide on the next panel and fasten it with a hammer and a tapping block
• before fastening the panel permanently, you need to make sure that there is no gap between the panels
and verify again its vertical / horizontal alignment
3. Wooden frame construction
• the frame should be made of wooden battens fastened directly to the wall
• using a level, you must level the battens so they are flush with each other; if necessary, you can use
shims or wedges to keep the panels level
• the battens should run perpendicular to the direction of the panels – if the panels are being assembled
vertically, the battens should be placed horizontally, and the other way around
• distance between the battens – 40 cm
• the battens should be:
- made of good quality wood, without any knots
- attached to the wall in a secure and strong manner, with screws or other mounting devices that are
appropriate for the given surface
- the battens should be stored in the room in which they will be mounted for at least 24 hours (to adjust
to the ambient temperature and humidity)
4. Installation on wooden frame
• screw down the panels to the battens through the panel's tongue, along the long edge and within the
area marked by a groove
• the screw should go in deep enough so that it does not snag when you slide on the next panel
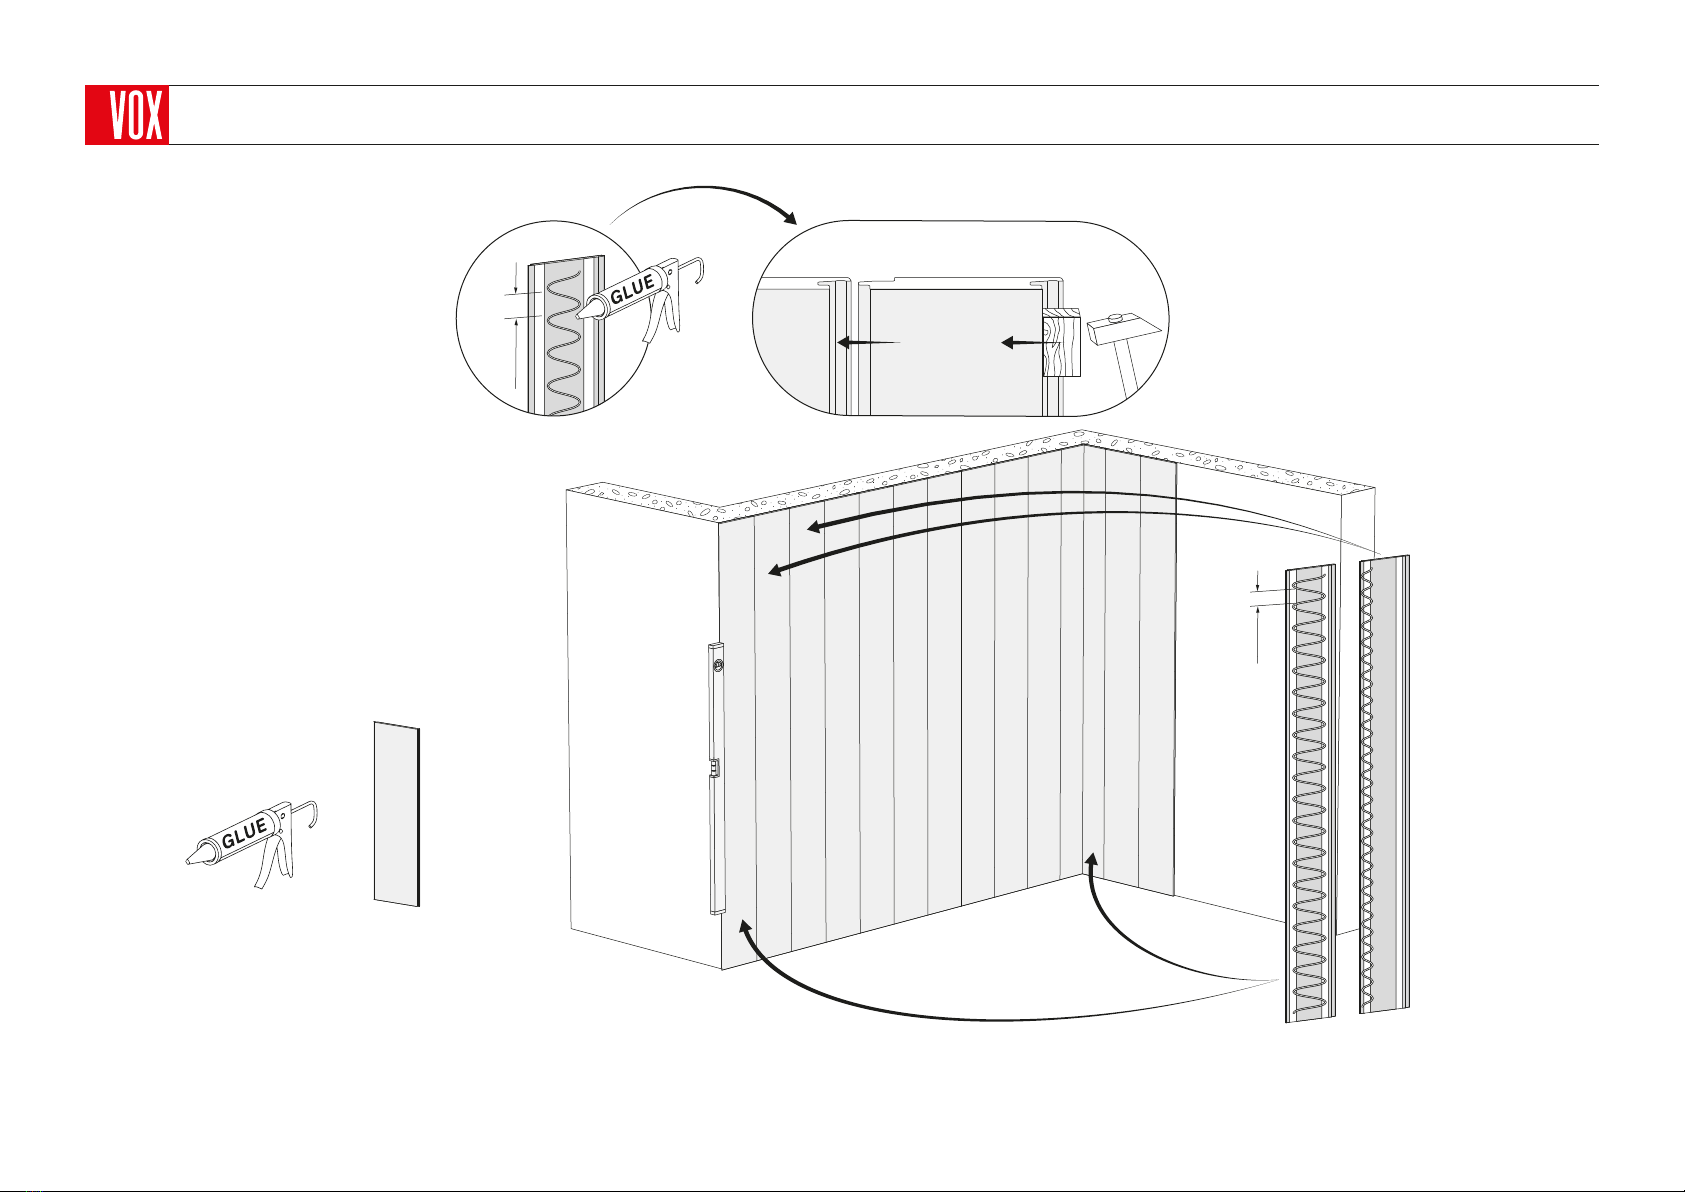
5. Installation with glue
• the surface should be smooth, not crumbling, ensuring good adhesion
• we recommend to use a highly flexible glue, based on a hybrid polymer formulation, intended for indoor
applications and for various building and construction materials – including damp materials: concrete, brick,
drywall, natural stone, wood and wood-based products, metals, glass and ceramics, the majority of plastics,
for example PVC, styrofoam, polyacrylates and polycarbonates
• the glue should be applied according to its instructions, in a well ventilated area
• apply the glue in a S-shaped motion
• the surface of the first panel on a given wall should be completely covered with glue; each successive one
only along the edge with the tongue
6. Cutting the panels
• to cut the panels you can use: hand saw, jigsaw, table saw
• when adjusting the panel for the trims, cut off the tongues or grooves with a sharp knife
7. Hanging shelves on the panels
• no additional weight should be applied to the panel, and neither should it be a bearing element in
construction
• no hangers, shelves or any other objects may be directly screwed to the panel
• instead, they should be mounted to the surface underneath the panel, with screws or anchors intended
for the given type of surface. To do so, drill the appropriate hole in the panel, allowing for such possibility
8. Cleaning
• do not allow liquid stains to dry
• from time to time, clean the panels with a damp cloth and a mild detergent
• intensive scrubbing and use of strong detergents may damage the panel's surface or cause its
discoloration
• do not clean with coarse and rough clothes, sponges or brushes
• never use for cleaning any solvents, acids, nor any other liquids based on these substances
• no cleaning liquids should be left on the surface, they must be rinsed off with water; cleaning substances
left out on the surface may cause its discoloration

- 3 -
Panels and trims
Panel 135 cm Panel 270 cm A-01
universal trim
A-02
internal angle
A-03
external angle
295 mm
310 mm
1350 mm
1355 mm
9 mm
295 mm
310 mm
9 mm
2700 mm
11,5 mm
19,5 mm
1,5 mm 1,5 mm
31 mm
19,5 mm
19,5 mm
19,5 mm
31 mm
1,5 mm
19,5 mm
31 mm

Additional tools
for wooden
frame construction
- 4 -
Tools
Additional tools
for installation
in damp areas
Basic tools
3 x 16 mm
6 x 80 mm

- 5 -
Panels 270 cm
Panels 270 cm
295 mm
310 mm
9 mm
2700 mm

- 6 -
Panels 270 cm Basic rules for panel assembly and their sequence
1234
3–5 mm
2
1
3
4
A wedge can be used to even the printed pattern and to maintain the distance on the finishing trim.

- 7 -
Panels 270 cm Installation on a wooden frame – frame construction
40 cm
4 cm
min. 2 cm
6 x 80 mm

- 8 -
A tapping block should be used to avoid damage to the panel's edge or its groove.
The panels should be placed without any gaps between them.
3 x 16 mm
Panels 270 cm Installation on a wooden frame – panel assembly

- 9 -
5 cm
5 cm
I II,III,IV...
Panels 270 cm Installation with glue – panel assembly
When installing panels with glue, make sure that the surface is smooth, not crumbling, ensuring good adhesion (for example: concrete, ceramic tiles, drywall).
The surface of the first panel on a given wall should be completely covered with glue, each successive one only along the panel’s edge with the tongue.
1 x
=
3÷4 x

- 10 -
Panels 270 cm Finishing angles without the finishing trim
45º45º
90º
Finishing angles without the finishing trims require more advanced technical skills.

KERRADECO (-2314*") ,.-3 ď4[1824-$*[,- 61.3[
- 11 -
Panels 270 cm Finishing angles with the finishing trims
In case of the internal angles, the trim should be placed on the panel before its installation.
A-01
A-02
A-03

- 12 -
Panels 270 cm Installation in damp areas
KERRADECO panels are waterproof, but their joints need to be additionally sealed with silicon – to prevent water from penetrating the gaps.
Particular attention should be paid to the angles and to the spaces along the ceiling and the floor.
KERRADECO (-2314*") ,.-3 ď4[1824-$*[,- 61.3[
A-01
A-02A-03

- 13 -
Panels 135 cm - vertical installation
Panels 135 cm
295 mm
310 mm
1350 mm
1355 mm
9 mm

- 14 -
1357
2468
3–5 mm
2
1
3
4
Panels 135 cm - vertical installation General guidelines for panel assembly and their sequence
A wedge can be used to even the printed pattern and to maintain the distance on the finishing trim.

- 15 -
Panels 135 cm - vertical installation Installation on a wooden frame – frame construction
40 cm
4 cm
min. 2 cm
6 x 80 mm

- 16 -
Panels 135 cm - vertical installation Installation on a wooden frame – panel assembly
A tapping block should be used to avoid damage to the panel's edge or its groove.
The panels should be placed without any gaps between them.
3 x 16 mm

- 17 -
Panels 135 cm - vertical installation Installation with glue – panel assembly
5 cm
5 cm
I,II III,IV,V...
When installing with glue, make sure that the surface is smooth, not crumbling, ensuring good adhesion (for example: concrete, ceramic tiles, drywall).
The surface of the first panel on a given wall should be completely covered with glue, each successive one only along the panel’s edge with the tongue.
1 x
=
7÷8 x

- 18 -
45 º45 º
90 º
Panels 135 cm - vertical installation Finishing angles without the finishing trim
Finishing angles without the finishing trims require more advanced technical skills.

- 19 -
Panels 135 cm - vertical installation Finishing angles with the finishing trims
KERRADECO SHORT (-2314*") ,.-3 ď4[1824-$*[,- 61.3[
In case of the internal angles, the trim should be placed on the panel before its installation.
A-01
A-02
A-03

- 20 -
Panels 135 cm - vertical installation Installation in damp areas
KERRADECO panels are waterproof, but their joints need to be additionally sealed up silicon – to prevent water from penetrating the gaps.
Particular attention should be paid to the angles and to the spaces along the ceiling and the floor.
KERRADECO SHORT (-2314*") ,.-3 ď4[1824-$*[,- 61.3[
A-01
A-02A-03
Table of contents
Other Vox Indoor Furnishing manuals
Popular Indoor Furnishing manuals by other brands

bauhaus
bauhaus ST0520SRW Installation

Forte
Forte Selly YLSS12414B Assembling Instruction

Baxton Studio
Baxton Studio HIF-007-NATURAL/BLACK quick start guide

The Land of Nod
The Land of Nod Hampshire Arched Twin Bed Assembly instructions

Bensons for Beds
Bensons for Beds ORIANNA STK770501 Assembly instructions

Amart Furniture
Amart Furniture DALVIN 74029 Assembly instruction

Philips
Philips LAA61BYWC/10 Specification sheet

Forte
Forte Iloppa TIQS851S Assembling Instruction

Alice's Home
Alice's Home LARS ICHRSCAMX4 Series manual

Whittier Wood
Whittier Wood 3804DUET Assembly instructions

Broyhill
Broyhill GBO22-602-3 Assembly instructions

E.N.Z. Engineering
E.N.Z. Engineering WM503 Assembly instruction