Voxx ACA801 User manual

NO.
Part # ITEM QTY PICTURE
1 4360614
Camera + License
Plate Mount 1
2 4460036
Mounting Bracket
1
3 4060049
Screws 1
4 4060050
Screws 1
5 4120334
Power Cable 1
64120335
Video RCA Cable
for Cameras 1
7 4280689
Manual 1
ACA801 –License Plate Mount Camera
Installation Set-up Guide

System Layout
Monitor
Camera

Harness & Device Wire Diagram

The product is intended to assist in safe driving and to allow the driver to have a broader
rear view while the vehicle is in reverse. You, as the driver, are solely responsible for the
safe operation of your vehicle and the safety of your passengers according to local traffic
regulations. Your first priority while driving should always be the safe operation of your
vehicle. VOXX Electronics Corporation will not accept any responsibility whatsoever for
accidents resulting from failure to observe these precautions or safety instructions.
1. This product utilizes high voltage. Any unauthorized modifications or damage to the
product may result in electrical shock. Handle all components with care. Inspect
regularly for damage to components and cabling.
2. You are responsible for ensuring that the installation of this product does not void or
affect the vehicle manufacturer’s warranty. VOXX Electronics Corporation or its
subsidiaries are not liable in full or in part for improper installation resulting in loss or
damage to your property, or for voiding all or part of the vehicle manufacturer’s
warranty.
3. Do not apply excessive force to any of the components contained within this kit.
Excessive force used before, during or after installation that results in a damaged or
non-functional part will void all warranties.
4. Please follow the procedures in this installation manual. Improper installation or
modification of this product will void all warranties.
Warnings
This camera design integrates a backup camera with your vehicle’s rear license plate without
covering the license plate. The camera is easy to mount on your car, truck, or van with the
bracket being hidden by your license plate. We have also included a surface mount bracket
to help with other installation methods.
This Wired Camera is compatible with most monitors/TFT screens and can be connected
using a standard RCA connector.
Product Description

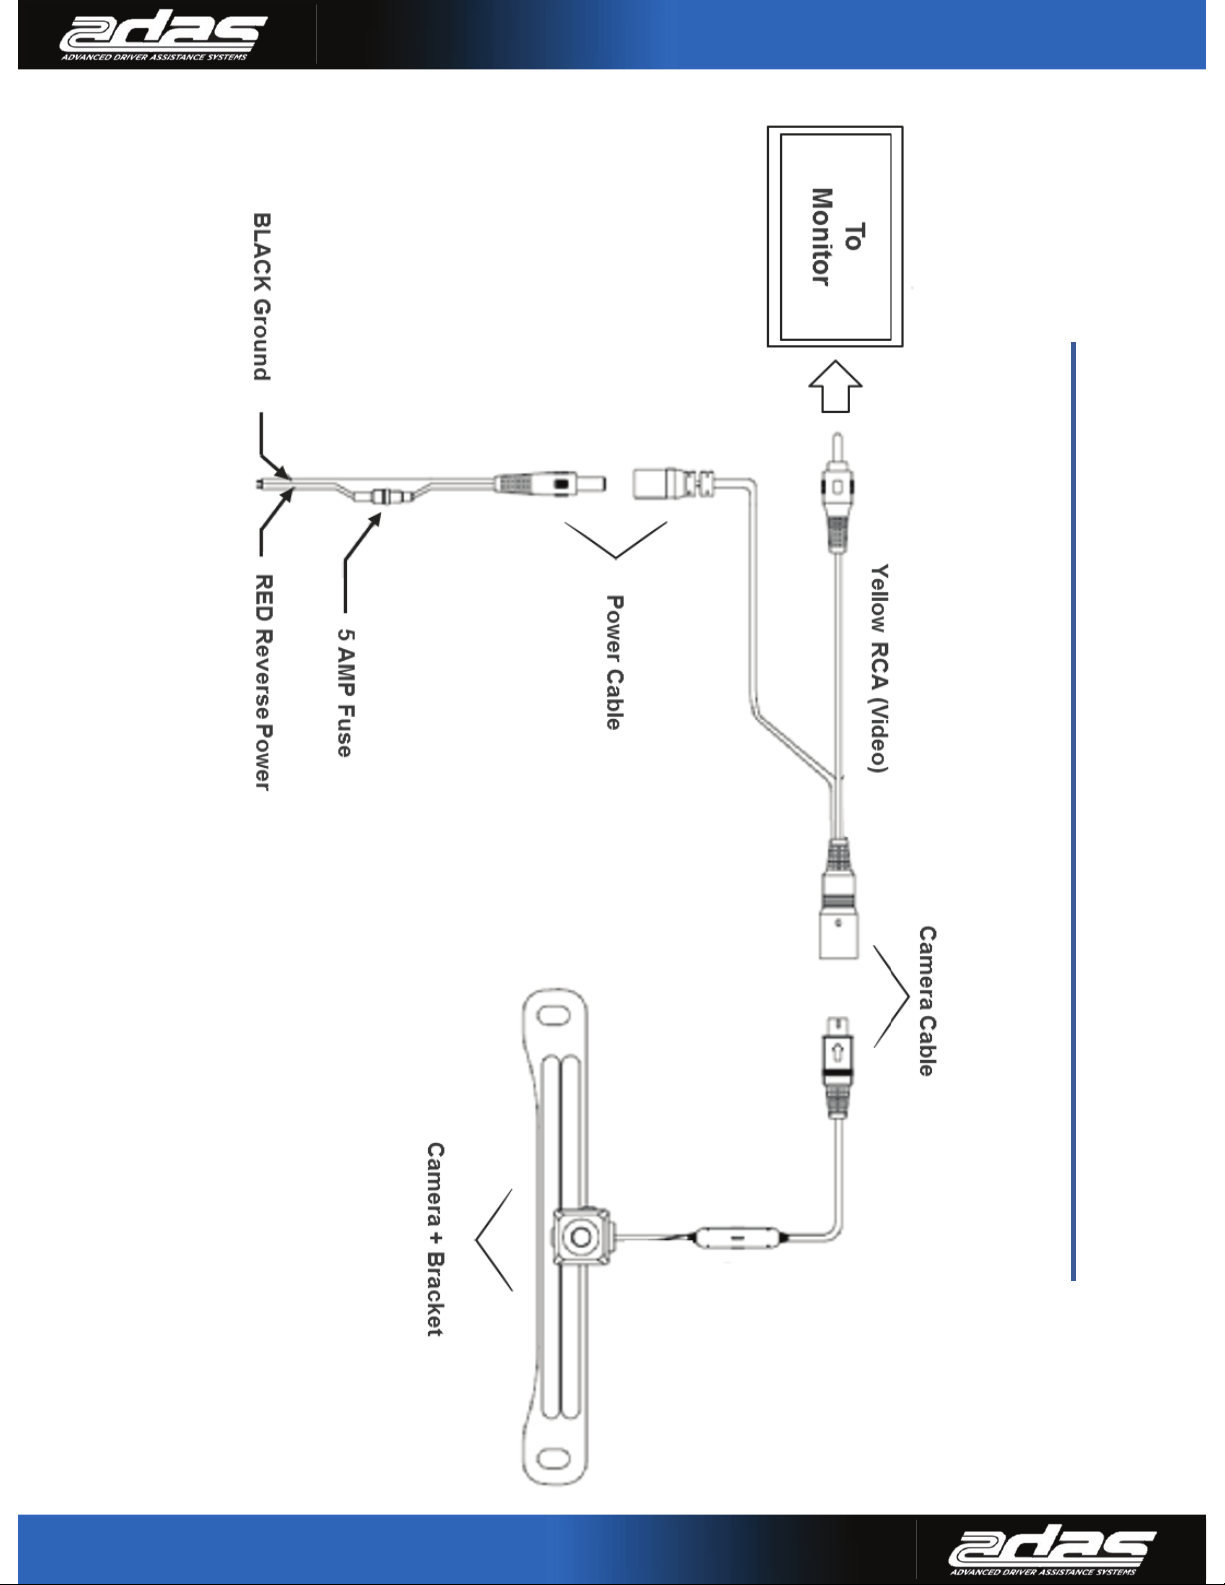
1. Remove the rear license plate.
2. Examine the vehicle to determine the best way to run the power wires to the reverse
lights and the extension cable through the car.
3. The Camera can be mounted above or below the plate. (For surface mounting with the
included bracket, see the next section.) Determine the mounting location that best suits
your needs. Be sure to verify that your installation plan complies with local laws and
requirements.
NOTE: Most states require that the state name, registration stickers, and license
number are not obstructed in any way.
4. Place the camera bracket behind the license plate and line up the holes. Fasten the
camera mounting bracket and the license plate to the vehicle using the anti-theft screws
provided. After installation of screws with the tool provided, place the tool in the glove
compartment or other safe place for future use.
NOTE: If you decide to mount the camera at the bottom of the license plate, you must
first remove the screw that holds the camera to the bracket and flip the camera over
so the picture will not be displayed upside down.
5. Route the camera wiring into the vehicle. The wire can be run through an existing
grommet, behind a tail lamp, under the trunk molding, or if necessary, through a 5/8
inch hole drilled near the vehicle’s rear license plate. When choosing a wiring path,
make sure the cable will not be damaged or pinched, as this may cause a short circuit
that is not covered by the warranty. If drilling a hole, perform the following steps:
a) Acquire a 5/8 inch drill bit, rust preventive, all of which can be purchased at a
hardware store.
b) Check behind the intended drilling location before drilling to verify that no wires
or mechanisms can interfere with or be damaged during drilling.
c) Check for interference with license plate lights and the hatch release switch
and/or mechanism.
d) Drill a 5/8 inch hole at the selected location.
e) Coat the edge of the hole with rust preventative.
f) Route the camera cable through the grommet and then through the hole.
g) Insert the grommet in the hole to keep water from entering the vehicle.
Camera Installation: License Plate Mount

1. Find a suitable location on the vehicle where the bracket will not interfere with any
equipment or doors, or block the line of sight. Verify that the planned mounting location
is accessible from behind and that you have access to route the wiring inside the vehicle.
Be sure that the mounting screws will not hit any wires or equipment inside the vehicle.
2. Attach the surface mounting bracket to the vehicle with the hardware included.
3. Route the camera wiring into the vehicle. The wire can be run through an existing
grommet, behind a tail lamp, under the trunk molding, or if necessary, through a 5/8
inch hole drilled near the vehicle’s rear license plate. When choosing a wiring path,
make sure the cable will not be damaged or pinched, as this may cause a short circuit
that is not covered by the warranty. If drilling a hole, perform the following steps:
a) Acquire a 5/8 inch drill bit, rust preventive, and a 5/8 inch rubber grommet, all of
which can be purchased at a hardware store.
b) Check behind the intended drilling location before drilling to verify that no wires
or mechanisms can interfere with or be damaged during drilling.
c) Check for interference with license plate lights and the hatch release switch
and/or mechanism.
d) Drill a 5/8 inch hole at the selected location
e) Coat the edge of the hole with rust preventative.
f) Route the camera cable through the grommet and then through the hole.
g) Insert the grommet in the hole to keep water from entering the vehicle.
4. Remove the camera from the license plate bracket and attach it to the surface mount
bracket on the vehicle.
Camera Installation: Surface Mount
1. Wire the Camera’s power wire to the vehicle’s reverse lamp.
a) Locate the reverse lamp in the tail light assembly.
b) Using a crimp connector or by soldering, attach the red wire to the positive 12
volt wire from the reverse lamp. Attach the black wire to ground.
Obtaining Reverse Power

Notes

For customer or technical support please call Voxx Support:
1-800-645-4994
9 AM –6 PM (EST - Eastern)
Monday –Friday
VOXX Electronics Corporation, 150 Marcus Blvd., Hauppauge, New York 11788
Patented www.voxxintl.com/company/patents
This manual suits for next models
1
Table of contents
Other Voxx Dashcam manuals