VSS Nederland VCD-5371PIX User manual

INFORMATION - This equipment has been tested and found to comply with
limits for a Class A digital device, pursuant to part 15 of the FCC Rules & CE Rules.
These limits are designed to provide reasonable protection against harmful
interference when the equipment is operated in a commercial environment.
This equipment generates, uses, and can radiate radio frequency energy and, if
not installed and used in accordance with the instruction manual, may cause
harmful interference to radio communications.
Operation of this equipment in a residential area is likely to cause harmful
interference in which case the user will be required to correct the interference at
his own expense.
◆
Do NOT use power sources other than those specified.
◆
Do NOT expose this appliance to rain or moisture.
This installation should be made by a qualified service person and
should conform to all local codes.
The lightning flash with an arrowhead symbol, within an equilateral
triangle is intended to alert the user to the presence of uninsulated
dangerous voltage within the product's enclosure that may be of
sufficient magnitude to constitute a risk of electric shock to persons.
The exclamation point within an equilateral triangle is intended to alert
the user to the presence of important operating and maintenance
(servicing) instructions in the literature accompanying the appliance.
WARNING - Changes or modifications not expressly approved by the
manufacturer could void the user's authority to operate the equipment.
CAUTION : To prevent electric shock and risk of fire hazards:
1
WDR Digital Sensor Color Dome Camera

2
WDR Digital Sensor Color Dome Camera
3
WDR Digital Sensor Color Dome Camera
How to Use the Camera 15
■Menu 15
■Settings 16
ㆍPRESETS 17
ㆍEXPOSURE 18
ㆍWDR 20
ㆍWHITE BALANCE 21
ㆍDAY/NIGHT 22
ㆍIMAGE ADJ. 23
ㆍSPECIAL 25
- CAMERA ID
- VIDEO OUT
- D-ZOOM
- MOTION
- PRIVACY SETUP
- SYNC
- RS485 SETUP
ㆍEXIT 29
25
26
27
27
28
29
29
Troubleshooting 30
Specifications 32
■Contents
Features
Warnings and Precautions
Names and Functions of Parts
Installation
Cable Connection
■Lens
■OSD
■VBS-EXTRA
■3 Axis Bracket
4
5
9
Dimensions 11
12
Installation (Adaptor Plate) 14
12
10
10
11
11
Components 8

4
WDR Digital Sensor Color Dome Camera
5
WDR Digital Sensor Color Dome Camera
Additional Functions
SYNC (INT/LL), SENS-UP, FREEZE, FLIP
(H/V-REV), D-ZOOM, SHARPNESS and
PRIVACY functions are provided.
Controlled by OSD Menu
The camera can be controlled by selecting
text displayed on the monitor screen.
Wide Dynamic Range (WDR)
The camera delivers clear high quality pictures,
even when backlit, by increasing exposure in
dark areas while decreasing it in bright areas;
a corrected image with clear details results.
ㆍ120dB maximum dynamic range
RS-485 Communication
Control Support (optional)
Remote OSD menu control via an RS-485
interface is supported.
■Features Warning ■
The camera requires periodic inspection.
Contact an authorised technician to carry out the inspection.
Stop using your camera when you find it malfunctioning.
If the camera emits smoke or is unusually hot for a long period,
a fire may be caused.
Do not Install the camera on a surface that can not support it.
If the camera is installed on an inappropriate surface, it may fall
and cause injury.
Do not hold plug with wet hands.
It could cause an electric shock.
Do not dis-assemble the camera.
It may result in an electric shock or other hazards.
Do not use the camera close to a gas or oil leak.
It may result in a fire or other hazards.
Motion Detection
Since the camera detects motion without any
additional external sensor, you can monitor
activity more efficient.
Programmable GAMMA Processing
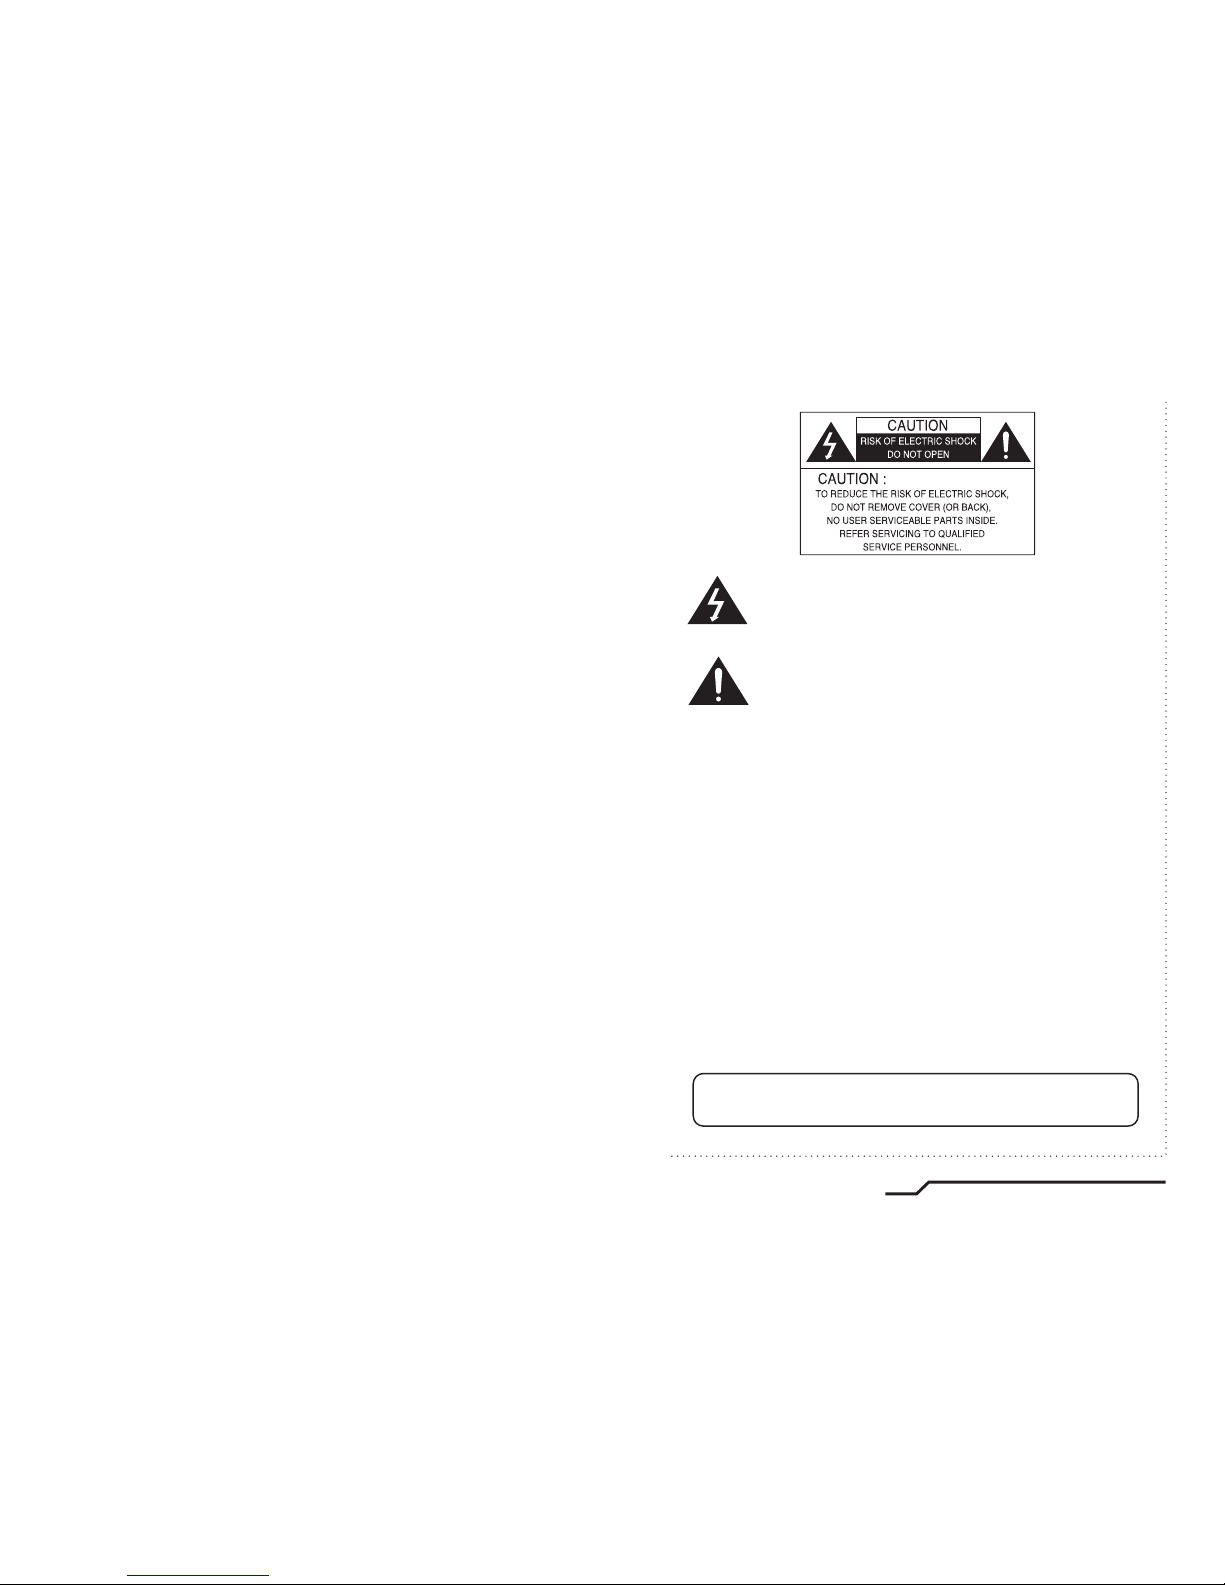
3 Axis built-in 100mm Dome Housing
High Resolution Color for Crisp,
Clear Video
ㆍProgressive image capture
ㆍ690TVL Effective
Day & Night
The camera identifies whether it is day or night
and automatically switches to the appropriate
mode, depending on its environment. By day,
the camera switches to color mode in order to
maintain optimal color. At night, it switches to
B/W mode so as to obtain better picture definition.
High Sensitivity for low-light
images
The built-in high sensitivity
PIXIM SEAWOLF
Sensor enables
a clear image even at 0.1Lux
DNR (Digital Noise Reduction)
The amount of low illuminance noise has been
significantly reduced, and the signal-to-noise
ratio (S/N ratio) as well as horizontal resolution,
have been improved resulting in a clear and
sharp image image even in low light.

6
WDR Digital Sensor Color Dome Camera
7
WDR Digital Sensor Color Dome Camera
■Precautions
Do not install the camera in
extreme temperature conditions.
Do not install the camera under
unstable lighting conditions.
Do not touch the front lens of the
camera.
Only use the camera under conditions
where temperatures are between
-10˚C and +50˚C. Be especially
careful to provide ventilation when
operating under high temperatures.
It can cause the image quality to be
poor.
Severe lighting change or flicker can
cause the camera to work improperly.
This is one of the most important parts
of the camera. Be careful not to leave
fingerprints on the lens cover.
Do not install or use the camera in an
environment where the humidity is high.
It can cause malfunctions to occur.
If it gets wet, wipe it dry immediately.
Liquids can contain minerals that
corrode the electronic components.
If exposed to radioactivity the CCD
will fail.
It can damage the CCD.
Do not drop the camera or protect
it from physical shocks.
Do not expose the camera to rain
or spill beverage on it.
Do not expose the camera to
radioactivity.
Never keep the camera pointed
directly at strong light.
ㆍIf the camera is exposed to spotlight or an object reflecting strong light,
smear or blooming may occur.
ㆍPlease check the power supply satisfies the normal specification before
connecting the camera.

8
WDR Digital Sensor Color Dome Camera
9
WDR Digital Sensor Color Dome Camera
■Components Names and Functions of Parts ■
1. COLOR DOME CAMERA
2. SCREWS
3. WIRE FOR VBS-EXTRA
4. INSTRUCTION GUIDE
③
④
②①

10
WDR Digital Sensor Color Dome Camera
11
WDR Digital Sensor Color Dome Camera
■Names and Functions of Parts Names and Functions of Parts ■
②OSD PCB
●SET button : Used for the menu display. This button can be used to
confirm settings after changing the value of the selected function or
current conditions.
●UP & DOWN buttons : Used for selecting items by moving the cursor
up or down on the menu screen.
●LEFT & RIGHT buttons : Used when changing item values, by moving
the cursor to the left or right on the menu screen.
①LENS : Vari-Focal DC Auto Iris Lens
DOWNUPSETRIGHTLEFT
③VBS-EXTRA FOR CONNECTING TO LCD
Please use the supplied wire when connecting to external monitor
VBS-EXTRA
④3 AXIS BRACKET
Adjust the pan and tilt to give the correct angle of view.
(unit : mm)
100φ
73.0φ
125.79φ
105.5
55.0
Dimensions ■

12
WDR Digital Sensor Color Dome Camera
13
WDR Digital Sensor Color Dome Camera
■Installation
1. Dome Base Mounting
- Open the dome cover by loosening 3 screws using special wrench
provided.
- Mount the base of camera to a sturdy surface using 4 screws
(1.5 inch) and 4 premade holes on the base of the dome.
2. Power Connect & Monitor Impedance
- DC12V/300mA regulated power supply (DC12V only)
AC24V Class 2 power supply (AC24V/DC12V)
- To avoid fire or shock hazard, must use a UL listed power supply.
- Set the monitor impedance switch to 75Ω. Check the impedance
switch when the screen turns blurred.
3. Camera Module Adjustment
- Loosen screws for 3-axis camera bracket and adjust the direction
and angle of camera.
- Make sure to retighten the screws for camera bracket.
- Set any function you wish to activate by using the OSD buttons.
4. Dome Cover Mounting
- Replace the dome cover to the base and tighten 3 screws.
Control via RS-485 Interface (Optional)
RS-485 Control Port
485 Control Board Connection Port
485+
(+) CONNECTION TERMINAL (TRX+)
(- ) CONNECTION TERMINAL (TRX-)
485-
Item
Initial value
PET PKT
UART MODE
BAUD RATECamera ID
ENABLE
8-NONE-124001
The camera can be controlled by using an external controller equipped
with RS-485 communications.
• To control using a DVR or keyboard controller
Connect the RS-485 cable (TRX+, TRX-) to the connection port of the
485 control board in the DVR or controller.
* RS-485 communication default initial values
•
To control the camera use Pelco-D protocol.
- Set Preset 95 : Enters into OSD menu.
- Iris Open command : Set key function.
- Iris Close command : Cancel function.
Note
■Cable Connections
DOME COVER
GIMBAL A'SSY
BASE HOUSING
DECORATION RING
DC only
AC24V
DC12V AC IN
DC IN AC IN
DC IN
VIDEO
POWER
RS-485 (Optional)

14
WDR Digital Sensor Color Dome Camera
15
WDR Digital Sensor Color Dome Camera
How to Use the Camera ■
ㆍOUTDOORㆍINDOORㆍNORMAL
SETUP menu
PRESETS
EXPOSURE
WDR
WHITE BALANCE
DAY/NIGHT
IMAGE ADJ.
EXIT MENU
ㆍMIDDLE
ㆍLOW
ㆍRS485 SETUP
ㆍCAMERA ID
ㆍMOTION
ㆍATW
ㆍAWB ㆍMANUAL
ㆍFREEZE
ㆍAUTO
SPECIAL
ㆍHIGH
ㆍRESET
ㆍVIDEO OUT
ㆍPRIVACY SETUP
ㆍINDOOR ㆍOUTDOOR
ㆍFLIP ㆍSHARPNESS
ㆍCOLOR GAIN ㆍGAMMA
ㆍUSER
ㆍDZOOM
ㆍSYNC
ㆍRETURN
ㆍCOLOR ㆍBW
■
Menu
■Installation (Adaptor Plate)
* When installing on an adaptor plate bracket.
① Place the adaptor plate bracket on a flat installation surface and fix it with
the screws provided.
② When placing the camera body onto the plate, insert the plate pin into the
corresponding holes on the camera body as shown in figure-1. Lock the
camera in place by turning the camera body clockwise.
③
When placing the camera body on the plate, make sure that the power and
video cables pass through.
④
After installation and adjustment of the camera is complete, secure the dome
cover by turning it clockwise.
Unlocking
direction
Locking
direction
Dome Cover
Unlocking
direction
Locking
direction
Camera Body
3.5x25 tapping
screw (provided)
Adaptor Plate
ㆍLENS
ㆍDNR
ㆍCOLOR ROLL ㆍSENS-UP
ㆍEXPOSURE MODE
ㆍFOCUS
ㆍHIGHLIGHT
ㆍAGC

16
WDR Digital Sensor Color Dome Camera
17
WDR Digital Sensor Color Dome Camera
■How to Use the Camera
SETUP
PRESETS
EXPOSURE..
WDR
WHITE BALANCE
DAY/NIGHT
IMAGE ADJ..
SPECIAL..
EXIT MENU.
NORMAL
MIDDLE
ATW
AUTO..
3.
Set up a selected item by using the Left and Right buttons.
4.
To finish and save the settings, select 'EXIT' and press the SET button.
Select the function using
the UP or DOWN button.
Change the status using
the LEFT or RIGHT button.
PRESETS
Note
•
An item with the .. icon also has sub-menus. To select a sub-menu,
press the SET button.
SETUP
PRESETS
EXPOSURE..
WDR
WHITE BALANCE
DAY/NIGHT
IMAGE ADJ..
SPECIAL..
EXIT MENU.
NORMAL
MIDDLE
ATW
AUTO..
●
NORMAL : Normal environment.
●
INDOOR : Indoor environment.
●
OUTDOOR : Outdoor environment.
Settings can be made using the 5 buttons located in the camera.
DOWNUPSETRIGHTLEFT
1. Press the SET button
ㆍSettings can now be made. The SETUP menu is displayed on the monitor.
2. Select a menu item from the list available by using the UP and DOWN
buttons.
ㆍFuntions are selected using up and down buttons.
ㆍThe selected position is displayed in blue.
■
Settings
SETUP
PRESETS
EXPOSURE..
WDR
WHITE BALANCE
DAY/NIGHT
IMAGE ADJ..
SPECIAL..
EXIT MENU.
NORMAL
MIDDLE
ATW
AUTO..

18
WDR Digital Sensor Color Dome Camera
19
WDR Digital Sensor Color Dome Camera
EXPOSURE
SETUP
PRESETS
EXPOSURE..
WDR
WHITE BALANCE
DAY/NIGHT
NORMAL
MIDDLE
ATW
AUTO..
● LENS : Using this function, you can control the screen brightness.
ㆍDC / Manual : Select Lens Type
LENS MENU
DC GAIN
VIDEO GAIN
AI THRESH
PREVIOUS PAGE.
0 120 255
-24
500 255
-48 60
When the SETUP menu screen is displayed, select‘EXPOSURE’by
using the Up and Down buttons so that the arrow indicates‘EXPOSURE’.
■How to Use the Camera
EXPOSURE
LENS
FOCUS..
EXPOSURE MODE
AGC
DNR
HIGHLIGHT
COLOR ROLL
SENS-UP
PREVIOUS PAGE.
DC..
60 i
MIDDLE
MIDDLE
ON
LOW
2X
● FOCUS : To adjust the DC and VIDEO lens focus
● EXPOSURE MODE : To select the number of fields and number
of exposure cycles.
- 60i / 30p selectable
● AGC (AUTO GAIN CONTROL) : In the dark situation, the higher the
gain level, the brighter the screen but the higher the noise.
- OFF / LOW / MIDDLE / HIGH selectable
● DNR (Digital Noise Reduction) : The level of background noise in low
light decreases automatically as the level of gain changes.
- OFF / LOW / MIDDLE / HIGH selectable
● HIGHLIGHT : To optimize the scene when high dynamic range lighting
is detected.
- ON : bright parts of the image are most visible.
- OFF : dark parts of the image are most visible.
FOCUS DETECTOR
FOCUS METER
SET FOCUS REGION..
PREVIOUS PAGE.
88
SET FOCUS REGION
● COLOR ROLL : To control a detector that finds color fluorescent roll.
- OFF / LOW / MIDDLE / HIGH selectable

20
WDR Digital Sensor Color Dome Camera
21
WDR Digital Sensor Color Dome Camera
WDR
● SENS-UP : When it is night or dark, the camera automatically detects
the light level and maintains a clear picture if this mode is activated.
- 2X, 4X, 8X, 16X, 32X
- OFF : Deactivates the SENS-UP function.
● WDR : When the image has simultaneous bright and dark areas, the
Wide Dynamic Range makes both areas distinct.
- LOW / MIDDLE / HIGH / USER selectable
WDR LEVEL
BIAS
LIMIT
PREVIOUS PAGE.
2
36
-30 30
036
SETUP
PRESETS
EXPOSURE..
WDR
WHITE BALANCE
DAY/NIGHT
IMAGE ADJ..
SPECIAL..
EXIT MENU.
NORMAL
MIDDLE
ATW
AUTO..
■How to Use the Camera
MANUAL WHITE BALANCE
RED
BLUE
PREVIOUS PAGE.
-18
13
-20 20
-20 20
WHITE BALANCE
Use the White Balance function to adjust the screen colors.
1. Position the cursor to point to WHITE BAL on the SETUP menu screen,
select using the Up and Down buttons.
2. Select the desired mode using the Left and Right buttons.
SETUP
PRESETS
EXPOSURE..
WDR
WHITE BALANCE
DAY/NIGHT
IMAGE ADJ..
SPECIAL..
NORMAL
MIDDLE
ATW
AUTO..
※Select one of the following 5 modes, as appropriate.
● ATW : The ATW mode continuously monitors.
● INDOOR : Select when the color temperature is between 4000˚K
and 8500˚K
● OUTDOOR : Select when the color temperature is between 2000˚K
and 11000˚K
● AWB : To obtain the optimum state under the current luminance
levels, direct the camera to point toward a sheet of white paper and
press the SET button. If the environment changes, including the light
source, the white balance will require re-adjustment.
● MANUAL : Select to "fine-tune" the White Balance manually. Set
White Balance first using the ATW or AWB mode. Afterwards switch
to MANUAL mode, fine-tune the White Balance and then press
the SET button.

22
WDR Digital Sensor Color Dome Camera
23
WDR Digital Sensor Color Dome Camera
DAY/NIGHT
Note
•Under the following conditions White Balance may not work properly.
In such cases, select the AWC mode.
①When the color temperature of the subject environment has a very
high temperature range (e.g. clear sky, or sunset)
②When the ambient illumination of the subject is low.
③If the camera is directed toward a fluorescent light, or is installed in
a place where illumination changes dramatically, the White Balance
operation may become unstable.
● AUTO : This camera has an IR Cut-Filter and automatically changes
to the appropraite mode according to lighting levels.To set up the switching
time and switching speed for the AUTO mode press the SET button.
SETUP
PRESETS
EXPOSURE..
WDR
WHITE BALANCE
DAY/NIGHT
IMAGE ADJ..
SPECIAL..
EXIT MENU.
NORMAL
MIDDLE
ATW
AUTO..
■How to Use the Camera
● COLOR : The picture is displayed in color.
● B/W : The picture is always displayed in black and white.
When the SETUP menu screen is displayed, select 'IMAGE ADJ.' using
the Up and Down buttons.
SETUP
PRESETS
EXPOSURE..
WDR
WHITE BALANCE
DAY/NIGHT
IMAGE ADJ..
SPECIAL..
EXIT MENU.
NORMAL
MIDDLE
ATW
AUTO..
IMAGE ADJ.
DAY&NIGHT SETUP
TIME DELAY
PREVIOUS PAGE.
5
020

24
WDR Digital Sensor Color Dome Camera
25
WDR Digital Sensor Color Dome Camera
SPECIAL
When the SETUP menu screen is displayed, select 'SPECIAL' by using
the Up and Down buttons so that the arrow indicates 'SPECIAL'.
SETUP
PRESETS
EXPOSURE..
WDR
WHITE BALANCE
DAY/NIGHT
IMAGE ADJ..
SPECIAL..
EXIT MENU.
NORMAL
MIDDLE
ATW
AUTO..
SPECIAL
CAMERA ID
VIDEO OUT..
DZOOM
MOTION
PRIVACY SETUP..
SYNC
RS485 SETUP..
RESET
RETURN
OFF
OFF
OFF
INT
●CAMERA ID : User can enter a unique name for the respective camera.
The maximum length of the ID is ten characters.
ㆍYou can choose the ON and OFF with the selector. If you select ON,
the entered camera ID is displayed at the selected position in the video
picture (normal operation).
ㆍPlease select the setup button whilein ON mode.
ㆍSelect the desired position with the selector.
① Move the cursor to the letter required by using the Set-Up button.
② Select an ID from A,B~Y,Z, a,b~y,z, 0,1~8,9 by using the LEFT and
RIGHT buttons.
③ Repeat the above steps until the ID is complete.
① Select the position where the ID is to be displayed by using the
LEFT and RIGHT buttons.
●VIDEO OUT : Move the cursor to select the video system
CAMERA ID
ID
POSITION
PREVIOUS PAGE.
CAM-001
UP-LEFT
CAMERA ID
ID
POSITION
PREVIOUS PAGE.
CAM-001
UP-LEFT
■How to Use the Camera
VIDEO STANDARD
VIDEO SELECT
VIDEO LEVEL
SYNC LVL
BURST LVL
COLOR BAR
PREVIOUS PAGE..
0
0
OFF
NTSC
80 110 150
-16 15
-16 15
- VIDEO STANDARD : You can control NTSC / PAL, Video level,
Sync level, Burst level.

26
WDR Digital Sensor Color Dome Camera
27
WDR Digital Sensor Color Dome Camera
● FREEZE : View still pictures.
- OFF / ON selectable
●FLIP : OFF / HORIZ / VERT / BOTH selectable
●SHARPNESS : The outline of the video image becomes cleaner and
more distinctive as the level of SHARPNESS increases. If the level gose
up excessively, however, it may affect the video image and generate noise.
- The available range of level is -8 ~ 8
●COLOR GAIN : To control the color level in the video.
- The available range of level is -8 ~ 8
●GAMMA : Users can change the gamma setting between 25 and100
IMAGE
FREEZE
FLIP
SHARPNESS
COLOR GAIN
GAMMA
PREVIOUS PAGE..
OFF
OFF
-8 4 8
2
-8 8
2545 100
BOTHVERT
HORIZOFF
●DZOOM : Digital P/T/Z are used to create a zoom lens effect.
Zoom Factor (1X to 8X), Pan(±100%, center of image can be moved
to left and right edges of screen), Tilt(±100%, center of image can
be moved to top and bottom edges of screen)
●MOTION : This product has a feature that allows you to observe
movements of objects in on the screen, hence a single individual can
conduct supervision efficiently.
The camera detects an object's movement by sensing disparity of
outline, and level of brightness and color.
MOTION DETECTION
ACTIVITY THR.
MESSAGE TIME
SETUP MOTION ZONE..
PREVIOUS PAGE.
0 25 225
1 3 10
DZOOM
ZOOM
PAN
TILT
PREVIOUS PAGE..
1
0
0
-100 100
112
-100 100
MOTION ZONE SETUP
■How to Use the Camera

28
WDR Digital Sensor Color Dome Camera
29
WDR Digital Sensor Color Dome Camera
●PRIVACY SETUP : Hide an area you want to hide on the screen.
ㆍWhite : MOTION ZONE Position movement
Green : MOTION ZONE Size enlargement
Red : MOTION ZONE Size reduction
ㆍFor MOTION ZONE Confirm, long press SET button
PRIVACY MASK SETUP
PRIVACY MASK
MASK COLOR
PREVIOUS PAGE.
OFF
WHITE
ENABLE MASKS (1 to 6)
MASK 1
MASK 2
MASK 3
MASK 4
MASK 5
MASK 6
PREV. NEXT.
ON
OFF
OFF
OFF
OFF
OFF
ENABLE MASKS (7 to 12)
MASK 7
MASK 8
MASK 9
MASK 10
MASK 11
MASK 12
PREV. NEXT.
OFF
OFF
OFF
OFF
OFF
OFF
ㆍWhite : PRIVACY-ZONE
Position movement
Blue : PRIVACY-ZONE Size
enlargement or reduction
ㆍFor PRIVACY-ZONE Confirm,
long press SET button
■How to Use the Camera
●RS485 SETUP : This function sets up the camera communication
status when controlling the camera through an external control device.
RS485 SETUP
CAMERA # :
PROTOCOL
BAUD RATE
PREVIOUS PAGE.
1 < 1 > 255
PELCO-D
< 2400 >
< 4800 >
< 9600 >
< 19200 >
●SYNC : Two synchronization modes are available, INTERNAL and
EXTERNAL LINELOCK. In LINE-LOCK mode, it synchronizes the
video signal between cameras without a synchronous generator.
The line-lock synchronization is only used in areas of 60Hz (NTSC)
/ 50Hz (PAL).
- INT : Internal synchronization
- LL : External line-lock synchronization
ㆍIf 'LL' is selected, it can be adjusted to the desired phase.
Press the SET button.
ㆍAdjust to the desired phase from 0 to 624.
LINE LOCK
V PHASE
PREVIOUS PAGE.
0 519 624
EXIT MENU.
Saves all the setting menus and then exits.

30
WDR Digital Sensor Color Dome Camera
31
WDR Digital Sensor Color Dome Camera
■
Troubleshooting
Problem
The Motion Detection
function does not
work.
Color is not correct.
•Check that MOTION DET in the SPECIAL SETUP
is not set to 'OFF'.
•
Check the WHITE BAL settings in the SETUP menu.
The screen flickers
continually.
•Check that the camera is not facing toward the
sun.
RS-485
communication fails.
•
Check the polarity between the RS-485 Control Port
and the RS-485 cable.
•Check the RS-485 Communication default settings.
*RS-485 Communication default settings are:
Solution
RS-485 Control Port
485 Control Board Connection Port
485+
(+) CONNECTION TERMINAL (TRX+)
(-) CONNECTION TERMINAL (TRX-)
485-
Item
Initial value
BAUD RATECamera ID
1 2400
If you have trouble operating your camera, refer to the following table.
If the guidelines do not enable you to solve the problem, contact an
authorized technician.
Problem
Nothing appears on
the screen.
The image on the
screen is dim.
•Check the power connections.
•Check the VIDEO signal line connection.
•
Make sure the lens is clean. Clean the lens with a
soft clean lint free cloth.
•Adjust the monitor contrast & brightness controls.
•
Re-position the camera if necessary.
The image on the
screen is dark.
•Adjust the contrast control of the monitor.
•
If you have an intermediate device, set the 75Ω/ Hi-z
properly.
The camera is not working
properly, and the surface
of the camera is hot.
•Check that an appropriate power source is
connected to the camera.
The DAY/NIGHT menu
does not work.
•Check that AGC in the EXPOSURE menu is set
to 'OFF'.
Solution

ITEM
Image Sensor
Effective Pixels
Dynamic Range
Horizontal Resolution
Min. Illumination
Day & Night
White Balance
WB Range
Shutter Speed
Sens-up
Privacy Masking
Remote Control
AGC
Image Flip
Camera ID
S/N Ratio
Video Output
OSD
Sync. System
Operating Humidity
Operating Temp.
PIXIM 1/3" High Sensitivity Digital Sensor
758(H) x 540(V)
120dB(Max), 102dB(Typical)
690TVL Effective
0.1Lux
Auto / Color / B/W / EXTERN
Auto / AWB / Indoor / Outdoor / Manual
2000˚K~11,000˚K
up to 1/30, 720 sec
Auto / Off (Selectable x2 ~ x32)
12 Zones
RS-485
Low / Auto / High / Off
Horizontal and Vertical
On / Off
More than 50dB
Composite video output 75 ohm terminated
Built-in
Internal / Line Lock
30% ~ 90% RH
-10˚C to 50˚
NTSC PAL
Power Consumption
AC24V / DC12V DC12V
170mA(AC24V)/250mA(DC12V)
160mA
AC24V / DC12V DC12V
170mA(AC24V)/250mA(DC12V)
160mA
32
WDR Digital Sensor Color Dome Camera
■Specifications

Printed in KOREA
WDR Digital Sensor Color Dome Camera
WDR Digital Sensor
Color Dome Camera
Instruction Guide
Table of contents
Other VSS Nederland Security Camera manuals