Vuescape 61000084 Operation manual

10.4 Digital Photo Frame
Item Number: 61000084
Installation & User’s Guide
All brand names and trademarks are the property of their respective owners

2
FCC Norm
FCC
This equipment has been tested and complies with limits for Class B digital devices pursuant to Part 15
of Federal Communications Commission (FCC) rules.
FCC Compliance Statement
These limits are designed to provide reasonable protection against frequency interference in residential
installations. This equipment generates, and radiates radio frequency energy, and if not installed properly
or used in accordance with the instructions, may cause harmful interference to radio communication.
However, there is no guarantee that interference will not occur in television reception, which can be
determined by turning the equipment on and off. Interference may be corrected by one or more of the
following measures:
Reorient or relocate the receiving antenna
Increase the separation between the equipment and the receiver
Plug the equipment into an outlet on a circuit different from that to which the receiver is
connected.
CAUTION!
The Federal Communications Commission warns the user that changes or modifications to the unit not
expressly approved by the party responsible for compliance could void the user’s authority to operate the
equipment.

3
Contents
Precautions...................................................................................................................................... 4
Overview .......................................................................................................................................... 5
Quick Start Guide ............................................................................................................................ 5
Easel Stand to the Digital Photo Frame…………………..……………………………………………..6
Package Contents ........................................................................................................................... 7
10.4” Digital Photo Frame............................................................................................................... 7
Installation and Setup of Accessories........................................................................................... 8
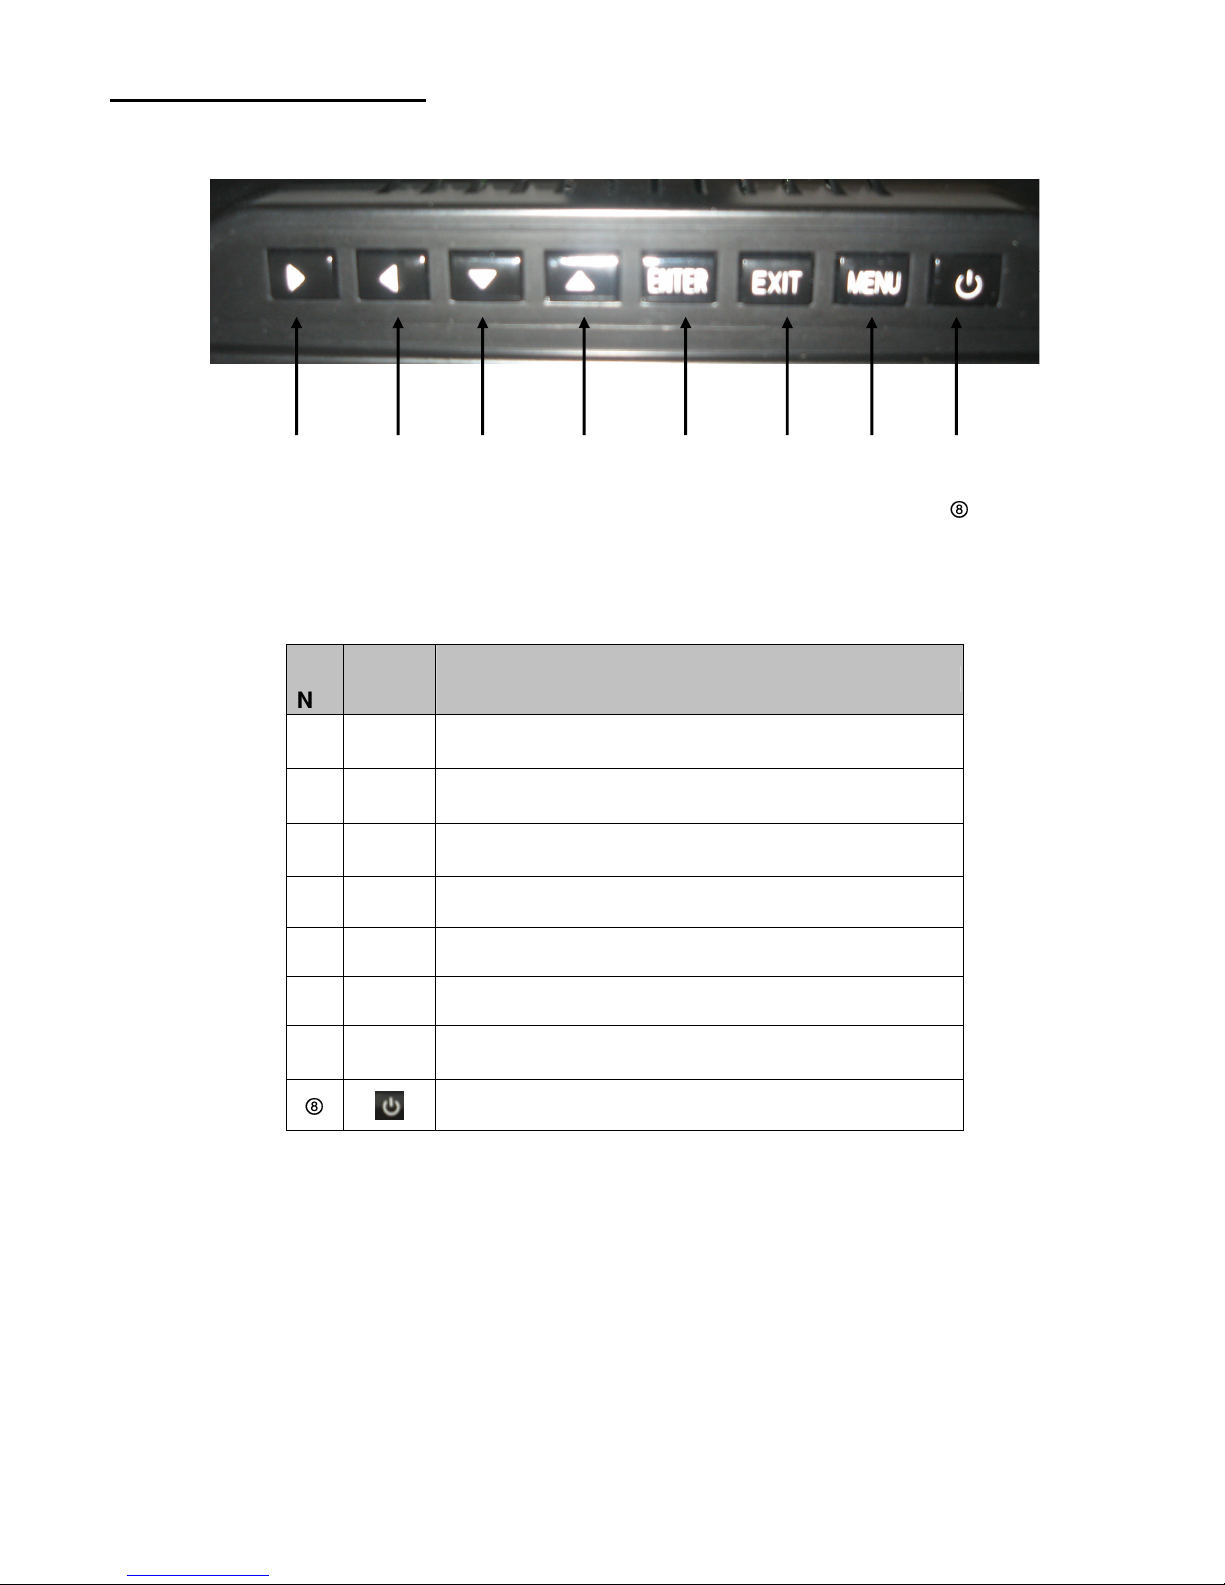
Menu Control Buttons..................................................................................................................... 9
Remote Control Operation............................................................................................................ 10
Changing the Battery in the Remote Control…………………………………………………………10
On Screen Display (OSD) Main Menu………………………………………………………………11-13
Specifications ................................................................................................................................ 14
Troubleshooting ............................................................................................................................ 15
Maintenance................................................................................................................................... 16
Service Procedure......................................................................................................................... 17
Warranty ......................................................................................................................................... 18

4
Precautions
1. Read all of these instructions and save this manual for later use.
2. Follow all warnings and instructions on the product.
3. Do not insert sharp objects or spill liquid into the digital photo frame through the cabinet slots; this
may cause accidental fire, electric shock or failure.
4. Unplug the unit when not in use for an extended period of time.
5. Unplug the unit from power outlet before cleaning.
6. Do not attempt to service this product yourself, as opening or removing the cover may expose
you to potential electric shock. Only a qualified technician should service this product.
7. Do not apply pressure to the screen, the LCD screen is very delicate.
8. Keep the digital photo frame away from extreme heat, cold or humid places.
9. Do not place directly under sunlight, dusty surroundings or near equipment which may
generate strong magnetic fields.
10.Do not place any object on the power cord.

5
Overview
•The 9” Digital Photo Frame enables you to view digital photos, videos and play music files from
different types of memory cards simply and quickly. There’s no need to use a computer. You can
enjoy your photos anytime and anywhere. It’s very convenient and quick.
•The Digital Photo Frame does not require a direct connection to a computer. The built-in card
reader can read a wide assortment of the most popular memory cards.
•The Digital Photo frame supports CF, SD, MMC, MS and MS Pro memory cards via the built-in
card reader, and camera via the USB port.
•Automatic slideshow with multiple transition effects and adjustable display time
•Plays slideshow.
•Plays MP3 music.
•Plays MPEG1, MPEG2 and MPEG4 files stored on supported memory cards or external USB
devices.
Quick Start Guide
1. Insert your CF, SD, MMC, MS and MS Pro memory card found in your digital camera into the card
slot on the side of the Digital Photo Frame. The Digital Photo Frame will initialize and display your
media in a slide show format.
2. Plug the DC power adapter cable into the DC + 12V input and plug the AC end of the adapter into
a normal AC outlet.

6
Easel Stand to the Digital Photo Frame
1. Clear a flat clean area to set your photo frame down upon in order to attach the easel stand to the
back of the frame. Make sure there are no sharp objects in the area that can make contact with the
LCD screen of the photo frame that may cause damage to the screen.
Stand is attached at the back of the unit. Simply pull the stand up to desired angle.
2. The length can be adjusted by pushing the lock and then pull the stand.

7
Package Contents
9” Digital Photo Frame
Plastic Frame (1 black
and 1 wood tone
frame)
Power Adapter
User’s Manual
Remote
USB Cable
AV Cable
10.4” Digital Photo Frame
LCD Screen
Remote Control Receiver
Plastic Frame

8
Instillation and Setup of Accessories
1. Carefully position your Digital Photo Frame so that you can see all of the connection ports on the side of the frame.
2. Plug the DC Power Adapter Cable into the DC +12V input, and plug the AC end of the adapter into a normal AC
outlet.
3. The photo frame has built-in speakers but you may listen to the audio program by plugging in the Earphone Cable
to the Earphone outlet.
4. To view your pictures on TV you can plug the AV Cable into the AV port and connect to the proper input on your TV
or DVD player.
5. In order to view pictures, video and listen to music: insert the CF, SD, MMC, MS and MS Pro Memory Cards into the
correct slot on the side panel of the photo frame. You may also connect a camera directly through a USB cable.
6.

9
Menu Control Buttons
No.
Symbol
Function
Moves the cursor Right
Moves the cursor Left
Moves the cursor Down
Moves the cursor Up
ENTER
Access the function selected
EXIT
MENU Goes to the main OSD Menu
Turn the unit on or off

10
Remote Control Operation
1. MUTE: Mutes the volume
2. AV OUT: Switch to AV mode
3. POWER: Turn the unit on or off
4. PHOTO: Goes to the Photo Setup and
displays the photo files
5. MUSIC: Goes to the Music Setup and
displays the music files
6. MOVIE: Goes to the MOVIE Setup and
displays the video files
7. SETUP: Goes to setup mode
8. : Move the cursor up/down/left/right
when making a selection
9. MENU: Goes to the main OSD Menu
10. ENTER: Access the function selected
11. : Pause and play the media
12. STOP:
13. VOL+ / VOL-: Increase / decrease the
volume
14. :Rewinds and forwards the movie
15. : Goes to the previous / next file
Changing the Battery in the Remote Control
Hold the remote control, squeeze the button to the right, and pull the battery tray out. Then re-place the battery (model
CR2025) inside the tray with the “+” polarity facing up, and then push the tray back to its place.

11
On Screen Display (OSD) Main Menu
1. Turn on the Digital Photo Frame to display the OSD menu.
2. Select the desired function menu, by pressing “
“, “
“, “
” or the “
” button and press “ENTER”.
3. Select the storage media type that you have the media save, by pressing “
“, “
“, “
” or the “
” button and press
“ENTER”.
PHOTO
Provides a list of
photos that you
have saved on the
card and allows you
to see the photos.
MUSIC
Provides a list of
song(s) that you
have saved on the
card and plays the
song.

12
COMBO
Allows you to select
the movie/video
and MP3 music
clip(s) that you have
saved on the card
as background
music
VIDEO
Allows you to select
the movie/video
clip(s) that you have
saved on the card.
TEXT
Allows you to select
and read txt file
EDIT
Allows you to edit
your files. Press
right arrow to select
a file then press
stop. Then you can
choose to copy,
paste or delete the
file.

13
SETUP
Allows you to select
languages,
slideshow, clock,
alarm and color
settings or reset.
CALENDAR
Allows you to set
the date on the
digital photo
frame.

14
Specifications
LCD Panel Type
Viewing Angle
Contrast Ratio
Brightness
Response Time
Resolution
Aspect Ratio
10.4” TFT LCD Display
H: 120°, V: 120
300 : 1
400 cd/m2
30ms
640 X 480
4 : 3
Supported Formats Type
MP3, JPEG, MPEG1, MPEG 2 and MPEG4
Built-in Card Reader
Type
CF, SD, MMC, MS and MS Pro memory card
Media
Audio
Photo
Video
Functions
File Format
File Format
File Format
Video Play – A/V Output
MP3
JPEG
MPEG1, MPEG2 and MPEG4
Built-in Speakers 2 x speakers 1Watt
Power Voltage
Current
Consumption
100-240V DC 12V
2A
Active < 9 Watt Max
Slideshow
Pictures File Format JPEG
Operating Condition Temperature
Air Humidity
15°C~50°C
20% ~ 80% R.H.
Dimensions Physical 11.625” (W) 1.625” (H) 9.25” (D)
Net Weight 2.2 lbs
Regulation (Certifications) FCC
Accessories UL Adaptor, Remote Control, USB Cable, AV Cable and
User ‘s Manual.

15
Troubleshooting (FAQ)
1. Q: What type of file formats does the Digital Photo Frame support?
A: Support JPEG, MP3, MPEG 1, MPEG 2 and MPEG 4
2. Q: Why are some of my photos not able to be displayed on the viewer?
A: Most digital cameras take and save the photos in a JPEG format which allows the digital photo frame to
display the photos. However, some images (for example web page images, scanned images, or RAW
format photos taken by special cameras) may not be supported.
3. Q: There is no picture on the screen?
A: Make sure the flash card is installed properly in the flash card reader.
Verify the power adapter is connected properly to the power outlet and DC input on the digital picture
frame.
Turn off the Digital Photo Frame and reinsert the memory card properly.

16
Maintenance
To clean your digital photo frame, please refer to the instructions below:
NOTE: To prevent electrical shock, do not open the Digital Photo Frame casing. Leave repair of
the frame to qualified personnel, please see the tech support information in the warranty.
1. Unplug the power
Unplug the Digital Photo Frame power adapter from the AC socket before cleaning the monitor.
2. Check the cover
Check to see if the frame and accessories are damaged, broken, or strained. If so, please consult the
warranty card for Tech Support information.
3. Clean
Never spray or pour any liquid directly onto the screen or frame. Avoid allowing any water or liquid from
entering the Digital Photo Frame or accessories.
4. Cleaner
Use water or non-ammonia/non-alcohol based glass cleaner. Do not use harsh or abrasive cleaners
such as ketene (such as acetone), ethanol, toluene, acetic acid, methane, chloride, or other detergents
to clean the digital photo frame , these chemicals can damage the LCD screen or the frame.
5. Screen
To clean your LCD screen or case, use water or a mild cleaner, as listed above. Moisten a soft, clean
cloth or if possible, use a special screen cleaner sheet or a solution suitable for static electricity
application. Using any cleaner other than water or a mild cleaner may damage your digital photo frame
and will not be covered under the warranty.
6. Storage of Unit
If the Digital Photo Frame is not in use for a long time, please unplug it and store it in its original box in
order to avoid any damage.
7. Disclaimer
Any damage resulting from use of any cleaner that is not mentioned above is not covered under the
terms of the warranty on this product.

17
Service Procedure
For technical support after the first 14 days of purchase, please call the toll free number below to obtain
service. A customer service representative will assist you and provide a return authorization number (RA
number) if needed allowing you to ship your product to the service center.
DO NOT RETURN THIS PRODUCT TO THE STORE. PLEASE CONTACT THE TOLL FREE
NUMBER LISTED BELOW
Please have the following information available when you call the service center:
Your Name and Address
Date of Purchase
Model Number
Serial Number
Store Name and Address
Store Location Number
Type of problem with the Unit
After receipt of the RA number:
Send the complete unit, including power cord and adapter in the original carton to the address below.
Include a copy of the original receipt for proof of purchase (within 90 days).
Write the RA number on the outside of the package. Packages without RA numbers will not be
accepted.
The Digital Photo Frame is fragile. Use extreme care when handling and packaging the unit.
The purchaser is responsible for any shipping charges to the repair facility and assumes all risk.
The service center will repair or replace the unit and send it back to the purchaser within 10 working
days from receipt of the unit.
To contact the service facility, please call 508-435-4830 or 800-639-3803. The address for this facility is:
Fourstar Group
26840 Fargo Ave. Unit C
Bedford Heights, OH 44146
Email Support: techsupport@fourstari.com

18
Warranty
90 Days Limited Warranty
This product is warranted to be free from defects in material and workmanship for a period of 90 days.
Warranty obligations are limited to replacement or repair of defective parts and components, at the option
of the manufacturer. The warranty of this product is null and void if the product is subjected to negligence,
abuse, modification, misuse, accident or if the customer uses the product for a function it was not
intended for. This warranty is only valid for the original purchaser of this product and will not be honored
if the product is resold. This warranty gives you specific legal rights, and you may also have other
rights which vary from state to state.
The manufacturer will not be liable for incidental or consequential damages caused by the use of this
product. The manufacture will not be liable for any costs such as lost profits or revenues, cost of
temporary replacements, loss of data, loss of equipment or use of equipment or any claims by third
parties.
After 14 days from purchasing the product, please call the phone number mentioned below to obtain
service. DO NOT RETURN THIS PRODUCT TO THE STORE. A customer representative will give you a
return authorization (RA number) allowing you to ship the product to the service center. The purchaser
must have a copy of the original receipt for proof of purchase within 90 days. The purchaser of this
product is responsible for any shipping charges to the repair facility. The manufacturer service center will
repair or replace the unit in question and send it back to the purchaser within 10 working days of receipt
of the unit.
In order to contact the service facility, please call 508-435-4830 or 800-639-3803.
The address for this facility is:
Fourstar Group
26840 Fargo Ave. Unit C
Bedford Heights, OH 44146
Table of contents
Other Vuescape Digital Photo Frame manuals