Wahl Quick Cut 9314-300 User manual

'
\
I
QUICKg
~
--
BYWAHL
~
HAIRCUTTING
KIT
Easy
step-by-step
instructions included
Long-lasting metal
blades
5 Guide combs
rangin_g
from
1/8"
to
1"
allow
for
full
haircuts
\
SAVE
TIME
&
MONEY

0ram:m~
w.mn
~
'if
~~mmiw
lmh~
m;p
©lliaffi--
No
. 2
~IA" (6mm)
Blade G
uar
d
·30·
.Tw
o-yea~
oA
v
. .
~
h
m1t
ed w
arrantv,
,..
,,~
details
inside
.
Valid
in
u.s.
A".'
only
.
Outside
U.S.A.
check
with
store for
Wahl
authorized distributor's warranty.
This
product
is
not intended
fo
r
professional
use
; warranty
void
if used
comme
r
cially
.
Styling
Como
CUICl(g
B
Y.
WAHL•
Long-lasting
metal blades
~ra
~:f;)
~~
HOME
HAIRCUTTING
KhD
laaf
•ic•lf
~
~\'!JW.1~•1•i,,n,lf0!!

QUICKS
BY
WAHL®
},,
~
~-
\j
.,
. Durable & ,
:>
powerful
moto
"."l.'
_.~
,.'
..
.k .
•·
c . .

! QUICK[
i ....._
___
BYWAHL
®
SAVE
TIME
&
MONEY
Join
the
40 million
households
that
save
time
&
money
with
convenience
of
cutting
hair
at
home
~
Wahl®
makes
..
Questions?
Friendly &
kna.wledgeable
it
easy!
.7~...
•
customer
service
representative
located
in
SterIing, IL USA
M
onday
-Friday 8am -
4pm
CST
1-800-767-9245 •
info@wahlclipper
.com

D · 43917 93142 5

(QUl~w~@
Easy
s
tep
:by:step instructions included
Long-lasting
metal
blades
SAVE
TIME
&
MONEY

TIPS & TECHNIQUES
When
you
cut
your
hair
,
you
should
visualize
the
head
as
1f
it
were
divided
into
four
sections
Image
below
shows
the
different
sections
Using
proper
techniques
when
moving
from
one
section
to
the
next
will
help
you
bl
end
the
sechons
together
for
professional
looking
resulls
Section
4:
Top
of
the
head
Section
3:
The
r
im
or
side
Section
1:
The
neckl
ine
•
The
fir
st
11
me
you
c
ut
hair
,c
ul
o
nly
a
sma
ll
amount
of
ha
irunlll
you
llcCCJllllJ
accus
t
omed
to
th
e
leng
th
ol
hair
eac
h
alla
c
hm
en
l
guarcf
pr
o
vid
es
For
be
sl
re
s
ult
s,
hair
sh
ou
ld
be
dry
before
us
ing
c
l1pn
cr
•
For
be
st
resulls.
wh
en
c
ut1111g
hair
.
go
lhrough
hau
at
,1
slo
w.
ovc11
wcrn
J
0011
I
for
ce
th
ec
lipper
thr
ough
th
e
hair
•
For
best
r
es
ults
.
go
through
111
0
hai1
again
st
th
o
d11o
c
t1on
of
your
hoir\
g1uwth
so
you
can
ca
t
ch
more
ha11
w1lh
111
0
guard
• l he
blad
es
on
your
newc
llpp
e1
s
hould
bo
oiled
ove1
y few
ha
11
cuts
1
Comb
hair
an
d
remove
tangles
Attach
the
largest
attachment
guard
to
the
clipper
(lUJld
#{
STEP-BY-STEP
GUID~
FOR CUTTING HAIR
2
Start
at
hauline
on
side
of
head
and
cut
up
to
middle
of
head
Note
II
cu1
h1lr
Is
loo
l
ong
repeal with
..
11
smaller
gu1rd
3
Continue
around
head
repeating
step
2
~
on
t
bann
area
••
•••••••••
Middle
.,
••••••••••••••
4
You
are
now
ready
to
cut
the
middle
portion
ol
the
ha11
8
Cut
aaoss
top
of
r
oo
Caro
l:;i,r
on
ent,re
head
to
as:.ess
rt
furtt.:r
cutt
lllJ
is
necP,SSary

BLENDING
V\ll
)t'n \
OU
\\
J
nt
ll
n1:.11J
trvm
.:i,~
S..."-''
,~"
;l·
~hf~
\-
\ll.
J
,,
11
llt
't"\l to
t1
rd
fh(..'P
m0\'
1110
th
e
Clippp1
In
cln
UP
ll.l
lil
1
,1':
"
no
m,1t1.,1
":-
".le,,a
I\
l
c.1\e
tne
1~
1
11
sligllll
\
lo11oe1
11
he
1e
l
hp
cli
~o
?r
p
ulls
a
.1
J1
,.,,m
:~
,:
...
1·n
C\i'.' oJ
h'1
J
,,
, h
t'Oc!
betwee
n
tlw
st>Cl
Ion
sand ac
hieve
a
smootil
11ans
I110,
r,
,,
11
('fl<' t'n,n
01
'\
, ,,,
rt.>
nr,r
Tn,s
lt'l:hn
,
oue
111
11
enli.mce
Ille
app
eJ
rancr
011
ou·
'"kw,u:s
B
lend
out
ani
cu:
Im
es
L
ines
'™I
io:11
I\
1e
le \
'OU
change
guaro
sizes
USe
the
sam
e
gu
ard
used
in
step
3.
OUTLINING
1.No
attachments
needed
. 2.
Continue
around
ear
as
3.
Tri
m
ne
ck
lin
e
as
shown
.
Start
with
the
sideburns
.
shown
.
WARRANTY
2-YEAR
LIMITED
WARRANTY
-
CORDED
CLIPPER
/
BATTERY
TRIMMER
Valid
Ill usA.
Only
II
yolll
Wahl
p1odu
cl
tails
loo
pcia
tc
sat
1slact
o11
Iyw
1t1
1In
two
(2)
yea,s
l
rom
lhe
dat
e
ol
or
igin
al
Plll
C
ha
se
Of
1
ccc
Ip1
asa
gill
.
Wa
hl
will
.at
ow
op
t
io
n,
,cpair
or
replace
II
and
re
turn
ii
to
you
FREE
OF
C
HARGE
.
Do
not
return
this
product
to
store
where
purchased
.
Prod
uc
tsn
eeding
repa
ir
unde
r
ll
us
wa,ranty
sh
ould
be
,e
tu
rne
d
with
postage
pr
epai
d
to
:
Wahl
Clipper
Corp
.
Attn
:
Repa
ir
Departmen
t ·
3001
locust
Street
,
Ste
r
ling
,
Illinois
61081
In
clude
a
note
des
c
ribing
th
e
de
l
ec
t
and
the
da
teol o
rig
inal
purch
ase
orr
eceip
t
as
a
gilt
(if
in
wa,ranty)
.
P,oduc
ts
ou
t
of
warran
tywill
be
r
epa
i
re
dat
ou
r
standa
rd
repair
charges
.
Th
is
wa11anty
is
void
an
dno
repa
ir
or
rep
l
acement
will
be
made
und
er
th
is
warra
nt
y
or
otherw
ise
if
:(1)
Tile
p1oduct
ism
odil
i
ed
in
any
ma
n
ne,
or
repai
r
ed
by
anyone
oth
er
th
an
Wah
l
Clipper
C01p01at1on
or
Wahl
au
thor
ized
se
rvi
ce ce
nter.
(2)
The
produ
ct
ha
s
been
u
sed
c
ommercially
or
subjec
t
ed
to
umeas
on
able
use
.
This
warranty
gives
yo
u
specific
l
egal
rig
ht
s
an
d
you
may
also
h
ave
other
rights
which
may
vary
lrom
st
ate
to
state Noo
th
er
wri
tten
express
warranty
is
given
Any
im
pli
ed
warran
ty.
inc
l
uding
any
warranty
ol
merchan
l
abi
l
ity
whicl1
may
ar
is
e
lrom
pur
chase
or
use
,
is
limited
tot
he
year
period
pr
ovide
d
in
ll
1is
express
warranly
Some
states
may
no
t
al
l
ow
such
limitat
i
on,
so
it
may
n
ot
apply
to
you
No
responsibi
lit
yIs
assumed
101
incidental
01
consequential
damages
ol
any
type.
or
lor
the
u
se
ol
unautho
rize
d
atta
c
hmen
ts
So
me
st
at
es
may
not
allow
th
e
exclus
io
n
01
limitati
on
ol inc
idental
or
co
ns
eq
uen
t
ia
l
damag
es.
so
th
e
limi
tat
ion
or
exclusion
ma
ynota
ppl
y
to
you
.
Outside
U
.S.
A,ch
ec
k
with
sto
rel
or
Wahl
a
uthorized
dis
t,ibut
or's
warrant
y
Please
register
your
Wahl
Clipper
online
at
:
grooming
.
wahl.com
Purchase
Confirmation
-
Wi
th
th
e information
you
provide
,
we
con
linn
th
e
date
of
purc
h
ase
ol
yo
ur
produ
c
t.
This
co
nfirmat
io
n
is
of
ben
ef
it
to
yo
u,
es
p
ecia
lly ii
yo
ur
origin
al
proo
f of
pu
rcl
1a
se
is lost.
Proof
ol
Ownership
-
Your
UPC
nu
mbe
r, it
em
number
an
d o
th
er
in
f
ormat
i
on
will
be
k
ep
t
111
our f
iles
for
up
to
te
n
years
.
Question?
contact
us
at:
www.grooming.wahl.com
or
1-
800
-
767
-
9245
Part #56527-300
v20
" 01
C 2017
WAH
L CLIPP
ER
CORPOA
ATIOU
PO
8
0.-.
578 Sterhng
t11m
o1s
6
10
81
USA
Pr1111
eo m
Ch111J
HOME
HAIRCUTTING
PERFORMER
®
QUICKS:
'
-
BY
WAHL:
---
BY
WAHL
"

EASY-TO-USE
ATTACHMENT
GUARDS
Some
kits
do
not
include
all
size
Wahl
guards.
ADDING
GUARDS:
Pictured
in
fig
A&
fig
B
#½
(1
5mi)
1
/
16"
-
#1
(Jrm)1/a"
-
#1
½(4
5mi)3/16"
~
112_
(furn)¼
"
~
#3
(
1Dmi)
3/a"
~
'4
·
(1:hn)1/2
"
~
#5
(16im)5/s
"
~
16
(1!irm)
3
/4
"
~
#7rz;rm,)7/B'
'
~
#8
(25-rm)1"
~
Rgtfar~
~
wtfarT~
~
•
Attachment
guards
help
you
cut
hair
to
a
desired
length
by
keeping
the
blades
at
set
distance
from
the
skin
helping
ensure
an
even
hair
length
when
cutting
hair
with
a
clipper
.
For
reference,
each
guard
is
numbered
and
also
lists
what
the
length
of
the
hair
will
be
after
being
cut.
•
Attachment
guard
sizes
vary
.
Always
start
with
a
longer
length
guard
(you
can
always
use
a
shorter
length
guard
if
the
length
is
not
short
enough)
.
•
The
first
time
you
cut
hair,
cut
only
a
small
amount
of
hair
until
you
become
accustomed
to
the
length
of
hair
each
attachment
guard
provides
.
Belore
adding
guards
.
ma
ke
sure
the
on
/o
f!
s
wit
ch
is
turn
ed
to
the
"O"
or
"
OFF
"
position
.
1.
While
holding
at
a
slight
angle
,
place
the
att
a
chment
guard
onto
the
clipper
so
the
tips
of
the
blade
rests
into
the
slots
of
the
guard
fingers
.
(fig
A)
2.
Using
your
thumb,
push
down
on
the
guard
,wh
ere
t
he
guard
size
number
is
located,
until
you
hear
a"
SNAP
".
(fig
B)
REMOVING
GUARDS:
Pictured
In
fig
C
Before
removing
guards
,
mak
esu
re
the
on/of!
switch
is
turned
lo
the
"O"
or
"OFF
"
position
.
1.
While
holding
the
top
of
attachment
guar
d,pl
ace
your
thumb
on
the
underside
of
the
attachment
guard
tab
.
Push
up
on
tab
to
remove
guard
from
clipper.
(fig
C)
fig.
A
fig.
B
ig.
B
fig.
C -
---
-

EARS
Some
kits
do
not
include
ear
taper
guards.
To
achieve
a'
1ap
e
red
"c
ut
a
rou
nd
the
ears
,
use
the
le
tt
and
ri
ght
ta
pere
d
attachme
nt
gua
r
ds
1)
Attach
the
"
R"
RIGHT
atta
c
hme
nt
gu
a
rd
to
the
cli
ppe
r.
fig.
A)
First.
start
in
gb
ehind
the
RI
G
HT
ear
(
so
shorter
p
ortion
of
gu
a
rd
fi
ngers
a
re
c
losest
to
the
ear
),m
ov
ethec
li
p
per
upward
and
a
rou
nd
to
wards
the
fr
o
nt
side
of
the
ear.
Repeat
as
needed
.
fig
B)
Second
,
start
i
ng
ont
he
f
ro
nt
of
the
LEFT
ea
r.
(
so
shorter
portion
of
guard
fingers
are
closest
to
the
ea
r
),
mov
et
he
cl
ip
pe
r
upward
and
around
towards
the
back
side
of
the
ear.
Repeat
as
neede
d.
.'\
. ,
' '
--,
1$;
"'v
fig
.A
fig
.B
2)
Repeat
,
except
now
using
the
"L•
LEFT
guard.
Attach
the
"L"
LEFT
attachment
guard
to
the
clipper
.
fig
.
A)
First,
starting
behind
the
LEFT
ear
(so
shorter
portion
of
guard
fingers
are
closest
to
the
ear)
,
move
the
clipper
upward
and
around
towards
the
front
side
of
t
he
ear
.
Repeat
as
needed
.
fig
.
B)
Second,
starting
on
the
front
of
the
RIGHT
ear,
(so
shorter
portion
of
guard
fingers
are
closest
to
the
ear),
move
the
clipper
upward
and
around
towards
the
back
side
of
the
ear.
Repeat
as
needed
.
fig
.A f
ig
.B
YOUR
NEW
CLIPPER
Clipper
Blades
On/OH
Switch
'
Cord
Strain
Relief
Power
Cord
YOUR
NEW
BATTERY
TRIMMER
BATTERY
INSTRUCTIONS
Select
clipper
kits
include
a
battery
trimmer,
your
kit
may
or
may
not
include
a
trimmer
1.
Remove
battery
cove
r
from
trimmer
by
pushing
in
and
back
on
the
plast
ic
door
in
the
direc
t
ion
of
the
arrow
.
2.
IMPORTANT
:
Be
sure
to
i
nsert
the
negat
i
ve
(-
)
end
of
each
battery
first
,
so
that
it
depresses
the
spring
at
the
top
ol
the
battery
compartment
.
Then
sl
i
de
the
posit
i
ve
(+)
end
i
nto
pos
i
tion
. Do
not
allow
the
negative
terminal
cl
i
ps
to
bend
and
cut
t
he
casing
of
the
batteries
.
Use
alkaline
batter
i
es
with
your
Wahl
trimmer
.
Alkaline
batteries
will
provide
th
e
longest
op
erat
in
g
time
before
battery
replacement
is
needed
.
Trimmer
should
run
approximately
three
hours
on
alkaline
batteries.
3.
Repla
ce
battery
cover
to
its
original
pos
i
tion.
4.
Move
sw
i
tch
to"
ON
"
pos
i
tion
to
use
.
5. To
max
im
ize
battery
life
,t
rimmer
sho
ul
d
be
shut
"
OFF"
i
mmediate
ly
after
usin
g.

CLIPPER
MAINTENANCE
CLEANING:
To
remove
hair
from
between
the
bl
ades
.
use
the
cleaning
brush
provided
.
DO
NOT
USE
WATER
TO
CLEAN
THE
BLADES.
For
best
resu
l
ts
,
atter
brush
cleaning
the
blades
,
add
Wahl
clipper
oil
to
the
blades
.
OIL:
The
blades
on
your
new
cl
ipper
should
be
oiled
every
few
haircuts
.
Place
a
few
drops
of
Wahl
Clipper
Oil
on
the
teeth
(
front)
as
well
as
at
the
back
side
of
the
blade
.
Use
only
Wahl
Clipper
oil
(a
small
bottle
is
included
in
this
kit
,
additional
oil
can
be
purchased
separately,
see
www
.
grooming.Wahl.com
tor
details
).
DO
NOT
USE
HAIR
Oil,
GREASE,
OR
ANY
Oil
MIXED
WITH
KEROSENE
OR
ANY
SOLVENT.
\\\\\\\\\\\\\\\\\\\~\
j. • t
ALIGNING
CLIPPER
BLADES:
Your
Wahl
clipper
blades
were
oiled
and
aligned
before
leaving
our
factory
.
Blades
may
need
to
be
realigned
ii
they
have
been
bumped
or
removed
for
cleaning
.
To
determine
if
realignment
is
necessary,
compare
your
clipper
blades
with
this
sketch
.
1.
II
your
clipper
has
a
taper
lever
,
pos
i
tion
the
lever
in
the
closest
cut
(up)
position
.
2.
End
of
top
blade
teeth
should
be
approximately
1/32-inch
(.64
mm)
back
from
bottom
blade
.
3.
Extreme
lett-hand
tooth
of
top
blade
must
be
covering
or
to
the
left
of
the
first
small
tooth
of
bottom
blade
.
4.
Extreme
right-hand
tooth
of
top
blade
must
be
touching
the
big
tooth
on
the
bottom
blade
.
If
blade
alignment
is
incorrect,
add
a
few
drops
of
Wahl
Clipper
Oil
to
the
blades,
turn
clipper
"ON"
for
a
few
moments,
turn
"OFF"
and
unplug
.
Loosen
screws
slightly
and
adjust.
Tighten
screws
after
blades
are
aligned
.
Other
than
blades
,
this
clipper
has
no
user-serviceable
parts
.
~
~
IF
YOUR
CLIPPER
IS
TOO
NOISY:
(A)
Oil
blades
as
directed
in
prev
i
ous
section
of
this
instruction
booklet.
(B)
You
can
reduce
the
"clatter
sound
"
by
adjusting
the
power
screw
.
The
powe
r
screw
was
adjusted
for
peak
efficiency
before
leaving
the
factory.
However,
ii
voltage
in
your
home
is
too
high
or
low;
the
clipper
powe
r
screw
may
need
adjustment.
ADJUST
POWER
SCREW
TO
REDUCE
CLIPPER
NOISE
(excessive
clatter
i
ng)
:
1.
Turn
your
cl
i
pper
"ON"
2.
Use
the
end
of
the
cleaning
brush
or
a
screwdriver
to
turn
power
screw
ina
COUN
T
ER
CLOCKWISE
direction
until
clatter
goes
away
.
ADJUST
POWER
SCREW
FOR
MAXIMUM
POWER
SETTING
:
1.
Turn
your
clipper
"ON
"
2.
Use
the
end
of
the
cleaning
brush
or
a
screwdriver
to
turn
powe
r
screw
ina
CLOCKWISE
direction
until
you
hear
a
clattering
noise
.
3.
Then
turn
power
screw
in
opposite
direc
t
ion
(COUNTER
CLOCKWISE)
unt
il
clatter
i
ng
stops.
CORD:
The
cord
should
not
be
used
to
pull
the
clipper.
Since
freedom
of
movement
needs
to
be
maintained,
care
shou
ld
be
used
to
keep
the
cord
untwisted
and
unobstructed.
YOUR
CLIPPER
HAS
A
POLARIZED
PLUG:
To
reduce
the
risk
of
electric
shock,
this
appliance
has
a
polarized
plug
(one
plug
blade
is
wider
than
the
other).
This
plug
fits
in
a
polarized
outlet
only
one
way
.
In
the
event
the
plug
doesn
't
fit
fully
in
the
out
l
et,
reverse
the
plug
.
DO
NOT
CHANGE
THE
PLUG
IN
ANY
WAY.
TAPER
LEVER:
The
taper
lever
adds
versat
i
lity
to
your
cl
ipper
by
allowing
you
to
gradually
change
the
closeness
of
your
cut.
(Up
posit
i
on
=
closest
cut;
Down
position
=
longest
cut)
.
Should
the
blades
become
jammed
with
hai
r,
move
the
taper
lever
up
and
down
several
times
.
Th
iswi
ll
help
f
ree
up
the
blades
.

IMPORTANT
SAFEGUARDS
When
us
i
ng
your
el
ectr
i
cal
app
li
a
nc
e,
basic
precautions
should
always
be
followed
,i
nclud
in
g
th
ef
oll
ow
i
ng
:
READ
ALL
INSTRUCTIONS
AND
SAFEGUARDS
BEFORE
USING
THIS
APPLIANCE.
DANGER
To
reduce
the
risk
of
death
or
injury
by
electric
shock:
1.
Do
no
t
reach
f
or
an
app
li
ance
that
has
fallen
into
water.
Unplug
imm
ed
i
ate
lyf
ro
m
the
outlet.
Note
:
Some
electrical
parts
insi
de
the
app
li
an
ce
are
electrically
live
,
even
with
the
sw
i
tch
"o
ff
."
2.
Do
not
use
wh
il
e
ba
t
hing
or
in
a
shower
.
3.
Do
not
pl
ace
or
store
appliance
where
it
can
fall
or
be
pulled
into
at
ub
or
si
nk
.
Do
not
place
in
or
drop
into
water
or
other
liqu
id.
4.
Always
unplug
this
appliance
before
cleaning
. '
For
an
appliance
that
has
a
permanently
attached
cord:
5. Al
ways
unpl
ug
this
app
l
iance
from
the
electrical
outlet
i
mmedia
tel
yaf
ter
us
in
g.
For
an
appliance
that
has
a
rechargeable
battery:
6. Al
ways
unplug
the
charger
from
the
electrical
outlet
immed
i
ately
after
use
or
after
charging
the
battery
.
~
7.
(Recharg
e
able
Unit
Only)
Unplug
the
charger
before
using
app
l
iance
.
WARNING
To
reduce
the
risk
of
burns,
electrical
shock
or
injury
to
persons:
1.
This
appliance
can
be
used
by
children
aged
from
14
years
and
above
and
persons
with
reduced
physical
,
sensory
or
~ental
capabilities
_
or
lack
of
experience
and
knowledge
1f
they
have
been
given
supervision
or
instruction
,
by
a
person
re
s
ponsible
for
their
safety
,
concern
i
ng
the
use
of
the
appli
a
nce
in
a
safe
way
and
understand
the
hazards
i
nvolved.
Children
should
be
supervised
to
ensure
that
they
do
not
play
with
the
appliance
.
Cleaning
and
user
maintenance
shall
not
be
made
by
children
without
supervision
.
2.
Use
this
appliance
only
for
its
intended
use
as
described
in
this
manual.
Do
not
use
attachments
not
recommended
by
the
manufacturer.
3.
Never
operate
this
appliance
if
it
has
a
damaged
cord
or
plug,
if it
is
not
working
properly,
if
it
has
been
dropped
or
damaged,
or
if
it
has
been
dropped
into
water.
Return
the
appliance
to
Wahl
Clipper
Corporation
for
examination
and
repair.
4.
Keep
the
cord
away
from
heated
surfaces
.
5.
Never
operate
the
appliance
with
the
air
openings
blocked
or
while
on
a
soft
combustible
surface,
such
as
a
bed
or
eouch,
where
air
openings
may
be
blocked.
Keep
the
air
openings
(if
any)
free
from
lint,
hair
or
the
like
.
6.
Do
not
use
outdoors
or
operate
where
aerosol
(spray)
7.
8.
products
are
being
used
or
where
oxygen
is
being
administered.
Never
drop
or
insert
any
object
into
any
opening
.
Do
not
use
this
appliance
with
a
damaged
or
broken
comb
nor
with
teeth
missing
from
the
blades
,
as
injury
may
occur.
Before
use,
make
certain
blades
are
aligned
properly
.
(See
Clipper
Maintenance
Instructions
.
May
no
t
be
applicable
for
all
applicances
.)
9.
During
use
,
do
not
place
or
leave
the
appli
an
ce
wh
ere
it
is
expected
to
be
subject
to
damage
by
an an
imal,
or
e
xpo
s
ed
to
weather.
10.
To
disconnect,
turn
all
controls
to
"OFF,
"
th
en
rem
o
ve
plug
or
charger
from
outlet.
11.
Turn
all
controls
to
"
OFF
"
before
pl
a
cing
on
or
removing
blades
or
attachments
.
12
.
An
appliance
with
a
permanently
attached
cord
shou
ld
never
be
left
unattended
when
plugged
in
.
~
2018
Wahl
C
li
pper
Corporation
Part
No
.
93235
-
001
(v
.
201
7.1
2)
Printed
in
Ch
i
na
13.
Keep
thi
s
appliance
dry
.
For
an
appliance
that
has
a
rechargeable
battery:
14
.
Do
not
crush
,
disassemble,
heat
above
100
°c
(212
°
F)
,or
incinerate
t
he
appl
i
ance,
due
to
risk
of
fir
e,
explosion
,
or
burns
.
15
.
Use
only
the
charger
suppl
i
ed
by
the
manufa
ct
urer
to
recharge
.
16
.
This
charger
is
intended
to
be
correctly
orien
t
ated
ina
vert
i
cal
or
fl
oor
mount
pos
i
tion
.
17
.
Always
attach
plug
to
appl
i
ance
firs
t,
thento
outlet.
SAVE
THESE
INSTRUCTIONS
For
Household
Use
Only
For
Alkaline
Battery
Units:
l
Whe
n
discarding
an
old
battery
,
do
not
throw
it
in
to
fire
where
heat
could
cause
it
to
rupture
or
explode
.
Also,
do
not
attempt
to
r
echarge
alkaline
,
heavy-duty
,
or
lithium
batter
i
es
in
a
batte
ryc
harger.
Dispose
batte
ri
es
proper
ly.
2.
Risk
of
fi
re
and
burns
.
Do
not
recharge,
disassemble
,
or
inc
inerate
.
Keep
battery
out
of
reach
of
children.
Dispose
of
used
batteries
promptly
.
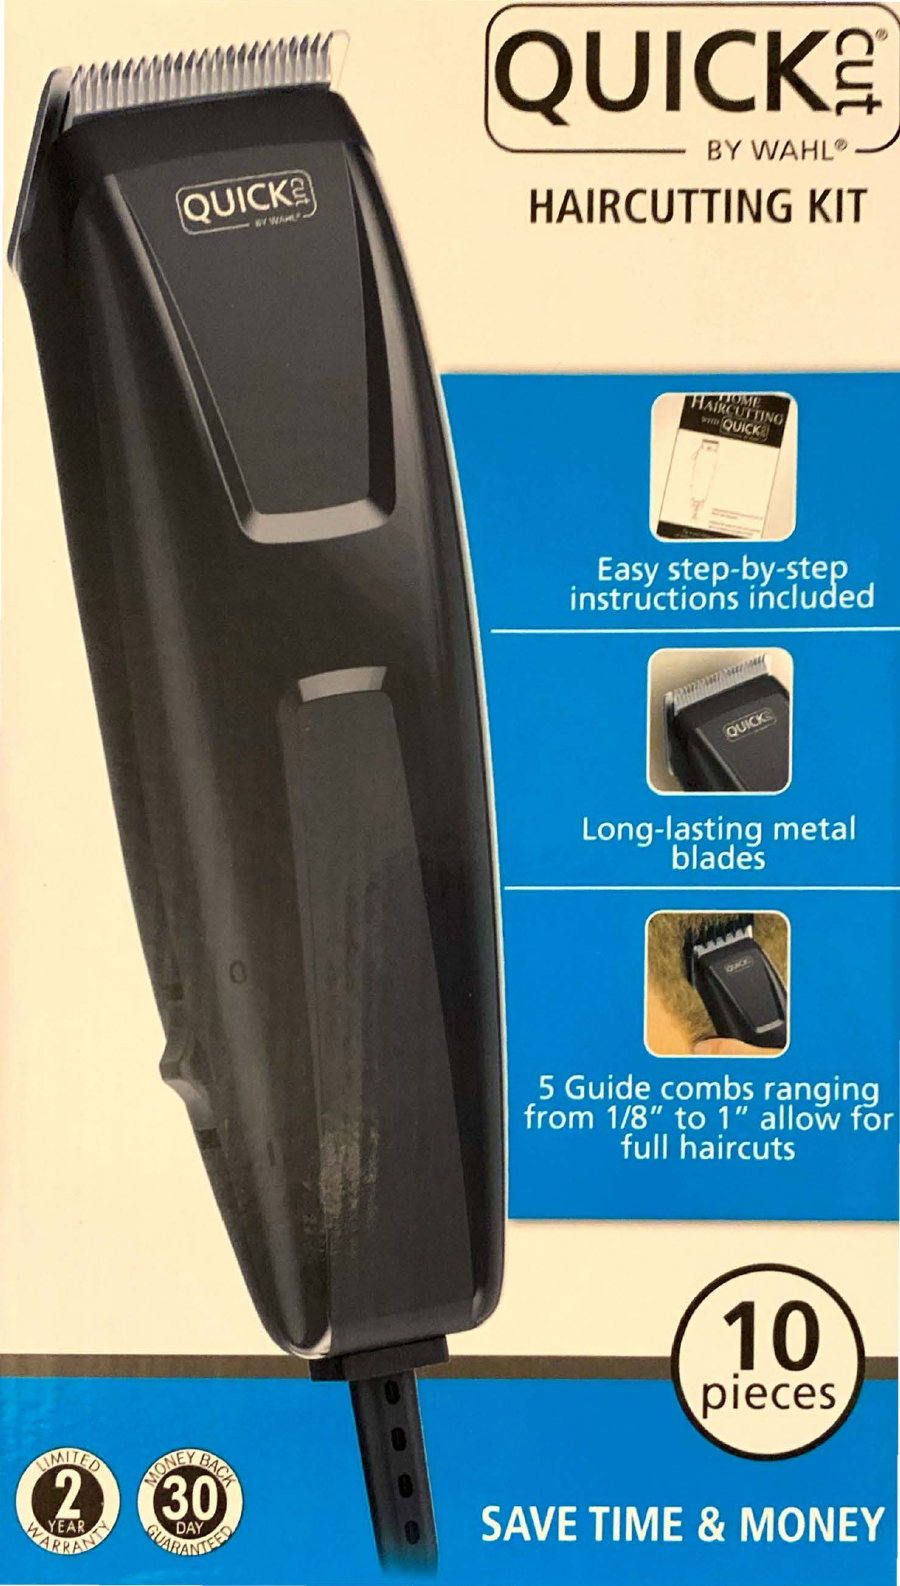
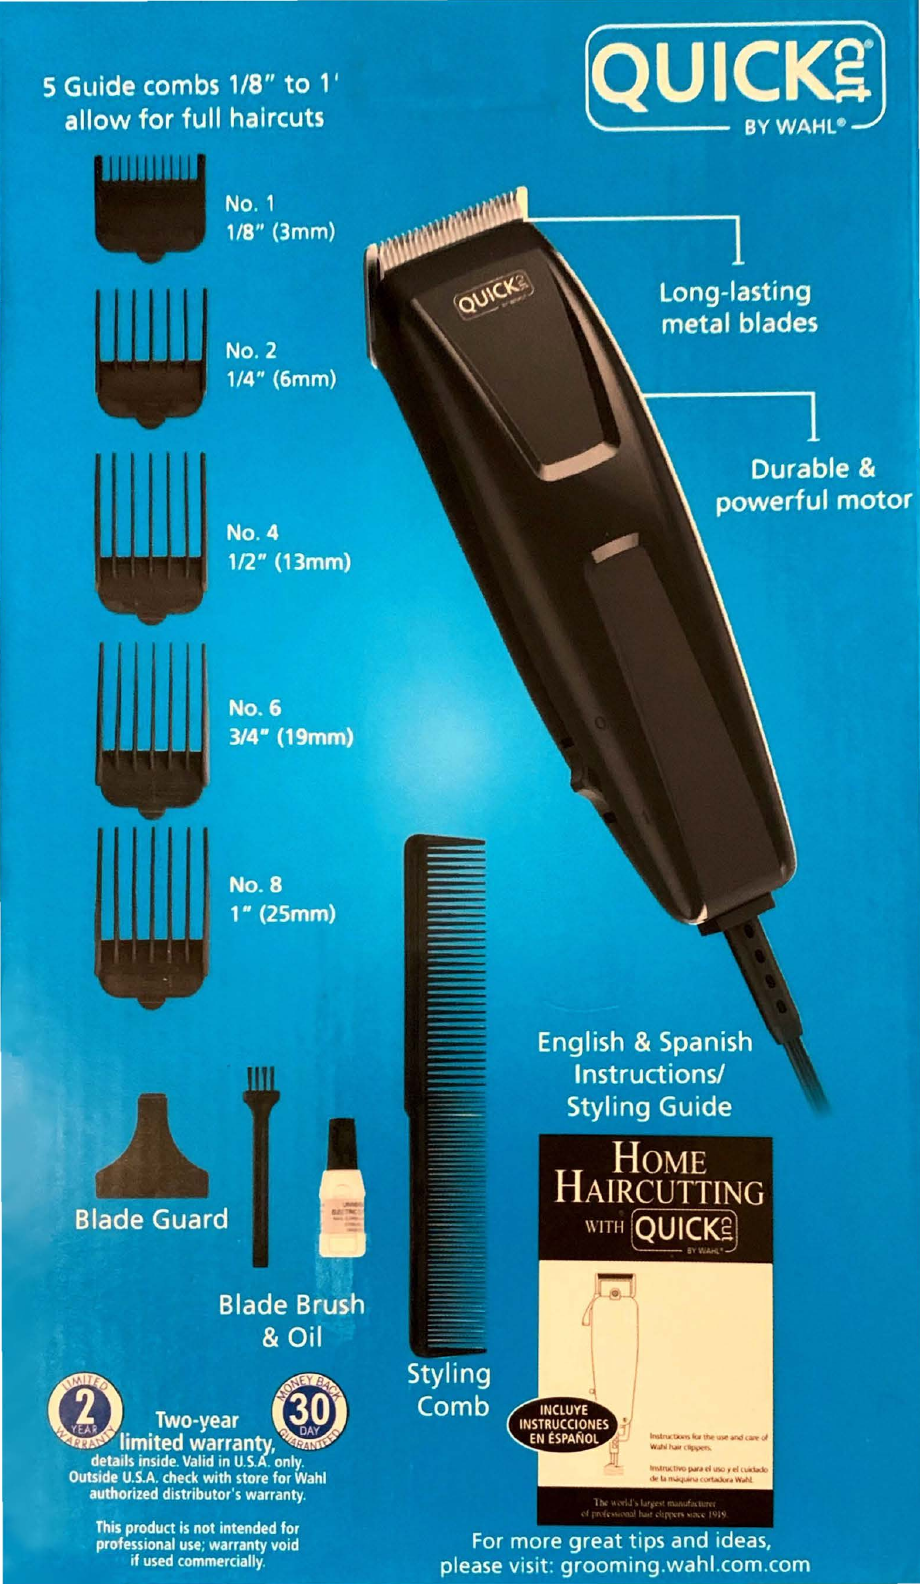
This manual suits for next models
1
Table of contents
Other Wahl Electric Shaver manuals

Wahl
Wahl Lithium Ion+ User manual

Wahl
Wahl Lithium Ion User manual

Wahl
Wahl 3615 User manual

Wahl
Wahl Lithium Ion 9854L User manual

Wahl
Wahl 9870-800 User manual

Wahl
Wahl Micro Finish User manual

Wahl
Wahl ProLithium User manual

Wahl
Wahl Sterling 2 User manual

Wahl
Wahl 5640 User manual

Wahl
Wahl 7061 User manual

Wahl
Wahl 1855 User manual

Wahl
Wahl Electric Shaver User manual

Wahl
Wahl Bump-Free User manual

Wahl
Wahl ULTIMA PLUS User manual

Wahl
Wahl 9865 User manual

Wahl
Wahl Smart-Shave 07061-900 User manual

Wahl
Wahl 1541 User manual

Wahl
Wahl 9947-801 User manual

Wahl
Wahl TRIPLE PLAY User manual

Wahl
Wahl 9639 User manual