Wainman Hawaii ManiaC User manual


ATTENTION
WAINMAN HAWAII LLC STRONGLY SUGGESTS THAT YOU TAKE LESSONS AND BE A CONFIDENT AND
COMPETENT KITEBOARDER BEFORE USING THIS PRODUCT ON YOUR OWN. THE SUPPLIERS OF THIS
PRODUCT ARE NOT RESPONSIBLE FOR ANY DAMAGE TO PROPERTY OR ANY PERSONAL INJURY CAUSED
BY ANY USE, MISUSE, ABUSE OR IRRESPONSIBLE USE OF THIS PRODUCT BY THE USER.
THIS IS A POWERFUL TRACTION KITE MADE FOR YOU TO DO KITESURFING ONLY. IT IS NOT A PARACHUTE
OR A PARAGLIDER.
IF YOU WANT TO KITESURF, YOU HAVE TO FIRST LEARN HOW TO DO IT PROPERLY AND SAFELY FROM AN
EXPERIENCED AND RESPONSIBLE KITESURFER.
KITEBOARDING IS AN EXTREME SPORT AND THE USE OF THIS EQUIPMENT COULD RESULT IN RISK OF
SERIOUS BODILY INJURY AND DEATH TO YOURSELF AND THOSE IN CLOSE PROXIMITY TO YOU. INJURIES
ARE AN INHERENT RISK OF KITEBOARDING AND PARTICIPATION IN KITEBOARDING IMPLIES THE USER’S
ACCEPTANCE AND ASSUMPTION OF THOSE RISKS.
WHEN YOU KITESURF, ALWAYS STAY WITHIN SWIMMING AND GOOD VISIBILITY RANGE OF THE SHORELINE.
DON’T GO OUT WHEN THE SURF IS BIG AND THE CURRENTS ARE STRONG. REMEMBER THAT ANY ACTIVITY
ON THE WATER MIGHT RESULT IN DROWNING. NEVER KITESURF ALONE.
WHEN YOU KITESURF, REMEMBER TO KEEP A SAFE DISTANCE FROM ALL OBJECTS AS THEY COULD RESULT
IN SERIOUS INJURY OR DEATH: LAND, TREES, BUILDINGS, CARS, POWER LINES, ALL OBJECTS IN SHALLOW
WATER, YOUR OWN BOARD AND BAR, OTHER KITES AND ALL OTHER VESSELS ETC.
AVOID GUSTY WINDS AND DON’T GO OUT IF THE WIND IS TOO STRONG. NEVER KITESURF WHEN WIND
IS OFFSHORE. TAKE EXTREME CARE WHEN THE WIND IS BLOWING ONSHORE. PERFECT CONDITIONS TO
KITESURF ARE SIDESHORE STEADY WINDS WITH A MODERATE STRENGTH OF 1525 KNOTS.
REGULARLY INSPECT AND MAINTAIN ALL COMPONENTS OF THIS KITE PROPERLY, PAYING PARTICULAR
ATTENTION TO LINES, WHICH MUST ALWAYS BE REPLACED IF DAMAGED AND WORN. IT IS NECESSARY
TO ENSURE THAT YOUR QUICK RELEASE IS IN PROPER WORKING ORDER BY ACTIVATING IT PRIOR TO EACH
KITESURFING SESSION. AFTER EACH USE, RINSE YOUR QUICK RELEASE WITH FRESH WATER.
INFLATE THE LE AND STRUTS OF YOUR KITE FIRMLY AND MAKE SURE THAT ALL VALVES ARE CLOSED
PROPERLY.
ALWAYS CONNECT YOUR FLYING LINES PROPERLY TO THE KITE. FOLLOW THE COLOR CODING OF THE
LINES. WRONG CONNECTION WILL CHANGE THE KITE FLYING CHARACTERISTICS AND POSSIBLY RESULT
IN SERIOUS BODILY INJURY. REMEMBER TO ALWAYS HAVE THE LINES SYMMETRICAL IN LENGTH. THIS
SHOULD BE CHECKED REGULARLY.
WHEN USING THIS KITE, ALWAYS USE COMMON SENSE, RESPECT NATURE, AND TRY TO SAFELY HELP
OTHERS WHEN THEY ARE IN TROUBLE.
IF YOU HAVE ANY QUESTIONS ABOUT HOW TO USE THIS KITE PROPERLY, STUDY THE MANUAL OR
CONTACT US THROUGH WWW.WAINMANHAWAII.COM FOR MORE INFORMATION.
DO NOT USE THIS PRODUCT UNLESS YOU HAVE READ AND UNDERSTAND THESE WARNINGS,
CAUTIONS, AND INSTRUCTIONS WHICH ARE FOR YOUR SAFETY AND PROTECTION. THIS INFORMATION
MAY BE SUBJECT TO CHANGE AT ANY TIME. FOR CURRENT UPDATES, PLEASE VISIT OUR WEBSITE AT:
WWW.WAINMANHAWAII.COM.
HAVE FUN AND RIDE HARD! ALOHA!

1. Kite (Inside the Bag)
2. Pump (Left Pouch)
3. Compression Bag
4. ManiaC Bar (Right Pouch)
5. Safety Leash
6. Additional Lines
and Line winder/storage
7. Bar Spare Parts located
in Accessory Bag
(hex key, suicide connector, metal ring,
from line pigtail and extra swivel seals)
8. Bungee
9. ManiaC Bar Accessory Bag
10. ManiaC Repair kit & Stickers
(located in the front pouch of Kite Bag) Vein
Ination System repair kit, bladder patches, sail
repair, glue and stickers
INSIDE THE PACKAGE
www.wainmanhawaii.com - 1
1. 3.
2.
4.
5.
10.
7.
6.
9.
8.

THE KITE
They are:
I) Strong Wind Knot (labeled)
II) Center Knot (not labeled)
III) Light Wind Knot (labeled) (See Rigging Tips on pg. 5)
5. Center line bridle attachment options - changes ying
characteristics.
6A. Leading Edge (LE) Inate Valve.
6B. LE Dump Valve.
7. Vein Ination System (VIS) - Single point ination system
called for rapid and easy ination
8.
2 - MANIAC MANUAL
7.
1. Thermo-molded bumpers - EVA foam.
2. Center line pigtail attachment points using larks head knot.
3. Rear (steering) line pigtail attachment points. The steering
line pigtail comes set on the “STOCK” setting (no label) on the
LE. To increase the turning speed of the kite, remove pigtail
and re-attach to the FAST tab. To decrease the turning speed
re-attach the pigtail to the SLOW setting. The various turning
speed options of the ManiaC combined with the center line
attachment options can provide unique ying and bar pressure
characteristics.
4. Steering line pigtail. Attach color coded steering line to
pigtail using larks head knot. The LEFT steering line and pigtail
is ORANGE. The RIGHT steering line and pigtail is GREY. There are
(3) knots on the pigtail that you can attach the back line to.
6B.
1.
2.
3.
4.
6A.
5.

FRONT LINE ATTACHMENT
www.wainmanhawaii.com - 3
There are 3 trimming options on the front lines called the“Feeling Spectrum”which gives you options of aggressive vs. relaxed,
upwind vs downwind, lower vs higher bar pressure, fast turning vs wider turnsIt is suggested that the ManiaCs be used on the
factory “upwind”setting for the rst few sessions. This “upwind” setting is the conguration that comes straight out of the bag
when you purchase the kite . It is very important to properly trim the kite (on the clam cleat). If the kite is not properly trimmed,
the performance of the kite may be jeopardized (back stalling etc.). When you decide it is time for changing the ManiaC
performance characteristics, it is suggested that you always make a single change at a time (on center and back lines). This
approach will enable the rider to nd his/her perfect setting to match their riding style and maximize optimal performance.
REMEMBER: When changing the front line setting, be sure to adjust the knot to the corresponding setting on the pigtail.
UPWIND tab on LE / UPWIND knot on LE pigtail; DOWNWIND tab on LE / DOWNWIND knot on LE pigtail; “STOCK” tab on LE /
“STOCK” center knot on LE pigtail (“STOCK”is not labelled on kite).
“MODERATE" SETTING
Attach LE pigtail to STOCK (middle tab not labeled)
tab on LE (see diagram on left). The center lines
attaches to a LE pigtail with 3 knots (see diagram on
right) on it: UPWIND which is labeled, “MODERATE”
which is the center knot and not labeled, DOWNWIND
which is labeled. The “MODERATE” setting is the
all- round setting. You can adjust the pigtail to
nd your favorite riding characteristic for the kite.
To change the settings, undo larks head knot on LE
pigtail. Remove LE pigtail and attach to desired tab
(UPWIND or DOWNWIND).
DOWNWIND SETTING
Attach LE pigtail to DOWNWIND tab on LE (see diagram
on left) . Attach larks head knot to DOWNWIND knot
(see diagram on right) on LE pigtail that is labeled on
the kite. This option will make the kite shift back into
the window increasing downwind riding. The kite will
turn faster and jump with a more horizontal lift. The
kite sits deeper (further back) in the window and the
bar pressure decreases.
UPWIND SETTING
The ManiaC comes set up on the “UPWIND” setting tab
on the LE out the bag using the END tab and knots (see
diagram on left and right). This option will make the
kite shift further towards the edge of the wind window
enabling better upwind capabilities. The kite will turn
a bit slower than the “STOCK” setting and jump with
a traditional vertical lift. This setting will also have
increased bar pressure.


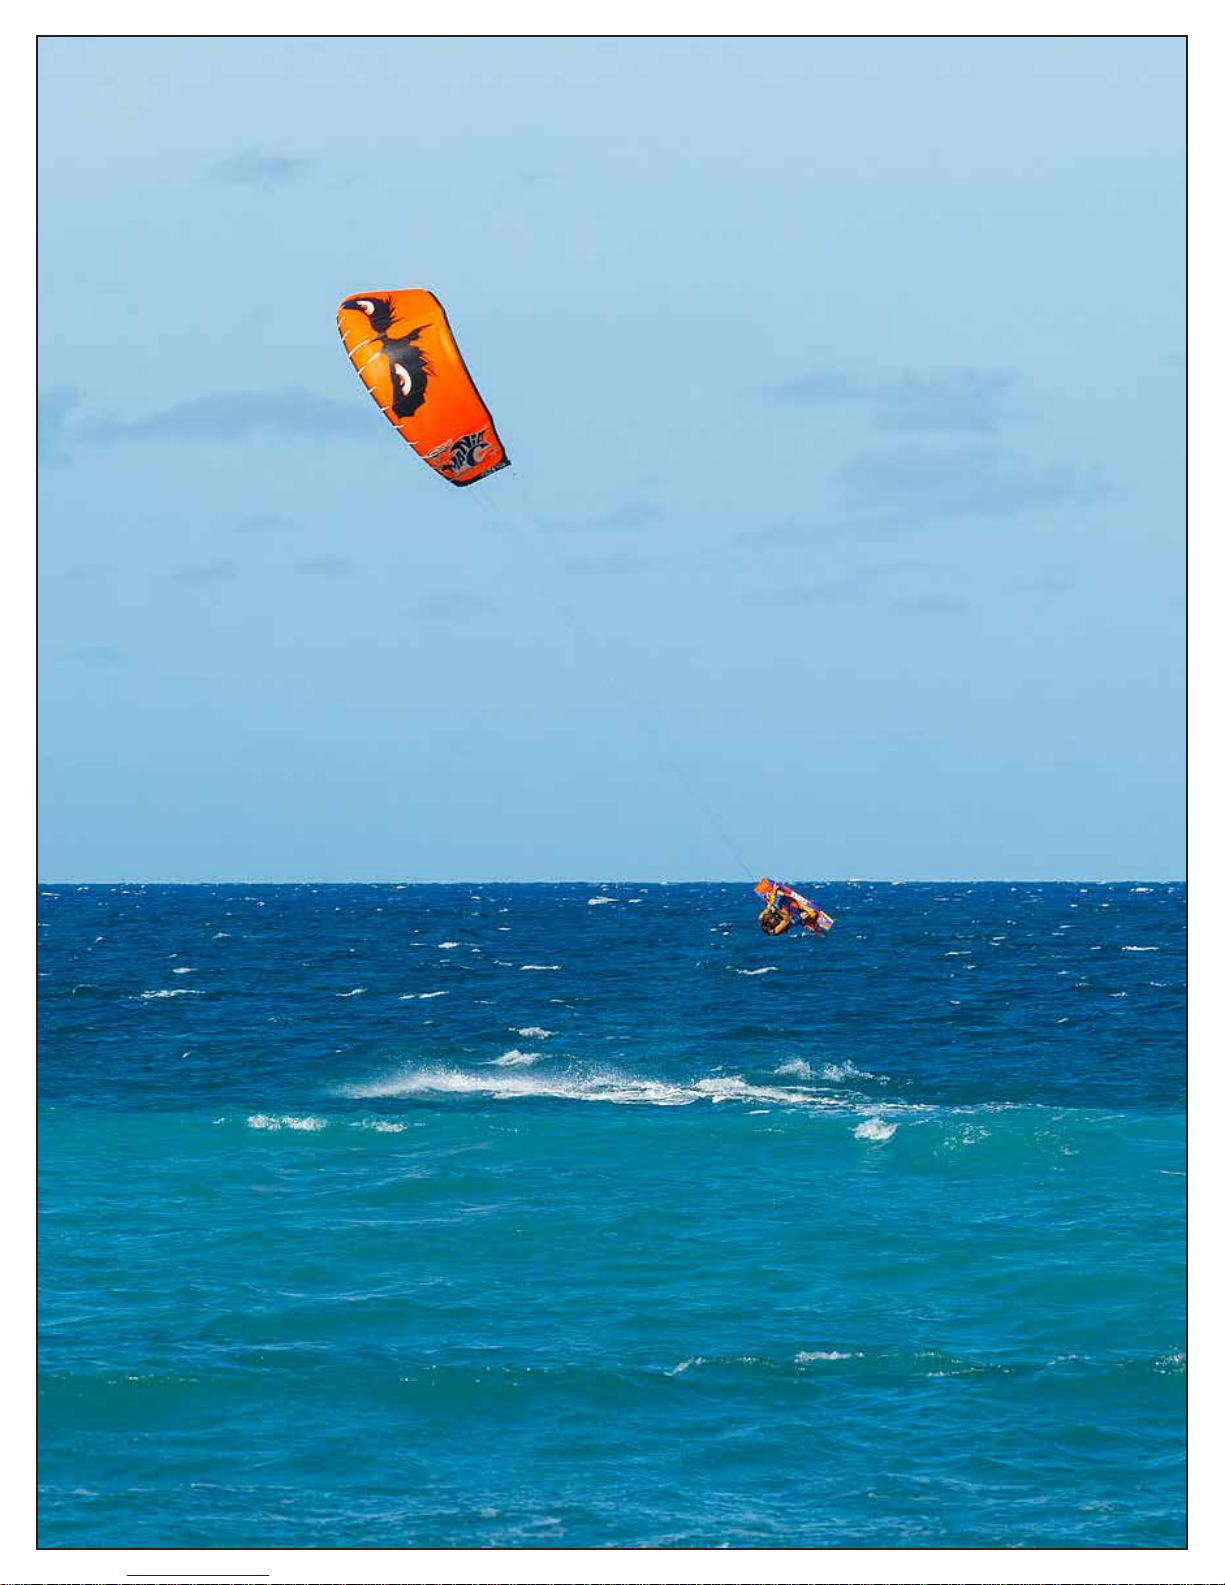
www.wainmanhawaii.com - 5
As mentioned before, it is VERY IMPORTANT that you take lessons with a competent and
certied instructor which will ensure safe kite setup and rigging. REMEMBER: Safety is
the number one priority. Below are a few steps on rigging the ManiaC.
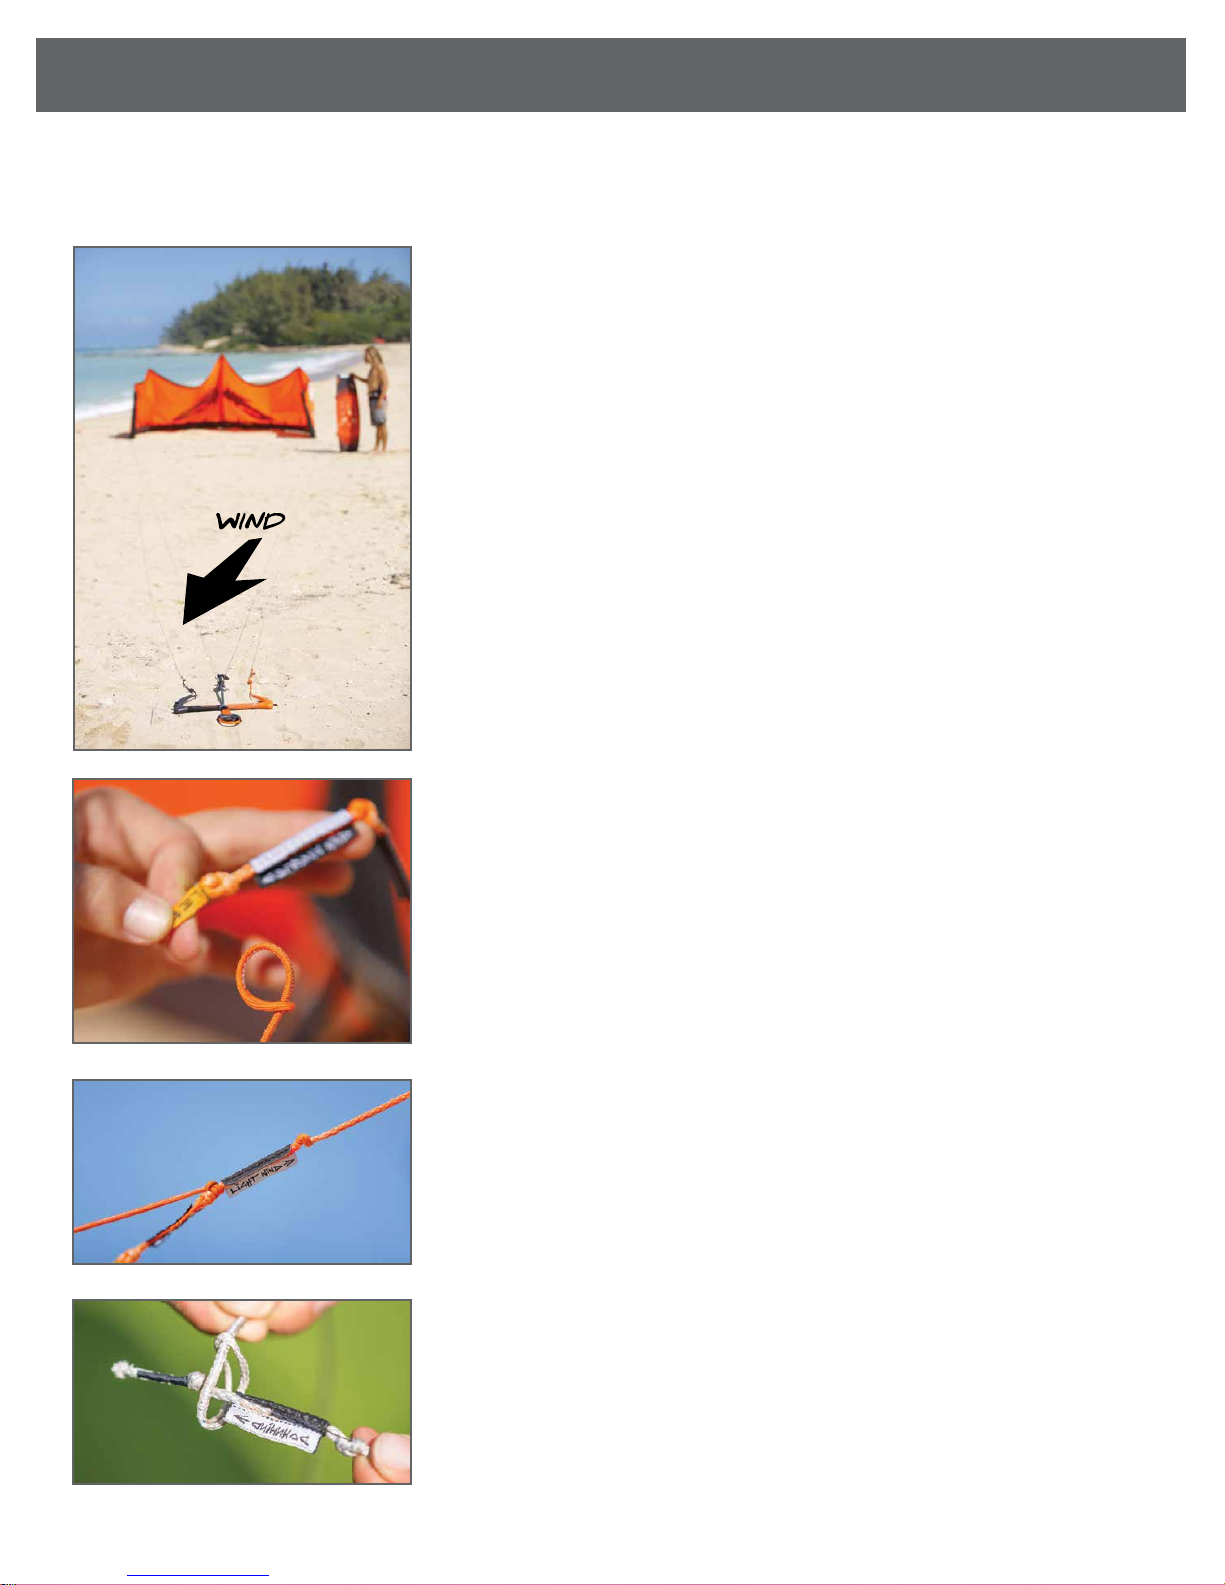
STEP 1. There are two ways of laying out your lines - upwind and downwind of the
kite. Wainman Hawaii highly recommends rigging DOWNWIND of the kite (gure 1).
There will be certain situations that you can only lay out your lines upwind of the kite.
When rigging DOWNWIND, make sure that your bar is ipped upside down and Grey
rear line is on left and orange rear line is on right (gure 1). Separate all four lines by
combing the lines towards the kite with the grey line on your left and orange line on
your right. Double check that no lines are crossed over each other.
STEP 2. Once you have pumped up your kite (see tips section on pg. 20), separated
all four lines and double checked that no lines are crossed over each other, you can
attach the lines to the pigtails on the kite. The lines are color coded to ensure that you
attach the correct lines to the corresponding pigtail on the kite.
i) Attaching Rear Steering Lines:
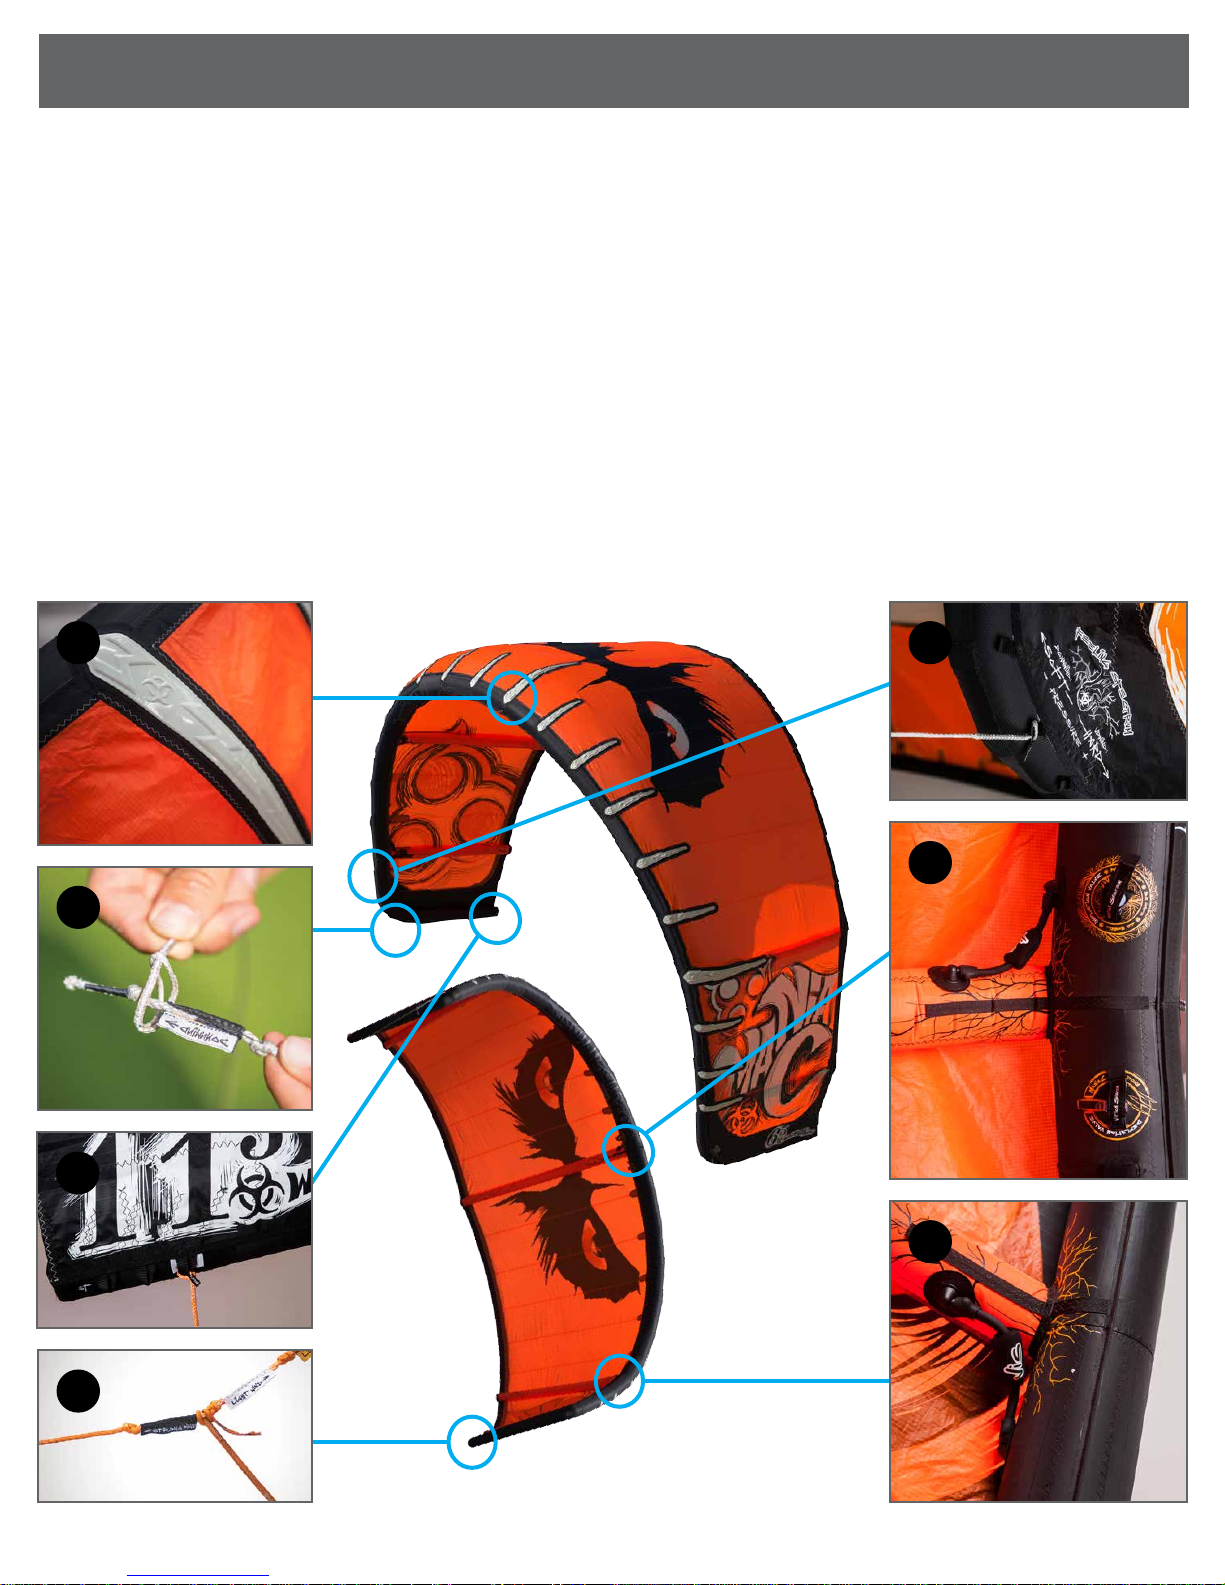
Attach color coded steering line to pigtail using larks head knot (see gure 2).
The LEFT steering line and pigtail is ORANGE. The RIGHT steering line and pigtail
is GREY.
Depending on the wind conditions and rider experience level, always start by
using the MIDDLE knot (see gure 3) and move it up or down to get more or
less power.
There are (3) knots on the pigtail that you can attach the back line to. They are:
Strong Wind (labeled) - The knot (furthest from the) kite will lengthen the back
lines providing more depower capabilities. This setting is recommended when you
are over powered and need to spill extra power from the kite.
Center Knot (not labeled) - This knot provides power in the kite that is in
between Strong Wind and Light Wind.
Light Wind (labeled) - The knot (closest to the kite) will shorten the back lines
and provide the most power in your kite.
NOTE: When adjusting the position of the rear line pigtail (SLOW/FAST) at the
webbing on the kite tips, the rear to center line length ratio will also change.
Please make sure your kite is trimmed correctly to ensure that the kite does not
oversheet or backstall.
ii) Attaching Front Center Lines:
Attach color coded (GREY) and labeled (CENTER) line to pigtail using larks head
knot (see gure 4) . There are three knots on the pigtail. Make sure you use the
same knot on each side and that the pulley is free of sand and moving freely on
bridle line. You can use 2 dierent knots in situations where you center lines are
not of equal length. This is only a temporary solution and if your front lines are not
equal, they must be adjusted.
STEP 3. Once you have attached your lines, once again be sure to do a nal check that
your lines are connected to the corresponding pigtails and not crossed. Make sure all
knots are corresponding to the tabs on the LE (Upwind tab/Upwind Knot, Stock tab/
Stock Knot, Downwind tab/downwind knot).
STEP 4. If you have rigged DOWNWIND, REMEMBER to ip your bar over the correct
way (DANGER label on bar facing down;left hand on the orange side; right hand on
grey side). Double check once again that your lines are not crossed before you hook
your harness loop into spreader bar.
RIGGING TIPS
Figure 4.
Figure 3.
Figure 2.
Figure 1.

6 - MANIAC MANUAL
STEP 1. When the kite goes down with the LE in the water,
make sure the kite is directly downwind of you. To ensure that
your lines are not crossed over, ip the bar upside down and
spin it until lines are uncrossed (see gure 1). Try to keep your
board on your feet as the added resistance that the board
provides will assist in quicker relaunch.
STEP 2. Remember that the bar will now be ipped over, so
once you have uncrossed the lines, spin bar facing right way up,
grab any one of the rear lines (you can use the Relaunch Ball for
assistance) and pull towards your body as illustrated in Figure 2.
This will cause the wind to catch the sail and wing tip to lift.
STEP 3. Once
the wing tip lifts, the kite will rotate on its side and start
moving towards the wind window. Remember to keep the
bar tensioned to maintain rear line tension and the bar aimed
towards the side of the wind window that your are
trying to move it towards.
STEP 4. Keep the tension on the line as the kite moves to the
edge of the window on the wing tip ready for relaunch (see
gure 3).
STEP 5. As the kite starts to relaunch, level out your bar and
slowly direct the kite up into the sky. Remember to sheet the
bar out to depower the kite as soon as the kite leaves the water
(see gure 4).
It is VERY IMPORTANT that you take lessons with a competent and certied instructor
which will ensure safe kite relaunch. Make sure your kite is properly inated which will
assist in easy and quick relaunch capability. REMEMBER: Safety is the number one
priority. Below are steps and tips on relaunching the ManiaC.
MANIAC RELAUNCH
Figure 3.
Figure 1. Figure 2.
Figure 4.

MANIAC TRADITIONAL RELAUNCH
www.wainmanhawaii.com - 7
It is VERY IMPORTANT that you take lessons with a competent and certied instructor
which will ensure safe kite relaunch. Make sure your kite is properly inated which will
assist in easy and quick relaunch. REMEMBER: Safety is the number one priority.
Below are a few steps on relaunching the ManiaC (continued).
STEP 1.
When the kite goes down with the LE in the water,
make sure the kite is directly downwind of you. To ensure
that your lines are not crossed over spin the bar it until lines
are uncrossed. Flip the bar over into the correct position.
Swim towards your kite to ip it over on its back (see gure
1) - picture shows kite on its LE. Be sure to keep tension in the
lines and not swim too much towards the kite as the kite will
ip over.
STEP 2. Once the kite is almost on its back, grab a rear line
(you can use the Relaunch Ball for assistance) and pull towards
your body. This will cause the wind to catch the sail and wing
tip to lift (see gure 2).
STEP 3. Once the wing tip lifts, the kite will rotate on its side
and start moving towards the wind window. Remember to
keep the bar sheeted in for rear line tension and the bar aimed
towards the side of the wind window that your are trying to
move it towards (see gure 3).
STEP 4. Keep the bar sheeted in and the kite moving to the
edge of the window on the wing tip ready for relaunch.
STEP 5. As the kite starts to relaunch, level out your bar and
slowly direct the kite up into the sky. Remember to sheet the
bar out to depower the kite (see gure 4).
Depending on the wind conditions (light winds) and additional elements (currents etc.), it may take a little work to get the kite on its
wing tip and to the edge of window. You may have to use the traditional kite relaunch method as illustrated above. The concept is
very similar to the simple ManiaC Relaunch described on pg. 16, but requires letting the board go and swimming towards kite.
Figure 3.
Figure 1. Figure 2.
Figure 4.

SELF RESCUE
It is VERY IMPORTANT that you take lessons with a competent and certied instructor
which will ensure safe self rescue. REMEMBER: Safety is the number one priority.
Below are steps and tips on self rescue.
8 - MANIAC MANUAL
There are various circumstances that may occur and
require a self rescue (wind going oshore, sudden
and severe wind conditions, broken equipment,
dangerous situation etc.). Every rider should be well
versed in proper self rescue technique. To describe the
self rescue, the rider activated the Quick Release due
to a dangerous situation with the kite “agging” on
one of the front lines.
STEP 1. Activate the Quick Release on the harness loop. Please refer
to pg. 19 for steps on proper Quick Release activation. As the bar was
setup on “shool safety” or “stock” the kite will depower and “ ag” on
center line (gure 1).
STEP 2. Take the ONE center line that you agged the kite on and
slowly start pulling yourself towards the kite until you have reached
the bar. When you reach the bar, start wrapping the ONE center line
around the bar. Once you have wrapped approximately 15-20 ft.,
start wrapping the remaining three lines around the bar. This is to
ensure that your kite does not power up. You should be slowly moving
toward the depowered kite (gure 2). Although it is hard sometimes,
make sure NOT TO get tangled in your lines while wrapping. It is
suggested that you always carry a kite knife in case you do get tangled.
Remember to always watch the kite when winding up your lines. Be
prepared to immediately let go of everything if needed in case the
wind increases and powers up the kite.
STEP 3. Once you have rolled up your lines to within half of the kites
length, tie the lines down on the bar using a simple knot.
STEP 4. Grab hold of the kite (center of LE). Fold the kite in half and
work yourself down to the wing tips. Grab hold of the center line
bridles (gure 3).
STEP 5. Position the kite in the direction of wind (assuming the wind
direction is towards shore) and sail in the kite in (gure 4).
STEP 6. Sail the kite in until you reach the beach or a safe location
(gure 5). Be sure to secure your kite on the beach.
PLEASE NOTE: Sometimes this method of self rescue will not work
(oshore winds etc.). If this is the case, follow Step 1- 4. Once you
have secured the kite, deate the LE (not the struts) and roll the
kite up, securing it by wrapping your harness around it. Close
deate valve afterwards so bladder does not ll with water.
The rolled up kite (with inated struts) will oer otation for
your to lie on and paddle back to shore.
Figure 1.
Figure 2.
Figure 3.
Figure 4.
Figure 5.


1A.
3.
4.
6.
7.
8.
9.
1B.
MANIAC BAR
10 - MANIAC MANUAL
1A. FRONT FLYING LINES
330kg/725lbs grey color coded lines with preassembled extensions
that can be removed for dierent kite ying characteristics.
1B. REAR FLYING LINES
220kg/485lbs orange & green color coded lines with preassembled
extensions that can be removed for dierent
kite ying characteristics.
2. SWIVEL WITH CERAMIC BEARING
Marine swivel with the breaking strain of 500kg/1100lbs. This unique
high performance ceramic bearing oers unmatched free spinning
capabilities under high tension loads without any corrosion risks that
could result in the swivel getting stuck. Our swivel allows for multiple
safety set-up options and easy maintenance.
3. RELAUNCH BALL
The relaunch balls on the back lines are used to assist in relaunching
the kite when is leading edge down. Grab the relaunch ball in windy
conditions and pull towards you for instant relaunch of kite.
4. POWER TRIM ADJUSTMENT
WITH MAGIC VELCRO
Simple trimming system based on the original Clam Cleat
mechanism: pull rope in to shorten the front lines and reduce the kite`s
power or release rope to lengthen front lines and increase power. The
strong velcro keeps the extra adjustment rope in place while riding.
5. SOFT BAR ENDS AND COMFORT BAR GRIP
Ergonomic molded EVA (oating cushy foam) bar ends provide soft
touch feeling while riding and oats the bar when in the water.
The line winder and integrated bungees on the bar to keep winded
lines in place after the session. New ergonomic comfortable grip
with thinner EVA grip to assure maximized handling eciency.
New stainless steel center piece to minimize tearing of depower
section and increase durability of PU tube.
6. CUSTOM DEPOWER LINE
Dimmed transparent PU (very strong plastic) tube with two separate compartments, the tube
houses the depower main line (600kg/1320lbs of breaking strain) and safety bungee line. This
combo is well tted in the center hole of the bar, providing superb power/depower capabilities
and results in an amazing and direct kite feel.
7. SAFETY BUFFER
Our unique buer solution provides functionality for dierent safety setup options. The buer
length also ensures that all quick release activations will be successful. Additionally, the buer
provides chicken loop stability for unhooked riding as it gently locks into the center hole of the
bar.
8. SAFETY QUICK RELEASE
The push away quick release handle is used to release the kite from rider in case of emergency.
Depending on the selected set-up option, the kite will signicantly depower, totally depower
(ag) or separate from the rider.
9. SOFT HARNESS LOOP
Covered with a molded EVA (soft cushy foam), the harness loop is very safe for hands and it oats
in the water. Due to its construction the loop doesn’t elongate while riding. It comes equipped
with a removable security pin (Dingy Guy), and the small, integrated ring can be used as a leash
attachment point for One Release set-up.
2.
5.

MANIAC BAR: STOCK
www.wainmanhawaii.com - 11
STOCK SETUP
The “Stock” set-up is how the bar comes “out the bag”
and is geared towards the every day rider that engages
his/her quick release in rare emergency occasions.
In this option you attach the bar leash to the “safety” ring
on buer of the stock bar. When engaging the quick release
in case of an emergency, the bar leash will stay connected
to one of the front lines and “ag” the kite (depowers the
kite 100%). In case of further danger activate your quick
release on the safety leash to totally separate from the kite.
IMPORTANT: Always attach clip (closest to red release)
to your harness so you can reach the release when needed.
Attach this clip to the harness

MANIAC BAR: SUICIDE CONNECTION
12 - MANIAC MANUAL
SUICIDE CONNECTION SETUP
The “Suicide Connection”set-up is for experienced riders only. It
may meet the needs of expert riders who ride in waves and don’t
want to lose their kite. It allows for unhooked riding and letting
go of the bar without kite “agging”even if you activate the quick
release. After you convert the bar to “Suicide Connection” by
attaching the suicide connector to the buer, attach safety leash
to the ring on the suicide connector. When you unhook and let
go of bar, the kite will depower the distance of the depower main
line. If you activate your quick release, you will still be attached
to the kite (safety leash) and you must activate the safety leash
to release the kite. If a situation requires you needing to ag your
kite, grab the safety buer handle prior to activating the release
on the leash.
10.
HOW TO:
REQUIRED PARTS
- Suicide connector
- metal ring.

MANIAC BAR: SUICIDE CONNECTION
www.wainmanhawaii.com - 13
Remove suicide
connector and ring
from ManiaC Bar
accessory bag.
Attatch the ring to the suicide connector as
illustrated above.
Feed the suicide
connector through
the hole in the buer.
Loop the suicide
connector around the
buer.
Feed both ends of
the suicide connector
through the loop.
Attach your safety leash to the suicide connector on the
buer (shown above) and your harness.
IMPORTANT: Always attach clip (closest to red release) to
your harness so you can reach the release when needed.
9.
1. 2. 3. 4.
5. 6.

MANIAC BAR: DOUBLE DEPOWER
14 - MANIAC MANUAL
DOUBLE DEPOWER
The “Double Depower” set-up is for experienced riders
only and a favorite among avid freestylers. It allows for
unhooked riding and letting go of the bar without the
kite “agging”even if you activate the quick release.
After you convert the bar to the “Double Depower”
setup, attach the safety leash to the ring on the buer.
Activating the double depower (when you unhook
and let go of the bar), shortens your center lines
double the distance of the depower main line. If you
activate your quick release, you will still be attached to
the kite (safety leash) and you must activate the safety
leash to release the kite.
Remove the Safety Ring from the red bungee (as illustrated above).
1.
Attach thin line to
the bungee.
Pull the bungee through the
plastic tube.
3. Remove the thin line from
the bungee.
4.
HOW TO:
REQUIRED PARTS
(found in ManiaC Bar accessory bag)
- Front line swivel connector
- Metal ring
ADDITIONAL PARTS NEEDED
- Thin line
2.

MANIAC BAR: DOUBLE DEPOWER
www.wainmanhawaii.com - 15
Pull the bungee through the swivel and remove the front (grey) center line from the
bungee. Do not pull grey front line through the swivel.
Locate the front line (red) swivel
connector in ManiaC Bar accessory bag.
6.
Once the connector is attached to
front line, pull it tight so it seats
rmly in the swivel.
Feed the bungee line through
the side hole of swivel and loop
through itself.
9. Attach the thin line to the bungee.
10.
Pull the bungee back through
the plastic tube.
11. Remove the thin line from bungee.
12. Locate the metal ring in ManiaC Bar
accessory bag.
13.
Attach your safety leash to the metal
ring (shown above) and your harness.
Attach the red connector to the grey front line as illustrate above.
7.
Attatch the metal ring to the bungee as illustrated above.
5.
8.
14. 15.

MANIAC BAR: PARA SUICIDE
16 - MANIAC MANUAL
PARA SUICIDE
The “Para-Suicide Connection” set-up is for
experienced riders only and gives you the
same benet of Suicide Connection with the
benet of agging your kite if you activate your
Quick Release. It may meet the needs of expert
riders who ride unhooked and don’t want
to lose their kite. It allows for unhooked riding
and letting go of the bar without “agging”the
kite. After you convert the bar to “Para- Suicide
Connection”by attaching the suicide connector
to the safety bungee and feeding it through the
metal ring on the harness loop, attach the safety
leash to both the ring on the suicide connector
and metal ring on harness loop. When you
unhook and let go of bar, the kite will depower
the distance of the depower main line. If you
activate your quick release, you will “ag” your
kite as the leash is attached to the grey safety
bungee that ags the kite on a front line.
HOW TO:
REQUIRED PARTS
- Suicide connector
- metal ring.

MANIAC BAR: PARA SUICIDE
www.wainmanhawaii.com - 17
Remove the Safety Ring from the grey bungee (as illustrated above)
1.
Attach suicide leash to the grey bungee by looping through each other (as illustrated above)
2.
3. Attach your safety leash through the
suicide connector ring and metal
ring on the harness loop
4.
Feed the suicide connector
through the metal ring on the
harness loop (where security pin
named “Dingy Guy” is attached)
IMPORTANT: Always attach clip
(closest to red release) to your harness
so you can reach the release when
needed.

MANIAC BAR: ONE RELEASE SETUP
18 - MANIAC MANUAL
ONE RELEASE
The “One Release”set-up is based on the simple principle that in
case of major danger, there should be one ultimate kite release and
kite will be completely detached from the rider. When choosing this
setup you have to be aware that when your activate your QR, your
kite will y away. Make sure you don’t ride upwind from anyone
when activating the QR to avoid harming anyone downwind.“One
Release”can be ridden with the “Dingy Guy” or without It. Attach
safety leash to metal ring on the harness loop (where security pin
named “Dingy Guy” is attached). When you unhook and let go of the
bar, kite will depower the distance of the depower main line. If you
activate your quick release, you will be completely separated from
the kite. In certain circumstances, you may have time and choose to
grab the Safety Handle on the buer while activating the QR which
will ag out the kite on one of the front lines.
HOW TO:
Attach your safety leash to the ring on the harness loop
(shown below) and your harness.
IMPORTANT: Always attach clip (closest to red release) to
your harness so you can reach the release when needed.
Table of contents