Walker WP2210LCD User manual

English - 1 -
Contents
Features ................................................................. 3
Accessories ............................................................ 3
Introduction............................................................. 4
Preparation............................................................. 4
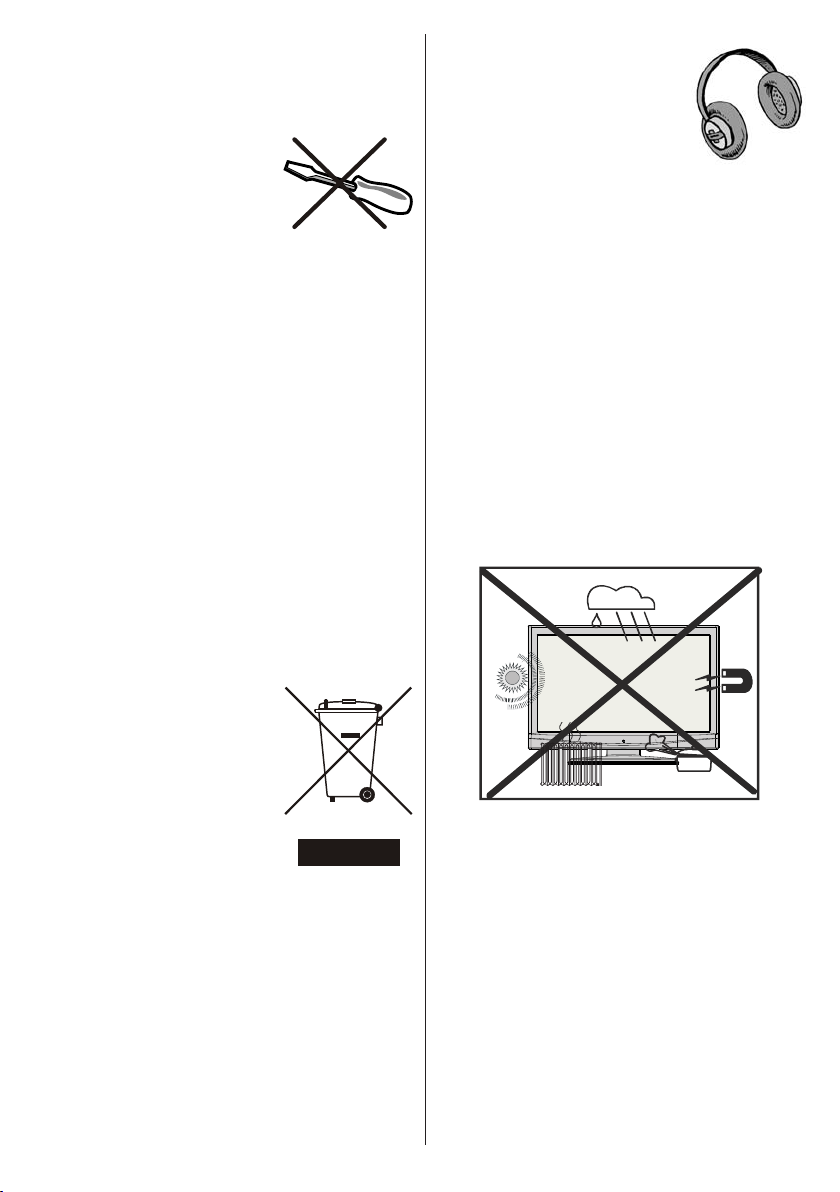
Safety Precautions ................................................. 4
Power Source ..................................................... 4
Power Cord......................................................... 4
Moisture and Water ............................................ 4
Cleaning.............................................................. 4
Ventilation ........................................................... 4
Heat and Flames ................................................ 4
Lightning ............................................................. 4
Replacement Parts ............................................. 4
Servicing............................................................. 5
Waste Disposal................................................... 5
Information for Users in European Union
Countries ............................................................ 5
Disconnecting the Device ................................... 5
Headphone Volume ............................................ 5
Installation........................................................... 5
LCD Screen ........................................................ 5
Warning .............................................................. 5
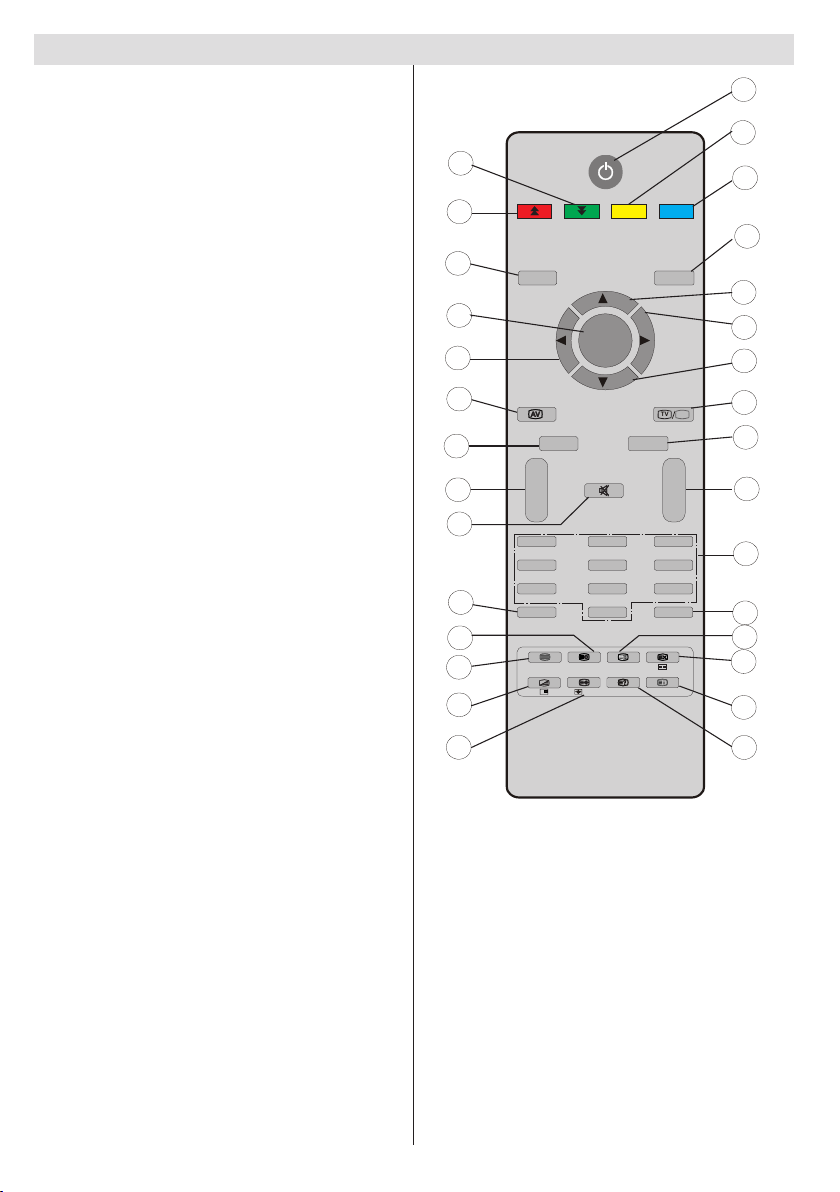
Overview of the Remote Control ............................ 6
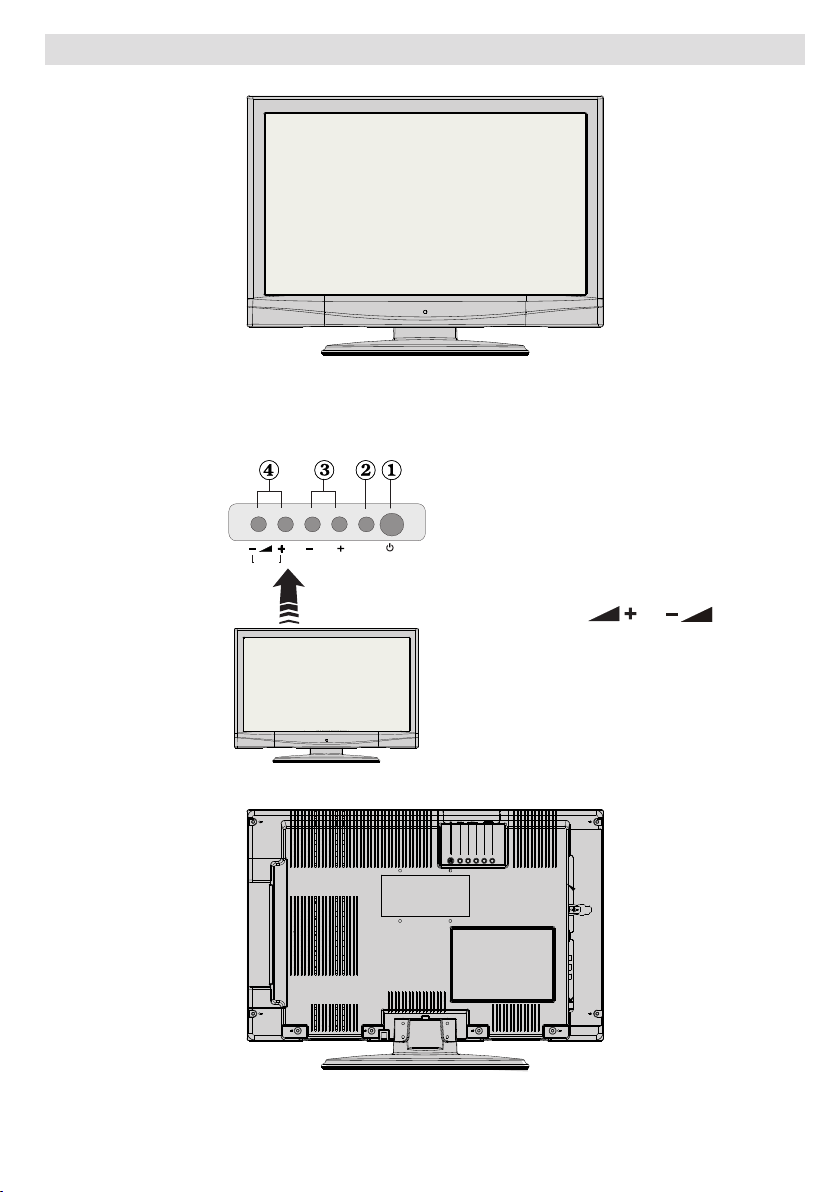
LCD TV and Operating Buttons.............................. 7
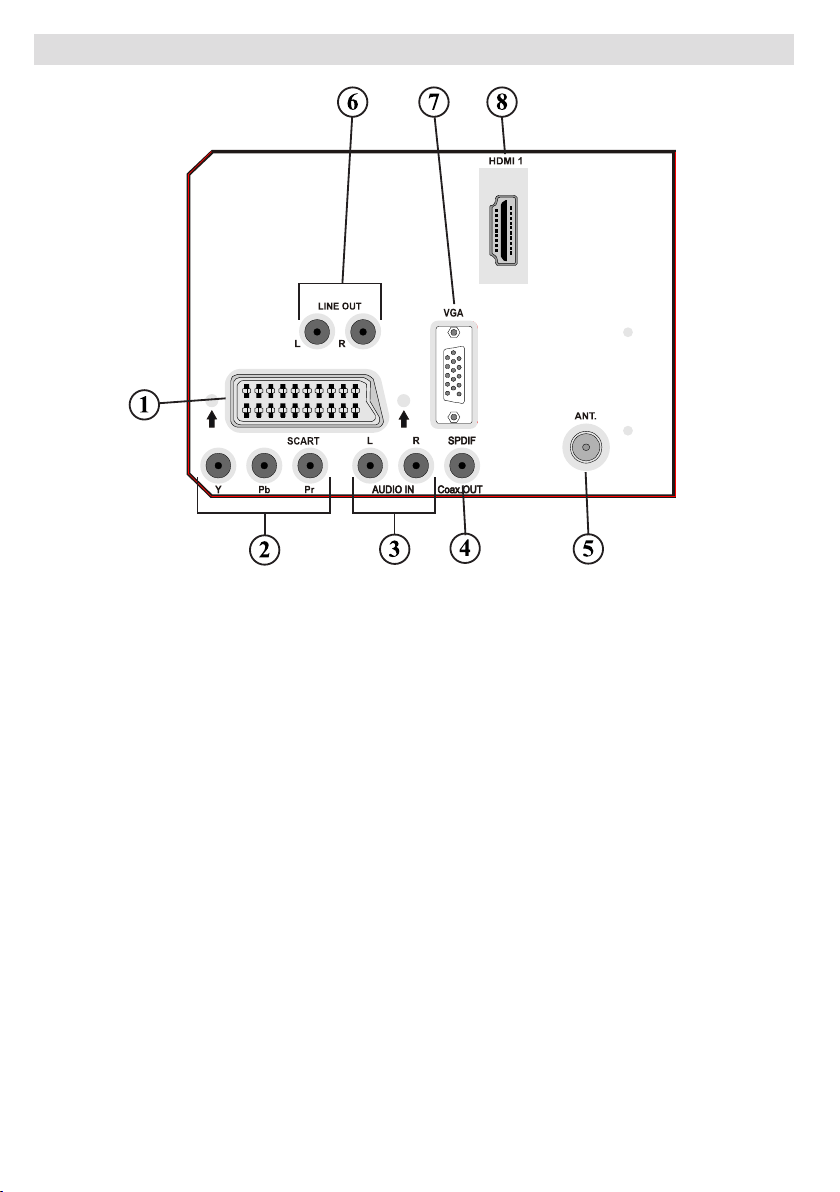
Viewing the Connections- Back Connectors .......... 8
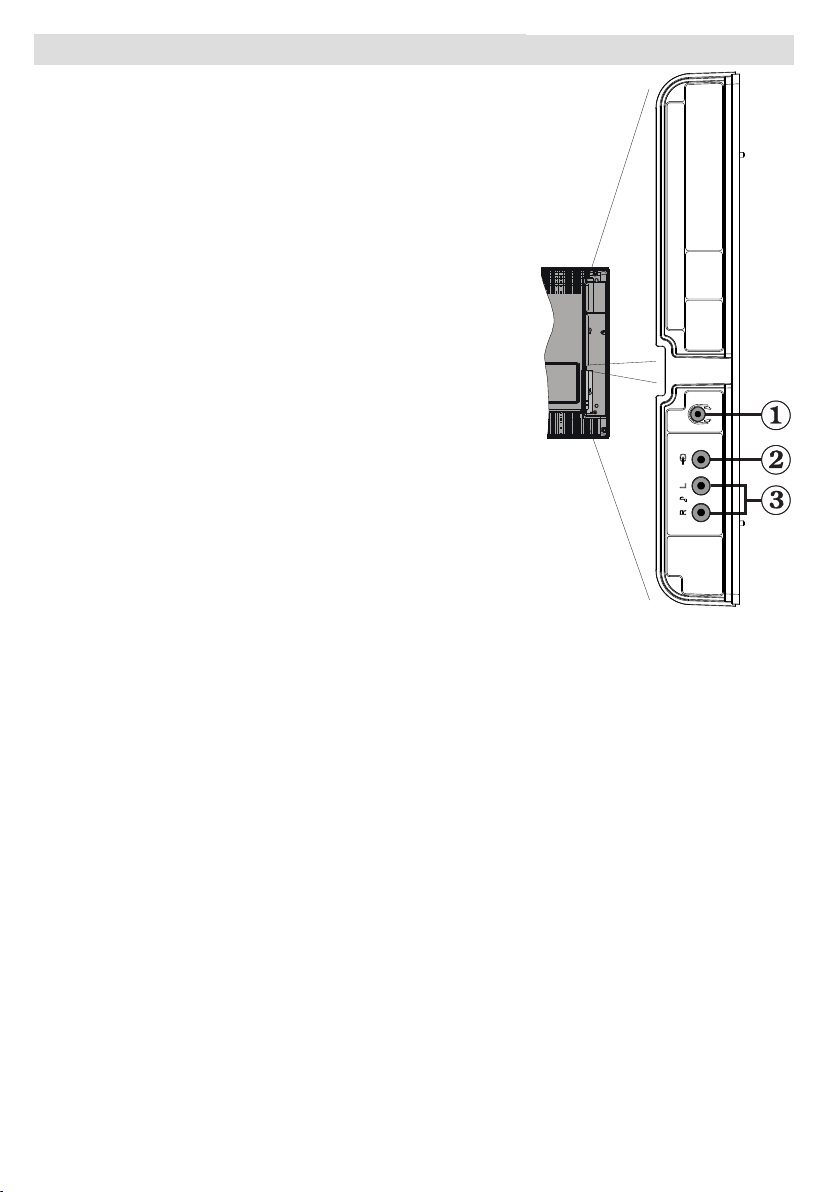
Viewing the Connections - Side Connectors ........ 10
Power Connection .................................................11
Aerial Connection ..................................................11
Connecting the LCD TV to a PC........................... 12
Connecting to a DVD Player................................. 13
Using Side AV Connectors ................................... 14
Using Other Connectors....................................... 15
Connecting Other Equipment via Scart ................ 16
Inserting Batteries in the Remote
Control Handset.................................................... 17
Operating Range for the Remote Control............. 17
Switching the TV On/Off ....................................... 17
To Switch the TV On......................................... 17
To Switch the TV Off ......................................... 17
First Time Installation............................................ 18
Input Selection...................................................... 18
Basic Operations .................................................. 18
Operation with the Buttons on the TV............... 18
Volume Setting.............................................. 18
Programme Selection ................................... 18
Viewing Main Menu....................................... 18
AV Mode ....................................................... 19
Operation with the Remote Control .................. 19
Volume Setting.............................................. 19
Programme Selection (Previous or
Next Programme) ......................................... 19
Programme Selection (Direct Access) .......... 19
Navigating the Menu System................................ 19
Menu System....................................................... 19
Picture Menu..................................................... 19
Mode............................................................. 19
Brightness/Contrast/Colour/Sharpness/Tint.. 19
Colour Temp.................................................. 20
Noise Reduction ........................................... 20
Film Mode ..................................................... 20
Game Mode (optional) .................................. 20
Picture Zoom ................................................ 20
Store ............................................................. 20
Reset ............................................................ 20
Sound Menu ..................................................... 20
Volume.......................................................... 20
Equalizer....................................................... 20
Balance......................................................... 21
Headphone ................................................... 21
Volume....................................................21
Spdif Out....................................................... 21
Store ............................................................. 21
Feature Menu ................................................... 21
Sleep Timer................................................... 21
Child Lock ..................................................... 21
Language...................................................... 21
Default Zoom ................................................ 22
Blue Background .......................................... 22
Menu Background......................................... 22
Backlight ....................................................... 22
Menu Timeout ............................................... 22
Teletext Language ........................................ 22
Ext Out.......................................................... 22
Program ........................................................ 22
Band ............................................................. 22
Channel ........................................................ 22
Colour System .............................................. 22
Sound System .............................................. 22
Fine Tune...................................................... 22
Search .......................................................... 22
Store ............................................................. 22
Install Menu in AV Modes.............................. 23
Colour System........................................23
Store ............................................................. 23
Program Table............................................... 23
Name......................................................23
Move.......................................................23
Delete .....................................................23
APS (Auto Programming System)..........23
Country ................................................23
Source Menu .................................................... 24
PC Mode Menu System........................................ 24
PC Position Menu............................................. 24
Autoposition .................................................. 24
H (Horizontal) Position.................................. 24
V (Vertical) Position ...................................... 24
Phase............................................................ 24
Dot Clock ...................................................... 24
PC Picture Menu........................................... 25
Sound Menu ................................................. 25

English - 2 -
Feature Menu ............................................... 25
Source Menu ................................................ 25
Displaying TV Information .................................... 25
Mute Function....................................................... 25
Picture Mode Selection......................................... 25
Freezing Picture ................................................... 25
Zoom Modes......................................................... 25
Auto .................................................................. 25
16:9................................................................... 25
4:3..................................................................... 25
Panoramic......................................................... 26
14:9................................................................... 26
Cinema ............................................................. 26
Subtitle.............................................................. 26
Zoom................................................................. 26
Teletext ................................................................. 26
Tips....................................................................... 27
Screen Care...................................................... 27
Image Persistence............................................ 27
No Power.......................................................... 27
Poor Picture...................................................... 27
No Picture......................................................... 27
Sound ............................................................... 27
Remote Control................................................. 27
Input Sources.................................................... 27
Appendix A: PC Input Typical Display Modes....... 28
Appendix B: AV and HDMI Signal Compatibility
(Input Signal Types).............................................. 29
Appendix C: Pin Specications............................. 30
SCART connector pin specications ................ 30
HDMI connector pin specications ................... 30
Signal Input....................................................... 30
PC RGB Terminal (D-sub 15-pin connector). 30
Specications ....................................................... 31
Important Instruction............................................. 32

English - 3 -
Features
• Remote controlled colour LCD TV.
• HDMI connector for digital video and audio.
This connection is also designed to accept
high denition signals.
• 200 programmes from VHF, UHF.
• OSD menu system.
• Scart socket for external devices (such as
video, video games, audio set, etc.).
• Stereo sound system. (German+Nicam)
• Teletext, fastext, TOP text.
• Headphone connection.
• Automatic programming system.
• Forward or backward manual tuning.
• Sleep timer.
• Child lock.
• Automatic sound mute when no transmission.
• NTSC playback.
• AVL (Automatic Volume Limiting).
• When no valid signal is detected, after 5
minutes the TV switches itself automatically
to standby mode.
• PLL (Frequency Search).
• PC input.
• Plug&Play for Windows 98, ME, 2000, XP,
Vista.
• Audio line out.
• Game Mode (optional).
Accessories
EXIT
/GUIDE
WIDE
ABC DEF GHI
JKL MNO PQR
STU VWX YZ
MP<P
TV DTV
iI-II
INFO
- -
V P
+ +
-/--
PP 0
123
456
789
PC
OK
Remote Control
Batteries
2 X AAA
Instruction Book

English - 4 -
Introduction
Thank you for choosing this product. This
manual will guide you for the proper
operation of your TV. Before operating
the TV, please read this manual
thoroughly.
Please do keep this manual in a safe
place for future references.
Preparation
For ventilation, leave a free space of at least
10 cm all around the set. To prevent any fault
and unsafe situations, please do not place any
objects on top of the set.
Use this device in moderate climates.
Safety Precautions
Please read the following recommended
safety precautions carefully for your
safety.
Power Source
The TV set should be operated only from a
220-240 V AC, 50 Hz outlet. Ensure that you
select the correct voltage setting for your
convenience.
Power Cord
Do not place the set, a piece of furniture, etc.
on the power cord (mains lead) or pinch the
cord. Handle the power cord by the plug. Do
not unplug the appliance by pulling from the
power cord and never touch the power cord with
wet hands as this could cause a short circuit or
electric shock. Never make a knot in the cord or
tie it with other cords. The power cords should
be placed in such a way that they are not likely
to be stepped on. A damaged power cord can
cause re or give you an electric shock. When it
is damaged and needs to be replaced, it should
be done by qualied personnel.
Moisture and Water
Do not use this device in a
humid and damp place (avoid
the bathroom, the sink in the
kitchen, and near the washing
machine). Do not expose this
device to rain or water, as this
may be dangerous and do
not place objects lled with
liquids, such as ower vases,
on top. Avoid from dripping
or splashing.
If any solid object or liquid falls into the cabinet,
unplug the TV and have it checked by qualied
personnel before operating it any further.
Cleaning
Before cleaning, unplug the TV
set from the wall outlet. Do not
use liquid or aerosol cleaners.
Use soft and dry cloth.
Ventilation
The slots and openings on the TV set are
intended for ventilation and to ensure reliable
operation. To prevent overheating, these
openings must not be blocked or covered in
anyway.
Heat and Flames
The set should not be placed
near to open flames and
sources of intense heat such
as an electric heater. Ensure
that no open ame sources,
such as lighted candles,
are placed on top of the TV.
Batteries should not be exposed to excessive
heat such as sunshine, re or the like.
Lightning
In case of storm and lightning
or when going on holiday,
disconnect the power cord
from the wall outlet.
Replacement Parts
When replacement parts are required, make
sure that the service technician has used

English - 5 -
replacement parts, which are specied by the
manufacturer or have the same specications as
the original one. Unauthorized substitutions may
result in re, electrical shock or other hazards.
Servicing
Please refer all servicing to
qualied personnel. Do not
remove the cover yourself as
this may result in an electric
shock.
Waste Disposal
Instructions for waste disposal:
• Packaging and packaging aids are recyclable
and should principally be recycled. Packaging
materials, such as foil bag, must be kept away
from children.
• Batteries, including those which are heavy
metal-free, should not be disposed of with
household waste. Please dispose of used
battery in an environment friendly manner.
Find out about the legal regulations which
apply in your area.
• Cold cathode fluorescent lamp in LCD
PANEL contains a small amount of mercury;
please follow the local laws or regulations for
disposal.
Information for Users in European
Union Countries
This symbol on the product or
on its packaging means that
your electrical and electronic
device should be disposed
at the end of its service
life separately from your
household wastes. There are
separate collection systems
for recycling in EU.
For more information, please
contact the local authority or the dealer where
you purchased the product.
Disconnecting the Device
The mains plug is used to disconnect TV set
from the mains and therefore it shall remain
readily operable.
Headphone Volume
Excessive sound pressure from
earphones and headphones
can cause hearing loss.
Installation
To prevent injury, this device
must be securely attached to the wall in
accordance with the installation instructions
when mounted to the wall (if the option is
available).
LCD Screen
The LCD panel is a very high technology product
with about a million thin lm transistors, giving
you ne picture details. Occasionally, a few
non-active pixels may appear on the screen
as a xed blue, green or red point. Please note
that this does not affect the performance of
your product.
Warning
Do not leave your TV in standby or operating
mode when you leave your house.
.

English - 6 -
Overview of the Remote Control
EXIT
/GUIDE
WIDE
ABC DEF GHI
JKL MNO PQR
STU VWX YZ
1
2
3
4
5
6
7
8
9
10
11
12
13
14
15
16
17
18
19
20
21
22
23
24
25
26
27
28
29
30
MP<P
TV DTV
iI-II
INFO
- -
V P
+ +
-/--
PP 0
123
456
789
PC
OK
Standby1.
Yellow (Feature menu)2.
Blue (Install menu)3.
Previous programme4.
Cursor up5.
Cursor right6.
Cursor down7.
TV mode / (No function)8.
Mono/Stereo - Dual I-II9.
Programme up/down10.
Numeric buttons11.
(No function)12.
Hold (in TXT mode) 13.
Update (in TXT mode) 14.
Index page / Guide (No function)15.
Reveal (in TXT mode) / Switch from TV to 16.
PC
Green (Picture menu)
17.
Red / (Sound menu)18.
Menu on/off19.
Ok / Conrm20.
Cursor Left21.
AV / Source22.
Info23.
Volume up/down24.
Mute25.
Personal preferences26.
Time27.
Teletext28.
Mix (in TXT mode) 29.
Expand (in TXT mode) / Image size30.

English - 7 -
LCD TV and Operating Buttons
FRONT VIEW
REAR VIEW
Standby button
1.
TV/AV button2.
Programme Up/Down3.
buttons
Volume Up/Down buttons
4.
Note: Press “ ” /“ ”
buttons at the same time to view
main menu.
TOP VIEW
TV/ VA
E UM N
P\CH

English - 8 -
Viewing the Connections- Back Connectors
SCART socket1. inputs or outputs for external devices.
Connect the SCART cable between SCART socket on TV and SCART socket on your
external device (such as a decoder, a VCR or a DVD player).
Note: If an external device is connected via the SCART socket, the TV will automatically
switch to AV mode.
Component Video Inputs (YPbPr)
2. are used for connecting component video.
You can connect the component video and audio sockets with a device that has component
output. Connect the component video cables between the COMPONENT VIDEO INPUTS
on on the TV and the component video outputs of your device. While connecting, be sure
that the letters on your TV, “Y”, “Pb”, “Pr” correspond with your device’s connectors.
PC/YPbPr Audio Inputs
3. are used for connecting audio signals of a PC or a device that
connects to the TV via YPbPr.
Connect the PC audio cable between the AUDIO INPUTS on the TV and audio output of
your PC to enable PC audio.
Connect the audio cable between AUDIO INPUTS on the TV and audio outputs of your
device to enable component audio.
S/PDIF Out
4. outputs digital audio signals of the currently watched source.
Use an S/PDIF coaxial cable to transfer audio signals to a device that has S/PDIF input.
You should also set SPDIF Out option in the Sound Menu as On.
RF Input5. connects to an antenna or a cable.
Note that if you use a decoder or a media recorder, you should connect the aerial cable
through the device to the television with an appropriate antenna cable, as shown in the
illustrationin the following pages.

English - 9 -
Audio Line Outs6. output audio signals to an external device such as an optional sound
system.
To connect the external speakers to your TV, use AUDIO LINE OUTS of the TV with an
audio cable. Note: Line out feature cannot be used while in HDMI source. You can use
SPDIF instead.
PC Input
7. is for connecting a personal computer to the TV set.
Connect the PC cable between the PC INPUT on the TV and the PC output on your PC.
HDMI 1:
8. HDMI input
HDMI Input is for connecting a device that has an HDMI socket.
Your LCD Television is capable of displaying High Denition pictures from devices such as a
High Denition Satellite Receiver or DVD Player. These devices must be connected via the
HDMI sockets or Component Socket. These sockets can accept either 480i, 480p, 576p,
576i, 720p, 1080i, 1080p signals. No sound connection is needed for an HDMI to HDMI
connection.
When you use the wall mount kit (optional) with the LCD TV, we would denitely recommend to
plug all your cables into the back of the LCD before mounting to the wall.

English - 10 -
Viewing the Connections - Side Connectors
Headphone jack is used for connecting an external1.
headphone to the system. Connect to the HEADPHONE
jack to listen to the TV from headphones (optional).
Video Input is used for connecting video signals of
2.
external devices.Connect the video cable between the
VIDEO IN socket on the TV and the VIDEO OUT jack on
your device.
Audio Inputs are used for connecting audio signals of
3.
external devices. Connect the audio cable between the
AUDIO INPUTS on the TV and the AUDIO OUTPUT jacks
on your device.
Note: If you connect a device to the TV via the VIDEO
INPUT, you should also connect your device with an audio
cable to the AUDIO INPUTS of the TV to enable audio.

English - 11 -
Power Connection
IMPORTANT: The TV set is designed to operate on 220-240V AC, 50 Hz.
• After unpacking, allow the TV set to reach the ambient room temperature before you connect
the set to the mains.
• Plug the power cable to the mains socket outlet.
Aerial Connection
• Connect the aerial or cable TV plug to the AERIAL INPUT socket located at the rear of the TV.
REAR VIEW

English - 12 -
Connecting the LCD TV to a PC
For displaying your computer’s screen image on your LCD TV, you can connect your computer
to the TV set.
• Power off both computer and display before making any connections.
• Use 15-pin D-sub display cable to connect a PC to the LCD TV.
• When the connection is made, switch to PC source. See “Input selection” section.
• Set the resolution that suits your viewing requirements. Resolution information can be found in
the appendix parts.
REAR VIEW
PC audio cable
(not supplied)
to AUDIO INPUTS
on the TV
PC RGB cable
(not supplied)
to PC input
Audio
Inputs
PC Input

English - 13 -
Connecting to a DVD Player
If you want to connect a DVD player to your LCD TV, you can use connectors of the TV set. DVD
players may have different connectors. Please refer to your DVD player’s instruction book for
additional information. Power off both the TV and the device before making any connections.
Note: Cables shown in the illustration are not supplied.
• If your DVD player has an HDMI socket, you can connect via HDMI. When you connect to DVD
player as illustrated below, switch to HDMI source. See, “Input Selection” section.
• Most DVD players are connected through COMPONENT SOCKETS. Use a component video
cable to connect video input. For enabling audio, use a component audio cable as illustrated
below. When the connection is made, switch to YPbPr source. See, “Input selection” section.
• You may also connect through the SCART socket. Use a SCART cable as shown below.
Note: These three methods of connection perform the same function but in different levels of quality. It is not
necessary to connect by all three methods.
HDMI
input
Scart socket
Component
video
inputs
Component
audio
inputs
DVD Player
REAR VIEW

English - 14 -
Using Side AV Connectors
You can connect a range of optional equipment to your LCD TV. Possible connections are shown
below. Note that cables shown in the illustration are not supplied.
• For connecting a camcorder, connect to the VIDEO IN socket and the AUDIO SOCKETS. For
selecting the related source, see the section “Input selection” in the following parts.
• To listen the TV sound from headphones, connect to the HEADPHONE jack of theTV.
Camcorder
Headphone
SIDE VIEW

English - 15 -
Using Other Connectors
You can connect a range of optional equipment to your LCD TV. Possible connections are shown
below. Note that cables shown in the illustration are not supplied.
• To connect external speakers, use an audio cable. Do not reverse the AUDIO LEFT and AUDIO
RIGHT jacks. Turn on the LCD TV and external speaker set after all connections are made.
Refer to your speaker set’s manual for further queries.
• For connecting a to a device that has SPDIF support, use an appropriate SPDIF cable to enable
sound connection. You should also set SPDIF Out option in the Sound menu as On.
External Speakers
A device that
supports
SPDIF signal.
REAR VIEW

English - 16 -
Connecting Other Equipment via Scart
Most devices support SCART connection. You can connect a; DVD recorder, a VCR or a decoder
to your LCD TV by using the SCART socket. Note that cables shown in the illustration are not
supplied.
Power off both the TV and the devices before making any connections.
For more information, refer to your device’s own instruction book.
REAR VIEW
Scart socket
Decoder
DVD Recorder Video Recorder

English - 17 -
Inserting Batteries in the
Remote Control Handset
• Remove the battery cover located on the back
of the handset by gently pulling backwards
from the indicated part.
• Insert two AAA/R3 or equivalent type batteries
inside. Place the batteries in the right directions
and replace the battery cover.
+
Note: Remove the battery from remote control
handset when it is not to be used for a long period.
Otherwise it can be damaged due to any leakage of
batteries.
Operating Range for the
Remote Control
• Point the top of the remote control toward the
LCD TV’s remote sensor LED while pressing
a button.
30 30
EXIT
/GUIDE
WIDE
ABC DEF GHI
JKL MNO PQR
STU VWX YZ
MP<P
TV DTV
iI-II
INFO
- -
V P
+ +
-/--
PP 0
123
456
789
PC
OK
Remote range is approximately 7m/23ft.
Switching the TV On/Off
To Switch the TV On
• Connect the power cord to the 220-240V AC,
50 Hz.
• Press STANDBY switch. Then the standby
LED lights up.
• To switch on the TV from standby mode
either:
• Press the “ ” button, P+ / P- or a numeric
button on the remote control..
• Press the -P/CH or P/CH+ button on the TV.
The TV will then switch on.
Note: If you switch on your TV via PROGRAMME
UP/DOWN buttons on the remote control or on the
TV set, the programme that you were watching last
will be reselected.
By either method the TV will switch on.
To Switch the TV Off
• Press the “ ” button on the remote control
or press the STANDBY switch, so the TV will
switch to standby mode.
• To power down the TV completely, unplug
the power cord from the mains socket.

English - 18 -
First Time Installation
When the TV set is operated for the rst time, the
following menu screen will be displayed:
Select your Country, Language and Text
language by using “ ” or “ ” and “ ” or “ ”
buttons. Press OK or RED button to continue.
To cancel, press the BLUE button.
The following menu will be displayed during the
automatic tuning:
After APS is nalized, the programme table
will appear on the screen. In the programme
table you will see the programme numbers and
names assigned to the programmes.
If you do not accept the locations and/or the
programme names, you can change them via
the program table.
Do not turn off the TV while initializing firs time
installation.
Input Selection
Once you have connected external systems
to your TV, you can switch to different input
sources.
• Press “ ” button on your remote control for
directly changing sources.
or,
• Select “Source” option from the main menu
by using “ ” or “ ” button. Use then “ ” or
“ ” button to highlight an input and press
“ ” button to select.
Note: You can mark desired source options by pressing
the OK button. Therefore, when “” button is
pressed, only the marked source options will be
available (except for the TV source)..
Basic Operations
You can operate your TV using both the
remote control and onset buttons.
Operation with the Buttons on the TV
Volume Setting
• Press “ ” button to decrease volume
or “ ”button to increase volume, so a
volume level scale (slider) will be displayed
on the screen.
Programme Selection
• Press “P/CH +” button to select the next
programme or “P/CH -” button to select the
previous programme.
Viewing Main Menu
• Note: Press “ ” / “ ” buttons at the
same time to view main menu. In the Main
menu select sub-menu using “P/CH -” or
“P/CH +” buttons and enter the sub-menu
using “ ” or “ ” buttons. To learn the
usage of the menus, refer to the menu system
sections.

English - 19 -
AV Mode
• Press the “TV/AV” button in the control panel
on the TV to switch between AV modes.
Operation with the Remote Control
• The remote control of your TV is designed
to control all the functions of the model you
selected. The functions will be described in
accordance with the menu system of your
TV.
• Functions of the menu system are described
in the following sections.
Volume Setting
• Press “V+”button to increase the volume.
Press “V-”button to decrease the volume. A
volume level scale (slider) will be displayed
on the screen.
Programme Selection (Previous or Next
Programme)
• Press “P-” button to select the previous
programme.
• Press “P+” button to select the next
programme.
Programme Selection (Direct Access)
• Press numeric buttons on the remote control
to select programmes between 0 and 9. The
TV will switch to the selected programme. To
select programmes between 10-199, press
the numeric buttons consecutively (e.g. for
programme 27, first press 2 and then 7).
When the pressing time is due for the second
numeric button, only the rst digit programme
will be displayed. The limit of the delay time
is 3 seconds.
• Press directly the programme number to
reselect single digit programmes.
Navigating the Menu System
For displaying
menu options
For navigation
To confirm choices
• Press “M” to display the main menu.
• Press “ ” or “ ” button to select an icon.
• Use “ ” or “ ” button to highlight.
• Press “ ” or “ ” buttons to change the
settings.
• Press “ ” for more options.
• Press OK to store.
• To exit the menu or return from sub-menu
screen, press “M”.
Note: These explanations are valid for the navigation
of the menu system. To select options that are
explained in the following parts, refer to “Navigating
the Menu System”.
Menu System
Picture Menu
Mode
For your viewing requirements, you can set the
related mode option.
Press “ ” or “ ” button to select Mode. Press
“ ” or “ ” button to choose from one of these
options: Cinema, Dynamic and Natural.
Brightness/Contrast/Colour/Sharpness/
Tint
Press “ ” or “ ” button to select the desired
option. Press “ ” or “ ” button to set the level.

English - 20 -
Note: Hue option can only be visible when the TV
receives an NTSC signal.
Colour Temp
Press “ ” or “ ” button to select Colour Temp.
Press “ ” or “ ” to choose from one of these
options: Cool, Normal and Warm.
Note:
• Setting Cool option gives white colours a slight
blue stress.
• Setting Warm option gives white colours a slight
red stress.
• For normal colours, select Normal option.
Noise Reduction
If the broadcast signal is weak and the picture
is noisy, use Noise Reduction setting to reduce
the noise amount.
Press “ ” or “ ” button to select Noise
Reduction. Press “ ” or “ ” to choose from one
of these options: Low, Medium, High or Off.
Film Mode
Films are recorded at a different number
of frames per second to normal television
programmes.
Press “ ” or “ ” button to select Film Mode.
Press “ ” or “ ” button to set this feature On
or Off.
Turn this feature on when you are watching.
lms to see the fast motion scenes clearly.
Game Mode (optional)
Select Game Mode by pressing “ ” or
“ ” button. Use “ ” or “ ” button to set Game
Mode as On or Off. When Game Mode is set
to On, specific game mode settings, which
are optimized for better video quality, will be
loaded.
Also; Picture Mode, Contrast, Brightness,
Sharpness, Colour and Colour Temp settings
will be invisible and disabled while Game Mode
is on.
Note:
Picture mode selection button on the remote control
will have no function while Game Mode is on.
Picture Zoom
Select Picture Zoom by pressing “ ” or
“ ” button.
Use “ ” or “ ” buttons, to change picture zoom
to Auto, 16:9, 4:3, Panoramic, 14:9, Cinema,
Subtitle or Zoom.
Store
Press “ ” or “ ” button to select Store.
Press “ ” or OK button to store the settings.
“Stored...” will be displayed on the screen.
Reset
Press “ ” or “ ” button to select Reset. Press
“” or “ ” or OK button to reset the picture
modes to factory default settings.
Sound Menu
Volume
Press “ ” or “ ” button to select Volume.
Press “ ” or “ ” button to change the level of
the Volume.
Equalizer
Press “ ” or “ ” button to select Equalizer.
Press “ ” button to view equalizer menu.
Press “ ” or “ ” button to change the preset.
In equalizer menu, the preset can be changed
Table of contents
Other Walker LCD TV manuals