wallas SafeFlame 86D Manual

Wallas 86D
Installation, operation and service instructions
Montage-, Anwendungs-, und Wartungsanleitungen
Monterings-, användnings- och serviceanvisningar
Asennus-, käyttö- ja huolto-ohjeet
Installatie, bediening en service handleiding
490048C

86D
1 / ENGLISH
490048C
TECHNICAL DETAILS
Content of the package
1 pc 86D diesel oven
1 pc Baking sheet
1 pc Baking tray
1 pc Control panel
1 pc Control panel wire
1 pc Extra wire for control panel
1 pc Auxiliary bag
4 m Power cord
4 m Fuel hose with a filter
2 pcs Fixing strip
2 pcs Lifting handle of oven
Content of the auxiliary bag:
4 pcs 5 x 16 standard screw
2 pcs 3.5 x 13 standard screw, black
1 pc Hose clamp
1 pc Fuse box bag
Figure 1: Diesel oven SafeFlame 86D
Table 1: Technical details of oven 86D.
Operation
SafeFlame 86D is a safe
diesel oven with no open
flame. The oven extracts
combustion air from the boat
and blows the exhaust gases
out. Therefore when the oven
is used, the air circulates in
the boat and stays both fresh
and dry. The steam from the
exhaust gas will not stay in
the boat to add humidity.
As the oil burns, the
released heat is transferred
to the oven with a heat
exchanger. The circulation
fan circulates the hot air from
the heat exchanger to the
oven. The heat is steplessly
adjustable with a thermostat.
The oven is ideally suited for
cooking and heating of all
kinds of food.
The oven is made entirely of
stainless materials.
leuF lioecanruf,lioleseiD
egatlovgnitarepO CDV21
noitpmusnocleuF h/l22.0–1.0
yticapacgnitaeH Wk2.2–1
noitpmus
nocrewoP tA.A6.1nosithgilehtnehw,A5.0
A8.nim7tuobarofnoitingi
snoisnemiD mm083x535x574
thgieW gk5.42.xorppA
dettimrepmumixaM
tsuahxeehtfohtgnel
esoh
m4
dettimrepmumixaM
esohleufehtfohtgnel m8
ehtfoaeramuminiM
gninepor
iatnemecalper mc001
2
-daeltsuahxeelbacilppA
shguorht 0642dna7642,8643
seirosseccA gnitnuom-labmig311

86D
2 / ENGLISH
490048C
2
1
3
INSTALLATION
Figure 3: Measurements for the installation cut-out.
Figure 2: Cut-out for 86D control panel.
The installation cut-
out of the oven must
have a replacement
air opening of at
least 100 cm2.
The minimum
measurements for the
installation space are
500x400x530 mm (WxHxD).
Do not put other devices in
the installation space. Make
holes, which comprise a
combined area of at least
100 cm2, at the base of the
cut-out for the cooling air (1).
There must also be at least
100 cm2 of free space
above the oven for the
cooling air if the top part of
the oven is to be covered
with a plate, or if it is to be
installed in a closed space
(2). The installation cut-out
should be made of fireproof
material, or it should be lined
with fireproof material.
The dimensions of the cut-
out for the control panel are
143 x 40 mm (figure 2). The
length of the control panel
wire is 1.5 m. Heat will
shorten the lifetime of the
electronic equipment. For
this reason, installation of the
control panel immediately
above the oven door is not
recommended.
Figure 5: Fastening the 86D control panel to the tabletop.
3,5x13
Fastening the control panel
The control panel is fastened
at the desired place on the
tabletop with two screws.
Cut-out for the installation
Figure 4: Location of the screws.
You must not mount the
85D cooking range and
the 86D oven to the
same installation
opening. 85D and 86D
require an installation
opening of their own.

86D
3 / ENGLISH
490048C
6
4
INSTALLATION
Fastening of the device
Fasten the oven with the two
fixing strips (Figure 3 (3)),
which have been screwed
onto base (4 universal
screws, 5x16 mm). Make
sure the strips are securely
fastened!
Lift the oven onto the fixing
strips so that the back
screws (4) slide into its
grooves (5). Tighten the
screws in the front (6) (2 DIN
933 A2 M5x16 screws)
using a 10 mm fork wrench.
Figure 7: 86D connections.
1. Exhaust gas hose. The exhaust gas pipe of the oven is insulated by
using a Ø 45 mm jacket tube. A combination lead-through is used for
the removal of exhaust gases, at which the jacket tube is fastened to
the outermost pipe of the lead-through.
2. Lamp and thermostat connector
3. Lamp and thermostat connector (PCB)
4. Control panel
5. Power cord
6. Fuel hose
Connections
5
4
1
Tighten the hose clamp
2
3
Figure 6: Installing and tightening the oven 86D into place
6
Solenoid valve Brown
Black
5

86D
4 / ENGLISH
490048C
USE
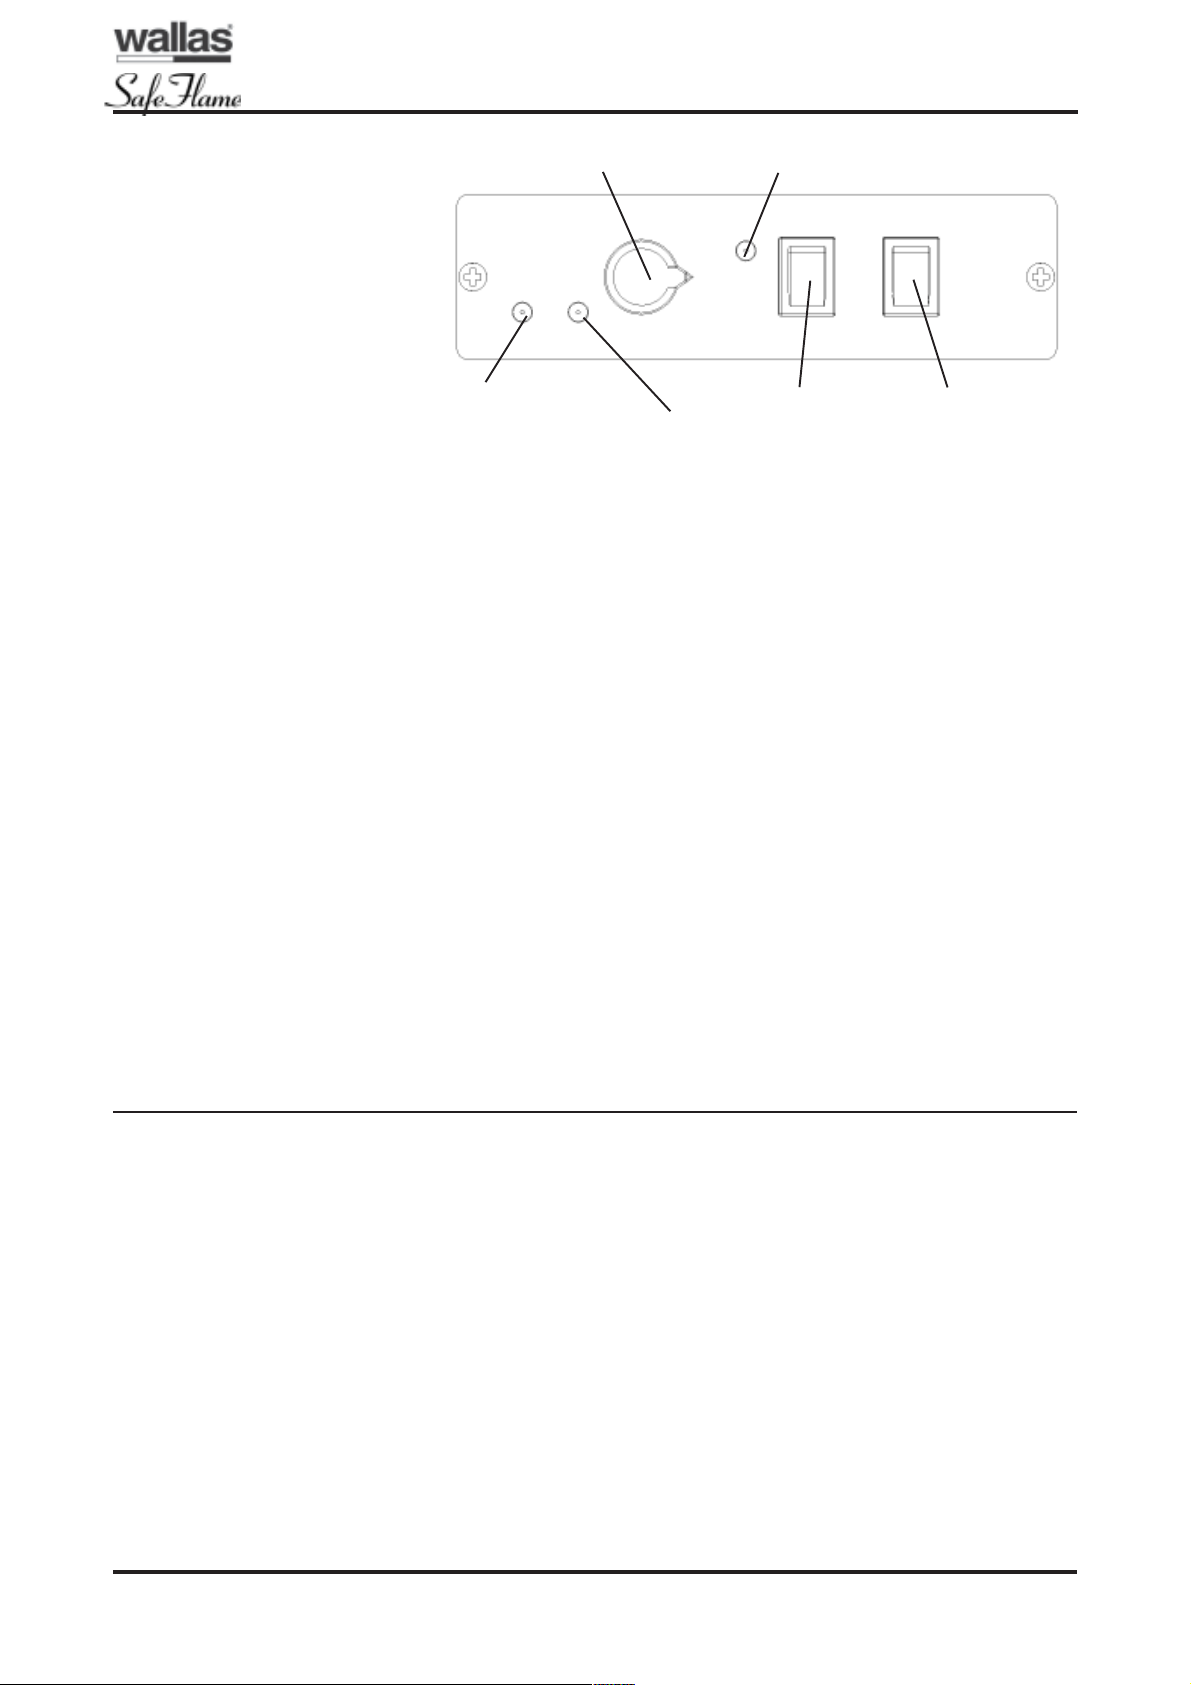
Figure 8: Operating switches of the oven
Thermostat knob
Power switch
Power indicator lamp
Combustion indicator
lamp
Use of the oven
The oven starts to heat up
automatically when the
power switch is turned to ON
position. The yellow indicator
lamp lights up as soon as
the oven is switched on. The
red combustion lamp will
light up when the combustion
has smoothened in the
burner, after 2.5–4 minutes
from the start-up.
The device will not
necessarily start at first after
the installation when the fuel
hose is empty. Then the
combustion light starts to
blink about 4.5 minutes after
the start-up. Turn the power
switch to OFF position. The
device cannot be restarted
until both indicator lamps
have gone out (cooling).
Once the indicator lamps
have gone out, restart the
device. The combustion
lamp will light up about 2.5 –
4 minutes after the start-up,
when the combustion is
normal.
After starting, the
temperature of the oven can
be adjusted steplessly by
using the thermostat knob
with a temperature scale.
The thermostat indicator
lamp lights up when the oven
starts up and goes out after
the inner temperature of the
oven has reached the level
shown by the thermostat. If
the temperature drops below
the set value, the thermostat
lamp lights up again and
remains on until the given
temperature has been
reached. You should avoid
unnecessary, quick adjusting
back and forth, as it gathers
soot in the burner.
Turn the power switch to
OFF position to switch off
the oven. The red
combustion lamp will keep
blinking for about 5 minutes
while the device is cooling
down. You cannot restart the
oven until the combustion
lamp has stopped blinking.
The lamp inside the oven is
operated by a separate
switch any time the power
cord of the oven is
connected to the power
supply.
Please note the following when using the oven
When using baking paper in
the oven, the unnecessary
edges of the paper should
be cut out, because they
disturb the air circulation in
the oven. It is recommended
to push the baking sheet and
the baking tray to the back
wall of the oven.
We recommend you let the
oven warm up before putting
the dish to cook in the oven.
While heating the oven the
baking sheet should be
taken out; the oven will then
heat up more quickly.
Thermostat indicator
lamp
Inner light switch

86D
5 / ENGLISH
490048C
SERVICING
* Opening the locking:
1. Switch the power ON (lock blinking).
2. Disconnect the main power cord (blinking stops).
3. Reconnect the main power cord (the yellow LED lights up for 1-3
seconds).
4. When the yellow LED has gone out, switch the power OFF.
Table 2:
If the device will not
start, even though the
fuel has reached the
pump, do not try to
start it more than twice
without checking the
cause of the problem.
Cleaning and care of the oven
The oven as well as the
baking sheet and tray should
be cleaned after use with a
moist cloth and dried
thereafter. If necessary, use
liquid detergents and
remember to wipe and dry
the oven after cleaning.
Do not use scratching
cleaning sponges or
scrubbing agents.
The technical parts of the
stove shall be serviced
according to general
servicing recommendations
of Wallas equipment.
Indicator lamps for functions and disturbances
Table 2 shows the error
messages linked to different
functions and operational
faults.
If necessary, please contact
the nearest Wallas repair
shop.
-locDEL
ruo etargniknilBgninaeM
noitcnuF
wolleY.tilyltatsnoCnosirewoP
deR.tilyltatsnoC
;rotacidninoitsubmoC
sahn
oitsubmoc
.yllamrondetrats
deRs52,0gnilooC
;melborP
noitacidnirorrE
5rofstsal
dnasetunim
derehtylnoneht
.knilbl
liwDEL
wolleYs2melborpwolG
wolleY 2dnas521,0
s
rewolbnoitsubmoC
melborp
wolleY
,s521,0
2dnas521,0
s
melborpnafnoit
alucriC
wolleYs52,0egatlovrednU
wolleY
deRdna s521,0
ecivedeht;gnikcoL
2retfaflestiskcol
*.stratslufsseccusnu
d
eRs52,0taehrevO
deRs03noitacidnirorreretfA

We reserve the right to make changes.
Änderungen vorbehalten.
Rätten till ändringar förbehålles.
Oikeudet muutoksiin pidätetään.
Wijzigingen voorbehouden.
Wallas-Marin Oy
Kärrykatu 4
20780 Kaarina Finland
www.wallas.com
Tel. +358 (0)2 412 0500
Fax +358 (0)2 412 0510
Other manuals for SafeFlame 86D
2
Table of contents
Other wallas Oven manuals
Popular Oven manuals by other brands

PowerXL
PowerXL CRISP 'N BAKE TOD3415B-LA Use & care manual

EAS Electric
EAS Electric EMV70DGN instruction manual

Royale
Royale RY60TGW Installation and operating instructions

Kuppersbusch
Kuppersbusch EEB 6600.0 user guide

Fisher & Paykel
Fisher & Paykel OB30DDEPX1 user guide

Hotpoint Ariston
Hotpoint Ariston FH G /HA operating instructions