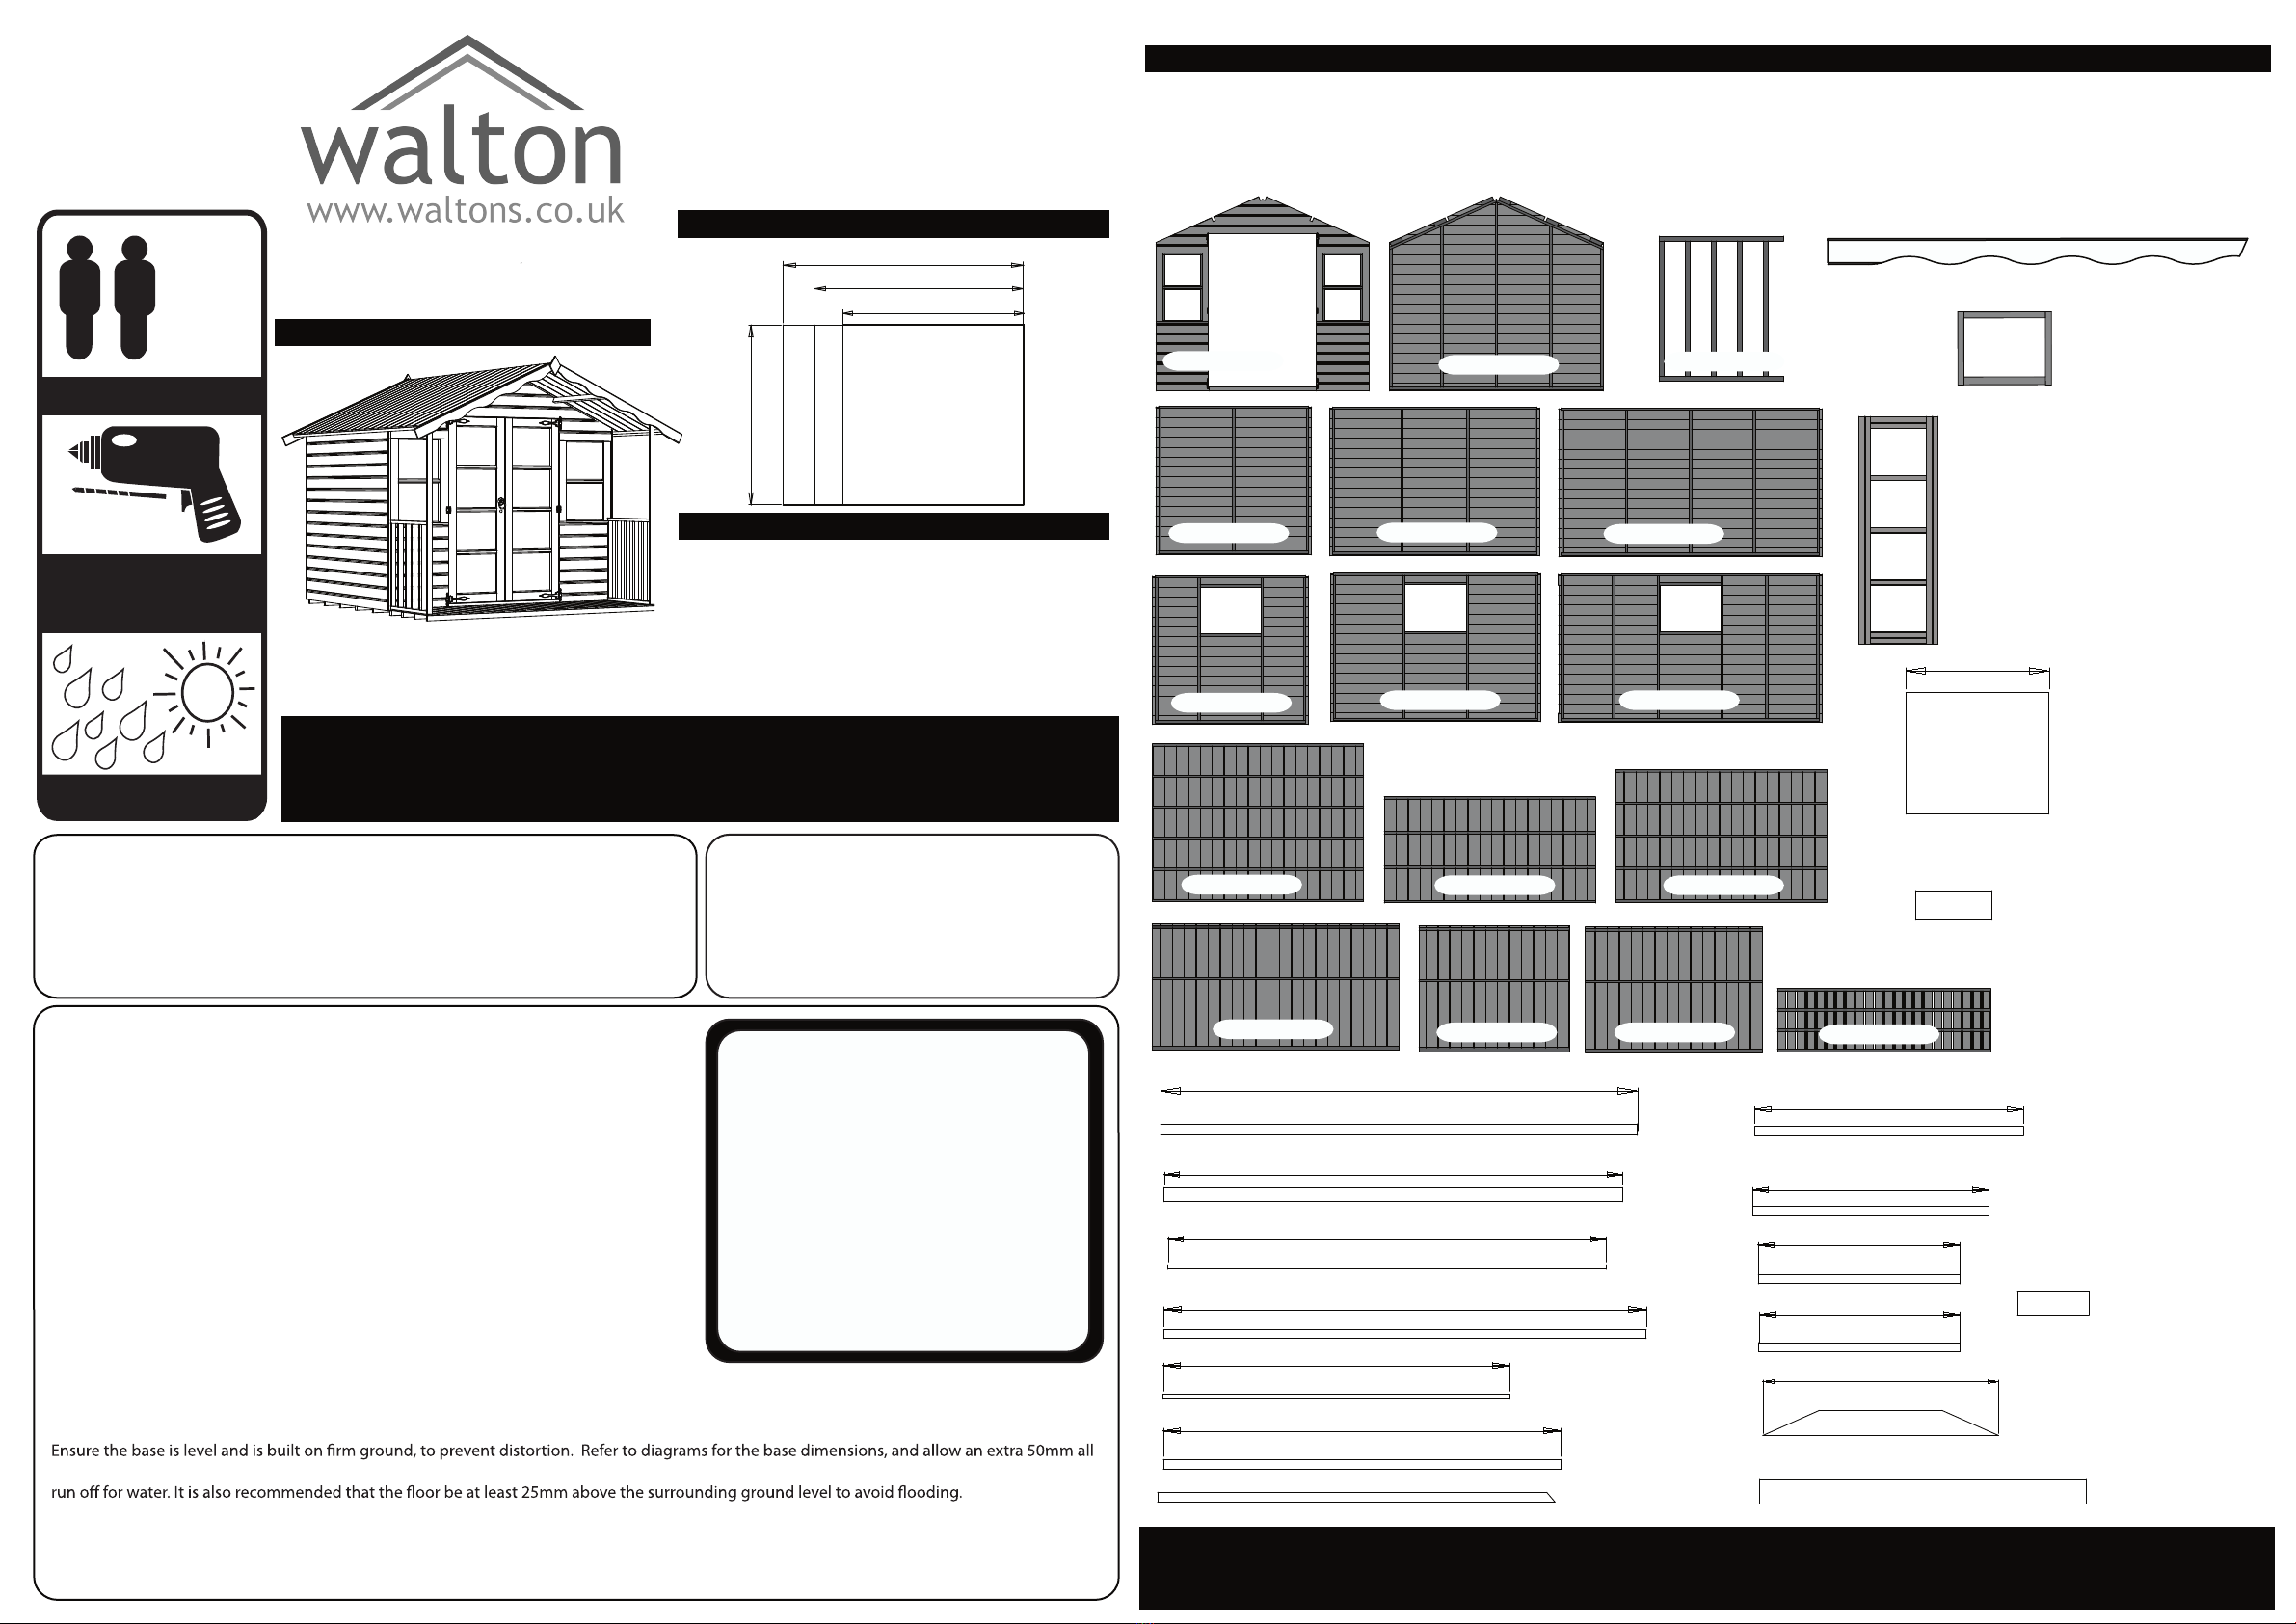
manuals.online logo
Brands
  1. Home
  2. •
  3. Brands
  4. •
  5. Walton
  6. •
  7. Garden House
  8. •
  9. Walton Sussex Summerhouse User manual

Walton Sussex Summerhouse User manual

BUILDING CONTENTS
2918
1703
1207
1680
500
692
415
375
373
2315
655
435
Veranda Rail Glazed
Side Window
Fornt Gable
Glazing
Side WIndow beading
Front Glazing Beading
Side WIndow Beading
Support Bar Block
10&12 models only
12x8 Roof Support
10x8 Roof Support
Door Beading
Door Head Beading
Corner strips
Fascia
Door Block
03WES0808PS 03WES1008PS 03WES1208PS
03WES0808WS 03WES1008WS 03WES1208WS
03WES0808F 03WES1008F 03WES1208F
03WES0808R 03WES1008R 03WES1208R
Veranda Floor
03WES0808PG 03WES0808VR
03WES0808V
Veranda Upright
1705
Tower Bolt Mount
140
Height x Width x Depth
2330mm x 2413mm x 3725mm (12’x8’)
2330mm x 2413mm x 3125mm (10’x8’)
2330mm x 2413mm x 2510mm (8’x8’)
This building should be
erected by two people.
For ease of assembly, it is
advisable to pilot drill all
screw holes and ensure all
screw heads are countersunk.
WINTER = HIGH MOISTURE = EXPANSION
SUMMER = LOW MOISTURE = CONTRAC TION
Drill
2mm bit
x2
CARE & USE
WOOD TREATMENT All buildings will need treating with a good quality preservative /
treatment prior to or during assembly and retreated annually. Preservative / treatments
are available in a choice of colours and is left to the customers preference.
Varnish is not recommended.
NATURAL MOVEMENT OF TIMBER THROUGHOUT THE SEASON Timber is a natural
material and will, during the year pick up moisture in damp periods and dry out
during hot spells. There will be constant expansion and contraction of the timbers
which will be particularly noticeable during the dry periods as the boards will shrink,
this is why all buildings have slight tolerances built into them.
BUILDING A BASE
When thinking about where the building and base is going to be constructed:
Ensure that there will be access to all sides for maintenance work and annual treatment.
TYPES OF BASE
Concrete 75mm laid on top of 75mm hard-core.
Slabs laid on 50mm of sharp sand.
round. The base should be slightly smaller than the external measurement of the building, i.e. the cladding should overlap the base, creating a
Before you start
- Tools required for installation (Not Supplied)
- Drill & 2mm drill bit, Hammer, Spirit level, Measuring tape, Screwdriver (Phillips),
Stanley knife, Wood Saw & Step Ladder
- Check the pack and make sure you have all the parts listed.
- When you are ready to start, make sure you have the right tools at hand,
plenty of space and a clean dry area for assembly.
For Assistance Please
Contact Customer Care on :-
01636 880514
Base Required
Specification
Your instructions should be read carefully before commencing assembly.
Dispose of all packaging and plastic bags safely. Retain instructions for
safety advice for future reference. Note: plastic bags can be harmful to small children.
If any parts have been
damaged during the assembly of
the building, replacement parts
can be ordered through our
customer care centre and will
carry a minimum charge.
Call Customer Care on :-
01636 880514
Sussex Summerhouse
2413mm
(10’x8’) 3125mm
(8’x8’) 2510mm
(12’x8’) 3725mm
Door
Door Strip
800
03WES0808DG
Fix a large hinge to the top and bottom of
each door and a small hinge in the middle
and x to the door gable using 30mm black
screws.
44 x 30mm black screws
Fix the door strips to the left
hand door using 3x30mm screws
per strip.
6 x 30mm screws
Door Fixings
Secure roof panels in place
using 60mm screws through roof
panel into the roof blocks.
60mm screws through roof in
alignment vertical with side frame
Locate the roof panel on top
of the building, allowing 50mm
overhang to the rear.
60mm screws x 16
50mm screws x 8
Once both roof sections are
secured, fix the side gables to
the floor as in the next section
(fixing method B).
30mm Screw - 6
10x8 & 12x8 x 40
50mm Screw - 8x8 x20
10x8 x28
12x8 x28
40mm Screw - 8x8 x 24
10x8 x 24
12x8 x 24
Felt Tacks - 8x8 x 112
10x8 x 136
12x8 x 160
Turnbutton x 2
60mm Screw - 8x8 x 54
10x8 x 56
12x8 x 60
Press Lock x1
Hinge x 4
b
Front
connect by a T & G joint. Fix with 8 x 50mm screws
50mm screw
For 10x8 and 12x8 Only
below.
Additional Roof Fixings
Finial x2
Tower Bolt x2
L Bracket
x2
L Channel x2
U Channel x2
Handle x1
Felt
10’x8’ and 12’x8’ Parts Only
30mm black Screw- 76
Window
Casement x1
25mm Glazing Pins - 153
8x50mm Screws
40x30mm Screws
30mm screws
40mm screws
* Important,
door gable,
remove screws
securing the
door from
bottom and top
of the panel.
Remove transportation blocks
from the bottom of each panel
before beginning assembly.
Each Panel should have two
blocks.
25mm Screw - 6
Antique Hinge x4
60mm
screws
60mm
screws
60mm
screws
3x40mm
screws per
corner trim
placed at
even spaces.
60mm screws x 12
40mm screws x 12
100mm
spacing
for felt
tacks
fold
corners
50mm
overhang
50mm
overhang
40mm nails x 12
25mm
25mm
glazing
pins
glazing
20/06/08
Felt Tacks 8x8 x 112, 10x8 x 136, 12x8 x 160
60mm Screws
8x8 x 16
10x8 x 16
12x8 x 20
30mm
Black Screws
5
5
Button
Verandah and Floor Fixing
2x turn button, fix one to top
and bottom of the door with
30mm black screw.
30mm
Black Screws
30mm black screws
black
black
60mm
screws
screws
screws
screws
screws
screws
glazing pins
screws

Other Walton Garden House manuals

Walton 5x5 Corner Playhouse Instruction manual

Walton

Walton 5x5 Corner Playhouse Instruction manual

Walton 7x7 Corner shed User manual

Walton

Walton 7x7 Corner shed User manual

Walton 01OSBP0602 User manual

Walton

Walton 01OSBP0602 User manual

Popular Garden House manuals by other brands

vidaXL 312066 quick start guide

vidaXL

vidaXL 312066 quick start guide

Leofric Building Systems FAIRFORD SHED instruction manual

Leofric Building Systems

Leofric Building Systems FAIRFORD SHED instruction manual

Gartenpro HP1007 28 2520F G Assembly instructions

Gartenpro

Gartenpro HP1007 28 2520F G Assembly instructions

Nordcabin Lovisa C 290600 manual

Nordcabin

Nordcabin Lovisa C 290600 manual

USP DURAMAX WoodSide-V2 owner's manual

USP

USP DURAMAX WoodSide-V2 owner's manual

Palmako FRB44-4735 installation manual

Palmako

Palmako FRB44-4735 installation manual

Oakville OF-95OS05 8x12 manual

Oakville

Oakville OF-95OS05 8x12 manual

Weka 221.2420.30.00 Assembly instructions

Weka

Weka 221.2420.30.00 Assembly instructions

Sunjoy A108000600 Assembly instruction

Sunjoy

Sunjoy A108000600 Assembly instruction

Luoman LILLEVILLA Roine Assembly and Maintenance

Luoman

Luoman LILLEVILLA Roine Assembly and Maintenance

Mercia Garden Products 03COR0707-V2 quick start guide

Mercia Garden Products

Mercia Garden Products 03COR0707-V2 quick start guide

telluria ELEGANTO 3930+ Assembly instructions

telluria

telluria ELEGANTO 3930+ Assembly instructions

Luoman Lillevilla 449 Assembly and Maintenance

Luoman

Luoman Lillevilla 449 Assembly and Maintenance

Palmako FRF19-2522 installation manual

Palmako

Palmako FRF19-2522 installation manual

ABSCO SHEDS J15301FK Assembly instruction

ABSCO SHEDS

ABSCO SHEDS J15301FK Assembly instruction

Gazebo penguin W1209 1/2-32 Assembly instructions

Gazebo penguin

Gazebo penguin W1209 1/2-32 Assembly instructions

Grosfillex ABRI UTILITY 11 ZF51 Assembly instructions

Grosfillex

Grosfillex ABRI UTILITY 11 ZF51 Assembly instructions

Mercia Garden Products 0619LOG015-V5 Assembly instructions

Mercia Garden Products

Mercia Garden Products 0619LOG015-V5 Assembly instructions

manuals.online logo
manuals.online logoBrands
  • About & Mission
  • Contact us
  • Privacy Policy
  • Terms and Conditions

Copyright 2025 Manuals.Online. All Rights Reserved.