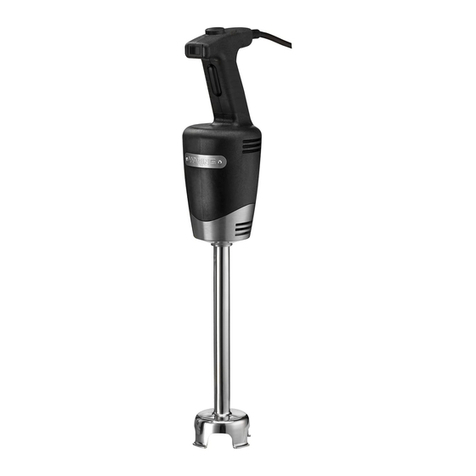
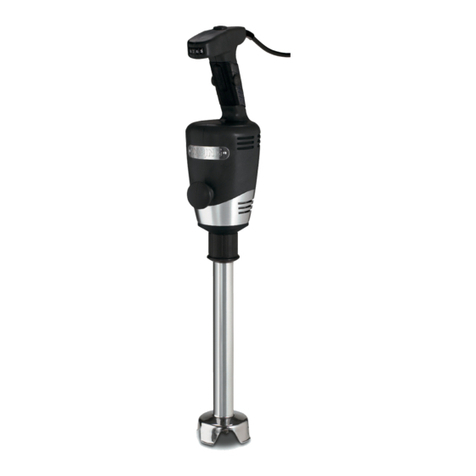
Waring WSB33XE/K User manual

For your safety and continued enjoyment of this product, always read the instruction book carefully before using.
Neem altijd de volledige instructies door vóór gebruik, voor een veilig en duurzaam gebruik van uw product.
Lesen Sie zu Ihrer eigenen Sicherheit und für dauerhafte Freude mit diesem Produkt vor der Inbetriebnahme
stets die Anleitung durch.
Per la sicurezza e per continuare a utilizzare questo prodotto, leggere sempre con attenzione il libretto di
istruzioni prima dell'uso.
Para sua segurança e melhor aproveitamento deste produto, sempre leia o manual de instruções antes de usar.
Para su seguridad y para disfrutar plenamente de este producto, siempre lea las instrucciones
cuidadosamente antes de usarlo.
Afin que votre appareil vous procure en toute sécurité beaucoup de satisfaction, lire attentivement le mode
d'emploi avant de l’utiliser.
IMMERSION BLENDER
STAAFMIXER
STABMIXER
FRULLATORE A IMMERSIONE
LIQUIDIFICADOR DE IMERSÃO
LICUADORA DE MANO
MIXER PLONGEANT
WSB33XE/K

WARRANTY
For Waring products sold outside the U.S. and Canada the warranty is the
responsibility of the local importer or distributor. This warranty may vary
according to local regulations.
WARNING: All warranties are VOID if appliance is used on direct
current (DC).
IMPORTANT SAFEGUARDS
When using an electrical appliance, basic safety precautions should always be
followed, including the following:
READ ALL INSTRUCTIONS.
1. Unplug from outlet when not in use and before cleaning.
2. To protect against risk of electrical shock, do not put motor base, cord or
plug in water or other liquid. The blade guard and shaft of this
appliance have been designed for submersion into water or other liquids.
Never submerge any other portion of this unit in any liquid.
3. Keep hands, hair, clothing, and utensils away from blade while operating
the Waring™ Immersion Blender to prevent the possibility of severe
injury to persons and/or damage to the immersion blender. A spatula may
be used but must be used only when the unit is not operating.
Avoid contact with moving parts.
4. Do not operate any appliance with a damaged cord or plug or
after the appliance malfunctions, or is dropped or damaged in any
manner. Return the appliance to the nearest Waring
®
authorised
service facility for examination, repair, electrical or mechanical
adjustment.
5. The use of accessory attachments not recommended or sold by Waring
for this specific model may result in fire, electric shock or personal injury.
6. Do not use outdoors.
7. Do not let any cord hang over the edge of the table or counter.
Do not let cord contact hot surfaces, including stovetop.
8. Do not place on or near a hot gas or electric burner, or in a heated oven.
9. Blade is SHARP. Handle carefully.
10. When mixing liquids, especially hot liquids, use a tall container or make
only small quantities at a time to reduce spillage and possibility of injury.
11. This appliance is not intended for use by persons (including children)
with reduced physical, sensory, or mental capabilities, or lack of
experience and knowledge, unless they have been given supervision or
instruction concerning use of the appliance by a person responsible for
their safety.
2

12. Children should be supervised to ensure that they do not play with the
appliance.
SAVE THESE INSTRUCTIONS
UK WIRING INSTRUCTIONS
The wires in the mains lead are coloured in accordance with the
following code:
BLUE = NEUTRAL BROWN = LIVE
As the colours of the wire in the mains lead of this appliance may
not correspond with the colour markings identifying the terminals
on your plug proceed as follows:
• The wire which is coloured BLUE must be connected to the
terminal which is marked with the letter N or coloured black.
• The wire which is coloured BROWN must be connected to the terminal
which is marked with the letter L or coloured red.
• Neither core should be connected to the earth terminal of a three
pin plug marked with the letter E or or is coloured green or green
and yellow.
With this appliance, if a 13 amp plug is used a 13 amp fuse should be fitted. If
any other type of plug is used a 10 amp fuse must be fitted either in the plug
or at the distribution board.
CONTENTS
Warranty ..................................................... 2
Important Safeguards ........................................... 2
UK Wiring Instructions ......................................... 3
Specifications.................................................. 4
The Parts..................................................... 4
Before You Begin............................................... 4
Using Your Waring Immersion Blender............................. 4
Cleaning Instructions ........................................... 6
3

SPECIFICATIONS
• RATINGS 230-240 V, 50Hz
• MOTOR w/RFI Suppression 2 speed II (HI) 20,500 +/-500RPM’s
I(LO) 15,500 +/-500RPM’s
•
Shaft/Blade Guard
Stainless Steel
• Cord 6 feet (Exposed) VDE recognised H03VVH2-F with
VDE plug for E models and UK plug for K models
• CE Listed
THE PARTS
1. Cord Wrap
2. Speed Control (2-speed switch)
3. Motor Base/Handle
4. Stainless Steel Shaft
5. Stainless Steel Protective Blade Guard
6. Metal Blade
(not shown)
BEFORE YOU BEGIN
NOTE: Always unplug the Waring™
Immersion
Blender
before cleaning the metal blade.
Before using the Immersion Blender,
Waring™
suggests that you wipe the unit with a clean, damp
cloth to remove any dirt or dust. Place the metal blade
end of the hand blender under running water to rinse it.
Dry thoroughly with a soft absorbent cloth. Read all instructions
completely for detailed operating procedures.
USING YOUR
WARING™
IMMERSION BLENDER
NOTE: Always unplug the
immersion blender
after each use. Keep
the
immersion blender
out of reach of children.
• To prevent splattering, be careful never to remove the
Waring™
Immersion Blender from the liquid while in operation.
• Use to blend ingredients to make salad dressing, whip eggs, and to
purée soups and sauces.
• Use II (HI) Speed for liquid ingredients, and keep the protective blade
guard at the bottom of the mixing container to prevent splattering.
• For recipes calling for ice, use crushed ice (not whole cubes) for best results.
4
3.
4.
5. 6.
1.
2.

5
NOTE: If a piece of food becomes lodged in the protective guard
surrounding the metal blade, follow the safety instructions
noted below:
1. Release the power button and unplug the unit from the electrical outlet.
2. Once the power source has been disconnected, use a spatula to carefully
remove the food lodged in the blade guard. Avoid injury. The blade is
sharp. DO NOT USE YOUR FINGERS TO REMOVE LODGED
OBJECTS.
3. After the lodged food has been removed, plug the unit back into its power
supply and continue processing.

6
CLEANING INSTRUCTIONS
THE IMMERSION BLENDER MUST BE CLEANED AND DRIED
ACCORDING TO THE FOLLOWING INSTRUCTIONS AFTER
EACH USE.
For Food Service Applications
• Disconnect from mains supply.
• Wash, rinse, and sanitise the stainless steel portion of the immersion blender
prior to initial use, after each use, or whenever it will not be used again
within a short period.
• Clean and sanitise the plastic motor housing prior to initial use and after
each use. Do not immerse the motor housing. Clean with a sponge or cloth.
• Washing solutions based on non-sudsing detergents, and chlorine-based
sanitising solutions having a minimum chloride concentration of 100 PPM
are recommended.
The following washing, rinsing, and sanitising solutions, or their equivalents,
may be used.
DILUTION
SOLUTION PRODUCT IN WATER TEMPERATURE
Washing Ajax®Sanitizer ¼ oz./2½ gallons Hot 115°F (46°C)
Cleaner Powder
Rinsing Plain Water Warm 95°F (35°C)
Sanitising Clorox®1 Tbl./Gallon Cold 50-70°F (10°-21°C)
Institutional Bleach
* Ajax®is a registered trademark owned by the Colgate Palmolive Company.
* Clorox®is a registered trademark owned by the Clorox Company.
• In repetitive use applications, frequent cleaning will prolong life.

7
To wash and sanitise the immersion blender:
1. Disconnect from mains supply.
2. Rinse the exterior of the stainless steel shaft and protective blade
guard of the immersion blender under running water. Scrub and
flush the interior of the protective blade guard and the blade.
A bottle brush is the most effective implement to dislodge and
remove as much food residue as possible.
3. Wipe down the exterior of the plastic housing and the stainless
steel portion of the immersion blender with a soft cloth or
sponge just dampened with the washing solution.
4. Immerse approximately 3/4 of the length of the stainless steel
shaft in a container of the washing solution and agitate manually
to remove remaining residue.
5. Repeat steps two (2) and three (3) using running water in place of
the washing solution.
6. Wipe down the exterior of the plastic housing and the stainless
steel portion of the immersion blender with a soft cloth or
sponge dampened with sanitizing solution.
7. DO NOT RINSE AFTER SANITISING IS COMPLETE.
Allow to air dry before use.
IMPORTANT: DO NOT IMMERSE PLASTIC HOUSING
IN WASHING SOLUTION, RINSE WATER, OR
SANITISING SOLUTION. PREVENT LIQUID FROM
RUNNING INTO PLASTIC HOUSING BY WIPING WITH
DRY CLOTH OR DAMP SPONGE. WHILST CLEANING
ALWAYS KEEP YOUR IMMERSION BLENDER IN THE
UPRIGHT POSITION.

8
GARANTIA
Para os produtos Waring vendidos fora dos EUA eCanadá, agarantia
éde responsabilidade do importador ou distribuidor local. Esta
garantia pode variar de acordo com as regulamentações locais.
ATENÇÃO: Todas as garantias serão ANULADAS se oaparelho for
usado em corrente contínua (DC).
CUIDADOS
IMPORTANTES
Ao utilizar aparelhos elétricos, precauções básicas de segurança devem
ser sempre seguidas, incluindo oseguinte:
LEIA TODAS AS INSTRUÇÕES.
1. Desligue da tomada quando não estiver em uso eantes da
limpeza.
2. Para se proteger contra risco de choque elétrico, não coloque
abase do motor, ocabo ou oplugue na água ou em outro líquido.
Oprotetor da lâmina ea haste deste aparelho foram projetados
para submersão em água ou outros líquidos. Nunca mergulhe
qualquer outra parte desta unidade em qualquer líquido.
3. Mantenha as mãos, cabelos, roupas eutensílios longe da lâmina
durante aoperação do Liquidificador de Imersão Waring™
para evitar apossibilidade de lesão grave apessoas e/ou
danos ao liquidificador. Uma espátula pode ser utilizada, mas
deve ser utilizada apenas quando oaparelho não estiver em
funcionamento. Evite ocontato com partes móveis.
4. Não opere qualquer aparelho com ocabo ou plugue
danificados ou após um mau funcionamento, ou se for
derrubado ou danificado de alguma forma. Leve oaparelho
aum serviço autorizado Waring®mais próximo para análise,
reparo, ajustes elétricos ou mecânicos.
5. O uso de acessórios não recomendados ou vendidos pela Waring
para este modelo específico pode resultar em incêndio, choque
elétrico ou lesão pessoal.
6. Não utilize ao ar livre.
7. Não deixe nenhum cabo pendurado na borda da mesa ou balcão.
Não deixe ocabo entrar em contato com superfícies quentes,
incluindo fogão.
8. Não coloque perto ou sobre gás quente, ou fogão elétrico, ou
forno quente.
9. A lâmina éAFIADA. Manuseie com cuidado.
10. Ao misturar líquidos, especialmente líquidos quentes, utilize um
recipiente alto ou faça apenas pequenas quantidades por vez para
reduzir apossibilidade de transbordar ea possibilidade de dano.

9
11. Este aparelhonão se destina ao uso por pessoas (incluindo
crianças) com capacidades físicas, sensoriais ou mentais reduzidas,
ou falta de experiência econhecimento, amenos que tenha sido
dada supervisão ou instruções relativas àutilização do aparelho
por uma pessoa responsável pela sua segurança.
12. As crianças devem ser supervisionadas para garantir que não
brinquem com oaparelho.
GUARDE ESTAS
INSTRUÇÕES
INSTRUÇÕES PARA REDE
ELÉTRICA UK
Os fios do cabo de alimentação estão coloridos de acordo com
oseguinte código:
AZUL = NEUTRO MARROM = LIGADO
Se as cores do fio no cabo de alimentação deste aparelho não
corresponderem com as marcações de cores que identificam os
terminais no seu plugue, faça oseguinte:
• Ofio de cor AZUL deve ser ligado ao terminal que está marcado
com aletra Nou de cor preta.
• Ofio de cor MARROM deve ser ligado ao terminal que está
marcado com aletra Lou de cor vermelha.
• Nenhuma parte central deve ser conectada ao terminal terra do
plugue de três pinos marcado com aletra Eou de cor verde ou
verde eamarelo.
Com este aparelho, se um plugue de 13 amp for utilizado um fusível
de 13 amp deve ser instalado. Se qualquer outro tipo de plugue for
usado, um fusível de 10 amp deve ser instalado no plugue ou no
quadro de distribuição.
CONTEÚDO
Garantia ................................................8
Cuidados Importantes.....................................8
Instruções para Rede Elétrica UK ...........................9
Especificações .......................................... 10
Peças ................................................. 10
Antes de começar........................................ 10
Utilizando oLiquidificador de Imersão Waring ............... 10
Instruções de Limpeza ................................... 12

10
ESPECIFICAÇÕES
• CLASSIFICAÇÃO 230-240 V, 50Hz
• MOTOR Supressão w/RFI 2 velocidades II (HI) 20,500
+/-500RPM’s
•
Haste/Protetor
daLâmina
I(LO) 15,500
+/-500RPM’s
Aço Inoxidável
• Cabo 2-F VVH com H03 VDE reconhecido de 6 p´[es
(exposto) com plugue VDE para modelos Eplugue UK
para modelos K.
• Catalogado CE
PEÇAS
1. Cabo Encapado
2. Controle de Velocidade (2 velocidades)
3. Base do Motor/Punho
4. Haste em Aço Inoxidável
5. Protetor da Lâmina em Aço Inoxidável
6. Lâmina de Metal (não mostrada)
ANTES DE COMEÇAR
NOTA: Desligue sempre oLiquidificador de
Imersão Waring™ antes de limpar alâmina de
metal.
Antes de utilizar oLiquidificador de Imersão,
aWaring™ sugere que você limpe aunidade com
um pano limpo eúmido para remover qualquer
sujeira ou pó. Coloque aextremidade da lâmina de
metal do liquidificador de mão sob água corrente para enxaguá-lo.
Seque bem com um pano macio eabsorvente. Leia todas as instruções
para procedimentos operacionais detalhados.
UTILIZANDO SEU LIQUIDIFICADOR
DE IMERSÃO WARING™
NOTA: Sempre desligue oliquidificador de imersão após cada
utilização. Mantenha oLiquidificador de imersão fora do alcance
dascrianças.
• Para evitar respingos, tenha cuidado para nunca remover
oLiquidificador de Imersão Waring™ do líquido enquanto estiver
em operação.
3.
4.
5. 6.
1.
2.

11
• Utilize para misturar ingredientes para fazer molhos para salada,
ovos mexidos, purês, sopas emolhos.
• Utilize aVelocidade II (HI) para os ingredientes líquidos,
emantenha aproteção da lâmina no fundo do recipiente de mistura
para evitar respingos.
• Para receitas que pedem gelo, utilize gelo triturado (cubos não
inteiros) para obter melhores resultados.
NOTA: Se um pedaço de comida ficar preso na proteção que envolve
alâmina de metal, siga as instruções de segurança descritas abaixo:
1. Solte obotão liga/desliga edesligue aunidade da tomada.
2. Uma vez que afonte de energia for desligada, use uma espátula para
remover cuidadosamente oalimento preso na proteção da lâmina.
Evite lesões. Alâmina éafiada. NÃO UTILIZE OS DEDOS
PARA REMOVER OBJETOS PRESOS.
3. Depois que oalimento preso for removido, ligue aunidade de volta
na sua fonte de alimentação econtinue oprocessamento.

12
INSTRUÇÕES DE LIMPEZA
O LIQUIDIFICADOR DE IMERSÃO DEVE SER LIMPO
ESECO DE ACORDO COM AS INSTRUÇÕES ASEGUIR
APÓS CADA UTILIZAÇÃO.
Para Aplicações com Comida
• Desligue da fonte de alimentação.
• Lave, enxague edesinfete aparte de aço inoxidável do
liquidificador de imersão antes do uso inicial, após cada uso, ou
sempre que não for utilizado novamente em um curto período.
• Limpe edesinfete acaixa plástica do motor antes do uso inicial
eapós cada uso. Não mergulhe acaixa do motor. Limpe com uma
esponja ou pano.
• São recomendados produtos de limpeza como detergentes eas
soluções desinfetantes com uma concentração mínima de cloreto
de 100 ppm.
Os produtos de limpeza, lavagem edesinfecção aseguir, podem ser
utilizados.
SOLUÇÃO PRODUTO DILUIÇÃO
EM ÁGUA
TEMPERATURA
Lavagem Desinfetante de
limpeza Ajax®¼ oz./2½ galão Quente 46°C
Limpando Água Limpa Morno 35°C
Desinfetando Clorox® Alvejante
Institucional 1 Tbl./Galão Frio 10°-21°C
* Ajax®marca registrada de propriedade da Colgate Palmolive Company.
* Clorox®marca registrada de propriedade da Clorox Company.
• Em aplicações de uso repetitivo, alimpeza frequente irá prolongar
avida útil.

13
Para lavar edesinfetar oliquidificador de imersão:
1. Desligue-o da fonte de alimentação.
2. Lave oexterior da haste de aço inoxidável ea proteção da lâmina
do liquidificador de imersão em água corrente. Lave eesfregue
ointerior do protetor da lâmina ea lâmina. Uma escova de
garrafa éo melhor utensílio possível para deslocar eremover
resíduos de alimentos.
3. Limpe oexterior da caixa plástica eda parte de aço inoxidável
do liquidificador de imersão com uma esponja ou pano macio
apenas umedecido com produto de limpeza.
4. Mergulhe aproximadamente 3/4 do comprimento da haste de
aço inoxidável num recipiente com produto de limpeza eagite
manualmente para remover oresíduo remanescente.
5. Repita os passos dois (2) etrês (3), utilizando água corrente no
lugar de produto de limpeza.
6. Limpe oexterior da caixa plástica eda parte de aço inoxidável
do liquidificador de imersão com uma esponja ou pano macio
umedecido com desinfetante.
7. NÃO ENXAGUE DEPOIS QUE AHIGIENIZAÇÃO
ESTIVER COMPLETA. Deixe secar antes do uso.
IMPORTANTE: NÃO MERGULHE ACAIXA DE
PLÁSTICO EM PRODUTO DE LIMPEZA, ÁGUA OU
DESINFETANTES. EVITE QUE LÍQUIDOS ENTREM
DENTRO DA CAIXA DE PLÁSTICO LIMPANDO COM
UM PANO SECO OU ESPONJA ÚMIDA. MANTENHA
SEMPRE OLIQUIDIFICADOR DE IMERSÃO NA
POSIÇÃO VERTICAL PARA LIMPEZA.

14
GARANTIE
Voor producten van Waring die buiten de VS en Canada worden
verkocht, is de lokale imnporteur of distributeur verantwoordelijk
voor de garantie. Deze garantie varieert mogelijk afhankelijk van de
lokale wetgeving.
WAARSCHUWING: Alle garanties zijn ONGELDIG wanneer het
apparaat op gelijkstroom (DC) wordt gebruikt.
BELANGRIJKE
WAARSCHUWINGEN
Bij het gebruik van een elektrisch apparaat dient men rekening
te houden met elementaire veiligheidsmaatregelen, waaronder de
volgende:
LEES ALLE INSTRUCTIES.
1. Trek de stekker uit het stopcontact wanneer het apparaat
niet in gebruik is en alvorens het wordt gereinigd.
2. Om het risico op elektrische schokken te beperken, mag u het
motordeel, het snoer of de stekker niet in water of een andere
vloeistof onderdompelen. De mesbeschermer en de staaf van dit
apparaat werden ontworpen om in water of een andere vloeistof
te worden ondergedompeld. Dompel nooit een ander onderdeel
van dit apparaat onder in een vloeistof.
3. Houd uw handen, haar, kleding en gebruiksvoorwerpen uit de
buurt van het mes terwijl u de Waring™-staafmixer gebruikt. Op
die manier voorkomt u ernstig letsel bij personen en/of schade
aan de staafmixer. Er kan een spatel worden gebruikt, maar enkel
als het apparaat niet in gebruik is.
Vermijd contact met bewegende onderdelen.
4. Gebruik geen apparaat waarvan het snoer of de stekker is
beschadigd of dat defect, gevallen of op eender welke manier
beschadigd is. Zend het apparaat naar het dichtstbijzijnde
erkende onderhoudscentrum van Waring®om een analyse,
reparatie of elektrische of mechanische aanpassing uit te
voeren.
5. Het gebruik van hulpstukken die niet door Waring voor dit
specifieke model worden aanbevolen of verkocht, leidt mogelijk
tot brand, elektrische schokken of persoonlijke letsel.
6. Gebruik het apparaat niet buiten.
7. Laat geen snoer over de rand van de tafel of het aanrecht hangen.
Breng het snoer niet in contact met hete oppervlakken, inclusief
een fornuis.

15
8. Plaats het apparaat niet op of in de buurt van een hete gas- of
elektrische brander of in een verwarmde oven.
9. Het mes is SCHERP. Wees voorzichtig.
10. Gebruik voor het mixen van vloeistoffen, in het bijzonder hete
vloeistoffen, een hoge kom of bereid slechts kleine hoeveelheden
tegelijkertijd om verspilling en mogelijke letsel te beperken.
11. Dit apparaat is niet ontworpen voor gebruik door personen
(inclusief kinderen) met beperkte fysieke, zintuiglijke of mentale
vaardigheden of een gebrek aan ervaring en kennis, tenzij ze
onder toezicht staan van of gebruiksinstructies omtrent het
apparaat kregen van een persoon die verantwoordelijk is voor hun
veiligheid.
12. Kinderen moeten onder toezicht staan, zodat ze niet met het
apparaat spelen.
BEWAAR DEZE
INSTRUCTIES
BEDRADINGSINSTRUCTIES
VOORHET VK
De draden in het netsnoer zijn in overeenstemming met de volgende
code gekleurd:
BLAUW = NEUTRAAL BRUIN = ONDER SPANNING
Aangezien de kleuren van de draden in het netsnoer van dit apparaat
mogelijk niet overeenstemmen met de kleurmarkeringen die de
contactklemmen in uw stekker aanduiden, gaat u als volgt te werk:
• De draad die BLAUW is gekleurd, moet worden aangesloten op de
contactklem die met de letter N is gemarkeerd of zwart is gekleurd.
• De draad die BRUIN is gekleurd, moet worden aangesloten op de
contactklem die met de letter L is gemarkeerd of rood is gekleurd.
• Geen van beide klemmen moet op de aardingsklem van een
driepenstekker die met de letter E is gemarkeerd of of groen of
groen en geel is gekleurd worden aangesloten.
Als bij dit apparaat een stekker van 13 A wordt gebruikt, moet een
zekering van 13 A worden aangebracht. Als een ander type stekker
wordt gebruikt, moet een zekering van 10 A in de stekker of in de
verdeelkast worden aangebracht.

16
INHOUD
Garantie............................................... 14
Belangrijke waarschuwingen............................... 14
Bedradingsinstructies VK ................................. 15
Specificaties ............................................ 16
Onderdelen ............................................ 16
Voor u aan de slag gaat ................................... 17
Uw staafmixer van Waring gebruiken ....................... 17
Reinigingsinstructies ..................................... 18
SPECIFICATIES
• VERMOGEN 230-240 V, 50 Hz
• MOTOR met
RFI-onderdrukking
2 snelheden II (HOOG)
20.500+/-500 tpm
I(LAAG)
15.500+/-500 tpm
•
Staaf/
mesbeschermer
Roestvrij staal
• Snoer 6 voet (blootliggend), VDE-erkend H03VVH2-F met
VDE-stekker voor E-modellen en VK-stekker voor
K-modellen
• CE-conform
ONDERDELEN
1. Snoerbinder
2. Snelheidsregelaar
(schakelaar met 2snelheden)
3. Motordeel/handvat
4. Roestvrijstalen staaf
5. Roestvrijstalen mesbeschermer
6. Metalen mes (niet afgebeeld)
3.
4.
5. 6.
1.
2.

17
VOOR U AAN DE SLAG GAAT
OPMERKING: Trek de stekker van de Waring™ -staafmixer altijd uit het
stopcontact alvorens u het metalen mes reinigt.
Alvorens de staafmixer te gebruiken, beveelt Waring™ u aan het
apparaat schoon te vegen met een schone, vochtige doek om vuil of
stof te verwijderen. Plaats het uiteinde van de handmixer met het
metalen mes onder stromend water om het te spoelen. Droog grondig
af met een zachte, absorberende doek. Lees alle instructies volledig
voor de gedetailleerde bedieningsprocedures.
UW WARING™ -STAAFMIXER
GEBRUIKEN
OPMERKING: Trek na elk gebruik de stekker van de staafmixer uit
het stopcontact. Houd de staafmixer uit de buurt van kinderen.
• Om gespetter te voorkomen, mag u de Waring™ -staafmixer nooit
uit de vloeistof halen terwijl hij in werking is.
• Gebruik de mixer om ingrediënten te mengen om saladedressings
te maken, eieren te kloppen en soepen en sauzen te pureren.
• Gebruik de snelheidsinstelling II (HOOG) voor vloeibare
ingrediënten en houd de mesbeschermer op de bodem van de
mengkom om gespetter te voorkomen.
• Gebruik voor recepten die om ijs vragen gemalen ijs (geen hele
ijsblokjes) voor de beste resultaten.
OPMERKING: Als er een stuk voedsel in de beschermer rond
het metalen mes blijft steken, volg dan de onderstaande
veiligheidsinstructies:
1. Laat de aan-knop los en trek de stekker van het apparaat uit het
stopcontact.
2. Gebruik zodra de stroombron is uitgeschakeld een spatel om
het stuk voedsel dat in de meskap is blijven steken voorzichtig
te verwijderen. Voorkom letsel. Het mes is scherp. GEBRUIK
NOOIT UW VINGERS OM VASTZITTENDE
VOORWERPEN TE VERWIJDEREN.
3. Nadat het vastzittende stuk voedsel is verwijderd, steekt u de
stekker van het apparaat terug in de stroombron en gaat u verder.

18
REINIGINGSINSTRUCTIES
DE STAAFMIXER MOET NA ELK GEBRUIK VOLGENS DE
VOLGENDE INSTRUCTIES WORDEN GEREINIGD.
Voor voedseltoepassingen
• Koppel los van de netvoeding.
• Was, spoel en ontsmet het roestvrijstalen gedeelte van de staafmixer
vóór het eerste gebruik, na elk gebruik of telkens als hij niet snel
opnieuw wordt gebruikt.
• Reinig en ontsmet de plastic motorbehuizing vóór het eerste
gebruik en na elk gebruik. Dompel de motorbehuizing niet onder.
Reinig met een spons of doek.
• Reinigingsoplossingen op basis van niet-schuimende
reinigingsmiddelen en ontsmettingsoplossingen op basis van
chloor met een minimale chloorconcentratie van 100 ppm zijn
aanbevolen.
De volgende reinigings-, spoel- of ontsmettingsoplossingen of diens
equivalent mogen worden gebruikt.
OPLOSSING PRODUCT VERDUNNING
IN WATER
TEMPERATUUR
Wassen Ajax®reinigend
schoonmaakpoeder 7 gram/10 liter Heet 46°C (115°F)
Spoelen Gewoon water Warm 35°C (95°F)
Ontsmetten Clorox®
institutioneel
bleekmiddel
1 eetlepel/4 liter Koud 10-21°C
(50-70°F)
* Ajax®is een gedeponeerd handelsmerk van het bedrijf
ColgatePalmolive.
* Clorox®is een gedeponeerd handelsmerk van het bedrijf Clorox.
• Bij herhaald gebruik verlengt reinigen de levensduur.

19
De staafmixer wassen en ontsmetten:
1. Koppel los van de netvoeding.
2. Spoel de buitenkant van de roestvrijstalen staaf en
mesbeschermer van de staafmixer onder stromend water. Schrob
en spoel de binnenkant van de mesbeschermer en het mes. Een
flesborstel is het meest doeltreffende hulpmiddel om zo veel
mogelijk voedselresten los te maken en te verwijderen.
3. Veeg de buitenkant van de plastic behuizing en het
roestvrijstalen gedeelte van de staafmixer schoon met een
zachte doek of spons die lichtjes werden bevochtigd met de
reinigingsoplossing.
4. Dompel de roestvrijstalen staaf voor ongeveer 3/4e onder in een
kom met de reinigingsoplossing en schud handmatig om het
resterende vuil te verwijderen.
5. Herhaal stappen twee (2) en drie (3) met stromend water in
plaats van de reinigingsoplossing.
6. Veeg de buitenkant van de plastic behuizing en het
roestvrijstalen gedeelte van de staafmixer schoon met een
zachte doek of spons die lichtjes werden bevochtigd met de
ontsmettingsoplossing.
7. NIET SPOELEN NADAT DE ONTSMETTING IS
VOLTOOID. Laat drogen voor gebruik.
BELANGRIJK: DE PLASTIC BEHUIZING
NIET ONDERDOMPELEN IN DE
REINIGINGSOPLOSSING, HET SPOELWATER OF DE
ONTSMETTINGSOPLOSSING. VOORKOM DAT ER
VLOEISTOF IN DE PLASTIC BEHUIZING STROOMT
DOOR MET EEN DROGE DOEK OF VOCHTIGE SPONS
AF TE VEGEN. HOUD UW STAAFMIXER TIJDENS DE
REINIGING STEEDS IN DE VERTICALE STAND.

20
GARANTIE
Bei Waring-Produkten, die außerhalb der USA und Kanada
verkauft werden, ist der lokale Importeur bzw. Vertriebshändler für
die Garantie verantwortlich. Diese Garantie kann je nach örtlich
geltenden Vorschriften variieren.
WARNUNG: Jegliche Garantie VERFÄLLT, sobald das Gerät mit
Gleichstrom betrieben wird.
WICHTIGE
SCHUTZMASSNAHMEN
Bei der Verwendung elektrischer Geräte sind grundsätzlich einige
Sicherheitsvorkehrungen zu befolgen, einschließlich der folgenden:
LESEN SIE SICH ALLE
ANWEISUNGEN DURCH.
1. Ziehen Sie den Netzstecker aus der Steckdose, wenn Sie das
Gerät nicht verwenden oder bevor Sie das Gerät reinigen.
2. Tauchen Sie den Motorblock, das Netzkabel und den Netzstecker
zum Schutz vor einem Stromschlag nicht in Wasser oder andere
Flüssigkeiten. Der Messerschutz und -schaft dieses Geräts
wurden für das Eintauchen in Wasser oder andere Flüssigkeiten
gebaut. Bringen Sie auf keinen Fall andere Bestandteile des
Geräts mit Flüssigkeiten in Berührung.
3. Achten Sie darauf, dass Ihre Hände, Haare und Kleidung
während des Betriebs nicht in den Messereinsatz des Waring™
-Stabmixers kommen, um mögliche schwere Verletzungen von
Personen und/oder Geräteschäden zu vermeiden. Ein Spachtel
kann verwendet werden – jedoch nur, wenn sich das Gerät nicht
in Betrieb befindet. Vermeiden Sie jegliche Berührungen mit sich
bewegenden Teilen.
4. Verwenden Sie das Gerät nicht, wenn Beschädigungen am
Netzkabel oder Netzstecker vorliegen oder das Gerät nicht
einwandfrei funktioniert, heruntergefallen ist oder sonstige
Beschädigungen aufweist. Bringen Sie das Gerät für eine
Durchsicht, Reparatur sowie für elektrische oder maschinelle
Anpassungen zum nächsten autorisierten Waring®
-Wartungsdienst.
5. Die Verwendung von Zubehör, das nicht von Waring für dieses
Modell empfohlen oder verkauft wurde, kann zu Bränden,
Stromschlägen oder Personenschäden führen.
6. Verwenden Sie das Gerät nicht im Freien.
7. Lassen Sie keine Kabel über die Kante der Arbeitsfläche
herunterhängen. Achten Sie darauf, dass das Netzkabel nicht in
Kontakt mit heißen Oberflächen, z.B. mit Herdplatten, kommt.
Table of contents
Languages:
Other Waring Blender manuals

Waring
Waring Mx series User manual

Waring
Waring Mx series User manual

Waring
Waring WSB40 User manual

Waring
Waring BB185SK User manual

Waring
Waring BIG STIX WSB50 User manual

Waring
Waring TBB160 User manual

Waring
Waring CB15 SERIES User manual

Waring
Waring LB10 User manual

Waring
Waring Ellipse User manual

Waring
Waring PRO WPB User manual

Waring
Waring 800ES User manual

Waring
Waring MX1000XT User manual

Waring
Waring NuBlend BB180 User manual

Waring
Waring MMB Series User manual

Waring
Waring BB145 Series User manual

Waring
Waring BB320 User manual

Waring
Waring PRO MEGAMIX HPB300 User manual

Waring
Waring MBB1000 Series User manual

Waring
Waring Torq 2.0 TBB160 User manual

Waring
Waring BB340 User manual