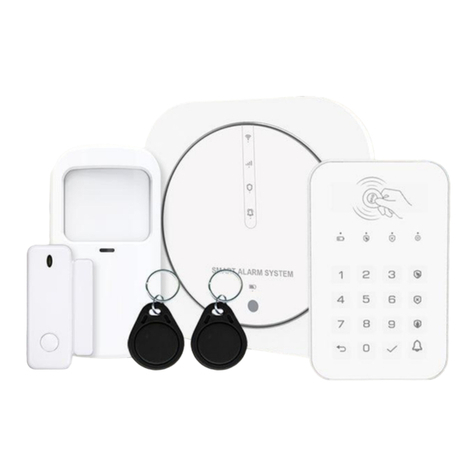
WatchOvers WG13 User manual

Users Manual WG13 Alarm & Keypad 04 04 2022
WatchOvers.com
WG13 4G & Wi-Fi Alarm System
Users Manual

Users Manual WG13 Alarm & Keypad 04 04 2022
Congratulations on your purchase of our WG13 4G & Wi-Fi Alarm System. To ensure
proper use and trouble-free operation, we advise you to follow this Quick set up Guide and
also read our User’s Manual first before use.
The WatchOvers WG13 4G & Wi-Fi Alarm System is a dual network system that utilises both
Wi-Fi (2.4GHz) and 4G cellular (GSM).
All sensors are wirelessly connected to the base station. In the event of alarm activation, for
example, when a sensor is triggered, a push notification will be sent through the App and an
SMS will be sent automatically to all your registered contacts. A phone call will also be made
to the 1st contact number and where the call is not answered it will call the next contact
number.
The system can be armed and disarmed on-site by the remote RFID tags supplied, or
remotely from anywhere, through the App. The base station can connect with up to 100
wireless sensors, 10 RFID tags, multiple wireless sirens, and an external siren.
If the building loses electrical power, the backup battery built-in to the base station provides
back up power for up to 3 hours. Alert notifications are sent to you and your registered
contacts advising you of the loss of power.
How to Set up Sensors according to their use or type
There are many different ways the alarm and sensors can be armed, giving you different
options depending on whether you are home or out. Each sensor is designated a Zone Mode,
which defines the way in which the system responds to breaches in that zone and arming and
disarming.
To set up your sensors so that they will alert you when you want to be alerted, please choose
from the list below and ensure your sensors are designated as required. The Zone modes
can be changed at any stage but it is best to set up to suit your needs from the beginning.
Tap Accessories and pick the sensor you want to set, then change Zone Mode as follows;
Normal Sensors set to Normal Zone are activated in Arm (full arm) or HOME Mode
(home/stay/partial arm). We recommend setting door/window sensors to
Normal Zone.
24 Hours Sensors set to 24H Zone will activate the alarm when triggered, regardless of
the alarm status (Armed or Disarmed). This setting is useful if you have an
area in your home that you don’t want people entering or at least you wish to
be notified if someone does enter. Alternatively, if you need to be alerted if
someone opens a door to leave the house, this setting can be used.
Delay If sensors set to Delay Zone are triggered, the panel will sound the alarm after
the delay time has passed. We recommend setting door sensors with a delay
if they are used as primary entry points as this allows you time to disarm the
alarm before the siren goes off. You can choose the length of time you need.
Home Sensors set to Home Zone mode are only activated in Arm (Away arm). If Home
Arm Mode (partial/home arm) is used, these sensors are not armed and will
not activate the alarm if triggered. We recommend setting PIR Motion Detectors
to Home Zone. If you are at home and wish to be able to walk around your
home without the alarm sounding, this is the setting you will need.

Users Manual WG13 Alarm & Keypad 04 04 2022
24 Hours The mode is same as 24 Hours but there will be no sound triggered.
Silent
Home with It is same as Home but with Entry Delay in Home Arm.
delay
Off To disable the sensor. This can be used if you wish to turn off a sensor for a
period of time as you may not require it but do not wish to remove it as will
use it in the future. Remember to Save each Zone Mode before you close
out of the screen.
How To ARM and DISARM the Alarm through the App
To set your alarm ON you can choose to set if for when you are going out or for when you are
at home.
Away Arm is what you would choose if leaving your home and Home Arm if you are going to
bed for instance.
From the main Alarm screen on your phone
•Tap Away Arm - to arm the alarm
Set to Away arm mode to arm all the sensors in your home to alert you of any movement or
entry while you are out
•Tap Home Arm - to home/partial arm the alarm
Set the Base Station in Home arm mode to disarm your interior sensors, while keeping your
exterior sensors armed. This will arm the sensors other than the sensors you have set as

Users Manual WG13 Alarm & Keypad 04 04 2022
HOME Zone. Sensors that have been given the zone as Home, will not arm when you chose
HOME Arm and will not activate if triggered in the usual way.
•Tap Disarm - to disarm the alarm
And Disarm your system to disarm all sensors and freely walk in and out of your home. The
sensors that have the zone set as 24 Hours or 24 Hours silent Zone, will activate if triggered
even when you have chosen the disarm option.
•Tap Panic - to trigger an emergency alarm.
The Panic mode will trigger the alarm so that the siren will sound. A notification will be sent
via the app to your contacts that are listed in the app. An SMS will be sent to your SMS
contacts in the app and a phone call will be made to alert the person you have listed to receive
an alarm call.
You can also arm and disarm the alarm using the keypad and/or RFID Tags – for
instructions please see below at Keypad & RFID Tags
Settings Explained
•Exit delay – Your security system has been programmed with delay times that allow
you to exit your home after arming. If you leave home too late when exiting, it will
cause a false alarm. If a false alarm occurs, you should disarm the system immediately.
Tap on Exit delay to change the amount of delay time you have to leave your home;
choose how many seconds you wish to delay the alarm setting and remember to
confirm so that the new setting is saved.

Users Manual WG13 Alarm & Keypad 04 04 2022
•Timer – Allows you to set a schedule for automated arming and disarming your alarm
system as frequently as you like, (daily or once weekly) for arming/disarming your
system automatically at a daily time. This can be useful if you want to allow someone
to enter your home, but don’t wish to give them access codes.
•Alarm duration – Adjust alarm sound duration from 0 to 59 minutes. If Set to 0 you
turn the alarm sound off when an alarm occurs. Please check this setting so that it is
above 0.
•Door/window unclosed notification – This defaults to Off. Set to On position to
receive a notification if you leave a door or window open when arming your alarm.
Note: When you arm the system, the panel will say “Hello, the door or window is
unclosed” (or sound an alarm) if you leave the door or window open, however the
alarm will still arm with the window/door open.
•Sensor low battery notification – Set to On position to receive a notification when
the wireless accessory battery is low battery (not all accessories have low battery alert
option).
•Notifications on/off – Set to Turn all notifications On or Off
•Entry delay – Your security system has been programmed with delay times that allow
you to enter your home and disarm your alarm before an alarm is triggered. If you
disarm the alarm too late when arriving home, it will cause a false alarm. If a false
alarm occurs, you should disarm the system immediately. Tap on Entry delay to
change the amount of delay time you have when entering your home, choose how
many seconds you wish to delay the alarm sounding, allowing you time to enter the
building and disarm the alarm in a time that’s appropriate for you.
•Countdown with tick tone – Set countdown tick tone to the On position to hear the
tick tone countdown from the base station during Exit Delay or Entry Delay for each
second of the delay time set.
•Alarm call number – Enter the phone number(s), including full country prefix, of the
person who should receive a call should the alarm be triggered. This is an automated
call and will inform the person that the alarm has been triggered with a prerecorded
message. If unanswered it will then call the second person on this list and so on. A
maximum of 5 contact numbers can be added. Voicemail counts as getting through
successfully.
•Alarm SMS number – Enter the phone number(s), including full country prefix, of all
the people who wish to receive an SMS should the alarm be triggered. This is an
automated SMS and will inform the persons that the alarm has been triggered with an
SMS message. The SMS will be sent to all contact numbers added to this list. A
maximum of 5 contact numbers can be added.

Users Manual WG13 Alarm & Keypad 04 04 2022
•Alarm call – Turn this option to ON for a telephone call to be made should the alarm
be triggered.
•Alarm SMS – Turn this option to ON for a SMS to be sent should the alarm be triggered.
•Unanswered phone redial times – This allows you to choose how many times the
alarm will repeat the call to your first call number saved.
•Factory reset – Reset your alarm base station to factory settings and removes all
pairings.
•Hub Language - Set the language to receive your notifications.
App Features
From the device App screen, above, choose the Pen Icon at the top right of the screen. This
will open the device information page.
•Device Information –Tap here to view device information.
•Tap-to-Run and Automation – List of any Smart Scenes that you have set up
•Third Party Control – This allows you to use a third-party control, for example, Alexa,
where you can instruct Alexa to control some of the settings on the alarm, such as, you
can instruct Alexa to “Arm” the alarm using voice control. Please note a third-party
control cannot “Disarm” the alarm for security reasons.
•Offline Notification –Tap to change the setting to On if you wish to receive
notifications if the device goes offline for a period of more than 30 minutes.

Users Manual WG13 Alarm & Keypad 04 04 2022
•Share Device –If more than one person wishes to have the device on their mobile
phone, the device can be “shared”. Tap to share the alarm with a member of your
family or whomever you would like to share the alarm with.
•FAQ & Feedback –Tap here to access the FAQ’s related to your alarm. Enter a
question or key word to view all related FAQ’s. This information is produced by the
App creators. If you are having problems locating the answer to your question, go to
WatchOvers Support on our website www.watchovers.com
•Add to Home Screen –Tap this to add alarm to the home screen of your mobile
phone. Follow the app instructions to set this up.
•Check Device Network – Checks Wi-Fi connection and signal strength.
•Device Update –Tap to check on device updates available and choose to set any
upgrades on automatic. Product version etc. available from this screen.
•Remove Device - Tap to remove the Alarm from your App. Follow the onscreen app
instructions to do this. You will be asked to confirm before the device is removed
Alarm Has Been Triggered
In the event the alarm is triggered
1. The alarm base station will sound and continue to sound for the length of time you
have this set. (See alarm duration in settings in App)
2. An SMS will be sent to all numbers listed in your “Alarm SMS number” list. The SMS
will advise what sensor has been triggered.
3. A pre-recorded phone call will be made to the number(s) saved in your “Alarm Call
number” list advising them of the alarm being set off in line with the calls protocol, a
call will be made to the first person on the calls list and if unanswered, the second
number will be called until it has reached the redial limit you have set in the app under
settings.
4. Anyone who has the App on their mobile phone that you have shared the alarm with
will receive a notification through the app on their phone. The notification will advise
what sensor has been triggered.

Users Manual WG13 Alarm & Keypad 04 04 2022
Keypad & RFID Tags
The wireless touch keypad Arms and Disarms your security system with a
passcode or RFID tag. It is connected to your alarm base station with an effective
communication range of up to 80 meters without obstacles. The internal lithium-ion
rechargeable battery provides power for up to 3 months allowing you to place the
keypad anywhere within range.
The RFID tag removes the need to remember the alarm code, this is very useful
for children or temporary users such as carers or tradesmen and can be attached
to a keyring. You will receive an App alert when a RFID tag is used to either arm
or disarm the alarm, letting you know they have arrived home or left home.
Charging the Battery
Push the battery On/Off switch to the On position.
Connect your keypad to a power outlet using the included cable and USB power adapter.
It takes two to three hours to charge the keypad battery fully from no power. The power
indicator changing from breathing green to solid green means that the battery is fully
charged.
If the keypad battery is low, the power indicator will flash red once every 2 seconds,
indicating that it needs to be charged.
About the Keypad
Sleep/Wake mode
To save the battery, the keypad goes into sleep mode within 20 seconds of non-use.
Touch any button to wake the keypad.

Users Manual WG13 Alarm & Keypad 04 04 2022
User and Admin Passcode
The keypad has two 4-digit passcodes. The user passcode is used to arm, home arm
and disarm your security system, the admin passcode can be used to pair, delete RFID
tags and change passcodes. The default user passcode is “1234” and the admin
passcode is “8888”.
Programming
Basic programming steps
STEP 1. Enter admin passcode then press √, the setting indicator light on means that
programming mode is ready.
STEP 2. Input the appropriate number to select functions:
1Pair RFID Tag
2Delete RFID Tag
3Delete All RFID Tags
0Set User Passcode
9Set Admin Passcode
then press √, and the setting indicator blinks.
STEP 3. Enter setting then press √, the buzzer beeps twice.
LAST STEP. Press ← then √ to exit programming.
Pairing an RFID Tag
The RFID tags supplied with the system are paired with the keypad. If they are unpaired
or you want to pair more tags, you can pair the tag with your keypad as following.
STEP 1. Enter the admin passcode then press √.
STEP 2. Press 1 then √.
STEP 3. Enter a digit from 0 to 9 to designate a unique number for the tag
to be paired, then √, the arming, disarming and setting indicators blink
together.
STEP 4. Tap the tag on the read zone, the keypad will beep twice to
confirm pairing successful.
Note: up to 10 RFID tags can be added. Two tags cannot have the same number.
Deleting an RFID Tag
STEP 1. Enter the admin passcode then press √.
STEP 2. Press 2 then press √.
STEP 3. Enter the tag number from 0 to 9 to be deleted, then press √.
Deleting All RFID Tags
STEP 1. Enter the admin passcode then press √.
STEP 2. Press 3 then press √ to delete all RFID tags.
Setting User Passcode
STEP 1. Enter the admin passcode then press √.
STEP 2. Press 0 then press √.
STEP 3. Enter the new 4-digit user passcode, then press √.
Setting Admin Passcode
STEP 1. Enter the admin passcode then press √.
STEP 2. Press 9 then press √.
STEP 3. Enter the new 4-digit admin passcode, then press √.

Users Manual WG13 Alarm & Keypad 04 04 2022
How to Connect your Keypad to the Base Station
STEP 1. Set your base station into pairing/sniffer mode.
STEP 2. Enter user passcode then press to send arming transmission signal to base
station.
STEP 3. The base station will beep to confirm pairing successful.
DOORBELL
If you wish to use the doorbell function on the keypad, the doorbell identification number
in the transmission code to the base station is different from the arming/disarming ID
number, so It is necessary to pair the doorbell code with your base station before using
doorbell function.
To pair the doorbell:
STEP 1. Set your base station into pairing/sniffer mode.
STEP 2. Press to send the doorbell transmission signal to base station.
STEP 3. The base station will beep to confirm pairing successful.
ARMING/DISARMING Your Security System via the Keypad
Using The User Passcode.
Enter user passcode then press to away arm.
Enter user passcode then press to disarm.
Enter user passcode then press to home arm.
Or Using an RFID Tag.
Press then tap the RFID tag to away arm.
Press then tap the RFID tag to disarm.
Press then tap the RFID tag to home arm.
RESET
This process resets your keypad to factory settings and removes all paired RFID tags.
With the bracket attached to the back of the keypad, slide the bracket up and down 10
times which slides the tamper switch underneath the bracket, this will restart and reset
the keypad.
Smoke Alarm

Users Manual WG13 Alarm & Keypad 04 04 2022
The Smoke Alarm is in the working mode after installation, with the LED flashing once for
every 45 seconds. When it detects smoke, the alarm will sound until the smoke is cleared from
the detector.
An SMS will be sent to all numbers listed in your “Alarm SMS number” list. The SMS will advise
what sensor has been triggered.
A pre-recorded phone call will be made to the number(s) saved in your “Alarm Call number”
list advising them of the alarm being set off in line with the calls protocol, a call will be made
to the first person on the calls list and if unanswered, the second number and so on until it has
reached the redial limit you have set in the app under settings.
Press the testing button to trigger the alarm signal, the alarm will sound, the LED flashes fast
and release the wireless signals. You can also use the smoke method to test the detector.
Testing is required regularly to make sure the smoke alarm is working correctly.
For installation instructions go to our Quick Set Up Guide
Notes.
1. This device must be paired with our base station to operate.
2. Do not install near the areas such as doors, windows, fans etc, where the air flows which
would affect the sensitivity; High humidity areas such as bathrooms, nor high temperature
places such as attic are unsuitable. The temperature should be-10°C to +50°C.
3. Please clean the alarm with a soft brush every six months to ensure the sensitivity and the
life of the product. Remove the battery before cleaning.
4. Changes in environmental conditions, or tampering can affect the performance of this
product. Users are advised to take all necessary precautions for his/her safety and the
protection of the property.
Specifications.
Working Voltage: 9V alkaline battery or carbon-zinc battery
Standby Current: <10uA
Working Current: <40mA
Sensitivity of Smoke: II Grade
Emission Frequency: 315MHz/ 433MHz
Emission Distance: open > 120m
Working Temperature: -10 °C*-+50 °C
Interface Temperature of Air: 10%-90%RH
Alarm Sound: 275dB
Outer Size: 113*45mm
Battery Life: 1 –2 years
Reference Standard: EN 14604-2005

Users Manual WG13 Alarm & Keypad 04 04 2022
Carbon Monoxide (CO) Alarm
Carbon Monoxide alarms should be installed in every room that have a ‘fuel burning’ appliance
and one within 5 metres of every bedroom.
Powered by a replaceable 9V battery, when triggered it makes over 85dB sounds with the
red indicator light flashing simultaneously. The green indicator will flash once every 30
seconds at normal working mode.
The Carbon Monoxide Alarm is in the working mode after installation, with the Green LED light
flashing once for every 30 seconds. When it detects Carbon Monoxide, the alarm will sound
and the red LED light will flash until the carbon monoxide is cleared from the alarm.
An SMS will be sent to all numbers listed in your “Alarm SMS number” list. The SMS will advise
what sensor has been triggered.
A pre-recorded phone call will be made to the number(s) saved in your “Alarm Call number”
list advising them of the alarm being set off in line with the calls protocol, a call will be made
to the first person on the calls list and if unanswered, the second number and so on until it has
reached the redial limit you have set in the app under settings.
Press the testing button to trigger the alarm signal, the alarm will sound, the LED flashes and
releases the wireless signals. You can also use the test carbon monoxide cans to test the
detector. Testing is required regularly to make sure the alarm is working correctly.
For installation instructions go to our Quick Set Up Guide
Notes.
1. This device must be paired with our base station to operate.
2. Do not install near the areas such as doors, windows, fans etc, where the air flows which
would affect the sensitivity; High humidity areas such as bathrooms, nor high temperature
places such as attic are unsuitable. The temperature should be-10°C to +50°C.
3. Please clean the alarm with a soft brush every six months to ensure the sensitivity and the
life of the product. Remove the battery before cleaning.
4. Changes in environmental conditions, or tampering can affect the performance of this
product. Users are advised to take all necessary precautions for his/her safety and the
protection of the property.

Users Manual WG13 Alarm & Keypad 04 04 2022
Specifications.
Power supply: DC9V alkaline battery;
Alarm current:《80mA
Static current: <40uA
Detection mode: CO detection
Alarm mode: Wireless and acousto-optic alarm
Frequency: 433HZM/(1527/2262 code)
Alarm sound: >80dB (testing distance: lm)
Emission distance: >100m (in open air)
Working temperature: -10~+ 55°C
Water Leak Alarm
This Wireless Water Leak Detector detects water leaks when both electrodes are flooded.
When the two sensors detect water, the red LED indicator light on the detector will be on and will
transmit a wireless signal sending a message to the alarm base station. Once the wireless signal
is received by the alarm base station an SMS will be sent to all numbers listed in your “Alarm
SMS number” list. The SMS will advise what sensor has been triggered.
A pre-recorded phone call will be made to the number(s) saved in your “Alarm Call number”
list advising them of the alarm being set off in line with the calls protocol, a call will be made
to the first person on the calls list and if unanswered, the second number and so on until it has
reached the redial limit you have set in the app under settings.
The product can be placed in the water storage devices or the place which is possible to have
the water leakage such as basements, kitchens, utility rooms, bathrooms, garages etc.
When the LED indicate light flashes, it means it is in the low voltage.
For installation instructions go to our Quick Set Up Guide
Note: This device must be paired with our base station to operate.
LED Indicate Light
Two Sensors

Users Manual WG13 Alarm & Keypad 04 04 2022
Specifications:
Operating voltage: 3V
Static current: ≦10uA
Alarm current: ≦65mA
Alarm indicator: Red LED
Alarm output: 315M/433M (Factory default is 433M)
Wireless distance: 100 meters(in the open space)
Working temperature: 0-60℃
Working humidity: 0-80%RH (No congelation)
Low Voltage indicator: 2V (Indicator flashes fast)
Product Size: 54*35MM
SOS Panic Button
The panic button pairs with our Alarm Base Station. Once pressed, the SOS panic button with
send a wireless signal to the alarm base station and the base station siren will ring.
An SMS will be sent to all numbers listed in your “Alarm SMS number” list. The SMS will advise
what sensor has been triggered.
A pre-recorded phone call will be made to the number(s) saved in your “Alarm Call number”
list advising them of the alarm being set off in line with the calls protocol, a call will be made
to the first person on the calls list and if unanswered, the second number and so on until it has
reached the redial limit you have set in the app under settings
The panic button can be installed anywhere around your home, within range of the base
station, and sends immediate alerts when pressed.
For installation instructions go to our Quick Set Up Guide
Specifications.
Connection: Wifi
Battery life: 1 year
Battery Type: Sealed in Lithium battery (Non-replaceable)
User app: Smart Life (multiple users)
Connectivity: Wireless (range 60 to 100 metres in open space)
Strap Material: Silicone

Users Manual WG13 Alarm & Keypad 04 04 2022
SOS EMERGENCY BUTTON WRISTBAND
The wristband pairs with our base station easily with the press of a button and fits comfortably
on your wrist. Once pressed, the SOS Emergency button wristband will send a wireless signal
to the alarm base station and the base station siren will ring.
An SMS will be sent to all numbers listed in your “Alarm SMS number” list. The SMS will advise
what sensor has been triggered.
A pre-recorded phone call will be made to the number(s) saved in your “Alarm Call number”
list advising them of the alarm being set off in line with the calls protocol, a call will be made
to the first person on the calls list and if unanswered, the second number and so on until it has
reached the redial limit you have set in the app under settings.
Specifications.
Connection: Wi-Fi
Battery life: 1 year
Battery Type: Sealed in Lithium battery (Non-replaceable)
User app: Smart Life (multiple users)
Connectivity: Wireless (range 60 to 100 metres in open space)
Strap Material: Silicone
Other manuals for WG13
1
Table of contents
Other WatchOvers Security System manuals