WatchOvers WG13 User manual

Quick Set up Guide WG13 Alarm & Keypad 29 03 2022 V1
WatchOvers.com
WG13 4G & Wi-Fi Alarm System
Quick Set Up Guide

Quick Set up Guide WG13 Alarm & Keypad 29 03 2022 V1
Congratulations on your purchase of our WG13 4G & Wi-Fi Alarm System. To ensure
proper use and trouble-free operation, we advise you to follow this Quick set up Guide and
also read our User’s Manual first before use.
The WatchOvers WG13 4G & Wi-Fi Alarm System is a dual network system that utilises both
Wi-Fi (2.4GHz) and 4G cellular (GSM).
All sensors are wirelessly connected to the base station. In the event of alarm activation, for
example, when a sensor is triggered, a push notification will be sent through the App and an
SMS will be sent automatically to all your registered contacts. A phone call will also be made
to the 1st contact number and where the call is not answered it will call the next contact
number.
The system can be armed and disarmed on-site by the remote RFID tags supplied, or
remotely from anywhere through the App. The base station can connect with up to 100
wireless sensors, 10 RFID tags, multiple wireless sirens, and an external siren.
If the building loses electrical power, the backup battery built-in to the base station provides
back up power for up to 3 hours. Alert notifications are sent to you and your registered
contacts advising you of the loss of power.
What’s In The Box
Alarm Base Station x 1
Mounting Screws and Wall Plugs x 3
Door & Window Sensor x 1
PIR Motion Sensor x 1
Power Adapter DC5V/1A x 1
USB Cable x 2
Configuration Pin x 1
3M Double Sided Adhesive Pads x 5
Wireless Keypad x 1
RFID Tags x 2
At a Glance
1. Wi-Fi Indicator
2. Cellular Indicator
3. Arm Indicator
4. Alarm Indicator
5. Power Indicator
6. Configuration Switch
7. Tamper Switch
8. Bracket
9. Built-in Siren
10. SIM Card Slot
11. Power Port (Micro USB)
12. Backup Battery ON/OFF Switch
1
2
3
4
5
8
7
6
10
9
11
12

Quick Set up Guide WG13 Alarm & Keypad 29 03 2022 V1
Wi-Fi Indicator
Cellular Indicator
Arm Indicator
Alarm Indicator
Power Indicator
What you see
What it means
Blinking quickly
Wi-Fi connection configuration
in Smart / EZ Mode
Blinking slowly
Wi-Fi connection configuration
in AP Mode
Solid
Connected to internet
Pulse every 4s
Connecting
Nothing
Wi-Fi module failure
What you see
What it means
Solid
Cellular network is available
Pulse every 4s
Searching network or no SIM card
Blinking
Calling or text message sending
Nothing
Cellular module failure
What you see
What it means
Blinking
System Alarming
Nothing
Normal
What you see
What it means
Solid
Away armed mode
Breathing
Home armed mode
Nothing
Disarmed
Blinking
Entry delay if Blinking quickly,
Exit delay if Blinking slowly
What you see
What it means
Breathing
Charging
Solid
Charged fully
Nothing
No battery or battery switch is off
Blinking
Powered by battery if Blinking slowly
Low battery if Blinking quickly

Quick Set up Guide WG13 Alarm & Keypad 29 03 2022 V1
1. Charging the Wireless Keypad
Remove the power cover from the back of the keypad to access the USB charging port.
Connect your keypad to a power outlet using the included USB cable and DC5V/1A
power adapter. It takes three hours to charge the keypad battery fully so it is best to
leave it on charge whilst you set up the App and alarm base station. The power indicator
changing from breathing green to solid green means that the battery is fully charged.
If the keypad battery is low, the power indicator will flash red once every 2 seconds,
indicating that it needs to be charged.
2. Installing & Setting up the App
If you have already installed the Smart Life app, skip the App installation instructions
and move to Pairing the Alarm Base Station to your App. If you do not have the App
installed, continue as follows;
Scan the QR code below or Search “Smart Life” from wherever you get your Apps to download
and Install the App.
Smart Life App
1. Open the App, enter your mobile phone number or email address and click to agree
the user agreement, then click “Register" to get the verification code. (For a better user
experience and for all services to work, please allow all the permissions to avoid
missing any notifications).
2. Enter the verification code and click “Next”. (If you cannot find the code in your
mailbox, please check your junk mailbox).
3. Set your login password and click “Register” to complete the registration. (For your
password security, the password requirement is a combination of letters and numbers
of more than 8 digits).
4. Enter the phone number or email address used for registration and enter the password,
then click “Login”.

Quick Set up Guide WG13 Alarm & Keypad 29 03 2022 V1
App Set up Guide
If you are installing devices into more than one room or building, we strongly advise that you
set up Homes and Rooms before adding any devices. This gives you better control on all
devices in different buildings and rooms.
Please note that if a device is added to the App without setting up Home or Rooms, the
device cannot be transferred into a “Home” or “Room” later. It is best practice to set
up Homes and Rooms from the start.
Once added to a Home, the devices can be moved from Room to Room within the Home.
Create a Home
1. From the Home page choose “Me” in the bottom right-hand corner.
2. Choose 3. Choose 4. Home Name:
Home Management Create a Home Enter Home Name
5. Location –This will show your current location on Maps (This feature is optional)
6. Rooms –You can remove or add rooms. You can remove the rooms you do not
need by tapping on the circle opposite the room you wish to remove, you can also
add a room by choosing “Add Room”.
7. Save –Once you have each room you want to set up, please choose “Save” on the
top right of screen.

Quick Set up Guide WG13 Alarm & Keypad 29 03 2022 V1
Adding a Device to your chosen Room
8. From the main App screen, top left hand 9. Next you choose from
corner you will see the list of your “Homes” within your home, what
using the down arrow choose which “Home” “Room” you wish to add
you want to add the device to. the device to.
10. Choose “Add Device” and follow the instructions in the App to add and pair your
device.
3. Alarm Base Station
Connecting to your Wi-Fi
Please have the name and password ready for the Wi-Fi you wish to connect to, this should
be the same Wi-Fi that your mobile phone is also connected to during set up.
The sensors included in the Alarm base station box will automatically pair once
powered on, see below. Any additional sensors purchased such as door/window
sensors, PIR motion alarms etc will need to be manually paired - see instructions below
for each sensor type.
STEP 1. Plug in your base station, insert the pin included or a paper clip into the hole indicated
at the back, then press and hold the Wi-Fi configuration switch until the Wi-Fi indicator
blue light on the front of the base station blinks quickly on and off every second, indicating the
device is ready to be paired.
STEP 2. On your mobile phone go to App home page, tap the “+” Icon at the top right of the
screen, the base station should be detected, then select Add to confirm.
4. Add/Pair Sensors
Firstly, power on the sensors.
Door/Window Sensor: Open the back of the Door/Window sensor and turn on the sensor
using the black switch below the battery and refit the back.

Quick Set up Guide WG13 Alarm & Keypad 29 03 2022 V1
PIR Motion Sensor: Use the Pin provided to slide the black button at the side of the PIR to
power it on.
Detection window
LED Indicator
Blinks for 30 seconds after sensor powers on. Lights up when there is
motion in the room. And blinks to indicate low battery
Wireless Keypad: When fully charged, remove the USB charger and push the On/Off
switch to the On position.
Power on/off - Slide up to ON, to power on the sensor
Pairing button – Press to send a transmission signal for pairing
with your base station.

Quick Set up Guide WG13 Alarm & Keypad 29 03 2022 V1
Once all sensors in the box have been powered on, they will automatically be paired and
added to your App. (Tap on Accessories, to check the alarms that have automatically paired)
If this does not happen, please see separate instructions at the end of this Quick set up Guide
to manually add each sensor and any other additional sensors and alarms you may have
purchased that were not included in the box.
5. Enter contact phone numbers to be alerted in the event of alarm triggered
When the alarm is triggered, you will receive 3 notifications. The first two will be from the sim
card inside your base station by SMS and a phone call. The third will be an App notification.
You can add the phone numbers you wish to have as points of contact and turn on this option.
•Choose Settings
•Choose Alarm Call number – enter the full telephone number of the person who should
be called if the alarm is triggered, please use the full country pre-fix. e.g. Ireland +353
•Choose Alarm SMS number – enter in the full telephone numbers of those who should
receive an SMS should the alarm be triggered, please use the full country pre-fix.
•Alarm Call – Turn on the notification
•Alarm SMS – Turn on the notification
6. Name/Type/Mode of each Sensor / Accessory
➢Each sensor should be given a name so you know when alerted which sensor has
been triggered.
Select your sensor in the Accessories list, Tap name, then enter a name you will
recognise (not to exceed 16 characters) such as “Front door No 10”, then Tap save to
save your setting.
➢Next change the description of the sensor type to one of the following:

Quick Set up Guide WG13 Alarm & Keypad 29 03 2022 V1
Sensor Type
Motion PIR
Door Contact
Smoke
Gas
Carbon Monoxide
Vibration
Water Leak
Photoelectric beam
Glassbreak
Panic
Doorbell
Air quality
Others
➢The Mode should then be selected, depending on how and when you want the device
to alert.
There are many different ways the alarm and sensors can be armed, giving you different
options depending on if you are home or out. Each sensor is designated a Zone Mode, which
defines the way in which the system responds to breaches in that zone and arming and
disarming.
To set up your sensors so that they will alert you when you want to be alerted, please choose
from the list below and ensure your sensors are designated as required. The Zone modes
can be changed at any stage but it is best to set up to suit your needs from the beginning.
Tap Accessories and pick the sensor you want to set, then change Zone Mode as follows;
Normal Sensors set to Normal Zone are activated in Arm (full arm) or HOME Mode
(home/stay/partial arm). We recommend setting door/window sensors to
Normal Zone.
24 Hours Sensors set to 24H Zone will activate the alarm when triggered, regardless of
the alarm status (Armed or Disarmed). This setting is useful if you have an
area in your home that you don’t want people entering or at least you wish to
be notified if someone does enter. Alternatively, if you need to be alerted if
someone opens a door to leave the house, this setting can be used.
Delay If sensors set to Delay Zone are triggered, the panel will sound the alarm after
the delay time has passed. We recommend setting door sensors with a delay
if they are used as primary entry points as this allows you time to disarm the
alarm before the siren goes off. You can choose the length of time you need.
Home Sensors set to Home Zone mode are only activated in Arm (Away arm). If Home
Arm Mode (partial/home arm) is used, these sensors are not armed and will
not activate the alarm if triggered. We recommend setting PIR Motion Detectors
to Home Zone. If you are at home and wish to be able to walk around your
home without the alarm sounding, this is the setting you will need.
24 Hours The mode is same as 24 Hours but there will be no sound triggered.
Silent
Home with It is same as Home but with Entry Delay in Home Arm.
delay

Quick Set up Guide WG13 Alarm & Keypad 29 03 2022 V1
Off To disable the sensor. This can be used if you wish to turn off a sensor for a
period of time as you may not require it but do not wish to remove it as will
use it in the future. Remember to Save each Zone Mode before you close
out of the screen.
7. Test Sim Card Alert Calls and SMS Messaging
To test your sim card, you first need to set up your monthly subscription, if you have not yet
done so already. Go to www.watchovers.com/pages/alarm-subscription Once set up,
trigger the alarm to ensure you get the SMS, the phone call and the App notification. To do
this, follow these steps:
•On the main App page, choose Arm Away, the alarm will be set
•Move your hand over the PIR to trigger the alarm
•You should hear the alarm siren, allow it to continue until you receive an SMS, an
Alarm notification through the App and a phone call is received to your first listed
contact number in the App. It can take up to 10 seconds for the call to connect.
•Allow the call to ring, answer the call and disarm the alarm.
•To disarm the alarm, Tap the disarm option in the app.
We recommend you test each sensor once they have been installed to ensure that all are
connected and installed correctly. Arm your alarm and trigger it using each sensor to
ensure the alarm is triggered each time.
To add any additional sensors and to pair the RFID Tags please see separate
instructions below.
8. Installation
Before securing your sensors and alarms in place, please test them at the location you wish
to fit them to ensure it is within range of the base station. Simply place the sensors at desired
location and separate them or set off the alarms to check they trigger an alert.
To fit the PIR motion alarms you will require a measuring tape and screwdriver (if using the
screws provided). It is not advised to mount the motion alarms or door/window sensors onto
metal surfaces as the metal can block RF signals between the transmitting sensor and the
base station.
Please ensure the surface is flat and clean where you intend to install the sensors if using
double-sided adhesive pads to install the alarms and the door/window sensor.
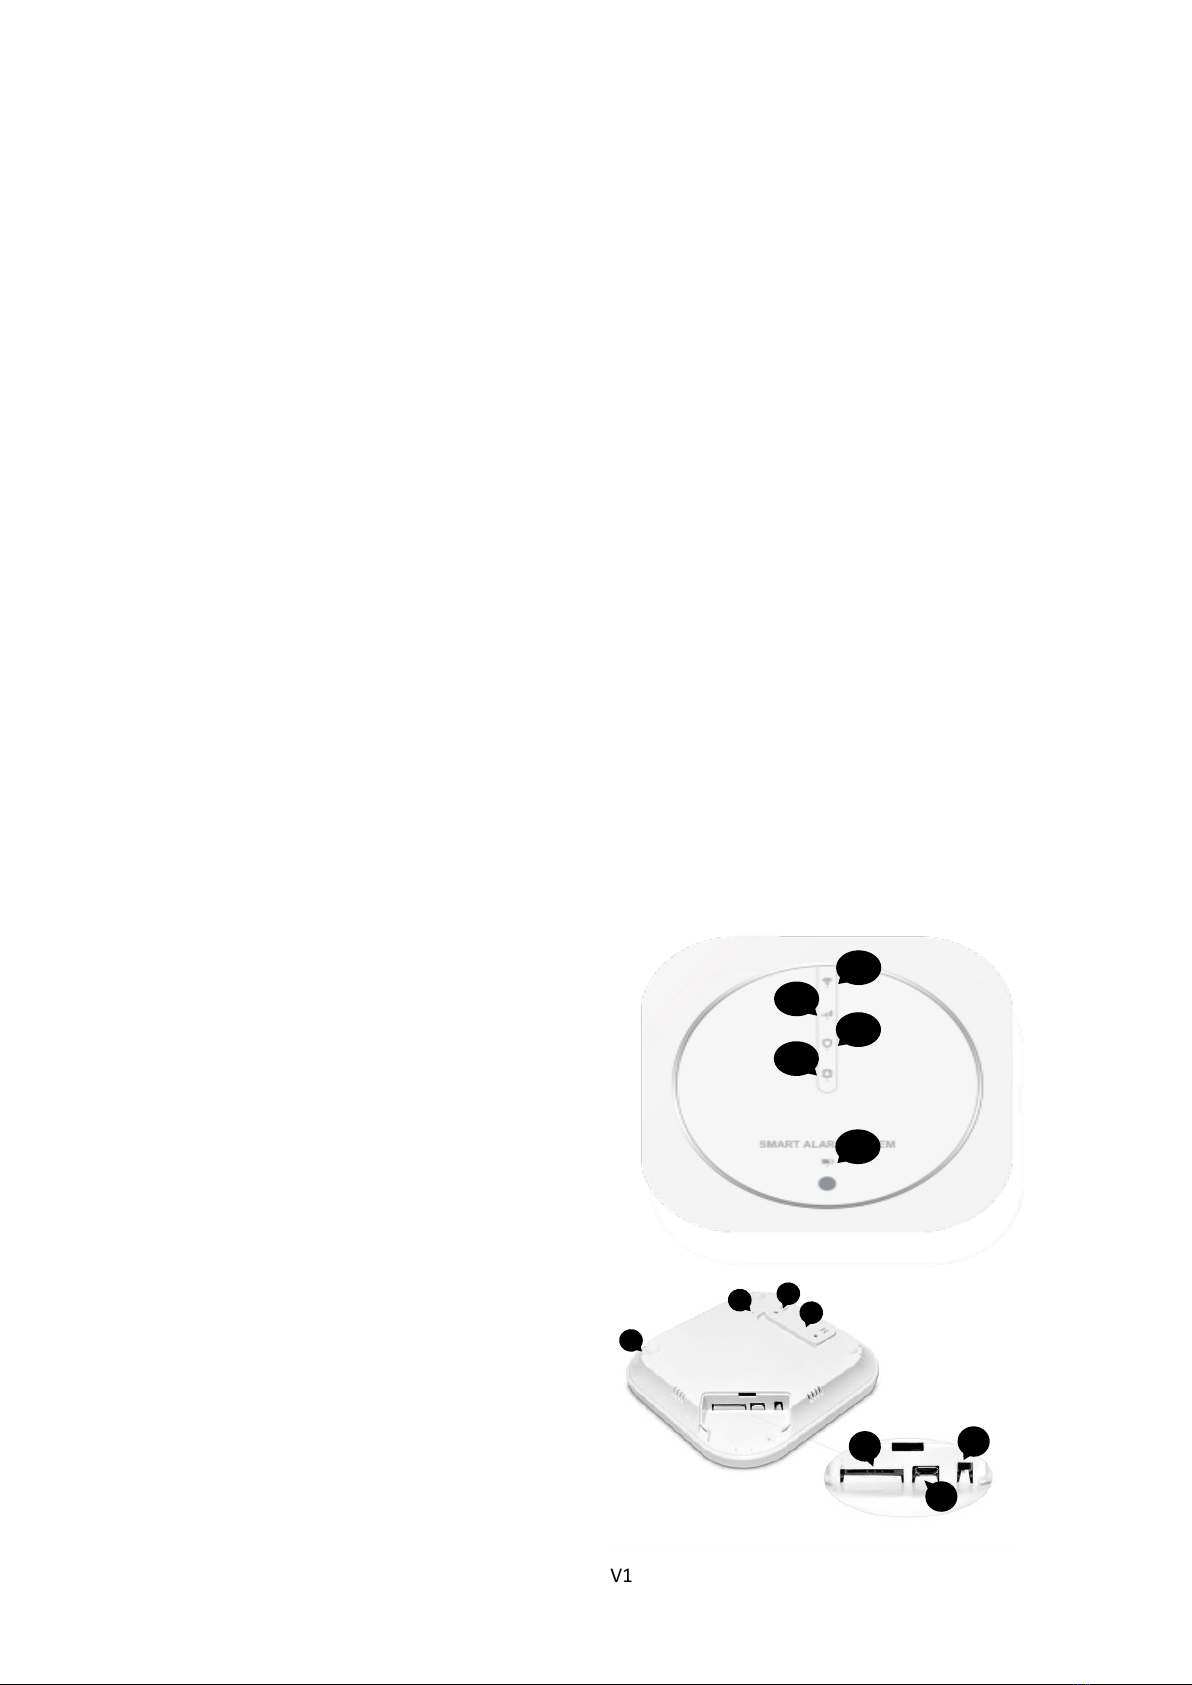
1. Alarm Base Station
Choose a wall power outlet with good Wi-Fi and cellular signal and preferably not controlled
by a switch, so you do not accidentally turn off the power. The closer the base station is to the
router the better the signal. If the base station is centrally located, it will give better connection
range for all sensors depending on the size of your home. Connect the power cable to the
USB port and plug the power adapter into the outlet to power on your base station, then slide
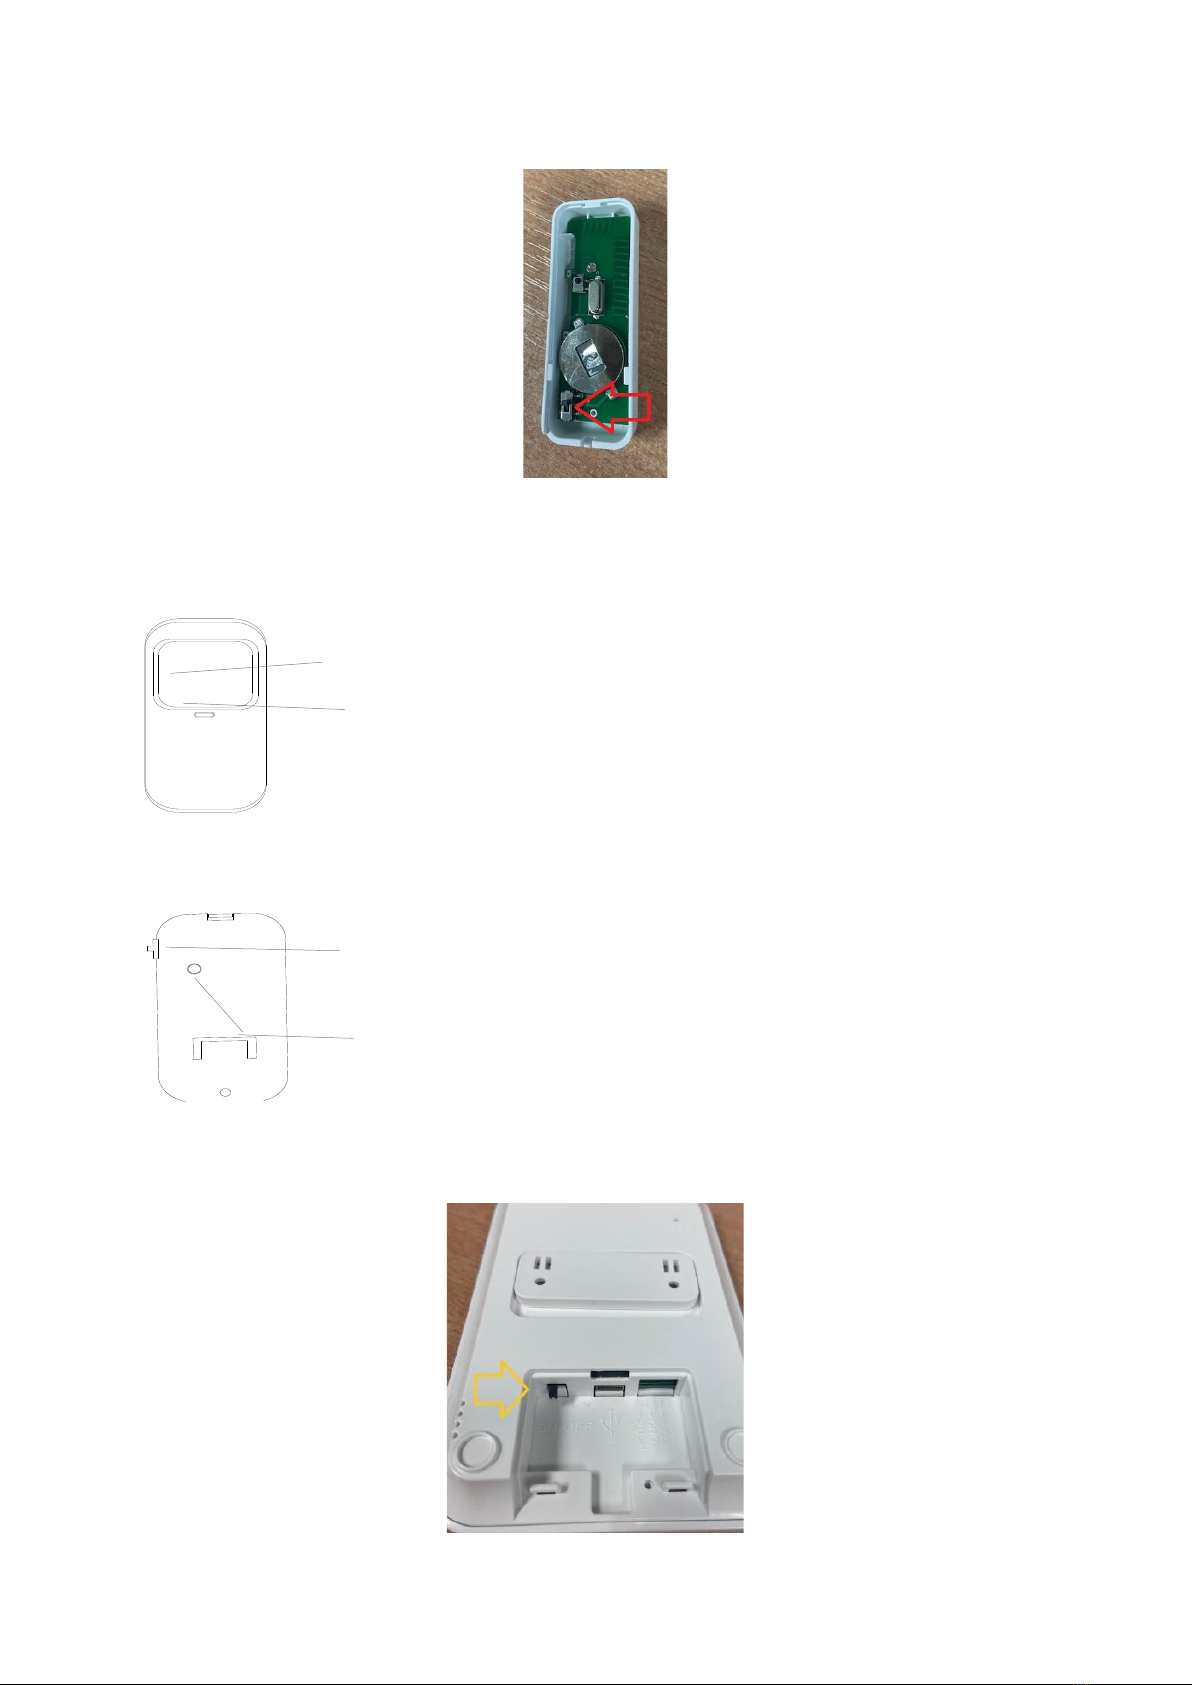
the battery switch at the back to the on position.
Remove the bracket from the back of the base station. Fit the double-sided adhesive pad to

Quick Set up Guide WG13 Alarm & Keypad 29 03 2022 V1
the back of the bracket and press the bracket onto your chosen location. Once the bracket is
secure, fit the keypad onto the bracket.
If using screws, remove the bracket from the base station and screw the bracket to the wall
with the screws provided. Fit the base station on to the bracket.
2. Door/Window Sensor
Fit the Double-Sided Adhesive pad firmly to the back of both parts of the sensor.
Carefully place the sensors where required and press firmly to ensure a secure bond.
Note: the maximum distance both parts can be from each other is 2.5 cm. If the gap on the
door/window to the frame is greater than 2.5cm in depth you can use a PIR motion alarm
instead in this location.
Arm the alarm and open the entry door/window to test the alarm is working correctly.
3. PIR Motion Sensor
Mounting height - Motion sensor should be mounted between 2m to 2.2m above the floor.
Mount the bracket with the adhesive pad or screw fixings provided. Fit the PIR motion sensor
in the bracket and set the direction of the detection range of the motion sensor.
Detection Area Top View Side View
Notes.
1. Do not install the PIR motion sensor outdoors or on glass.
2. PIR motion sensors cannot detect motion through glass if someone is moving outside
a window but it can give false alerts from outside motion or reflections so do not direct
the PIR towards a window from inside.
3. Do not install in places where the PIR motion sensor could get wet.
4. Do not install the PIR motion sensor within 1 meter of a heat source such as an electric
heater, heat vent or fireplace or a source that may produce turbulent air.
5. Do not install the PIR motion sensor behind large appliances or furniture that may
obstruct its motion sensors.
4. Wireless Keypad
Before installation, test the wireless keypad communication range with your base station
first.
It is not advised to mount the keypad onto metal surfaces as the metal can block RF
signals between the keypad and the base station.
Remove the bracket from the back of the keypad. Fit the double-sided adhesive pad to the
back of the bracket and press the bracket firmly onto your chosen location. Once the bracket
is secure, fit the keypad onto the bracket.

Quick Set up Guide WG13 Alarm & Keypad 29 03 2022 V1
5. Wireless Keypad and RFID Tags
Sleep/Wake mode
To save the battery, the keypad goes into sleep mode within 20 seconds of non-use.
Touch any button to wake the keypad.
User and Admin Passcode
The keypad has two 4-digit passcodes. The user passcode is used to arm, home arm
and disarm your security system, the admin passcode can be used to pair, delete RFID
tags and change passcodes. The default user passcode is “1234” and the admin
passcode is “8888”.
Programming
Basic programming steps
STEP 1. Enter admin passcode then press √, the setting indicator light on means that
programming mode is ready.
STEP 2. Input the appropriate number to select functions:
1Pair RFID Tag
2Delete RFID Tag
3Delete All RFID Tags
0Set User Passcode
9Set Admin Passcode
then press √, and the setting indicator blinks.
STEP 3. Enter setting then press √, the buzzer beeps twice.
LAST STEP. Press ← then √ to exit programming.
Pairing an RFID Tag
The RFID tags supplied with the system are paired with the keypad. If they are unpaired
or you want to pair more tags, you can pair the tag with your keypad as following.
STEP 1. Enter the admin passcode then press √.
STEP 2. Press 1 then √.
STEP 3. Enter a digit from 0 to 9 to designate a unique number for the tag
to be paired, then √, the arming, disarming and setting indicators blink
together.
STEP 4. Tap the tag on the read zone, the keypad will beep twice to
confirm pairing successful.
Note: up to 10 RFID tags can be added. Two tags cannot have the same number.
Deleting an RFID Tag
STEP 1. Enter the admin passcode then press √.
STEP 2. Press 2 then press √.
STEP 3. Enter the tag number from 0 to 9 to be deleted, then press √.
Deleting All RFID Tags
STEP 1. Enter the admin passcode then press √.
STEP 2. Press 3 then press √ to delete all RFID tags.
Setting User Passcode
STEP 1. Enter the admin passcode then press √.

Quick Set up Guide WG13 Alarm & Keypad 29 03 2022 V1
STEP 2. Press 0 then press √.
STEP 3. Enter the new 4-digit user passcode, then press √.
Setting Admin Passcode
STEP 1. Enter the admin passcode then press √.
STEP 2. Press 9 then press √.
STEP 3. Enter the new 4-digit admin passcode, then press √.
How to Connect your Keypad to the Base Station
STEP 1. Set your base station into pairing/sniffer mode.
STEP 2. Enter user passcode then press to send arming transmission signal to base
station.
STEP 3. The base station will beep to confirm pairing successful.
DOORBELL
If you wish to use the doorbell function on the keypad, the doorbell identification number
in the transmission code to the base station is different from the arming/disarming ID
number, so It is necessary to pair the doorbell code with your base station before using
doorbell function. To pair the doorbell:
STEP 1. Set your base station into pairing/sniffer mode.
STEP 2. Press to send the doorbell transmission signal to base station.
STEP 3. The base station will beep to confirm pairing successful.
ARMING/DISARMING Your Security System via the Keypad
Using The User Passcode.
Enter user passcode then press to away arm.
Enter user passcode then press to disarm.
Enter user passcode then press to home arm.
Or Using an RFID Tag.
Press then tap the RFID tag to away arm.
Press then tap the RFID tag to disarm.
Press then tap the RFID tag to home arm.
RESET
This process resets your keypad to factory settings and removes all paired RFID tags.
With the bracket attached to the back of the keypad, slide the bracket up and down 10
times which slides the tamper switch underneath the bracket, this will restart and reset
the keypad.

Quick Set up Guide WG13 Alarm & Keypad 29 03 2022 V1
Specifications
Power Supply: Micro USB+5VDC/1000mA
Backup Battery: 3.7V, 300mAh Lithium-ion Battery
Consumption: <150mA@normal
GSM: 850/900/1800/1900MHz
Wi-Fi: IEEE802.11b/g/n
Radio Frequency: 433Mhz
Connectivity: wireless siren and up to 100 wireless sensors
Operating Temperature: -10~55℃
9. Pairing Additional Sensors
Ensure the Base Station is plugged in and turned on.
It is best practice is to pair the sensors close to the base station and to test them in their
intended location before fixing each sensor to its permanent location.
Door/Window Alarm Sensor
Pairing your Door / Window Alarm Sensor
Ensure the Base Station is plugged in and turned on.
STEP 1. At your device home screen in the App tap Accessories > +, then the base station
goes into the pairing/sniffer mode with all indicators blinking.
STEP 2. Trigger the wireless Door/Window alarm sensor that you wish to add to send a
transmission signal to the base station before its 20 second sniffer countdown expires, once
paired the base station emits a sound.
STEP 3. Name your device, set the type and mode of your device. Please see above
instructions under Name/Type/Mode of each sensor.
To trigger a Door/Window alarm sensor for pairing - Start with the sensor and magnet closely
aligned, then separate them until the blue light comes on.

Quick Set up Guide WG13 Alarm & Keypad 29 03 2022 V1
Installation of the Door / Window Alarm Sensor
Before securing your sensor in place, please test the sensor at the location you wish to fit it,
to ensure it is within range of the base station by separating both contacts at the location you
wish to install it, with the alarm armed.
It is not advised to mount the motion alarms or entry sensor onto metal surfaces as the metal
can block RF signals between the transmitting sensor and the base station.
Please ensure the surface is flat and clean where you intend to install the sensors.
Using the double-sided adhesive pads to install the door/window sensor
Fit the Double-Sided Adhesive pad firmly to the back of both parts of the sensor.
Carefully place the sensors where required and press to ensure a secure bond.
Note: the maximum distance both parts can be from each other is 2.5 cm. If the gap on the
door/window to the frame is greater than 2.5cm in depth you can use PIR motion alarm instead
in this location.
With the alarm armed, open the entry door/window to test the alarm is working correctly.
Wireless PIR Motion Sensor
Pairing your Wireless PIR Motion Sensor
Ensure the Base Station is plugged in and turned on.
STEP 1. At your device home screen in the App tap Accessories > +, then the base station
goes into the pairing/sniffer mode with all indicators blinking.
STEP 2. Trigger the wireless PIR motion sensor that you wish to add to send a transmission
signal to the base station before its 20 second sniffer countdown expires, once paired the base
station emits a sound.
To trigger the PIR for pairing- Press the black button on the back for 5 seconds and the blue
light will flash.
STEP 3. Name your device, set the type and mode of your device. Please see above
instructions under Name/Type/Mode of each sensor.

Quick Set up Guide WG13 Alarm & Keypad 29 03 2022 V1
Installation of Wireless PIR Motion Sensor
Mounting height - Motion sensor should be mounted 2m to 2.2m above the floor.
Mount the bracket with the Adhesive pads or screws provided. Fit the motion sensor in the
bracket and set the direction of the detection range of the motion sensor.
Detection Area Top View Side View
Notes.
1. Do not install the PIR Motion sensor outdoors or on glass.
2. PIR Motion Sensor cannot detect motion through glass if someone is moving outside
a window but it can give false alerts from outside motion so do not direct towards a
window from inside.
3. Do not install in places where the PIR Motion Sensor could get wet.
4. Do not install the PIR Motion Sensor within 1 meter of a heat source such as an electric
heater, heat vent or fireplace or a source that may produce turbulent air.
5. Do not install the PIR Motion Sensor behind large appliances or furniture that may
obstruct its motion sensors.
Smoke Alarm
Pairing your Smoke Alarm
Ensure the Alarm Base Station is plugged in and turned on:
STEP 1. Open the back of the Smoke Alarm and remove the plastic covering from the battery.
Re insert the batter taking time to ensure you have the battery + and – matched correctly.

Quick Set up Guide WG13 Alarm & Keypad 29 03 2022 V1
STEP 2. From the App on your phone, on the device home screen in App tap Accessories >
+, then the base station goes into the pairing/sniffer mode with all indicators blinking.
STEP 3. Press the “Test” button on the alarm, a light will flash and sound alert. The wireless
smoke alarm sensor will send a transmission signal to the base station and once paired the
base station emits a sound.
STEP 4. Name your device, set the type and mode of your device. Please see above
instructions under Name/Type/Mode of each sensor.
Installation of the Smoke Alarm
Bracket installation:
Using Screw fixings - Choose the installation location, first make two holes in the ceiling or
wall, then insert the wall plugs into the holes. Insert the screws into the holes of the plate,
screw tightly to fix the bracket firmly.
Fit the battery into the battery holder of the alarm, align the back of the alarm and rotate
clockwise to lock in place.
Gently press the test button and to confirm the alarm is working.
Using the double-sided adhesive pad - Peel the paper from one side of the double-sided pad
and stick the pad to the centre of the backet and press firmly to ensure a good bond. Peel the
paper from the other side of the adhesive pad and fit the bracket in the selected location,
pressing firmly to ensure a good bond.
Fit the battery into the battery holder of the alarm, align the back of alarm and rotate clockwise
to lock in place.
Gently press the test button to confirm the alarm is working.
Note: Removing adhesive pads can remove paint from painted surfaces.

Quick Set up Guide WG13 Alarm & Keypad 29 03 2022 V1
Carbon Monoxide Alarm
Pairing your Carbon Monoxide Alarm
Ensure the Alarm Base Station is plugged in and turned on:
STEP 1. Open the back of the Carbon Monoxide Alarm and remove the plastic covering from
the battery. Re insert the batter taking time to ensure you have the battery + and – matched
correctly.
STEP 2. From the App on your phone, on the device home screen in App tap Accessories >
+, then the base station goes into the pairing/sniffer mode with all indicators blinking.
STEP 3. Press the “Test” button on the alarm, a light will flash and sound alert. The wireless
Carbon Monoxide alarm sensor will send a transmission signal to the base station and once
paired the base station emits a sound.
STEP 4. Name your device, set the type and mode of your device. Zone mode will default
to 24 hours for your CO Alarm and should NOT be changed from this. Please see above
instructions under Name/Type/Mode of each sensor.
Bracket installation:
Using Screw fixings - Choose the installation location, first make two holes in the ceiling or
wall, then insert the wall plugs into the holes. Insert the screws into the holes of the plate,
screw tightly to fix the bracket firmly.
Fit the battery into the battery holder of the alarm, align the back of alarm and rotate clockwise
to lock in place.
Gently press the test button to confirm the alarm is working.
Using the double-sided adhesive pads - Peel the paper from one side of the double-sided
pads and stick the pads to the backet on either side of the central hole and press firmly to
ensure a good bond. Peel the paper from the other side of the adhesive pads and fit the
bracket in the selected location, pressing firmly to ensure a good bond.

Quick Set up Guide WG13 Alarm & Keypad 29 03 2022 V1
Fit the battery into the battery holder of the alarm, align the back of alarm and rotate clockwise
to lock in place.
Gently press the test button to confirm the alarm is working.
Note: Removing adhesive pads can remove paint from painted surfaces.
Water Leak Alarm
Pairing your Water Leak Alarm
Ensure the Alarm Base Station is plugged in and turned on:
STEP 1. From the App on your phone, on Alarm home screen tap Accessories > +, then the
base station goes into the pairing/sniffer mode with all indicators blinking.
STEP 2. Touch the two sensors on the bottom of the water leak alarm at the same time with
your finger. The LED light will turn on. The water alarm will send a transmission signal to the
base station once paired and the base station emits a sound or the voice will prompt “adding
completed”.
STEP 3. Name your device, set the type and mode of your device. Zone mode for the Water
Leak Alarm should be set to 24 Hours Please see above instructions under
Name/Type/Mode of each sensor.
Installation
Place the alarm in an area which may flood such as basements, kitchens, utility rooms,
bathrooms, etc. To avoid magnetic interference on the sensor, do not mount it on a magnetic
surface such as a metal doorframe.
The water alarm can be reused after it has been wet, by drying it using a soft clean cloth and
place it back in the area you wish to monitor.

Quick Set up Guide WG13 Alarm & Keypad 29 03 2022 V1
Panic Button
Pairing your Panic Button
Ensure the Alarm Base Station is plugged in and turned on:
STEP 1. From the App on your phone, on Alarm home screen tap Accessories > +, then the
base station goes into the pairing/sniffer mode with all indicators blinking.
STEP 2. Trigger the Panic Button you wish to add, to send a transmission signal to the base
station before its 20 second sniffer countdown expires, once paired the base station emits a
sound.
To trigger the Panic Button for pairing – Power on the button by simply pressing the SOS
button, a light will come on the device.
Installation
To install the SOS button push the rectangular double-sided adhesive pad from the circular
pad and use the rectangular pad to fix the SOS button. Peel the paper from one side of the
double-sided pad and stick the pad to the rectangular center of the SOS button, pressing firmly
to ensure a good bond. Peel the paper from the other side of the adhesive pad and fit the SOS
button in the selected location, pressing firmly to ensure a good bond.
Note: Removing adhesive pads can remove paint from painted surfaces.
SOS Emergency Button Wristband
Other manuals for WG13
1
Table of contents
Other WatchOvers Security System manuals