Waterco Solclear 90 Instruction Manual

WARNING
!
www.waterco.com
This equipment must be installed and serviced by a qualified technician.
Improper installation may result in property damage, serious injury or death.
Improper installation and/or operation will void the warranty.
Notice to Installer
This manual contains important information about the installation, operation
and safe use of this product. Once the product has been installed this manual
must be given to the owner/operator of this equipment.
SOLCLEAR UV STERILIZER
Operating
Instructions
Manual

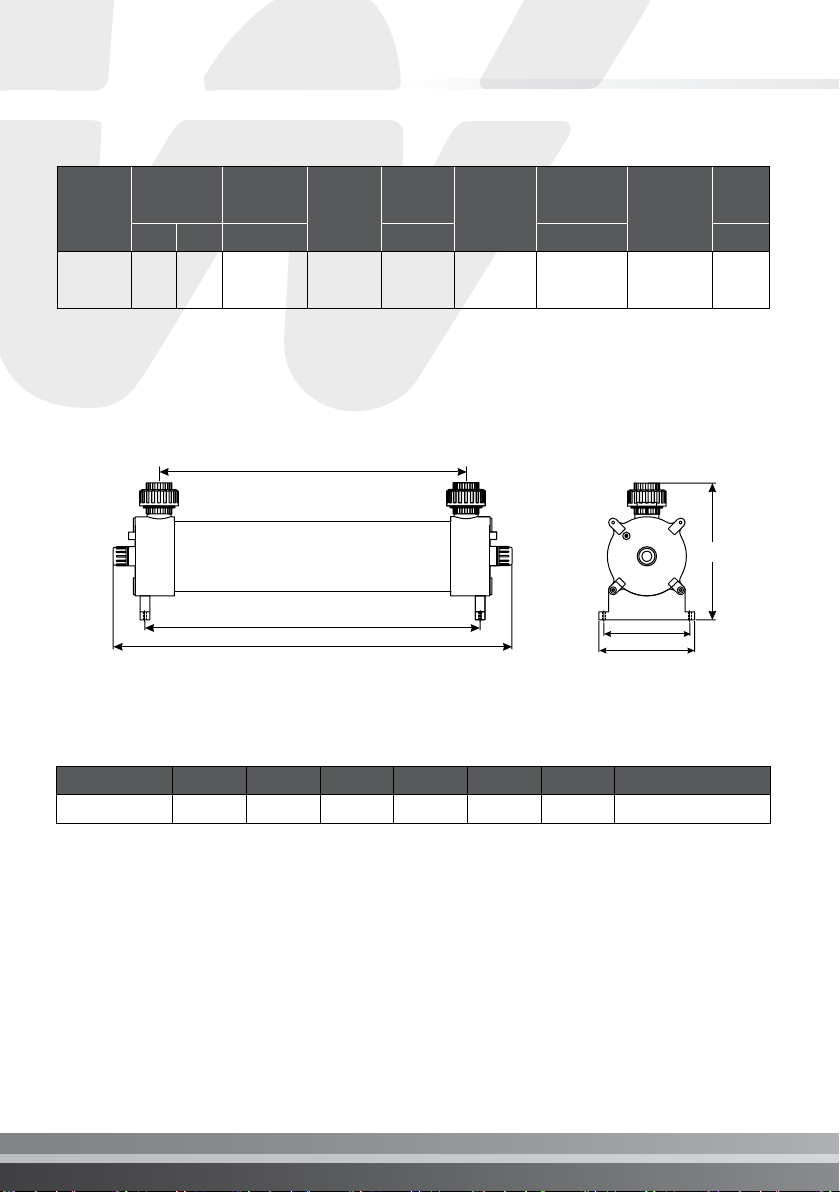
Model A B C D Inlet & Outlet Size
Solclear 90 780mm 63.5mm 115mm 925mm 1 1/2” BSP
Solclear 150 786mm 175mm 165mm 926mm 1 1/2” BSP
NOTE: Line cord and lamp lead wire omitted for clarity. All figure tolerance 1%.
SOLCLEAR 90 & 150
Model
Flow
Rate
Quartz
Thimble
Size UV
Lamp
Lamp
Wattage Standard
Ballast
Ballast
Size Operating
Pressure
Lamp
Life
gpm lpm mm W mm hour
Solclear
90 24 90.85
D24.5 x 910 T540 40W UVC-
2040T
238 x 113
x 77
100psi
(6.9bar) 9000
Solclear
150 40 150
Input Voltage: 230 VAC (190-260VAC) / 50-60Hz
02 I Solclear UV Sterilizer
General View of Solclear 90
General View of Solclear 150
Overall length excluding lamp lead wire
Distance between inlet & outlet
End View End View
End View
Distance between inlet & outlet
Overall length excluding lamp lead wire
End View

Solclear UV Sterilizer I 03
INSTALLATION DIAGRAM
Pressure switch
Elbow
Elbow
Point of use
Outlet line to be as
short as possible
Valve
Union
Valve
Solenoid
valve
Union
NOTES:
1. Do not allow Solclear UV sterilizer to freeze.
2. Recommended ambient temperature: 2°C-40°C (36°F-104°F).
3. Input voltage is 230VAC (190-260VAC) / 50-60Hz.
4. Maximum recommended operating pressure is 100psi (6.9bar).
5. The system and installation shall comply with applicable state and local regulations.
Incoming
water
supply
04 I Solclear UV Sterilizer
SOLCLEAR 300
Model
Flow
Rate
Quartz
Thimble
Size UV
Lamp
Lamp
Wattage Standard
Ballast
Ballast
Size Operating
Pressure
Lamp
Life
gpm lpm mm W mm hour
Solclear
300 80 300 D30 x 910 T6125
(212564) 125W UV-24 450 x 350
x 205
88.5psi
(6.1bar) 13,000
Input Voltage: 230VAC / 50-60Hz
General View of Solclear 300
Model A B C D E F Inlet & Outlet Size
Solclear 300 946mm 748mm 660mm 268mm 298mm 426mm 2” Union
NOTE: Line cord and lamp lead wire omitted for clarity. All figure tolerance 1%.
Distance between inlet & outlet
Overall length less lamp lead wire
E
C
B
A
F
D

Solclear UV Sterilizer I 05
INSTALLATION DIAGRAM
NOTES:
1. Do not allow Solclear UV sterilizer to freeze.
2. Recommended ambient temperature: 2°C-40°C.
3. Input voltage is 230VAC / 50-60Hz.
4. Maximum recommended operating pressure is 88.5psi (6.1bar).
5. The system and installation shall comply with applicable state and local regulations.
Pressure
switch
Flow rate
controller
Elbow
Elbow
Point of use
Outlet line to point of
use to be as short as
possible Union
Solenoid
valve
Incoming
water
supply

ITEM DESCRIPTION Solclear 90
(Part No.)
Solclear 150
(Part No.)
1 Water Proof Strainer 64489 64489
2 Aluminium Nut 725110641 725110641
3 Lamp Socket & Lead Wire 725110514 725110514
4 Germicidal Ultravoilet Lamp 725110423 725110423
5 O-ring BS212 Silicone 725912120 725912120
6 Quartz Sleeve 725110413 725110413
7 Stainless Steel Chamber - -
8-a Metal Clip - 725120042
8-b Plastic Clip 725120041 -
9 Ballast 725120054 725120054
Germicidal ultraviolet rays are
harmful to eyes & skin.
CAUTION: Ultraviolet lamp and quartz sleeve are easily damaged. Pay attention when removing or
replacing lamp and quartz sleeve.
WARNING
!
06 I Solclear UV Sterilizer
ASSEMBLY
Solclear 90 & 150

ITEM DESCRIPTION Solclear 300 (Part No.)
1 Water Proof Strainer 725110456
2 PVC Nut 725110646
3 Lamp Socket & Lead Wire 725110516
4 Germicidal Ultravoilet Lamp 725110426
5 Rubber O-ring 725110376
6 Quartz Sleeve 725110416
7 PVC Chamber –
8 Ballast 725110546
9 Spring –
Germicidal ultraviolet rays are
harmful to eyes & skin.
CAUTION: Ultraviolet lamp and quartz sleeve are easily damaged. Pay attention when removing or
replacing lamp and quartz sleeve.
WARNING
!
Solclear UV Sterilizer I 07
ASSEMBLY
Solclear 300

08 I Solclear UV Sterilizer
INSTALLATION:
1. Install Solclear UV sterilizer in a readily accessible and well-lit location to facilitate
inspection and maintenance.
2. Inspect for hidden electrical wiring or plumbing prior to drilling holes.
3. Attach mounting clips to the wall.
4. Insert chamber through mounting clips.
5. Connect to plumbing.
6. Install quartz sleeve and lamp.
Note: Avoid touching the sides of the quartz sleeve and lamp, handle by the ends only.
Ultraviolet lamp and quartz sleeve are easily damaged. Pay attention when removing or
replacing lamp and quartz sleeve.
a. Remove the aluminium / PVC nut (2).
b. Slide carefully the quartz sleeve (6) from one end to another end of the
chamber.
c. Slide the O-ring (5) at the open end of quartz sleeve for Soclear 90 & 150.
For Solclear 300, please put O-ring (5) at the both end of quartz sleeve.
d. Tighten the aluminium / PVC nut (2) hand tight.
e. Slide the lamp (4) into the quartz sleeve.
f. Connect the lamp to the lamp socket.
g. Tighten the water proof strainer (1) into the aluminium / PVC nut (2).
7. Turn on the water and inspect for leakages. Rectify as necessary.
8. Plug the ballast into an electrical outlet. An electrical outlet protected by a Ground Fault
Interrupt (GFI) circuit is recommended.
9. Run water through the chamber for 5-10 minutes prior to use.

Solclear UV Sterilizer I 09
REPLACING UV LAMP AND SERVICING UV
SYSTEM:
NOTE : Avoid touching the sides of the quartz sleeve and lamp, handle by the ends
only.
1. Disconnect power.
2. Turn water off and open down stream of system to relieve pressure.
3. Remove the water proof strainer (1) and unscrew the aluminium / PVC nut (2).
4. Carefully withdraw lamp (4) approximately 2 inches from chamber (7).
5. While holding lamp end carefully, remove lamp socket (3).
6. Carefully withdraw lamp from chamber (7).
7. Carefully remove O-ring (5) from the end of the quartz sleeve (6).
8. Carefully remove the quartz sleeve (6).
9. To reinstall, follow step 8 through 1 in reverse.
MAINTENANCE
To operate the Solclear UV sterilizer properly and attain its maximum efficiency,
appropriate maintenance is to be performed as follows:
I. Quartz sleeve cleaning or replacement:
• Quartz sleeve is to be cleaned every 6-12 months with glass cleaner.
• Quartz sleeve is to be replaced every 24 months.
II. UV lamp replacement is recommended every 8,000-9,000 hours (approximately
12 months for continous service) for Solclear 90 & 150, or 13,000 hours
(approximately 1.5 years of continous service) for Solclear 300 of operation.

10 I Solclear UV Sterilizer
Electronic Ballast (for Solclear 90 & 150 only)
General View of Ballast UVC-2040T
Features & Functions
1. Auto Timer Function
2. Constant Current Limited Power Output
3. Output Open Circuit Protection
4. Display for UV Lamp Status
5. Status Signal Output
Specification:
Model: UVC-2040T
Operation Voltage: AC230V (190V - 260V)
Input Frequency: 50-60Hz
Input Amp: 0.3A
Power Factor: > 0.9
Output Power: 20-40W
Output Frequency: 45kHz
Start Mode: Instant Start
Efficiency: > 83%
Display Operation Setting: Digital LCD, setting program by 1 button
Peak Coefficient: 1.6
Weight: 0.6kg
Ballast Size: 238mm x 113mm x 77mm
Operating Ambient Temperature: 0-40°C
IP Rating: IP 55
Certification: CE
Compatible UV Lamps: 20-40W
112.6
238
76.97

Solclear UV Sterilizer I 11
Installation Instruction
1. The no. 1 port is a relay dry contact output. When the ballast is working normally, the dry
contact is shorted, otherwise the dry contact is open. The withstand voltage is 250V,
ampere rating is 5A. It can be connected to PLC, solenoid valve and others. If it is not
used, please put the threaded cap on to avoid humidity and dust.
2. The no. 2 port is power input port: standard power input port with 3pins. When plug the
power cable into the input port, please push the plug into deep bottom of the port to
have good contact.
3. The no. 3 port is the power output for UV lamp
# Note: please disconnect power before unplug all connectors.
There are two ways to mount the ballast: (1) with hanging plate and (2) double sided tape.
Digital panel display operation instruction
1. Press the button and hold it for 5 seconds, the timer will reset to the factory defaults.
2. Quick press the button, the LED shows the used time of the lamp, then quick press the
button again it shows the start-up times. If left idle for 2 seconds, the LED will return to
show the remaining time.
3. When the remaining time is less than 300 hours, the ballast will sound alarm, and the
LED will blink. Quick press the button, the ballast will stop sounding.
4. When the lamp life expired, the ballast sounds alarm, LED turns red, the lamp is turned off.
5. When no lamp is connected or the lamp is damaged, the ballast sounds alarm and LED
turn red.
6. When situation as item 4 or item 5 happens, please turn to a new lamp and reset
according to step 1 as above.
Toubleshooting for Electronic Ballast
No Problem Solution
1When the ballast is connected to
power, there is no display on LCD.
Please check the power is connected
properly.
2
When the ballast is connected to
power, the lamp is not lighted up,
but the ballast alarm sounds.
Please turn off power, check the connections
between the ballast and the lamp separately,
and tighten them again.
The ballast has 3 ports:
1. Dry contact signal output port 2. Power input port 3. Lamp output port

Waterco Limited ABN 62 002 070 733
(W99400) 07/2021
OFFICES – AUSTRALIA
NSW - SYDNEY
(HEAD OFFICE)
Te l : +61 2 9898 8600
VIC/TAS - MELBOURNE
Te l : +61 3 9764 1211
WA - PERTH
Te l : +61 8 9273 1900
QLD - BRISBANE
Te l : +61 7 3299 9900
SA/NT - ADELAIDE
Te l : +61 8 8244 6000
ACT DISTRIBUTOR
Te l : +61 2 6280 6476
OFFICES – OVERSEAS
WATERCO (EUROPE) LIMITED
Sittingbourne, Kent, UK
Te l : +44 (0) 1795 521 733
WATERCO USA
Augusta, USA
Te l : +1 706 793 7291
WATERCO CANADA
Boucherville, Quebec, Canada
Te l : +1 450 748 1421
WATERCO (NZ) LIMITED
Auckland, New Zealand
Te l : +64 9 525 7570
WATERCO (C) LIMITED
Guangzhou, China
Te l : +8620 3222 2180
WATERCO (FAR EAST) SDN BHD
Selangor, Malaysia
Te l : +60 3 6145 6000
PT WATERCO INDONESIA
Jakarta, Indonesia
Te l : +62 21 4585 1481
WATERCO SINGAPORE INTL PTE LTD
Nehsons Building, Singapore
Te l :+65 6344 2378
This manual suits for next models
3
Table of contents
Popular Laboratory Equipment manuals by other brands


SciCan
SciCan Bravo Operator's manual

Agilent Technologies
Agilent Technologies SureCycler 8800 Setup and user guide

Eisco
Eisco PULLEY KIT user manual

Beckman Coulter
Beckman Coulter Optima MAX-TL Instructions for use

Endress+Hauser
Endress+Hauser Analytik Jena CyBio SELMA user manual

BIO RAD
BIO RAD PowerPac Universal Power Supply instruction manual

Littelfuse
Littelfuse PGR-6100 manual

EUROIMMUN Medizinische Labordiagnostika AG
EUROIMMUN Medizinische Labordiagnostika AG Sprinter XL Instructions for use

strex
strex STB-1400-04 user manual

Terragene
Terragene Bionova MiniPro manual

Altronix
Altronix NetWay1E installation guide

VWR
VWR 76019-132 instruction manual