Waterman Standard Series User manual

Assembly and
Operating Instructions
'Standard' Swimming Pools
English
Please read this manual carefully and
keep it for future reference.
Assembly and Operating Instructions 'Standard' Pools
2
Possible – but not recommended!
D
Pool-Standort wählen
UK
Selection of pool location
F
Sélection de l‘emplacement
I
Scegliere il luogo per la piscina
NL
Locatie zwembad kiezen
S
Välja placering för bassängen
CZ
Pool-volba místa
SK
Zvoľte miesto inštalácie bazéna
SI
Izbira mesta za postavljanje bazena
HU
Medence helyének a kiválsaztása.
RO
Selectarea locului de amplasare a piscinei
1
FOR ALL POOL TYPES
D
Untergrund vorbereiten
UK
Preparation of the foundation/ground
F
Préparation du terrain
I
Preparare il fondo
NL
Ondergrond voorbereiden
S
Förbereda underlaget
CZ
příprava podkladu
SK
Pripravte podklad
SI
Priprava tal
HU
Felállítási hely előkészítése.
RO
Pregătirea solului de bază
2
KURZANLEITUNG / QUICK START GUIDE / NOTICE SOMMAIRE / GUIDA RAPIDA /
BEKNOPTE HANDLEIDING / KORTFATTAD BRUKSANVISNING / STRUČNÁ PŘÍRUČKAG
/
STRUČNÝ NÁVOD / KRATKA NAVODILAG / GYORS ÚTMUTATÓ / MANUAL CU
INSTRUCŢIUNI PE SCURT
Assembly and Operating Instructions 'Standard' Pools 3
FOR FIGURE-8 SHAPED POOLSFOR PARTIAL INGROUNG/INGROUND
INSTALLATION
D
Graben für Stahlträger
UK
Trench for steel girder
F
Creusement pour poutre en acier
I
Scavo per trave d‘acciaio
NL
Greppel voor stalen drager
S
Gräv ett dike för stålbalken
CZ
Vykopat pro ocelový nosníky
SK
Jamy pre oceľové nosníky
SI
Luknje za jeklene nosilce
HU
Acélmerevítő alapja
RO
Gropi pentru montanţii de oţel
A
2.1
D
Schichtweise Betonhinterfüllung
UK
Concrete backll in layers
F
Remblai en béton par couches
I
Riempimento calcestruzzo a strati
NL
Beton laagsgewijs vullen
S
Fyll på betong i era skikt
CZ
Betonovat po vrstvách
SK
Vo vrstvách zaliať betónom
SI
Postopno v plasteh nanestite beton
HU
Lépcsőzetes betonozás
RO
Turnare beton umplutură laterală în straturi
2.2
D
Montage der Stahlstützträger
UK
Assembly of steel support girder
F
Montage des jambes de force en acier
I
Montaggio delle travi di sostegno in acciaio
NL
Montage van stalen steun
S
Montera stålbalken
CZ
Montáž ocelových nosníků
SK
Montáž oceľového podperného nosníka
SI
Montaža jeklenih nosilnih stebrov
HU
Acélmerevítő szerelése
RO
Montarea montanţilor de oţel pentru reazem
2.2
FOR ALL POOL TYPES
D
Vlies und Bodenschienen auslegen
UK
Installation of oor protection eece and oor rails
F
Pose du tapis feutre et des rails d‘assise
I
Posare velo protettivo e proli inferiori
NL
Vlies en bodemrails uitleggen
S
Lägga ut duk och bottenskenor
CZ
uložení vlákniny a dnových kolejnic
SK
Rozložte podložku a dnovú obruč
SI
Postavitev isa in talnih tračnic
HU
Védőfólia és alap sínek elhelyezése.
RO
Amplasarea păturii drenante şi şinelor bazei
3

Assembly and Operating Instructions 'Standard' Pools
4
English
FOR FIGURE-8 SHAPED POOLS
D
Montage des Sitzboards
UK
Mounting the seat
F
Montage du siège
I
Montaggio panchina laterale
NL
Montage van de bevestigings-board
S
Montera sittbrädan
CZ
Montáž sedačky
SK
Montáž sedadla
SI
Montaža sedeža
HU
Összekötő, felülő lemez szerelése
RO
Montarea banchetei
6.1
D
Folie und Handlauf einhängen
UK
Attaching the liner and top rail
F
Accrochage du liner et de la margelle
I
Agganciare il liner e il prolo superiore
NL
Folie en reling inhangen
S
Installera folien och hållskenan
CZ
Zavěšení folie a zábradlí
SK
Zaveste fóliu a držadlo
SI
Napenjanje folije in ročaja
HU
Fólia és felső sín behelyezése.
RO
Suspendarea foliei şi barei mână curentă
6
D
Stahlmantel aufstellen
UK
Installation of steel wall (jacket)
F
Mise en place de la paroi en acier
I
Disporre la lamiera
NL
Stalen mantel opstellen
S
Ställa upp stålmanteln
CZ
stavba ocelového pláště
SK
Postavte oceľový plášť
SI
Postavitev pločevinastega plašča
HU
Fémpalást felállítása.
RO
Amplasarea mantalei de oţel
4
D
Stahlwand verschrauben
UK
Assembly of steel wall
F
Assemblage de la paroi en acier
I
Avvitare la parete
NL
Stalen wand vastschroeven
S
Skruva ihop stålväggen
CZ
ocelovou stěnu spojit šrouby
SK
Zoskrutkujte oceľovú stenu
SI
Vijačenje pločevinastega plašča
HU
Fémfal összecsavarozása.
RO
Înşurubarea peretelui de oţel
5

Assembly and Operating Instructions 'Standard' Pools
English
5
Please observe the detailed instructions
on the following pages.
D
Eine ausführliche Anleitung in Ihrer Sprache steht im Internet
unter http://download.waterman-pool.com für Sie bereit.
F
Une notice d‘utilisation détaillée dans votre langue est disponible
sur le site Internet http://download.waterman-pool.com
I
Potete trovare la descrizione dettagliata nella vostra lingua in
Internet all‘indirizzo http://download.waterman-pool.com
NL
Een uitgebreide handleiding in uw taal staat op internet
onder http://download.waterman-pool.com voor u klaar.
S
En utförlig anvisning på ditt språk nns att ladda ner på Internet
under adressen http://download.waterman-pool.com
CZ
Podrobné pokyny ve vašem jazyce jsou k dispozici na internetu
jsou pro vás připraveny pod http://download.waterman-pool.com
SK
Podrobný návod vo vašom jazyku nájdete na internete
na stránke http://download.waterman-pool.com
SI
celotna navodila v Vašem jeziku najdete na spletni strani
http://download.waterman-pool.com
HU
Részletes útmutató az Ön beszélt nyelvén az interneten
a következő címen http://download.waterman-pool.com áll rendelkezésére.
RO
Un manual cu instrucţiuni detaliate vă stă la dispoziţie pe internet pregătit în
limba dumneavoastră la http://download.waterman-pool.com

Assembly and Operating Instructions 'Standard' Pools
6
English
ELECTRICAL SAFETY
• The power supply for your
swimming pool must be protected
by means of a residual current
circuit breaker (30 mA).
• Never take electrical equipment into your
swimming pool and never touch electrical devices
from inside the water.
• Free-standing lter systems/pumps exceeding 12
volts must be installed with a minimum distance
of 3 m from the pool, and a distance of 3.5 from
the pool for the current source.
• Please observe the DIN VDE 0100 part 702 for
all electrical installations of your pool.
SAFETY OF NON-SWIMMERS
• A permanent, active and watchful supervision
of weak swimmers and non-swimmers by a
competent, skilled adult supervisor is necessary
at all times (it should be remembered that the
greatest risk of drowning is among children under
5 years of age).
• A competent, skilled adult is appointed to monitor
the pool when it is used.
• Weak swimmers or non-swimmers must wear
personal protective equipment when using the
swimming pool.
• If the pool is not used or monitored, all toys must
be removed from the pool and its surroundings to
prevent that children are attracted by these.
SAFETY INSTRUCTIONS AND WARNINGS
The use of a swimming pool kit construction
presumes that the kit complies with the safety
regulations described in the operation and
maintenance manual. To prevent a drowning of
children, it is recommended to secure access to
the swimming pool. The access to the pool is to
be secured in such a way that children under 5
years cannot get into the pool water unnoticed.
You can protect the pool with a childproof fencing
or a childproof cover/roong of the complete pool,
with an additional alarm system, if desired. Safety
devices can make a pool safer, but never replace a
permanent supervision of children by an adult who
can help in an emergency.
While the pool is used, no equipment
used to access the swimming pool (e.g.
ladders) must be removed. When the
pool is no longer used, ladders must either be
completely removed from the pool or secured in
such a way that unauthorized access is not possible
(for example, we recommend using a safety ladder
with detachable, or foldable and lockable steps).

Assembly and Operating Instructions 'Standard' Pools
English
7
SAFE USE OF THE SWIMMING POOL
• Dives into the pool are not allowed, never jump
into shallow water (danger of serious injuries or
even death).
• Learn rst aid skills (cardiopulmonary
resuscitation CPR) and refresh your knowledge
regularly. This can make a lifesaving difference in
an emergency.
• All pool users, including children, are to be
instructed what to do in an emergency.
• Remove protecting covers completely before
using the pool, never dive under covers.
• Place the ladder to enter the swimming pool
on a secure, rm oor. Check regularly that all
connections are still tight and properly xed, and
that there is no damage.
• Never use the swimming pool when under the
inuence of alcohol, drugs, or medication.
• Never mix water treatment chemicals, keep
chemicals for the swimming pool securely closed
and out of the reach of children.
• Never allow swimming alone; children or
non-swimmers may only use the pool under
supervision and, if necessary, with swimming
aids. All users, especially children, are
encouraged to learn how to swim.
• Please use the enclosed safety labels and x
them in a clearly visible place in the area of your
swimming pool (within 2000 mm).
• Place life-saving equipment (bars, safety buoys,
rst aid emergency numbers) near the pool.
• Ensure a regular measurement of pH and
disinfectant levels, since this is the only way you
can prevent the spreading of germs (bacteria,
viruses, etc.) in the water. Please have a shower
before and after swimming. Never enter or jump
into the water when you are overheated.
• Never sit down on the edge of the pool and do
not cause excessive water movement, especially
in case of free-standing pools.
• Avoid running around the swimming pool (danger
of slipping).
• Never allow animals (dogs, cats, sh) to swim in
your swimming pool.
• Never use the pool in the dark or in dangerous
weather (lightning, thunder, thunderstorm).
• Never swim or dive between the ladder and the
pool wall (danger of getting trapped).
• Keep a working phone and a list of emergency
numbers near the swimming pool.
• Never climb directly out of the pool, always use
the ladder. Excessive pressure and kicks against
the pool wall can cause damage to or breakdown
of the swimming pool. Never sit on the basin
edge/top rail
• Do not use any sharp-edged cleaning devices or
toys, which could damage the lining (inside).
• Check all screw connections on a regular basis
and make sure that there are no sharp corners or
edges on the pool or on accessories (e.g. ladder),
which could involve a risk of injury.

Assembly and Operating Instructions 'Standard' Pools
8
English
PURCHASE INFORMATION / TECHNICAL DATA ROUND POOLS
Note:
This pool conforms
to the EN16562-1
standard. It is
supplied as above-
ground pool kit.
F
EB
A
D
C
A
Diameter
(m)
B
Height
(m)
C
Volume
(l)
D
Water
surface
E
Max.
depth of water
F
Max.
outer dimension
Time required
for setup (with-
out concrete)
No. of people
required for setup
3.00 0.84 5,600 7 m² 0.74m
Pool size + 5 cm
2h 2 - 3
3.60 0.84 7,500 9.6 0.74m 2h 2 - 3
4.00 0.84 8,500 12.5 m² 0.74m 2h 2 - 3
3.00 0.90 6,000 7 m² 0.80m 2h 2 - 3
3.50 0.90 8,000 9.6 m² 0.80m 2h 2 - 3
3.60 0.90 8,250 10.17 m² 0.80m 2.5h 3
4.00 0.90 9,000 12.5 m² 0.80m 2.5h 3
4.50 0.90 13,500 16 m² 0.80m 2.5h 3
4.60 0.90 13,650 16.6 m² 0.80m 3h 3
3.00 1.05 7,000 7 m² 0.95m 2h 2 - 3
3.50 1.05 9,600 9.6 m² 0.95m 2h 2 - 3
4.00 1.05 12,250 12.5 m² 0.95m 2.5h 3
4.50 1.05 15,750 16 m² 0.95m 2.5h 3
3.50 1.20 10,100 9.6 m² 1.10m 2h 2 - 3
3.60 1.20 11,000 10.17 m² 1.10m 2.5h 3
4.50 1.20 17,450 16 m² 1.10m 2.5h 3
4.60 1.20 23,000 16.6 m² 1.10m 2.5h 3
5.50 1.20 26,000 23.7m² 1.10m 3h 3 - 4
Manufacturer: Summerfun Pools S.A.R.L., Rue de Colonel Bouvet, 68530 Buhl/France
Assembly and Operating Instructions 'Standard' Pools
English
9
Note:
This pool conforms
to the EN16562-1
standard. It is
supplied as above-
ground pool kit.
G
FC
A
BE
D
A
Length
(meter)
B
Width
(meter)
C
Height
(meter)
D
Volume
(liters)
E
Water
surface
F
Max.
depth of water
G
Max.
outer dimension
Time required
for setup (with-
out concrete)
No. of people
required for setup
4.70 3.00 0.90 9,750 11.3 m² 0.80 4.75 x 3.05 3.5h 3
Use Above ground pool, semi-inground pool, inground pool
Assembly kit type Above ground pool kit
Water resistance classication WO: 0 lt
Tools required
for setup:
Straightedge Water level
Spade / shovel Rubber mallet
Vibrating plate, if required
Hack saw
Folding rule Flat blade screwdriver
Cord 10 mm ring spanner
Peg Marking spray or bottle of our
Material required in addition Floor protection eece Water care products
Useful accessories Safety ladder Scoop
Protecting cover Dosing oat
Floor vacuum cleaner Water tester
Enclosed
safety labels
Be aware of
the risks
of diving.
Children must be
supervised by adults
at all times.
Danger.
Risk of
drowning.
Assembly and Operating Instructions 'Standard' Pools
10
English
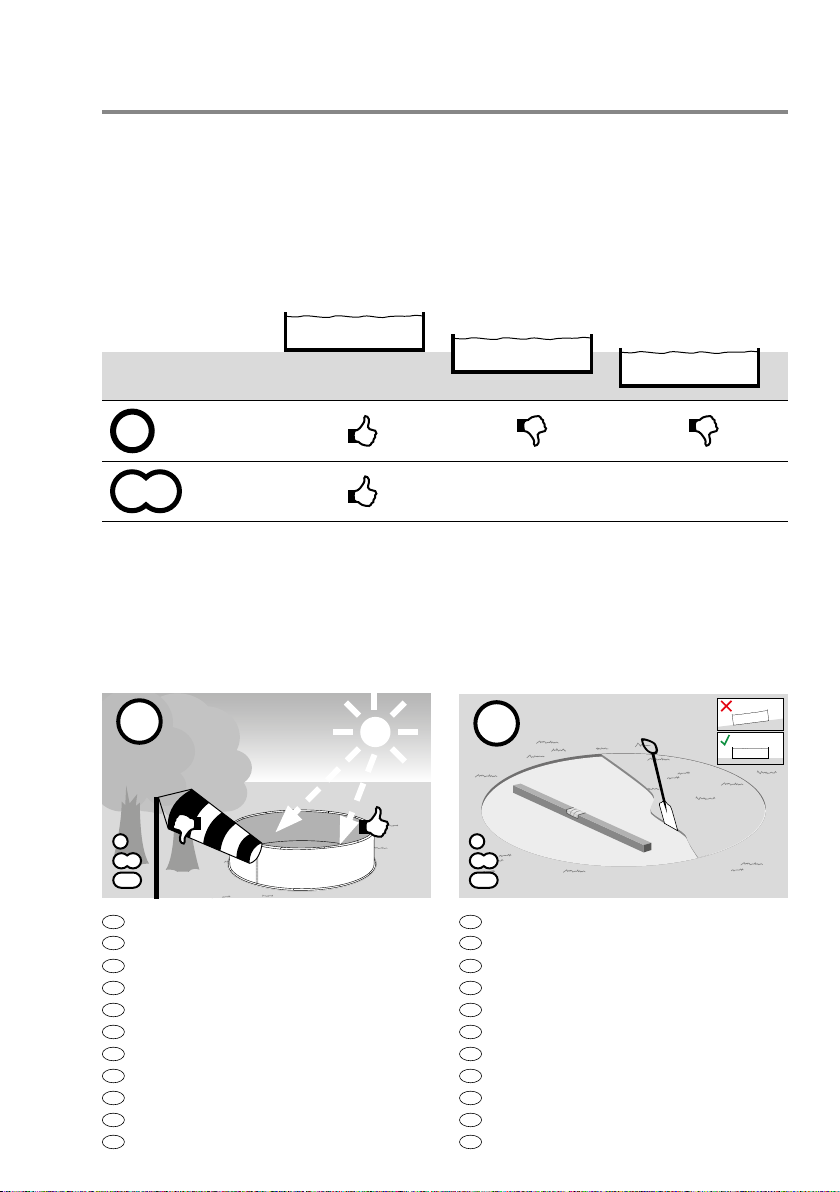
CHOOSING A LOCATION
Please clarify rst if the selected swimming pool
can be built at the chosen location without a building
permit and without further ofcial formalities. Please
take into account that there must be no pipes (gas,
water, electricity, telephone, etc.) in the installation
area of your new swimming pool. Built-in (inground/
semi-inground) swimming pools (not recommended
for Standard pools) must not be installed in the area
of strata water or ground water.
Sunny location: We recommend to select
a location that provides a maximum of solar
radiation per day.
Trees: There should be no trees in the
immediate vicinity of the pool, since they may
cause pollution (foliage, needles, pollen) and
excess shading.
Wind: Use the main wind direction in such a way
that dirt that falls on the water surface is driven
towards the skimmer.
Logistics/neighbours: To operate your
swimming pool, you need electricity (protected
by a residual current circuit breaker), water to
rell, and a sewage connection/sewer pipe. You
should place the pool as close to the house
as possible, if necessary next to the terrace.
However, you should always ensure that
technical problems will not result in damage to
the house (e.g. leaking water owing into the
basement). Be also careful that neighbours are
not disturbed excessively, and ensure that the
site is well protected (privacy), if possible.
MOUNTING INSTRUCTIONS
Please note that all of our Standard swimming pools
(steel wall thickness up to 0.35 mm) are designed
as above-ground swimming pools. An in-ground
installation is not recommended for these pools.
If you should still decide to install your pool in the
ground, this will void your warranty (in particular
with regard to the steel wall). When pools are
installed in the ground, it is mandatory that the pool
is provided with a surrounding concrete backll
(thickness 20 cm) throughout the installation area. It
is recommended in addition to insulate the steel wall
from the outside with a Styrodur panel (thickness 2
cm) to protect it from direct contact with the concrete.
Before setting the pool up, check that all required parts are available according to the attached parts list:
Round pool kits: 1 x Steel wall
1 x Liner
1 x Pack of prole rails
1 x Screw set
1 x Manual
1 x Cover strip
3 x Safety labels
2 x Fastening rails
(stabilizer bars)
Figure-8 shaped pool kits: 1 x Steel wall
1 x Liner
1 x Pack of prole rails
2 x Screw set
1 x Manual
1 x Cover strip
3 x Safety labels
2 x Fastening rail
(stabilizer bar)
1 x Base support
2 x Lateral supports
2 x Seats
There are separate assembly and operating instructions enclosed with the item (depending on model) for
sand lter system, skimmer (if existing) and ladder.

Assembly and Operating Instructions 'Standard' Pools
English
11
PREPARING THE TOP RAIL FOR A ROUND POOL
The best substrate for your swimming pool is a
concrete slab (thickness approx. 20 cm), which must
be perfectly level (terraces, paved areas, etc. are
critical/not suitable, since they use slopes).
1. Mark the required oor space by driving a
pole in and drawing a circle with a cord and
marking spray or our bottle.
Alternatively, you can do without a concrete slab in
case of small round pools if you take the following
into account:
2. Remove grass, ground cover/plant cover, and
roots completely.
3. Excavate soil until the ground is perfectly
level (never backll and do not use sand to ll
up). The ground must be perfectly level, with
a max. deviation = 1 cm on the entire oor
space, load bearing capacity of the ground per
meter basin depth = 1 ton.
The pool must be set up on natural ground, never on
a slope. Please compact the ground with a vibrating
plate. The diameter of the installation space for the
pool should exceed the actual pool diameter by at
least 20 cm.
Dimensions swimming pool Length of
cord
300 cm 160 cm
350 cm 185 cm
360 cm 190 cm
400 cm 210 cm
450 cm 235 cm
460 cm 240 cm
550 cm 285 cm
Assembly and Operating Instructions 'Standard' Pools
12
English
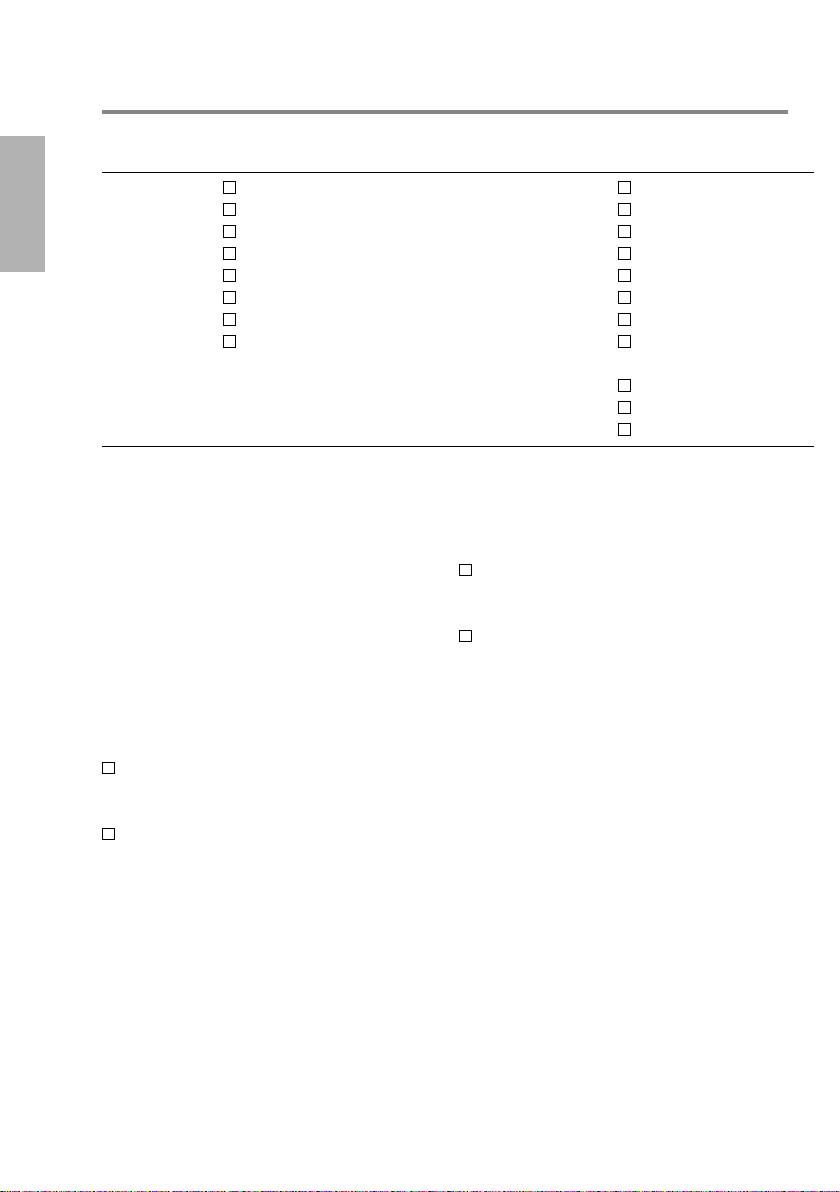
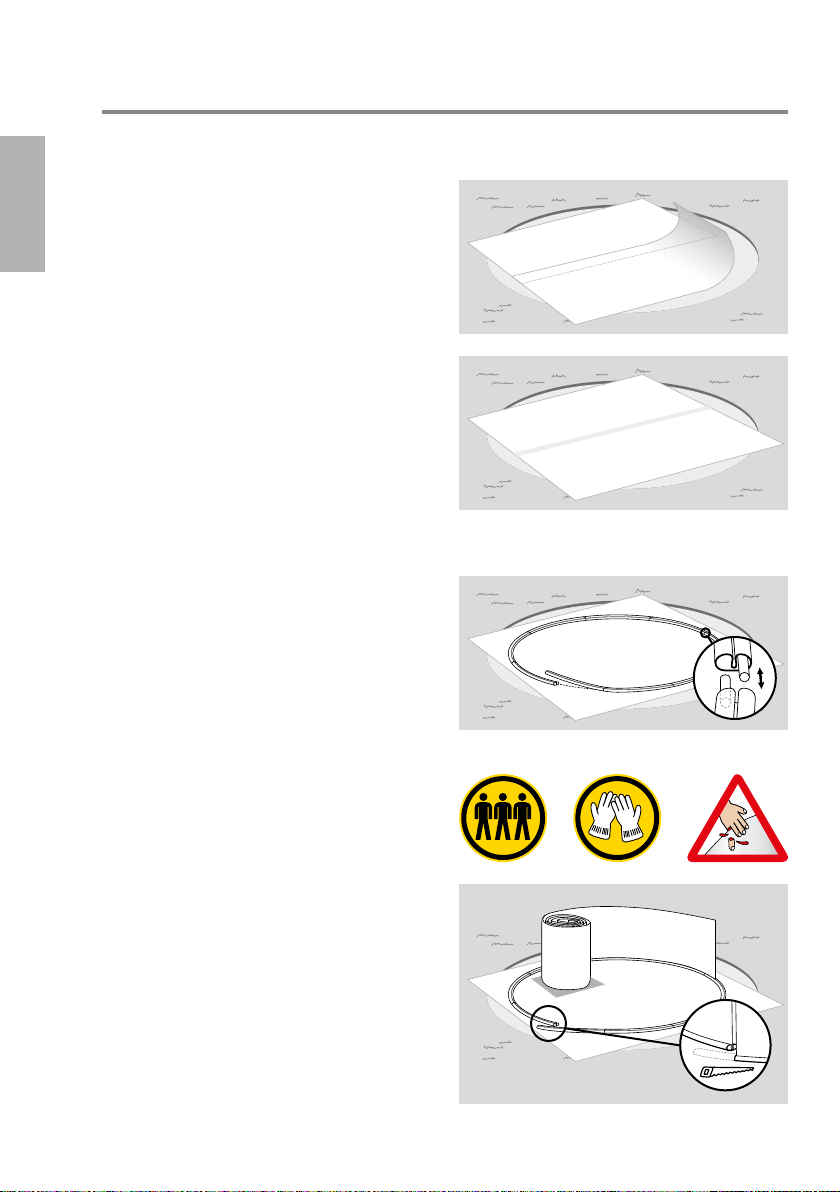
INSTALLING THE FLOOR PROTECTION
FLEECE
After the foundation has been properly prepared
and is perfectly level, you must cover the ground
with a synthetic oor protection eece (not included
in the delivery). Clean the surface thoroughly once
again and remove all stones/unevenness, which
could be dangerous for the liner.
Place the eece either end-to-end and secure with
double-sided adhesive tape, or allow it to overlap
(i.e. covering the edges). The eece should exceed
the pool dimensions by about 10 cm on the outside
(if no protective eece is used, there is no warranty
on the liner).
ASSEMBLING THE FLOOR RAILS
The next step is assembling the oor rail segments
with the connecting tubes.
Please note that the oor rails must be shortened to
the length of the steel wall.
STEEL WALL SETUP
Do not set the pool up in case of strong winds.
There should be at least 3 people to help so that the
steel wall does not bend/tilt over. To stabilize the
wall during assembly, the top rail segments can be
temporarily attached on the top of the raised steel
wall. Please wear protective gloves as the steel wall
can have sharp edges. Place the steel wall on a
wooden board and carefully roll it apart. Insert the
steel wall into the oor rails (white side outwards). It
may be helpful to push the oor rails into the steel
wall from below with a board.

Assembly and Operating Instructions 'Standard' Pools
English
13
STEEL WALL ASSEMBLY
Assemble the ends of the steel wall securely with
the screws (from the inside to the outside and
connected to washer and nut). To provide additional
stabilization, assemble also the two fasting rails
both from the outside and the inside as shown in the
illustration. To prevent damage to the liner at a later
time, it is important to pad the round screw heads
with adhesive tape from the inside.
Liner installation
Please note that liners for swimming pools are
always supplied undersized, so that they can
unfold against the pool wall without wrinkles
after installation. The PVC liner is made of a
thermoplastic material which becomes more
exible/soft with increasing outside temperatures.
The outside temperature should therefore be around
20° to 25° Celsius. Never drag the liner over the
oor, and never step on it with shoes.
Depending on the chosen model, you have either
a so-called overlap liner (which is pulled over the
edge and xed with the top rail), or beaded liner
(this is a welded reinforcement on the liner which is
hung on the steel wall). Most of the Standard pool
models are as standard supplied with an overlap
liner.
To assemble, install the liner in the pool (if
possible, expose it to the sun for ½ hour before the
installation to eliminate wrinkles) and align it roughly.
Then place the liner over the edge (with an overlap
of approx. 10 cm) and x it temporarily using clothes
pegs. The welding seam between the bottom and
the wall should be approximately at the level of the
oor rails. Then ll in approx. 2 cm of water (while
doing so, you can check again if the pool is really
level (horizontally). The water level should be the
same over the entire surface). With this water level,
you can easily remove all wrinkles by pushing the
2cm
Max. 85-110 cm
(depending on model)
liner outwards and modifying the overlap. Once the
liner is properly positioned, remove the clothes pegs
and carefully attach the top rail (segments). Shorten
the last segment of the top rail and the last oor
rail with an hacksaw. The pool can then be lled up
to the maximum ll level = 85 cm. Never leave the
swimming pool without water to avoid destabilizing
it. Do not cut off the overlapping liner.
Assembly and Operating Instructions 'Standard' Pools
14
English
POOL SETUP (FIGURE-8 SHAPED POOLS)
There are 3 different mounting options:
• Above ground / ground level
• Semi-inground
Possible – but not recommended!
(Attention, the built-in part of the pool requires a
lean concrete backll.)
• Completely inground
Possible – but not recommended!
(Possible only with a lean concrete backll (20 –
30 cm.) The pool must always be lled with water,
never leave without water for a longer period.
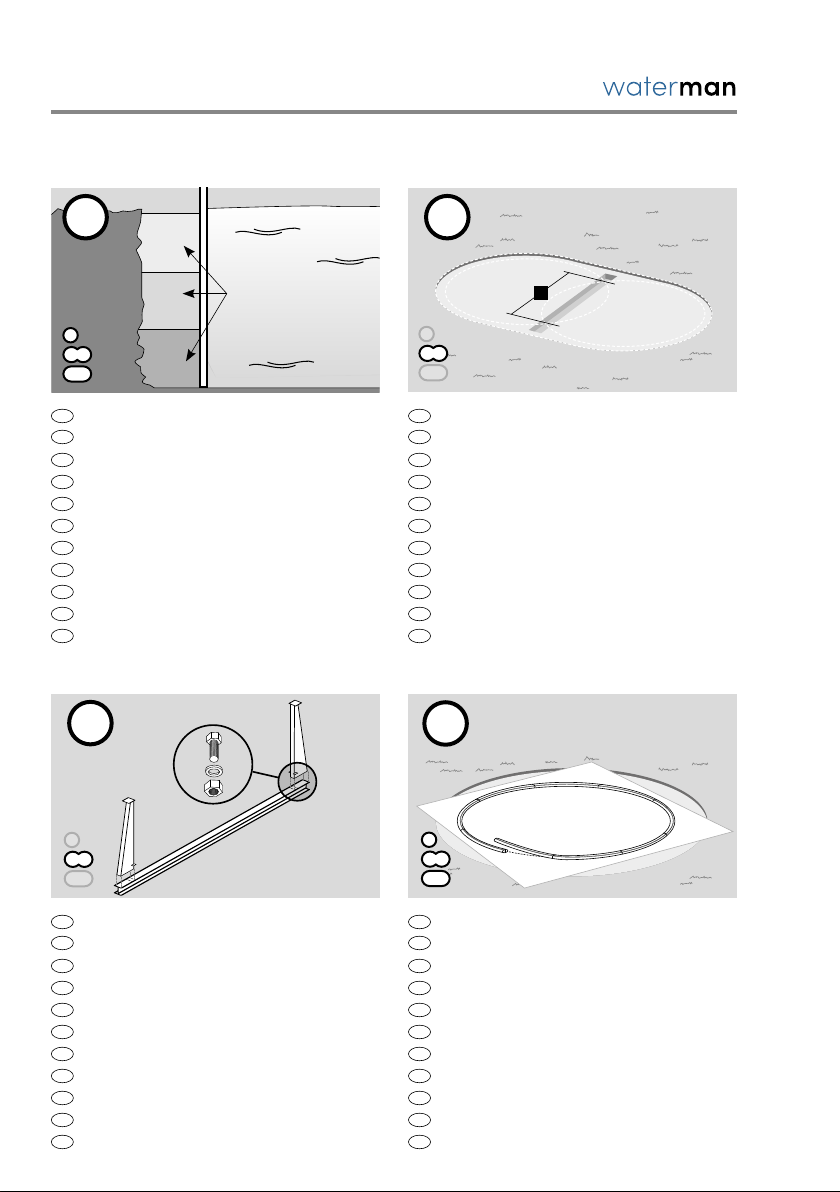
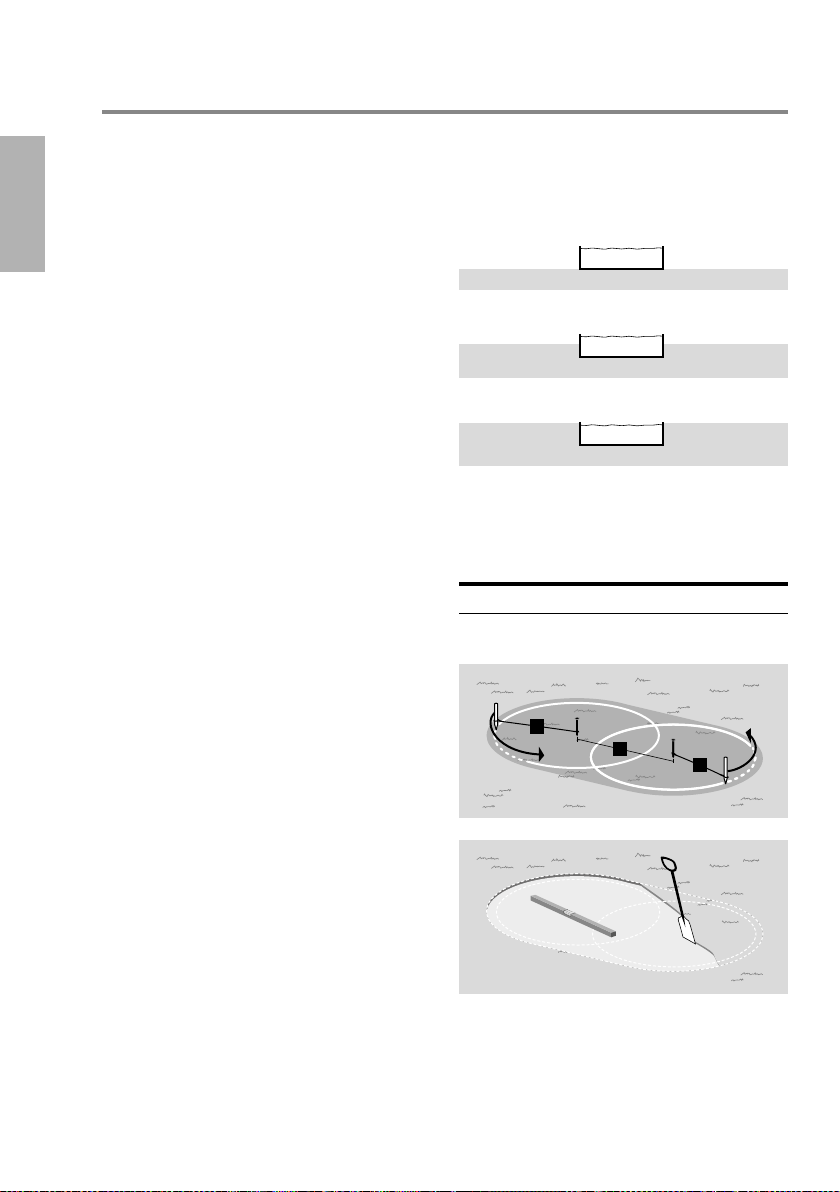
PREPARATION OF FOUNDATION
FOR FIGURE-8 SHAPED POOLS
Mark the oor space by driving in two pegs spaced
at distance A (see table), and use a cord (length see
table) and a marking spray or our bottle to draw
two circles:
We recommend to install your gure-8 shaped
swimming pool on a concrete slab with iron
reinforcement (thickness 20 cm). It is imperative that
the ground has a load bearing capacity of at least
1.2t (pool depth 1.20 m) or 1.0t (pool depth 0.90 m).
The ground must be perfectly level, with a maximum
deviation of 1 cm on the entire oor space. Larger
deviations involve the risk of the entire swimming
pool collapsing.
The diameter of the installation area for the pool
should exceed the actual pool diameter by at
least 20 cm (see cord length to table). In case of
an inground installation, adjust the cord length
according to the wall backll (in case of ground
pressure, we recommend a 30 cm lean concrete
backll). In this case, increase the cord length by 10
cm (see table).
R
R
A
Preparing a level
foundation
Dimensions
swimming pool
Cord length
"R"
Distance
"A"
470 x 300 cm 170 cm 170 cm
Assembly and Operating Instructions 'Standard' Pools
English
15
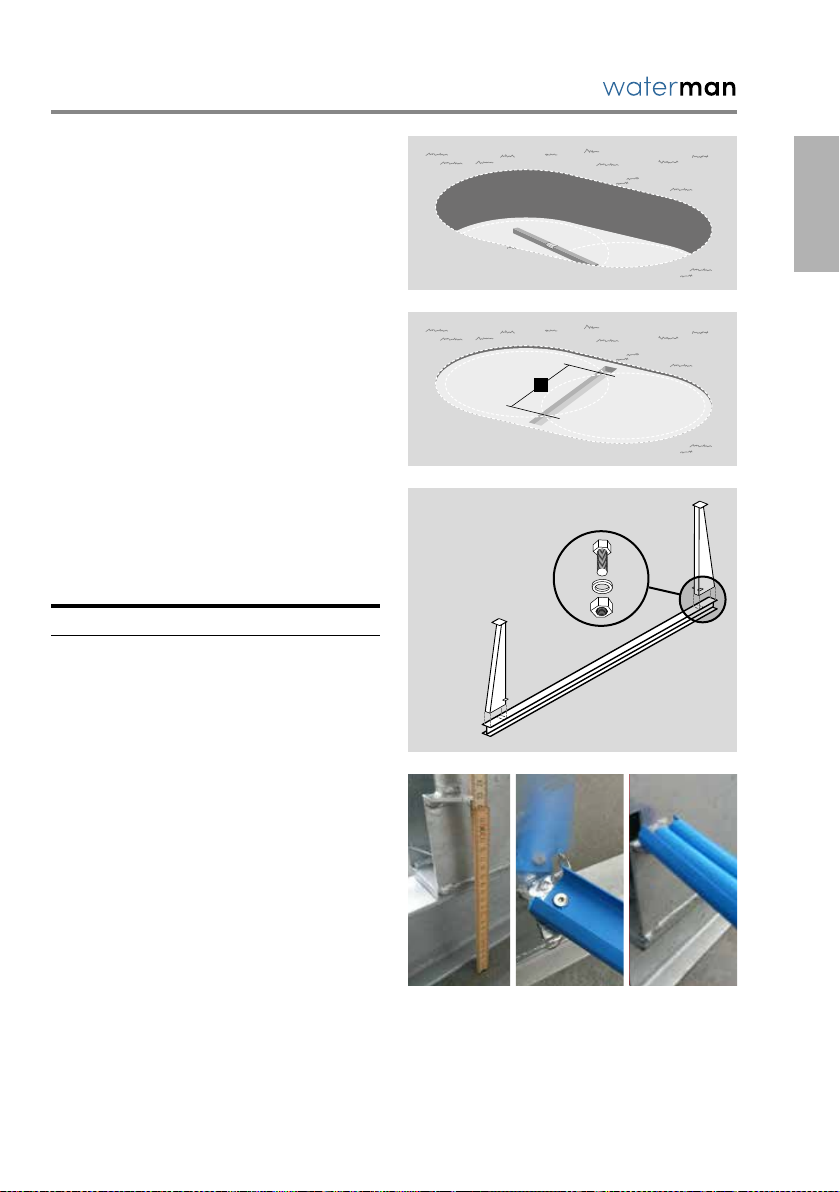
It is mandatory to provide a trench with a width of
240 mm and a depth of 255 mm in the middle of the
concrete slab. This is where the steel slab will be
inserted (recessed) and xed with concrete later.
(For length of the trench, see table on page 15).
The steel girder is ush-mounted into the base plate
(approx. 22.5 cm, up to the height of the fastening
plates of the oor rail connecting pieces):
MOUNTING THE STEEL SUPPORT
GIRDER
Mount the steel girder according to the following
drawing. Ensure that all screw connections are
absolutely tight and secure.
Dimensions
swimming pool
Trench
length
Distance
between
supports
"A"
470 x 300 cm 320 cm 248.0 cm
Please check the distance between the fully
assembled supports once again with the help of
the table. The table also shows the required trench
dimensions for embedding the supports.
MOUNTING AND FIXING THE
STEEL SUPPORT GIRDER
Place the pre-assembled support units in the
trench. Align the support unit exactly vertically.
Embed the concrete slab with concrete (installation
depth approx. 22.5 cm) so that the shplates for
xing the oor rails are ush with the top edge of the
concrete slab.
Inground
pool
Trench for
steel girder
A
Installation depth of
steel girder
(approx. 22.5 cm)
Installation of
oor rail
connector
Attaching the oor rail
to the steel girder
Base support one-piece

Assembly and Operating Instructions 'Standard' Pools
16
English
INSTALLING THE FLOOR PROTECTION
FLEECE AND THE FLOOR RAILS
After the substrate has been prepared, spread out
the oor protection eece (not part of delivery for
every pool). Either allow the edges to overlap (which
may be visible through the liner) or place the eece
end-to-end and x it with double-sided adhesive
tape from below. Then assemble the oor rails by
plugging them into the connectors. Always start
with the oor rail connectors on the steel girder.
The correct length of the oor rails can only be
determined after the steel wall has been adjusted;
the oor rails must be shortened accordingly, if
required.
Attention: For gure-8 shaped pools,
we always deliver 2 complete sets of
bottom rails for the respective round
pool size (e.g. for a gure-8 shaped
pool 470 x 300 cm, we deliver 2 sets of oor rails
300 cm round), so you always have a few segments
left.
ASSEMBLY OF SEATS
Finally, screw the enclosed seats on top of the steel
girder:
STEEL WALL SETUP
LINER INSTALLATION
TOP RAIL & CONCRETE BACKFILL
All further assembly steps and prescribed regulations
are the same as for round pools. Please continue reading
on page 12 of this manual.

Assembly and Operating Instructions 'Standard' Pools
English
17
TIPS FOR WINTERIZING
All our steel wall swimming pools are winterproof.
They can be lled with water also in the winter
(water level in the pool at least three-quarters).
Never leave the pool without water over the winter.
We recommend to add a winter preservative when
winterizing your pool, which makes the basic
cleaning in the spring much easier. After you added
the winter preservative (set the lter system to
the "Circulation" position for about 15 minutes to
ensure a good distribution), the lter system can be
demounted (for sand lter systems, please remove
the quartz sand completely and store the lter
system in the frost-free area). In case of cartridge
lters, leave the water level unchanged. For sand
lter systems, lower the water level to below the
skimmer edge, close the inlet nozzle with a winter
protection cap, and remove the hose from the
skimmer so that rainwater is drained. Underground
pipes/pipe systems are to be emptied to avoid any
damage or defects caused by freezing.
In the autumn, the pool should be covered with a
winterproof tarpaulin and closed so it is childproof.
Access to the pool must be blocked to avoid
drowning. When the water level has been lowered
for the winter, ensure that the used cover tarpaulin is
sufciently large to rest on the surface of the water
If a cavity should form under the cover tarpaulin,
this may result in bigger damage to the swimming
pool (up to a bending of the steel wall) due to the
pressure of rainwater.
GENERAL INFORMATION
• Use only tap water and never well water to ll
your swimming pool. Well water is often highly
ferruginous. When water care agents are added,
the pool water can turn brownish in colour.
• Set the correct pH value of the water Immediately
after the installation, and carry out a rst shock
chlorination (alternatively, use other water care
agents, if desired).
• If you use a cartridge lter, do not use a
occulant, as this may clog the lter cartridges.
• Never add water care agents directly to the water,
but add chlorine tablets, for example, via a dosing
oat.
• Rell fresh water regularly.
• This swimming pool is designed for installation as
freestanding pool only, it is in no case suitable for
an in-ground installation. (Non-observance will
void your warranty.)
• The pool must always be lled with water, since
otherwise it will lose its stability. In addition, the
liner could shrink when there is no water in the
pool.
• Fill water no higher than max. 5 cm below the
top rail.
• The lter system should run about 6 to 8 hours
every day. Please remember to clean the lter
cartridges regularly, or replace them after 6
weeks.
• The oor should be cleaned regularly
with a oor cleaner/suction device.
Waterman Customer Service
Bahnhofstr. 68
73240 Wendlingen/Germany
Tel.: + 49 (0) 7024/4048-666
Fax: + 49 7024/4048-667
E-mail: service@waterman-pool.com
Your contact data
Name*
Address*
Postcode/City*
Phone*
Mobile
Fax
E-mail*
Registration of a
complaint
It is imperative that you attach a proof of purchase* to your
claim! (A proof of purchase like a sales receipt is a mandatory
prerequisite for all warranty claims. Without proof of purchase,
it is unfortunately not possible for us to acknowledge/process a
complaint).
Please attach relevant photos* of the damage to your
complaint! (Photos of defective item.) These allow us to better
evaluate the facts. In addition, the complaint can be processed
faster and unnecessary costs and waiting times are avoided for all
involved.

I bought the product (model) with article number
from (company) at (Postcode/Town) on
I want to submit the following complaint (Please include a precise description):
Place* Date* Signature*
*Required information/documents
For a smooth, fast and uncomplicated processing of your complaint, it is important that the registration form is completely lled out in
block letters and submitted together with all required documents (proof of purchase or sales receipt/images). A proof of purchase like
a sales receipt is a mandatory prerequisite for all warranty claims. Without proof of purchase, it is unfortunately not possible for us to
acknowledge/process a complaint. Relevant photos regarding your complaint will help us to evaluate the facts more quickly. This will save both
you and us unnecessary costs and waiting times/delays.
By post to: Waterman Customer Service, Bahnhofstr. 68, 73240 Wendlingen/Germany
By fax to: + 49 (0) 7024/4048-667
By E-mail to: service@waterman-pool.com
You can download the registration form here: http://reklamation.waterman-pool.com
CUSTOMER SERVICE
Thank you for purchasing one of our products.
Even though our products are subject to stringent
nal quality checks, malfunctions or defects
cannot be excluded and may occur. If, contrary to
expectations, the purchased product should not
function properly or should otherwise not be in good
order, please contact our customer service directly.
As a matter of course, our customer service is
available for you also after the warranty period.
Waterman Customer Service
Bahnhofstr. 68, 73240 Wendlingen/Germany
Tel.: +49 (0) 7024/4048666
Fax: +49 (0) 7024/4048667
E-mail: service@waterman-pool.com
WARRANTY
Please note the following in case you want to assert a warranty claim:
• We offer a 2-year warranty for our products,
starting from the purchase date of the product.
During this period, we warrant that the products
delivered by us are free from manufacturing and/or
material defects.
• Our warranty obligation does not extend to
defects, errors or damage that are the result of
improper or violent use by the customer or third
parties who are outside our area of responsibility.
Furthermore, the warranty is excluded in case of
force majeure.
• In case of transport of the defective product
within the warranty period, we will bear the costs.
Outside the warranty period, the customer has to
bear the costs.
• In case of a free replacement delivery, this
does not lead to an interruption of the period of
limitation in accordance with §212 BGB (German
Civil Code).
• Furthermore, we assume no guarantee for
wearing parts, for cases of poor maintenance
and for consequential damages due to the use of
impermissible supplies.
• The same applies to non-compliance with
operating or maintenance instructions, overuse/
overstraining or other interventions in the
delivered goods, in cases where modications
are made to the delivered goods, parts
are replaced or consumables are used for
these products that do not meet the original
specications.
• Customer claims for damages, e.g. for non-
performance, culpa in contrahendo, violation of
secondary contractual obligations, consequential
damages caused by a defect, unlawful acts and
other legal grounds are excluded. This does
not apply to the liability for lack of a guaranteed
property, intent or gross negligence. In particular,
no damages are paid for water and chemicals that
had to be drained due to a leakage of/in your pool.
• Mechanical damage is excluded from the
warranty.
PLEASE DO
NOT RETURN TO
THE STORE!
Questions? Problems? Missing parts?
Please contact our customer hotline if
you need any help.
Table of contents
Other Waterman Swimming Pool manuals


Popular Swimming Pool manuals by other brands

Endless Pools
Endless Pools Streamline Installation, Operations and User's manual

GRE
GRE MINT 788032 instruction manual

Weka
Weka 593 Series Installation, operating and maintenance instructions

Cornelius
Cornelius S Assembly instructions

Bestway
Bestway Flex 'n Fold 43552 installation instructions

Bestway
Bestway STEEL PRO owner's manual


