Watsons water 8WS-SCB wats smart User manual
Cooling
ON/OFF
Heating
ON/OFF
This machine has self cleaning system . It automatically adds O3* (which last
for 4 seconds) into the cold water tank and bottle in every 4 hours . The release
of O3is strictly controlled to be under 50ppb per 24 hours .
The cleaning system:
Can maintain the water purity , quality and tasty.
Comply with American OSHA organization guidelines.
Is pollution free and harmless . Sanitary Shield Protector does not contain
heavy metals.
USER MANUAL
Place the dispenser on a flat and stable surface.
If the dispenser should be placed other than the above mentioned, please call
our customer service hotline for proper installation. Any parts incurred for this
shall be borne by the customer.
The recommended placement of the dispenser is indoors, away from direct
sunlight and excessive dampness.
Place the dispenser in a well-ventilated area , and far from heat source or
smoke soot.
Please allow a minimum of 10cm from the wall for proper funtion of the
condenser located at the rear side of the dispenser.
Do not modify the power plug or use an extension cord to avoid overload and
fire.
When the supply cord is unplugged or the power supply to dispenser is
discontinued,please wait at least 5 minutes before re-connecting the power and
restart.
Cleaning and maintenance: Unplug the supply cord first, do not put the
dispenser into the water, do not wash it with water nor wipe the body with gas or
chemical medication rubber ware should not be allowed.
Do not clean it with a cleaner or chemicals.
Remove label and sticker on cap,then invert the bottle and please it into the
dispenser . Drain water from the hot and cold water faucets after filling the
dispenser with drinking water.
Connect the electricity supply , cooling and heating system will work
automatically . It needs around 15mins for heating and a hour for cooling.
Replace a new water bottle when the “Change bottle” lights up.
Please use the supplied materials to fix the dispenser , or call our customer
service for any assistance.
This machine has double floater control system , When filling water reaches the
preset water level , The floater will close the inlet hole. If water drops below
water preset level , This machine will then inlet water automaticity . This filling
cycle continues automaticity.
Warning: If the power cord is damaged, you should call for service
Caution: Disconnect the power supply during cleaning and
inspection to avoid electric shocks
Warning: This machine is not recommended to be used by children,
eldly or any person in needed without accompanied and
guidance by an adult when using the machine
Warning: Please have children avoid playing the machine
Warning: Do not block the ventilation or exhaust. This may cause
electric shock, fire or damage
Warning: Do not place the dispenser in a close / poor ventilated
room or inside wooden cabinet.
CAUTIONS DURING INSTALLION START UP
WATER CONTROL SYSTEM
AUTOMATIC SELF CLEANING SYSTEM
GENERAL PRECAUTION
SPECIFICATIONS
Power Supply
Protective Type of An-electric Shock
Hot Water Power
Cold Water Power
Cooling current 0.6 A
220V~50Hz
I
600W
3-100C
80-920C
95W
4L/H
6L/H
R134a
Temperature Cold Water
Hot Water
Cold Capacity / Hour
Hot Capacity / Hour
Refrigerant Type
Model:8WS-SCB
USER MUST READ THIS MANUAL BEFORE ASSEMBLING,
INSTALLING & OPERATING DISPENSER.
SAVE FOR FUTURE USE
This dispenser is intending to be used in indoor area, with automatic cleaning system to avoid
secondary contamination of drinking water.
The company shall not be liable for any conditions or damages resulting
from accidents, alterations, exposure to the elements, misuse abuse, fire or
failure to follow the Company’s instructions with respect to installation, cleaning
or maintenance, In case of any dispute, the Company’s determination shall be
final.
*Ozone
PN: 5M009463X1
We recommend the dispenser to be fully sanitized in every 6-12 months.
this should be 3-6 months for users of distilled water with minerals.
After cleaning the product completely dry it. Please follow the “Start Up”
procedure to fill the water in the tank.
Keep the condenser free from dirt and dust do not directly spray water on the
surface of the product, clean the main body and/or its interior with a place of
clean, wet cloth.
The dispenser will be out of service once the fuse in the device is burnt,
Pleases call service hotline for replacement.
“Wats-smart” Upward Flow Dispenser
with automatic self cleaning system
Cooling
ON/OFF
Heating
ON/OFF
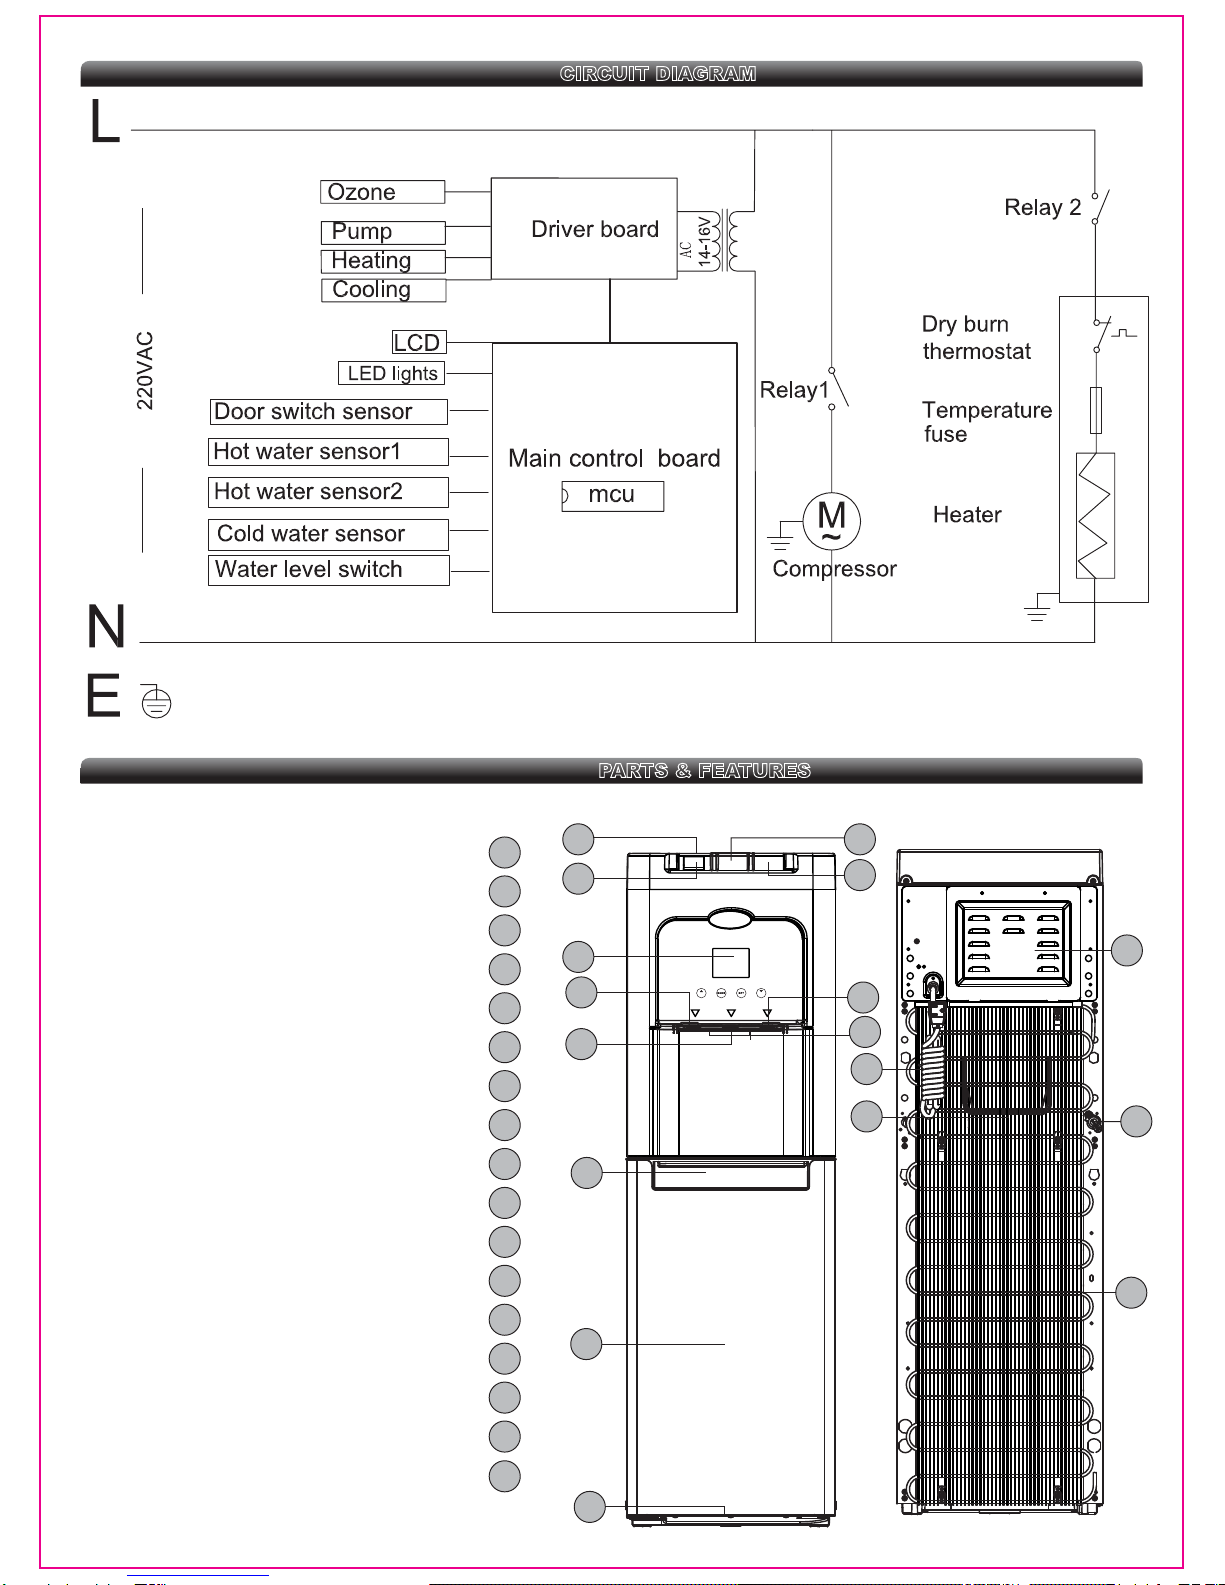
CIRCUIT DIAGRAM
PARTS & FEATURES
1
2
3
4
5
6
7
8
9
10
11
12
13
14
15
16
17
1 3
2
6
7
8
9
10
11
12
5
4
16
13
14
15
Control: Hot Water
Hot Water Release
Control: Cook Water
Control: Cold Water
LCD display
Tap: Hot Water
Tap: Cook Water
Tap: Cold Water
LED Nightlights
Drip Tray
Door
Bottle Tray (Inside)
Carry Handle
Power Cord
Drain Plug
Bottle Probe (Inside Cabinet)
17
Automatic SELF CLEANING system(Inside)
HOW TO CHANGE THE BOTTLE
1.Open the front door
5. Place the wand
handle down, insert the
wand into the bottle.
6. Pull up the wand handle,
make sure that it locked the
bottle, and take the bottle on
the dispenser bottom platform.
4. Remove the bottle
cap of the new bottle.
8. Close the door, water
will fill in automatically.
3. Take out the wand from the
top of the bottle.
Attention:The wand handle
should be placed down to take
out the wand.
7. Put down the wand
handle, and slide into the
dispenser.
Attention: When the bottle is empty , the dispenser will have a sucking sound and the LED light will twinking. If
the bottle can not be replaced rapidly, please open the front door to stop all alarms.
STABILITY ANCHOR INSTALLATION
Parts
Quantity 2 22
Stability Anchor Fixing Screw
Installation:
1、please remove the screws from the lower corners of the
dispenser
2、Fix the stability anchors on the back of the dispenser
3、Flooring drilling, place the water dispenser places the rubber
plug inserted into the hole
4、Fix the dispenser on level ground on table . Keep the
dispenser at least 10 cm away from wall
NOTE: The machine chassis containing mounting screw holes and
the L-shaped feet accessories
Screw nut Gasket Stability Anchor
Cross recessed pan head stud
Cross recessed pan head
self-tapping screws
II
2 : 5
The plastic expansion snails tube
The plastic expansion
snails tube
2. Pull out the empty
bottle with the bottle
handle.
II
≥ 4"
≥ 4"
≥ 4"
12.6"
15"
4.96"
1.4"
≥ 4"
WARNING: To avoid a hazard due to instability of the appliance, it must be fixed in accordance with the instructions.
DISPLAY OPERATION
When the hot cup icon is flashing this indicates the heating system is working to replenish the supply of hot water.
When the cold cup icon is flashing this indicates the cooling system is working to replenish the supply of cold water.
When the water bottle icon is flashing this indicates that the water bottle is empty and needs replacing. It could also mean that there is an
air leak in the system. If the bottle is not empty and this icon is flashing, check all air hose connections and make sure the probe stem
head is securely seated over the bottle cap.
Current temperature:
Pressing the mode button once will display the current temperature of cold and hot water available.
1 Setting the time and the day of the week
1.Press the MODE button and hold for 3 seconds.The hour digits will begin to flash.
2.Adjust the hours by pressing the up or down arrows. AM or PM will toggle automatically. Press
the SET button. The minute digits will begin to flash.
3.Adjust the minutes by pressing the up or down arrows. Press SET to save. The trangel symbol
below the day of the week will begin to flash.
4.Adjust the day of the week by pressing the up or down arrows. Press SET to save.
2 Setting the desired temperature
1.Press the SET button until either the F or C icon flashes.
2.Switch between either Celsius (C) or Fahrenheit (F) by pressing either the up or down arrow.
3.Press SET to save. All temperature related information will now be displayed in the selected
temperature scale.
3 Adjusting the hot water temperature
1.Press the SET button until the digits above the hot cup icon flash.
2.Adjust the number to the desired hot water temperature using the up or down arrows. Press SET
to save.
4 Adjusting the cold water temperature
1.Press the SET button until the digits above thecold cup icon flash.
2.Adjust the number to the desired cold water temperature using the up or down arrows. Press
SET to save.
5 Setting the Energy Saving Mode
(This controls when cold and hot water will be avaiable)
1. Press the SET button until the Office, Home or Always on icon flash.
2. Select the working time by pressing the up or down arrows. Press SET to save.
Cooler working time table
Monday to Friday
7:00 am to 8:00 pm OFF
0:00 to 24:00
6:00 am to 9:00 am
4:00 pm to 12:00 pm
Office
Mode
Home
Always ON
Saturday to Sunday
ALWAYS ON
0:00 to 24:00
0:00 to 24:00

7 Shortcut for having cold and hot water during non-working time
If cold and hot water is needed during non-working time and reprogramming is not desirable
then press the left arrow for 3 seconds to activate the hot wateror right arrow for 3 seconds
to activate the cold water. The desired function will start and word for 8 hours, then revert
back to the original Energy Saving Mode.
Note: it may require 15 minutes to produce hot waterand up to 1 hour to produce cold water.
8 Displaying the temperature
Press the MODE button once will display the current temperature of the hot and cold water. Display will show hot temperature then after 3 seconds
will display cold temperature. The temperatures will not be displayed at the same time. After 20 seconds of alternating temperature display the LCD will
revert to the standard display.
9 Night lights working time
Night lights are controlled automatically by the machine . The working time is from 4:0 pm to 7:00 am , the other time it is turned off.
Note: If you do not exit your setting menu, It will save automatically and the display will return to normal after 20 seconds without touching the buttons.
It will remember your settings if power failed.
Heating is on cooling is on cooling is on Heating is on cooling is off
Heating is off
Alternating
Alternating
6 Switching Off/On the heating system and Cooling system
If you do not need the hot water or coldwater, you can switch ON or OFF by pressing “Heating ON/OFF” / “Cooling ON/OFF” buttons for 3
seconds. Hot icon or cold icon will show up or for disappear.
Table of contents
Popular Water Dispenser manuals by other brands

InSinkErator
InSinkErator Hot1 owner's manual

Elkay
Elkay HEW1JO 2F Series Installation, care & use manual

Halsey Taylor
Halsey Taylor HAC8EECBL 1D Series owner's manual

Elkay
Elkay VRCHD8 Series Installation, care & use manual

Premium
Premium PWC200T Service manual

Plasmatic Systems
Plasmatic Systems PLASMA-PREEN I user manual


Kenmore
Kenmore IntelliSoft 370 Series owner's manual

Elkay
Elkay EZSTL8GL Installation and use manual

Scalemaster
Scalemaster Softline 150 Installation & operation manual

Honeywell
Honeywell HWBL1033 Series owner's manual

WaterLogic
WaterLogic WL Cube Firewall Technical manual

CG
CG MERIDIA CGMRBCM instruction manual