CG MERIDIA CGMRBCM User manual

WATER DISPENSER
CGMRBCM


The installation and maintenance has to be carried out by qualified professionals or authorized
technicians.
The manufacturer shall not be held responsible for any damage or malfunction caused by wrong
installation or failing to comply with following instructions included in this pamphlet.
For more detailed installation and maintenance guidelines, please refer to below chapters.
TABLE OF CONTENTS
TITLE PAGE
1. SAFETY INSTRUCTIONS...............................................................................................(2)
2. GETTING STARTED.......................................................................................................(3)
3. PART NAME....................................................................................................................(5)
4. DISPENSING WATER.....................................................................................................(6)
5. TROUBLE SHOOTING...................................................................................................(7)
●
●
●
General Remark
1
6. CLEANING......................................................................................................................(7)
7. MACHINE INSTALLATION..............................................................................................(8)
1. SAFETY INSTRUCTIONS
22
To reduce risk of injury and property damage, user must read this
entire guide before assembling, installing & operating dispenser.
Failure to execute the instructions in this manual can cause
personal injury or property damage.
This product dispenses water at very high temperatures. Failure
to use properly can cause personal injury.
When operating this dispenser, always exercise basic safety
precautions, including the following:
.
Prior to use, this dispenser must be properly assembled and installed in
accordance with this manual.
This dispenser is intended for water dispensing only. Do NOT use other liquids.
Do NOT use for other purposes. Never use any other liquid in the dispenser
other than known and microbiologically safe bottled water.
For indoor use only. Keep water dispenser in a dry place away from direct
sunlight. Do NOT use outdoors.
Install and use only on a hard, flat and level surface.
Do NOT place dispenser into an enclosed space or cabinet.
Do NOT operate dispenser in the presence of explosive fumes.
Position back of dispenser no closer than 20cm from wall and permit free airflow
between wall and dispenser. There must be at least 20cm clearance on the
sides of the dispenser to permit airflow.
Use only properly grounded outlets.
Do not use an extension cord with your water dispenser.
Always grasp plug and pull straight out from outlet. Never unplug by pulling on
power cord.
Do NOT use dispenser if cord becomes frayed or otherwise damaged.
To protect against electric shock, do NOT immerse cord, plug, or any other part
of dispenser in water or other liquids.
Ensure dispenser is unplugged prior to cleaning.
Never allow children to dispense hot water without proper and direct
supervision. Unplug unit to prevent unsupervised use by children.
Service should be performed only by a certified technician.
Warning: Do not damage the refrigerant circuit.
This appliance is not intended for use by persons (including children) with
reduced physical, sensory or mental capabilities, or lack of experience and
knowledge, unless they have been given supervision or instruction concerning
use of the appliance by a person responsible for their safety.
Children should be supervised to ensure that they do not play with the appliance
This appliance is intended to be used in household and similar applications
such as: staff kitchen areas in shops, offices and other working environments;
farm houses and by clients in hotels, motels and other residential type
environments; bed and breakfast type environments; catering and similar
non-retail applications.
If the supply cord is damaged, it must be replaced by the manufacturer, its
service agent or similarly qualified persons in order to avoid a hazard.

2. GETTING STARTED
3
The appliance must not be cleaned by a water jet.
The appliance is suitable for indoor use only.
WARNING: Keep ventilation openings, in the appliance enclosure or in the
built-in structure, clear of obstruction.
WARNING: Do not use mechanical devices or other means to accelerate the
defrosting process, other than those recommended by the manufacturer.
Do not store explosive substances such as aerosol cans with a flammable
propellant in this appliance.
The appliance must not be immersed.
This appliance should work under environment of temp from 10℃~43℃.
This appliance is not suitable for installation in an area where a water jet could
be used.
Never turn the machine upside down or lean it more than 45°.
Thermostat has be adjusted. No need to adjust it by yourself. When the
machine is under the ice point and blocked by ice, the cooling switch must be
closed for 4 hours before turning it on again to continue its operation.
This machine should not be turned on until 3 minutes later after turning off the
power switch.
It is recommended to use bottled pure water. If you use hard water, may lead to
hot pot furring or detonation tank or pipeline risk. If you need cleaning tube,
remove scale, need to find a professional institutions and professional
operation.
This product is not recommended at an altitude of 1500 meters above the
region to use.
WARNING: When positioning the appliance, ensure the supply cord is not
trapped or damaged.
WARNING: Do not locate multiple portable socket-outlets or portable power
supplies at the rear of the appliance.
Locate Dispenser
1. Place dispenser upright.
2. Locate dispenser on a hard and level surface in a cool shaded location near
a grounded wall outlet.
Notice: Do NOT plug in power cord yet.
3. Position dispenser so the back is at least 20cm from wall and there are at
east 20cm of clearance on both sides.
4
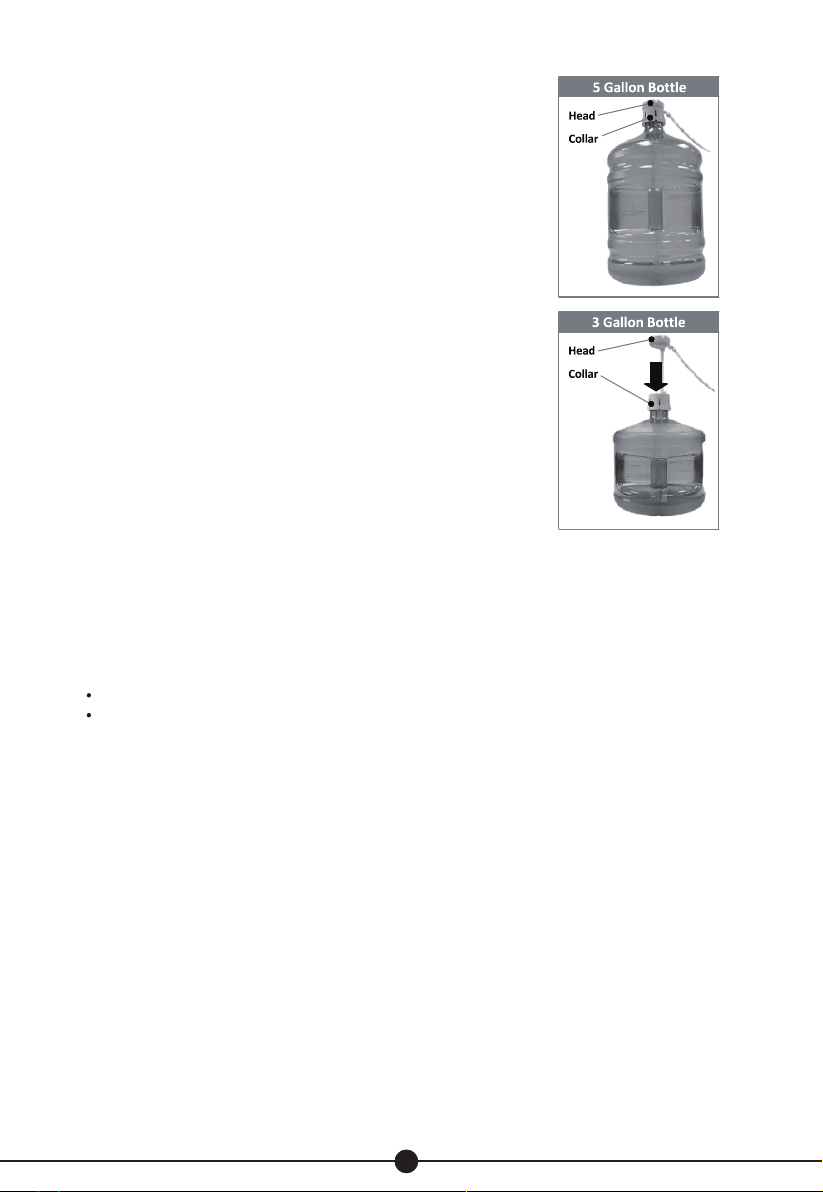
Install Water Bottle
1. Open dispenser door.
2. Place probe assembly on probe hanger.
3. Place fresh bottle outside of cabinet.
4. Remove entire plastic cap from top of bottle.
5. Clean outside of new bottle with a cloth.
6. Place probe into bottle.
7. Slide collar down until it clicks in place.
8. Push head down until tubes hit bottom of bottle.
9. Slide bottle into cabinet and close door.
Provide Electricity
Plug cord into a properly grounded wall outlet.At this time
the pump will begin to move water from the bottle to the
hot and cold tanks. It will take up to 5 minutes to fill the
tanks for the first time. During this period the pump will
run continuously. This is normal.
Activate Heating & Cooling
Notice: This unit will not dispense hot or cold water until the switches are
activated.
To activate, push top side of power switches in to start heating and coolingwater.
If you do not want to heat water, push bottom side of red switch in.
If you do not want to cool water, push bottom side of green switch in.
Activate Nightlight
Push top side of blue power switch in to turn light on. Push bottom side in to turn
light off.
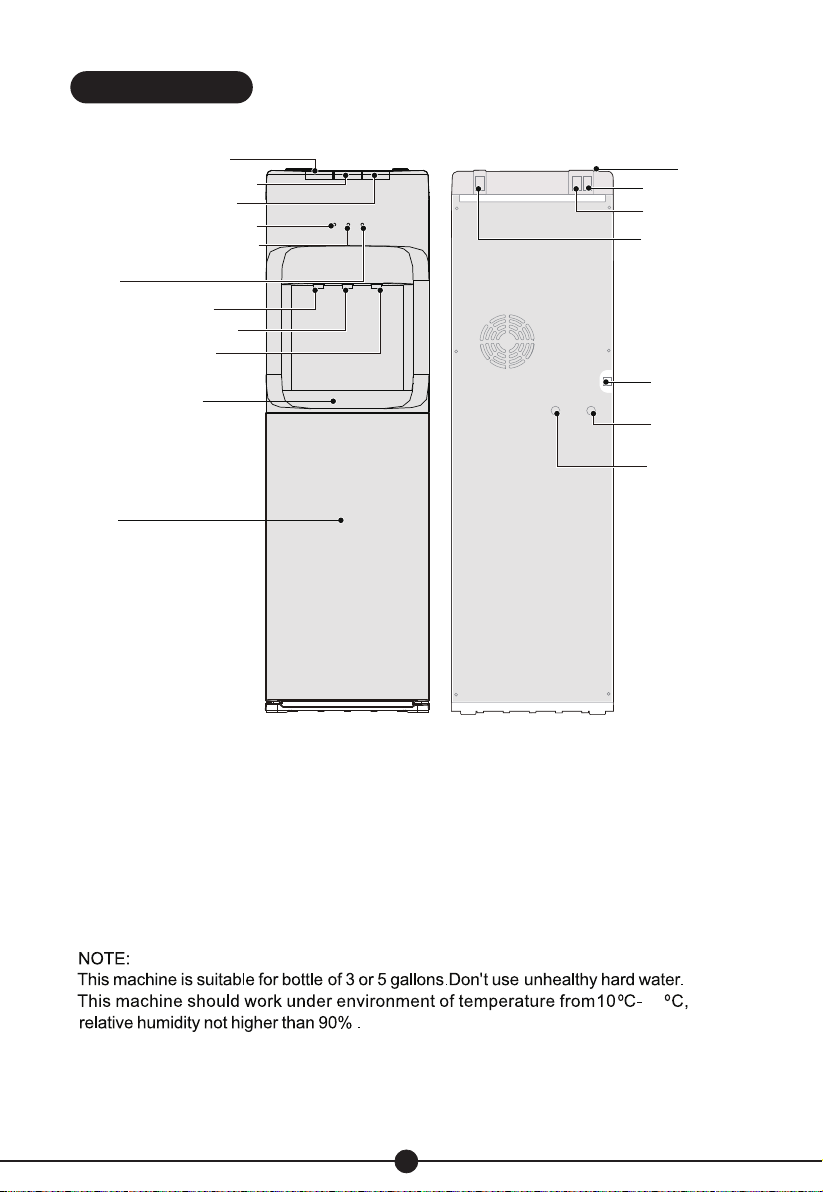
3. PART NAME
5
Cooling switch
Power supply
cord
Outlet of hot
water
Outlet of cold
water
Heating switch
Top cover
Button of hot water
Button of normal water
Button of cold water
Cooling Indicator Light
Heating Indicator Light
Lacking Water Indicator
Light
Water collector
Door
Tap of hot water
Tap of normal water
Tap of cold water
43
LED night light
switch

6
This unit has been tested and sanitized prior to packing and shipping. During transit
dust and odors can accumulate in the tank and lines. Dispense and dispose at least
one quart of water prior to drinking any water.
Dispensing Cold Water
After setup, it will take up to 1 hour to get water to maximum cold temperature.
During this time the compressor could run continuously. This is normal.
1. Position bottle, glass, pitcher or cooking pot below spout.
2. Depress cold water control downward to start cold water flow.
3. Release control once desired fill level is achieved.
Dispensing Normal Water
1. Position bottle, glass, pitcher or cooking pot below spout.
2. Depress normal water control downward to start normal water flow.
3. Release control once desired fill level is achieved.
Dispensing Hot Water
After setup, hot water will be available in 15-20 minutes.
1. Position bottle, glass, pitcher or cooking pot below spout.
2. Slide red button away from you and depress hot water control downward to start
hot water flow.
3. Release control once desired fill level is achieved.
Changing Bottles
A flashing red light on your function lights alerts you when your bottle is empty.
Replace the bottle as soon as possible.
Notice: Do not dispense hot, cool or cold water if the red light is flashing as you
could empty the tanks and cause the dispenser to overheat.
1. Open dispenser door.
2. Slide empty bottle out of cabinet.
3. Remove probe assembly from empty bottle. Place probe assembly on probe
hanger.
4. Set empty bottle aside.
5. Place fresh bottle outside of cabinet. Remove entire plastic cap from top of bottle.
Clean outside of new bottle with a cloth.
6. Place probe into bottle. Slide collar down until it clicks in place. Push head down
until tubes hit bottom of bottle.
7. Slide bottle into cabinet and close door.
4. DISPENSING WATER

7
Water is leaking
Unplug dispenser, remove bottle and replace it .
No water is coming from the spout
Make sure the bottle is not empty. If empty, replace it.
Make sure to completely depress the pushbutton controls.
Cold water is not cold
It takes up to one hour after setup to dispense cold water.
Make sure the power cord is properly connected to a working outlet.
Make sure the back of the dispenser is at least 20cm from a wall and there is
free airflow on all 20cm sides of the dispenser.
Make sure green power switch on back of dispenser is ON.
If water still isn't cold, please ask for the service agent for assistance.
Hot water is not hot
It takes 15-20 minutes after setup to dispense hot water.
Make sure the power cord is properly connected to a working outlet.
Make sure red power switch on back of dispenser is ON.
Nightlight Isn't Working
Make sure the power cord is properly connected to a working outlet.
Make sure nightlight power switch on back of dispenser is ON.
Dispenser Is Noisy
Make sure the dispenser is positioned on a level surface.
5. TROUBLE SHOOTING
6. CLEANING
To avoid accident cut off the power supply before operation according to the
following instruction.
1. The machine had been disinfected before departed from factory. Cleaning the
dispenser prior to installing a full bottle of water for the first time.
2. Cleaning and draining instruction:
1) Making sure the power switch in the O(off) position and unplug the water dispenser
before cleaning.
2) Twist out the two screws ①, then take down top cover, cold tank cover and separa
tor ②.
3) Fill 0.6 gallons pure water into cold tank to clean it.
4) Turn on all the taps in turn for 3 minutes after the water outflow, which completes
the internal pipeline flushing.
5) Place a large water bucket beneath the drain outlet which on the back of water
dispenser, then, remove the drain cover and drain the water ③.
6) Reposition the drain cover, separator, cold tank cover and top cover after draining.
Ensure the pipe and wires are connected properly, then, you can use the machine
normally.
8
Attention:
1) The cleaning must be under the guidance of professional staff.
2) The dispenser heats water to a temperature of approximately 85℃.It can cause
severe burns. Please operate it carefully.
3. Sanitizing
The machine should be disinfected with the disinfectant separately bought from
drugstore or marketplace according to the instruction manual of the disinfectant and
then clean it with water(see cleaning and draining instruction). Generally this
should be done every three months.
4. To Remove Mineral Deposits:
Mix 4 liters water with 200g citric acid crystals, inject into the machine and make sure
the water can flow out of the hot water tap. Switch on the power and heat it about 10
minutes, 30 minutes later, drain off the liquor and clean it with water for two or three
times. Generally this should be done every six months.
Never disassemble this machine by yourself to avoid danger from damaging machine.
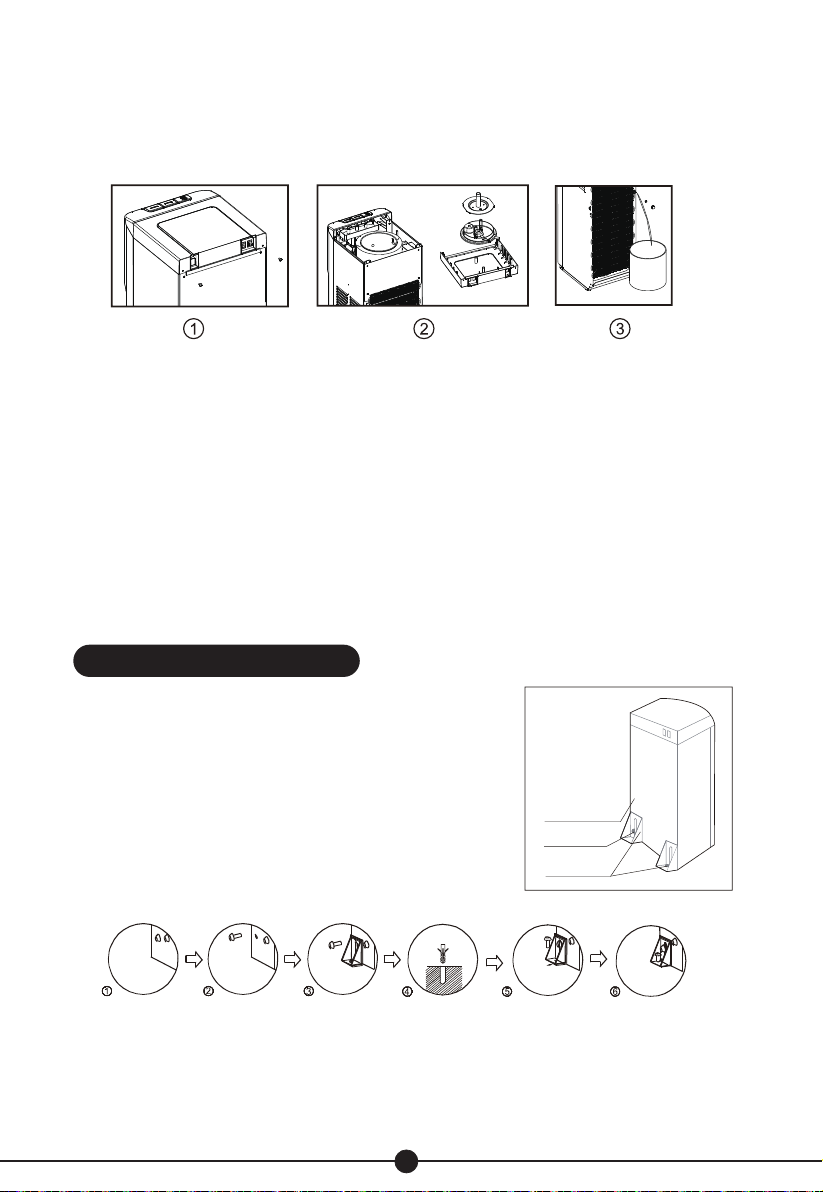
7. MACHINE INSTALLATION
WARNING! To avoid a hazard due to instability of the appliance, it must be fixed in
accordance with the instructions.
To prevent the machine from swaying to fall,
please instal the bracket accordingly.
1-2. Loosen the screw of the left or right bottom
angle just as the picture shown.
3. Use the screw to fix the bracket on the left
or right bottom angle of the water dispenser.
4. Make a hole on the floor's or the desk's
surface where the water dispenser will be
installed,
5. Fix the bracket on the floor by screw tightly.
6. Tighten the screw.
Water dispenser
Bracket
The hole for
tighten screw


The packaging material used is recyclable; we recommend that you
separate plastic, paper and cardboard and give them to recycling compa-
nies. According to WEEE (Waste of Electrical and Electronic Equipment)
guidelines, waste from electrical and electronic devices should be collected
separately. If you need to dispose of this appliance in the future, do NOT
throw it away with the rest of your domestic garbage. Instead, please take
the appliance to the nearest WEEE collection point, where available.
Table of contents
Other CG Water Dispenser manuals

Popular Water Dispenser manuals by other brands

Murdock
Murdock BF3 series Installation and maintenance instructions

Everpure
Everpure Filter Cartridge EFS5002-K Specification sheet

Scalemaster
Scalemaster Softline 100 Installation Procedures & Operating Manual

Quantum
Quantum UC1000 installation guide

Brita
Brita Wave BPA-Free Water Pitcher user guide

Whirlpool
Whirlpool HD1000XSC7 Installation instructions and use and care guide


