Watts HF scientific Air Sentinel H-28136 User manual

Operations and Maintenance Manual
Air Sentinel™ Replacement Kit
Model H-28136
IOM-HF-Air Sentinel Replacement Kit 29207
WARNING
!
Read this Manual BEFORE using this equipment.
Failure to read and follow all safety and use information can
result in death, serious personal injury, property damage, or
damage to the equipment.
Keep this Manual for future reference.
IOM-HF-Air Sentinel Replacement Kit 29207 Rev 4
2
2.0 Overview
2.1 Kit Contents
The kit consists of all the hardware required to replace the Cyclops
Purge Controller with the Air Sentinel™ or for a direct replacement.
The complete kit consists of:
• The Air Sentinel
• This Guide
• The Bypass Key
• 10 washer/locknuts
• Cat # 25359 Hole Plug
• Information sticker
If this kit is used for to replace a defective Air Sentinel the hole plug Cat
# 25359 will not be required.
Table of Contents
1.0 Safety........................................................................................... 2
1.1 Understanding Safety Information............................................. 2
2.0 Overview ..................................................................................... 2
2.1 Kit Contents ............................................................................. 2
2.2 Understanding Safety Information
2.3 Hardware.................................................................................. 2
3.0 The Cyclops Purge Controller....................................................... 3
3.1 The Chassis Removal and Replacement .................................. 3
3.2 Temperature Controller Finger Guard........................................ 4
3.3 Cyclops Removal...................................................................... 4
3.4 Removing the Cyclops Vent...................................................... 4
3.5 The Information Sticker............................................................. 4
4.0 Installing the Air Sentinel™ ........................................................... 5
4.1 Installing the Top Hole Plug (25359).......................................... 5
4.2 Install the Air Sentinel ............................................................... 5
4.3 Air Vent Connection.................................................................. 5
4.4 Wiring the Air Sentinel .............................................................. 5
4.4 Wiring the Air Sentinel .............................................................. 5
4.5 Chassis Replacement............................................................... 5
5.0 Replacement of a Defective Air Sentinel ....................................... 6
6.0 Warranty....................................................................................... 8
WARNING
!
Nothing is more important than personal safety. There is high
voltage connected to the instrument Make sure all voltage
has been removed. Disconnect or turn off the water and
Air supplies.
To prevent hand injury is recommended that safety gloves
be worn.
2.2 Safety
2.3 Hardware
As there will be quite a bit of hardware removed it may be handy
to have a small container to prevent losing any parts during the
service work.
This is a safety-alert symbol. The safety alert symbol
is shown alone or used with a signal word (DANGER,
WARNING, or CAUTION), a pictorial and/or a safety
message to identify hazards.
When you see this symbol alone or with a signal word
on your equipment or in this Manual, be alert to the
potential for death or serious personal injury.
This symbol identifies hazards which, if not avoided,
could result in death or serious injury.
This symbol identifies hazards which, if not avoided,
could result in minor or moderate injury.
This symbol identifies practices, actions, or failure to
act which could result in property damage or damage
to the equipment.
This pictorial alerts you to the need to read the
manual.
This pictorial alerts you to electricity, electrocution, and
shock hazards.
!
1.1 Understanding Safety Information
This manual contains safety and use instructions that must be
followed during the installation, commissioning, operation, care and
maintenance and service of the Air Sentinel™ Replacement Kit. All
responsible personnel must read this manual prior to working with this
instrument and should familiarize themselves with the following safety
symbols, signals and pictorials.
1.0 Safety
3
3.0 The Cyclops Purge Controller
The purpose of the Purge controller
is to ensure the enclosure is in a safe
condition before applying line power. To
do this it monitors air pressure and air
flow. If these two conditions meet the
control parameters this is considered
safe. To ensure that all potentially
explosive air has been purged when
power is first applied, a five minute
times period must occur prior to power
allocation, under the safe condition
mentioned above.
The Cyclops system consists of the
Cyclops controller, the vent and the
external stainless steel interconnection
tube.
The controller is sealed and no repair
is possible. This manual will guide you
through removal of the Cyclops System
and the upgrade to The Air Sentinel.
The Air Sentinel is smaller, lighter and
includes the vent integral to the controller.
This system was designed specifically for
the CLX-Ex and CLX-Ex2.
3.1 The Chassis Removal and Replacement
To gain access to the Cyclops mounting hardware it is first required to
remove the chassis
Tools Required:
A medium size Philips screwdriver
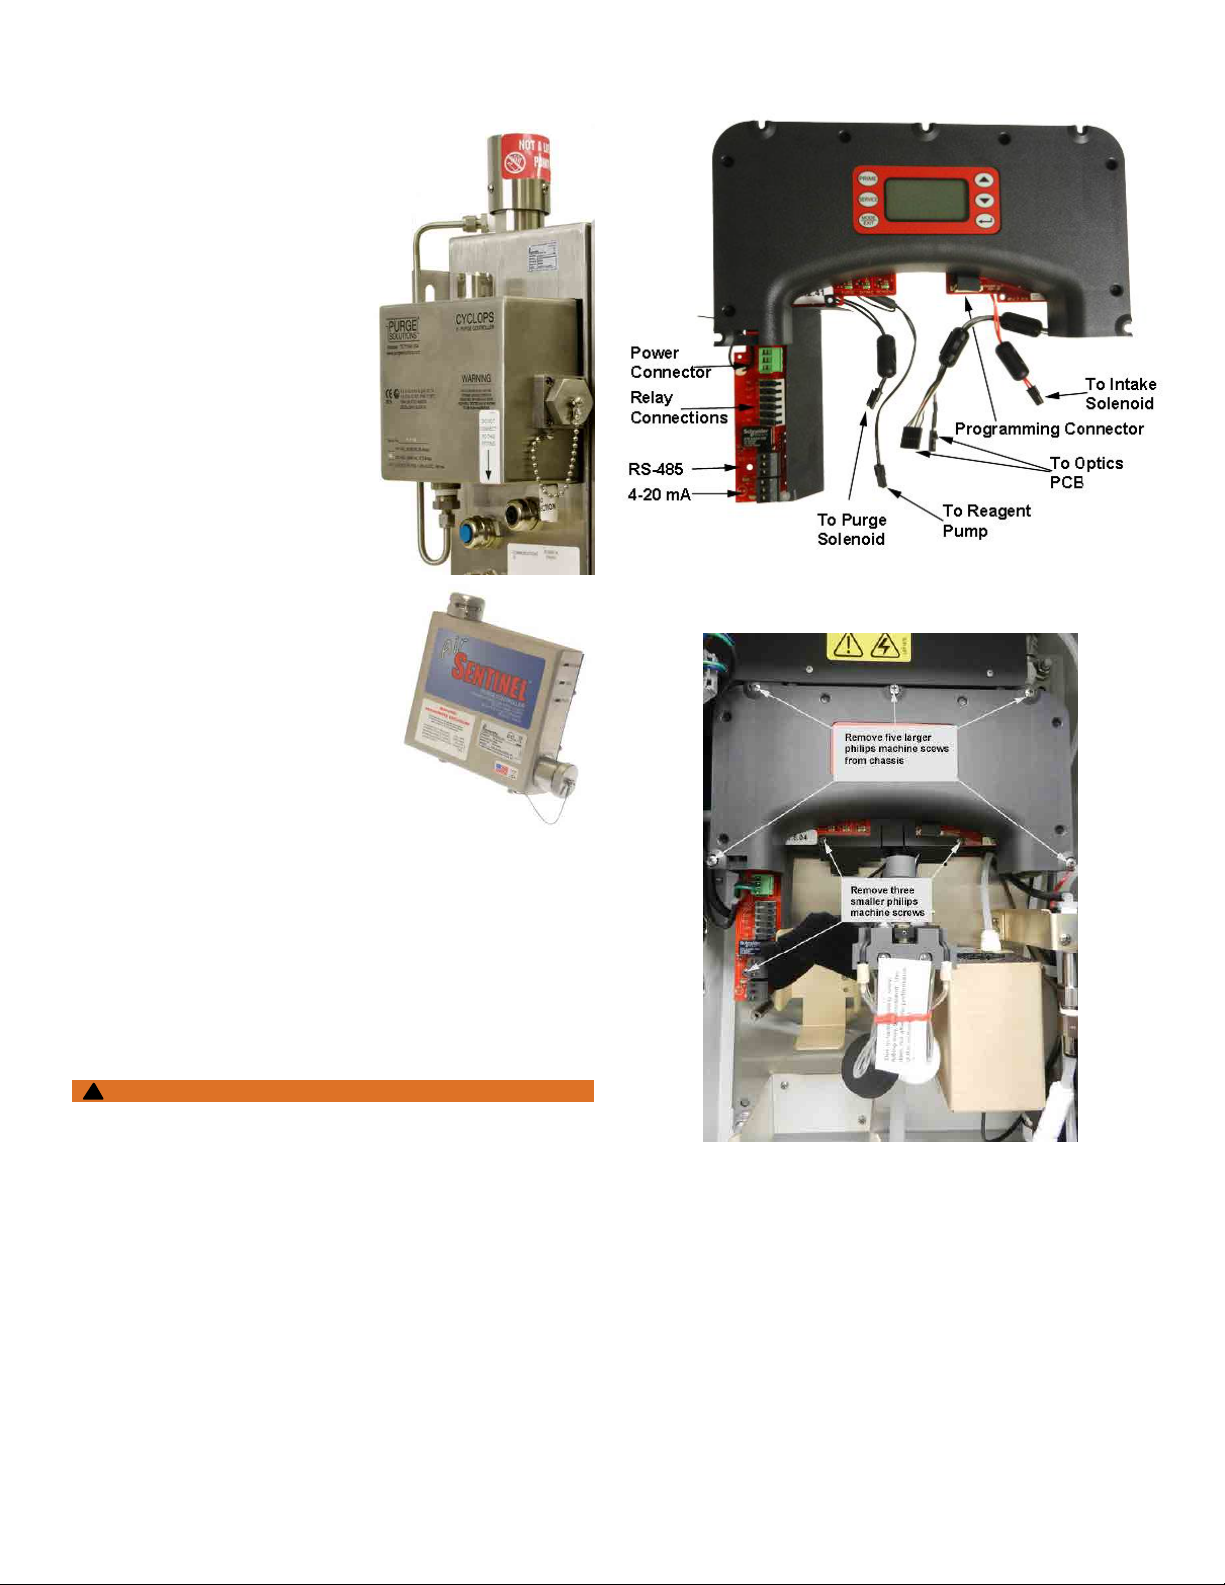
The Electronic PCB and Chassis assembly is the complete system
as shown to the right. This includes the LCD, keypad, power supplies
and cables.
Steps:
1. Remove electrical connectors to Optics PCB (2 places), the intake
solenoid, the purge solenoid and the reagent pump.
2. Remove 8 screws as shown in the photo on the next page. Please
note that two different sized screws are used. The five larger screws
go around the perimeter of the plastic frame.
3. Remove the entire chassis.
4. Replace the chassis and reverse the steps 1-3 above. Ensure
that the PCB is installed correctly in the enclosure before screwing
in place.
When properly located, the PCB and Chassis should have no wires or
tubing pushing against it.
Electronic PCB and Chassis Assembly
Chassis Screw Locations
To remove the PCB and Chassis assembly, ensure that water
and all electrical connections to the instrument are removed.
WARNING
!

4
3.4 Removing the Cyclops Vent
Tools and Supplies Required:
14mm (or 9⁄16") open end wrench
23mm (or 29⁄32") closed end wrench
Steps to remove the Vent:
1. Remove the connection to the external interconnection stainless
steel tube if this has not already been done. This requires a 14mm
(or 9⁄16") open end wrench.
2. From inside the enclosure use a 23mm (29⁄32") closed end wrench to
remove the nut and washer, then remove the vent.
3.5 The Information Sticker
When replacing the Cyclops with the Air Sentinel one of the four front
door yellow stickers will have incorrect information. The kit includes a
replacement sticker to be used. The stickers are exceedingly difficult to
remove. To make this easier, we recommend that this sticker be placed
over the existing sticker that showed the Minimum and Maximum
Overpressure values.
3.2 Temperature Controller Finger Guard
To gain better access the back nuts the Temperature Controller Finger
Guard should be removed.
Tools Required:
A small size Philips screwdriver
Located above the Electronic PCB and chassis is a large finger guard
and Temperature Controller cover. This is easily removed by loosening
the four screws. Use care not to lose these screws as they are quite
small.
After replacement of the controller, be sure the reattached the cover
and finger guard.
Remove all power from the system before starting removal to
avoid risk of electrocution.
WARNING
!
3.3 Cyclops Removal
Tools Required:
14mm (or 9⁄16") open end wrench
11mm (or 7⁄16") combination wrench and socket wrenches
Small flathead screwdriver 2.5 - 4mm (or 1⁄8- 5⁄32")
Steps:
1. Remove the power from the system.
2. Remove the wire connections at terminals 4, 5 and 6 of the Cyclops.
3. Remove the external interconnection stainless steel tube. Undo
the connection at both ends. This requires a 14mm (or 9⁄16") open
end wrench.
4. Remove the Chassis. See section 1.1 above.
5. Remove the 10 perimeter nuts flat washers and lock washers. This
will require 11mm (or 7⁄16") tools. Often a combination wrench and a
socket set work the best.
6. Once all the hardware is removed you may need to give small tug as
the rubber gasket can stick to the enclosure.
7. After the hardware is removed, there is a small safety cover and a
DIN rail containing a terminal. The safety cover can be discarded,
but the Din rail will need to be replaced when installing the
Air Sentinel.
Use care as the Cyclops weighs over 2.3 kg (5 lbs).
CAUTION
!
5
4.0 Installing the Air Sentinel
The kit includes the Air Sentinel, ten locking nuts and a top hole plug.
4.1 Installing the Top Hole Plug (25359)
Tools Required:
3⁄8" or 10mm nut-driver or socket wrench
As the Air Sentinel has an integral vent the Cyclops Vent was removed.
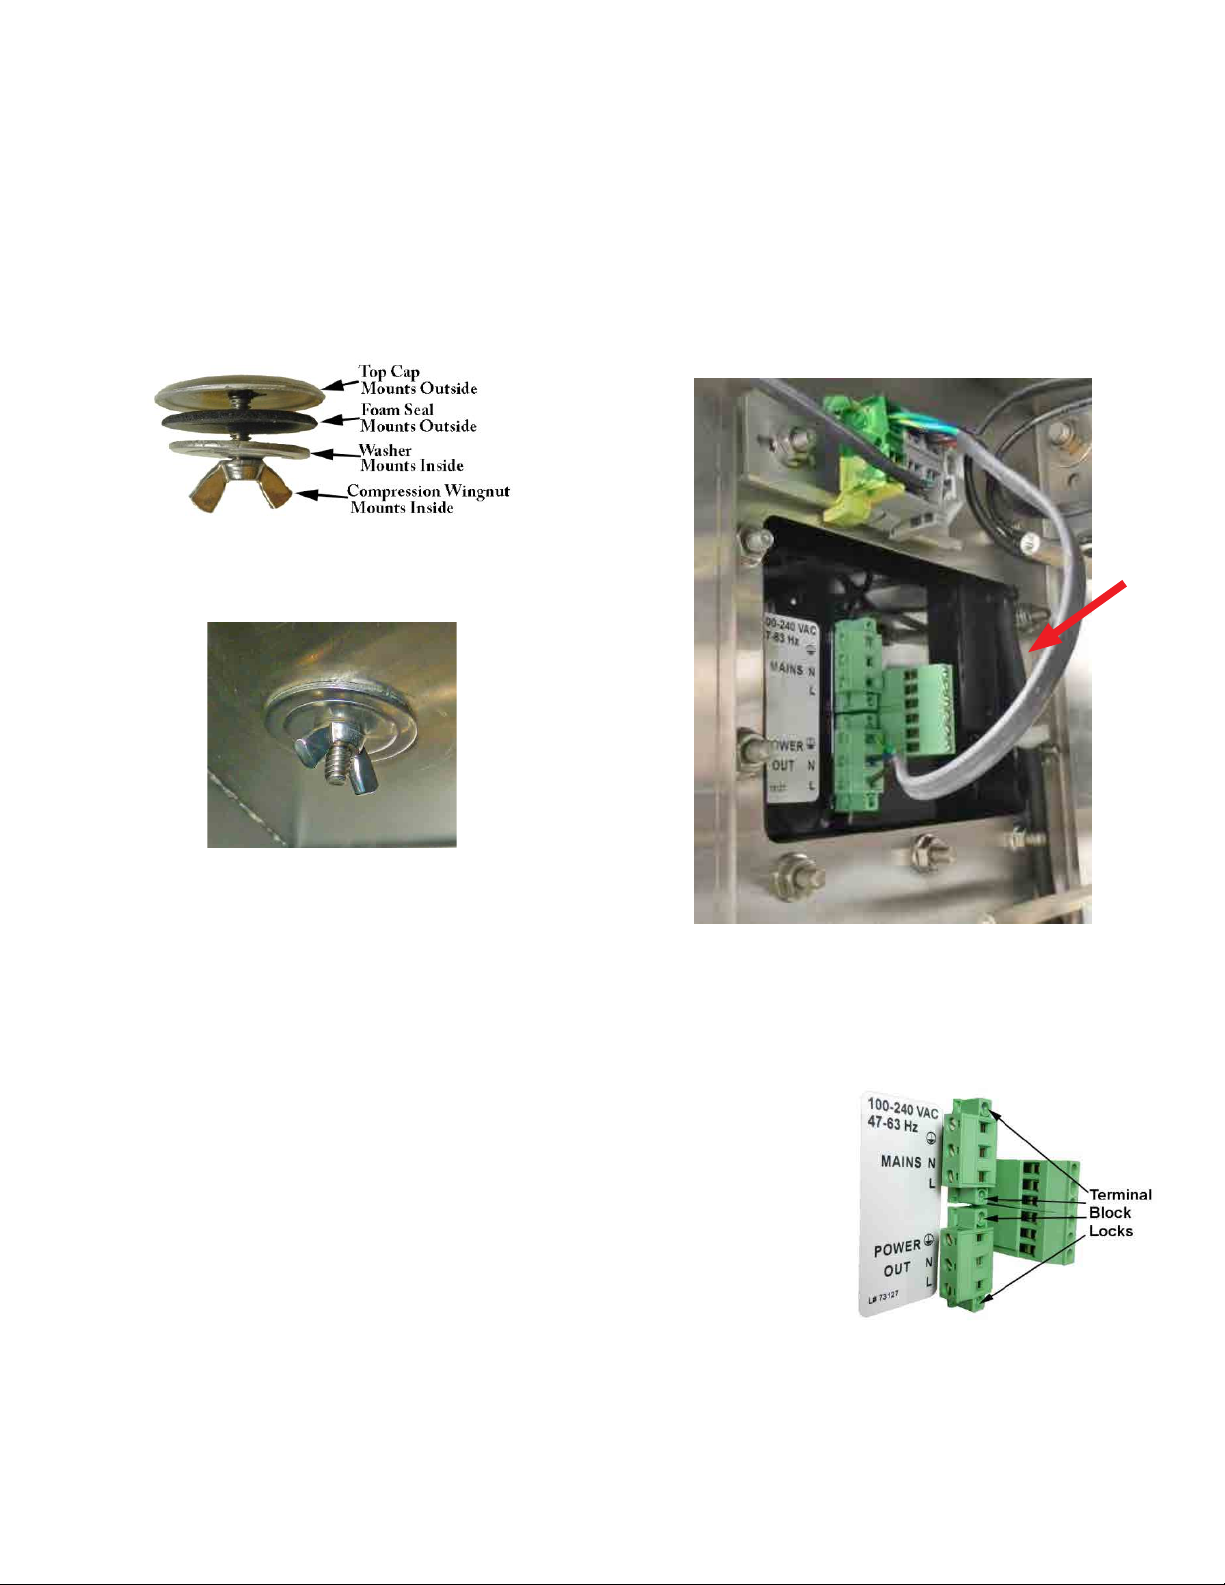
This hole must now be plugged. A stainless steel plug is provided.
This has rubber seal that goes on the outside and washer and nut
on the inside.
The plug needs to be sealed until there is no gap between the top cap
and the enclosure but do not over tighten.
4.2 Install the Air Sentinel
Tools Required:
11mm (or 7⁄16") combination wrench and socket wrenches
The Air Sentinel is sent with 10 Stainless Steel locking nuts. These are
a combination of a nut, washer and lock to make installation easier.
When installing the din rail needs to be installed at the top left side
tightened with two nuts.
After installing, check all 10 nuts one last time to ensure all are tight.
4.3 Air Vent Connection
Tools Required:
Knife or Scissors
The vent from the top of the optics assembly previously had no final
connection. A check valve was used to prevent water from entering
the enclosure.
This vent must now connect to a fitting on the Air Sentinel through the
same check valve. The tube is shortened by about 50-60mm. This tube
will be placed on the output of the check valve to allow for the optics to
vent through Air Sentinel.
Installed Air Sentinel
4.4 Wiring the Air Sentinel
Tools Required:
Small flat blade screwdriver
Each of the power terminal
blocks can be removed
for ease of use. Be sure to
tighten these locks after
connections are finished.
As stated on the label, Mains
power is applied to the upper
set of terminals and the
connection to the DIN rail
must be made to the lower
set of terminals.
4.5 Chassis Replacement
Refer to section 1.1 and reverse all the electrical connections. When
replacing the chassis, ensure there are no interferences, that the finger
guards are in place and there no pinched wires.
This completes the installation. Refer to the Air Sentinel for operation.

6
5.0 Replacement of a Defective
Air Sentinel
In this application the instrument should look exactly the same after
replacement. It would be wise to take a few photos before disassembly.
Be sure to note problems and mark these on the defective unit. In most
instances you can contact HF scientific for an RMA number to return
the defective controller.
Tools Required:
11mm (or 7⁄16") combination wrench and socket wrenches
Small flathead screwdriver 2.5 - 4mm (or 1⁄8- 5⁄32")
Steps:
1. Remove the chassis Assembly as shown in section 2.1.
2. Remove the Temperature Controller Finger Guard as described in
section 2.2.
3. Remove the existing air vent connection. See section 3.3
4. Remove the Mains and Power Out connections terminal blocks
using the flat blade screwdriver. It is not necessary to wires from the
terminal blocks unless these terminal blocks have been damaged.
See section 3.4
5. Remove the 10 Washer/Locknuts.
6. Remove the defective Air Sentinel.
7. Replace in the reverse order of steps 1-6. Ensure all hardware
is tight. Also make certain that the terminal blocks have been
tightened into place.
To remove the PCB and Chassis assembly, ensure that water
and all electrical connections to the instrument are removed.
WARNING
!

7
Notes
______________________________________________________________________________________________________________________________________________________________________________________________________________
______________________________________________________________________________________________________________________________________________________________________________________________________________
______________________________________________________________________________________________________________________________________________________________________________________________________________
______________________________________________________________________________________________________________________________________________________________________________________________________________
______________________________________________________________________________________________________________________________________________________________________________________________________________
______________________________________________________________________________________________________________________________________________________________________________________________________________
______________________________________________________________________________________________________________________________________________________________________________________________________________
______________________________________________________________________________________________________________________________________________________________________________________________________________
______________________________________________________________________________________________________________________________________________________________________________________________________________
______________________________________________________________________________________________________________________________________________________________________________________________________________
______________________________________________________________________________________________________________________________________________________________________________________________________________
______________________________________________________________________________________________________________________________________________________________________________________________________________
______________________________________________________________________________________________________________________________________________________________________________________________________________
______________________________________________________________________________________________________________________________________________________________________________________________________________
______________________________________________________________________________________________________________________________________________________________________________________________________________
______________________________________________________________________________________________________________________________________________________________________________________________________________
______________________________________________________________________________________________________________________________________________________________________________________________________________
______________________________________________________________________________________________________________________________________________________________________________________________________________
______________________________________________________________________________________________________________________________________________________________________________________________________________
______________________________________________________________________________________________________________________________________________________________________________________________________________
______________________________________________________________________________________________________________________________________________________________________________________________________________
______________________________________________________________________________________________________________________________________________________________________________________________________________
______________________________________________________________________________________________________________________________________________________________________________________________________________
______________________________________________________________________________________________________________________________________________________________________________________________________________
______________________________________________________________________________________________________________________________________________________________________________________________________________
______________________________________________________________________________________________________________________________________________________________________________________________________________
______________________________________________________________________________________________________________________________________________________________________________________________________________
______________________________________________________________________________________________________________________________________________________________________________________________________________

IOM-HF-Air Sentinel Replacement Kit 29207 2225 H-28136 © 2022 HF scientific
USA: T: (239) 337-2116 • Toll-Free (888) 203-7248 • F: (239) 454-0694 • HFscientific.com
Latin America: T: (52) 55-4122-0138 • HFscientific.com
6.0 Warranty
Watts Regulator Co. (the “Company”) warrants each product to be free from defects in material and workmanship under normal usage for a period
of two (2) years from first use or three (3) years from date of invoice, whichever occurs first. In the event of such defects within the warranty period,
the Company will, at its option, replace or recondition the product without charge. Parts, which by their nature are normally required to be replaced
periodically, consistent with normal maintenance, specifically reagents, desiccant, sensors, electrodes and fuses are excluded. Also excluded are
accessories and supply type items.
Proof of purchase (invoice or paid order confirmation) and/or first use (commissioning) must be provided when making a product warranty claim.
THE WARRANTY SET FORTH HEREIN IS GIVEN EXPRESSLY AND IS THE ONLY WARRANTY GIVEN BY THE COMPANY WITH
RESPECT TO THE PRODUCT. THE COMPANY MAKES NO OTHER WARRANTIES, EXPRESSED OR IMPLIED. THE COMPANY HEREBY
SPECIFICALLY DISCLAIMS ALL OTHER WARRANTIES, EXPRESSED OR IMPLIED, INCLUDING BUT NOT LIMITED TO, THE IMPLIED
WARRANTIES OR MERCHANTABILITY AND FITNESS FOR A PARTICULAR PURPOSE.
The remedy described in the first paragraph of this warranty shall constitute the sole and exclusive remedy for breach of warranty, and the Company
shall not be responsible for any incidental, special or consequential damages, including without limitation, lost profits or the cost of repairing or
replacing other property which is damaged if this product does not work properly, other costs resulting from labor charges, delays, vandalism,
negligence, fouling caused by foreign material, damage from adverse water conditions, chemical, or any other circumstances over which the
Company has no control. In addition, the Company shall not be responsible for any costs incidental to the Company’s warranty response efforts,
including, without limitation, costs associated with the removal and replacement of systems, structures or other parts of facilities, de-installation,
decontamination and re-installation of products, or transportation of products to and from the Company. This warranty shall be invalidated by any
abuse, misuse, misapplication, improper installation or improper maintenance, alteration of the product, or use of any parts or accessories (including
but not limited to reagents) not provided by the Company.
Some states do not allow limitations on how long an implied warranty lasts, and some states do not allow the exclusion or limitation of incidental or
consequential damages. Therefore the above limitations may not apply to you. This Limited Warranty gives you specific legal rights, and you may
have other rights that vary from State to State. You should consult applicable state laws to determine your rights. SO FAR AS IS CONSISTENT
WITH APPLICABLE STATE LAW, ANY IMPLIED WARRANTIES THAT MAY NOT BE DISCLAIMED, INCLUDING THE IMPLIED
WARRANTIES OF MERCHANTABILITY AND FITNESS FOR A PARTICULAR PURPOSE, ARE LIMITED IN DURATION TO ONE YEAR
FROM THE DATE OF ORIGINAL SHIPMENT.
This manual suits for next models
1
Table of contents
Other Watts Monitor manuals


