Wave Central Axis HEVC ENC User manual

AXIS HEVC
ENCoder & DECoder
AXIS HEVC e n c o d e r
User Manual
May 22, 2019
This document features the AXIS HEVC encoder, h.265 stand-alone K UHD
and HDR encoder and AXIS HEVC decoder, h.265 stand-alone K UHD and
HDR decoder. The two units operate as a paired system.
Referenced the specification as posted on the Wave Central’s web site:
www.wavecentralrf.com

WARNING
The
TheThe
The
HD SDI
HD SDIHD SDI
HD SDI
Video
VideoVideo
Video
input
inputinput
input
connector
connectorconnector
connector
is
isis
is
75
7575
75
Ohms.
Ohms.Ohms.
Ohms.
Make
MakeMake
Make
sure
suresure
sure
that
thatthat
that
the
thethe
the
video
videovideo
video
cable(s)
cable(s)cable(s)
cable(s)
are
areare
are
fitted
fittedfitted
fitted
with
withwith
with
75
7575
75
Ohm
OhmOhm
Ohm
and
and and
and NOT
NOTNOT
NOT
50 Ohm
50 Ohm50 Ohm
50 Ohm
connectors.
connectors.connectors.
connectors.
The
TheThe
The
illustration
illustrationillustration
illustration
on
onon
on
the
thethe
the
right
rightright
right
is
isis
is
the
thethe
the
correct
correctcorrect
correct
BNC
BNCBNC
BNC
connector.
connector.connector.
connector.
Failure
FailureFailure
Failure
to
toto
to
do
dodo
do
so
soso
so
will
willwill
will
damage
damagedamage
damage
the
thethe
the
BNC
BNCBNC
BNC
connector(s)
connector(s)connector(s)
connector(s).
..
.
The
TheThe
The
customer
customercustomer
customer
is
isis
is
liable
liableliable
liable
for
forfor
for
any
anyany
any
damages
damagesdamages
damages
for
forfor
for
not
notnot
not
adhering
adheringadhering
adhering
to
toto
to
this
thisthis
this
practice.
practice.practice.
practice.
3
Wave Central LLC
HEVC ENC and DEC
May 2019
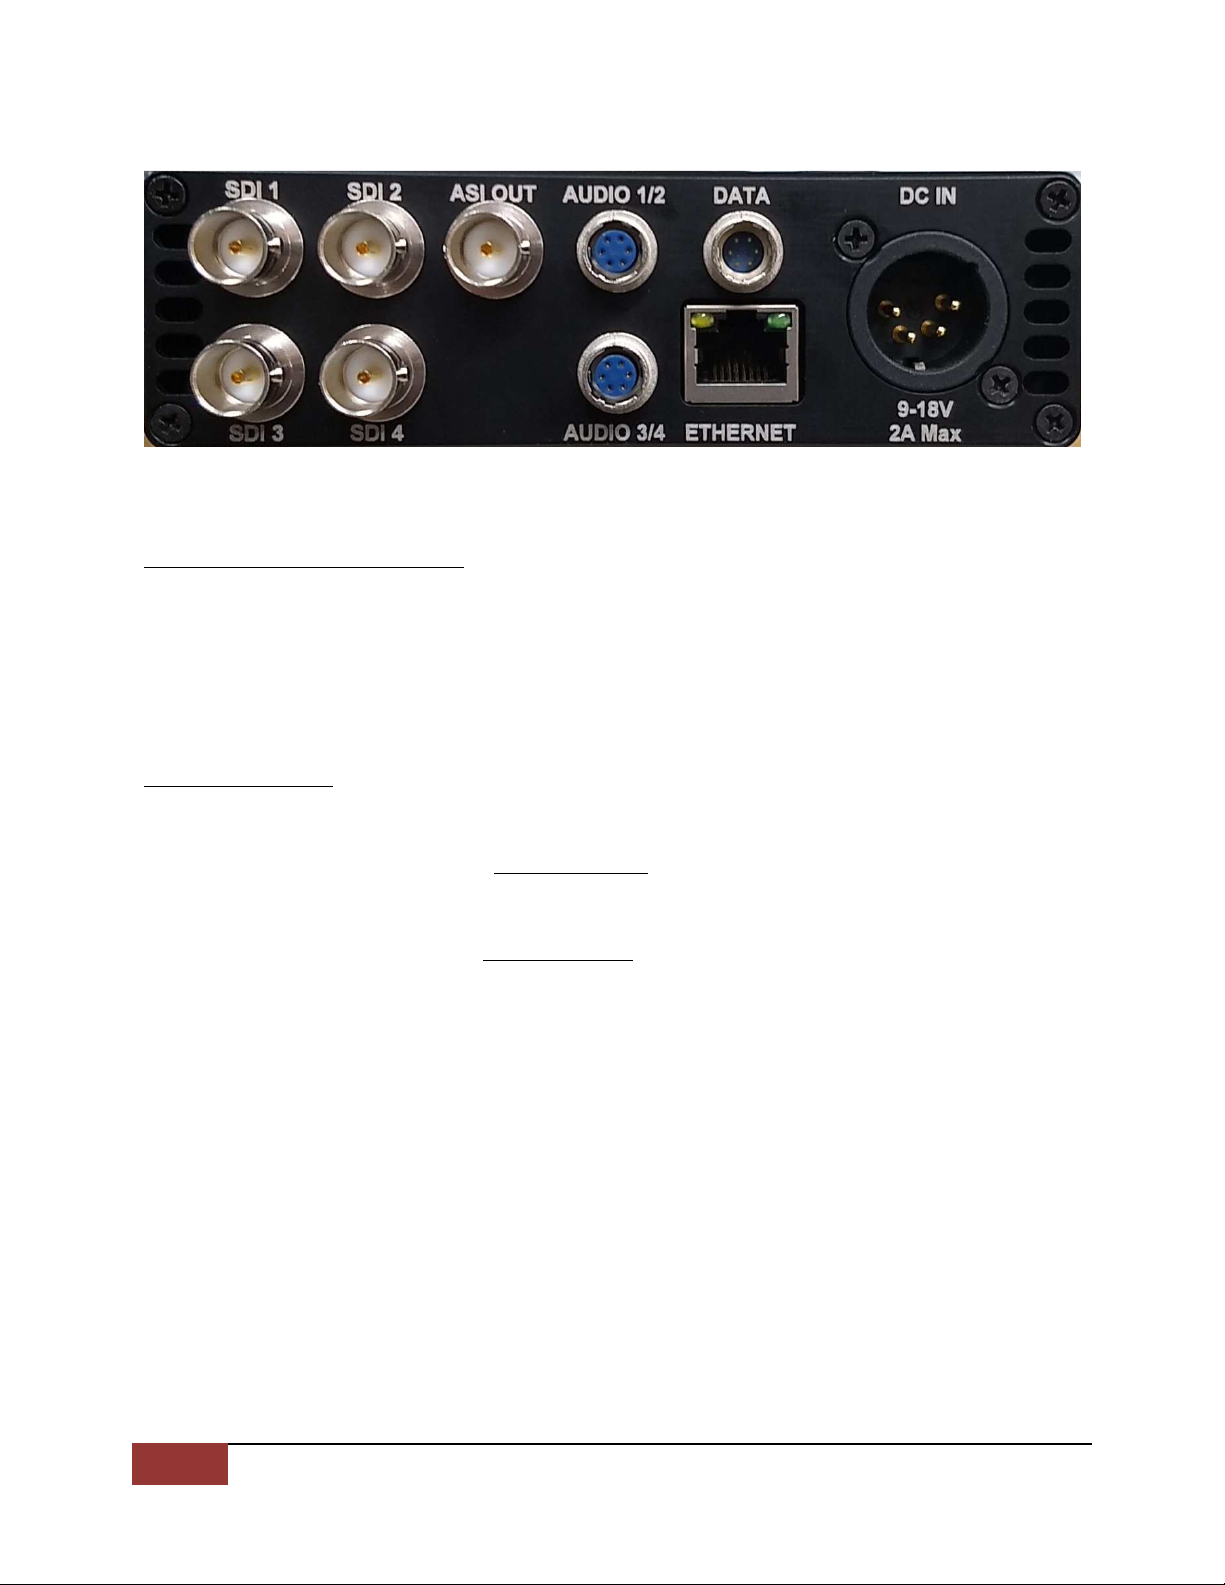
AXENC Rear Panel View
Introduction to the AXENC
There are two modes of operation. Mode 1
Mode 1Mode 1
Mode 1: K Ultra HD Mode. Input video
format is K Ultra HD. Format must be the same as the camera provided
format. Mode 2
Mode 2Mode 2
Mode 2: HD Mode. Input video is HD video, this can be up to four
separate HD video streams. An optional software key is required.
Getting Started
Typical video format used must match the video source e.g. 2160p50 or
2160p59. P
PP
P Progressive mode must be used for K UHD (Ultra HD) mode.
The Video Sample Format must match the video source e.g. SQD (Square
Division) quad pictures or 2SI
2SI2SI
2SI (two sample Interleave).
The Camera format for this procedure as described in this operator’s
manual is set to 2160p 59.9 and 2SI
2SI2SI
2SI
Once the source format is determined the AXENC is powered from the
external 12 VDC power supply provided. No external connections are
required during the initial startup. Turn the power switch on to begin the
initialization boot up procedure.
4
Wave Central LLC
HEVC ENC and DEC
May 2019
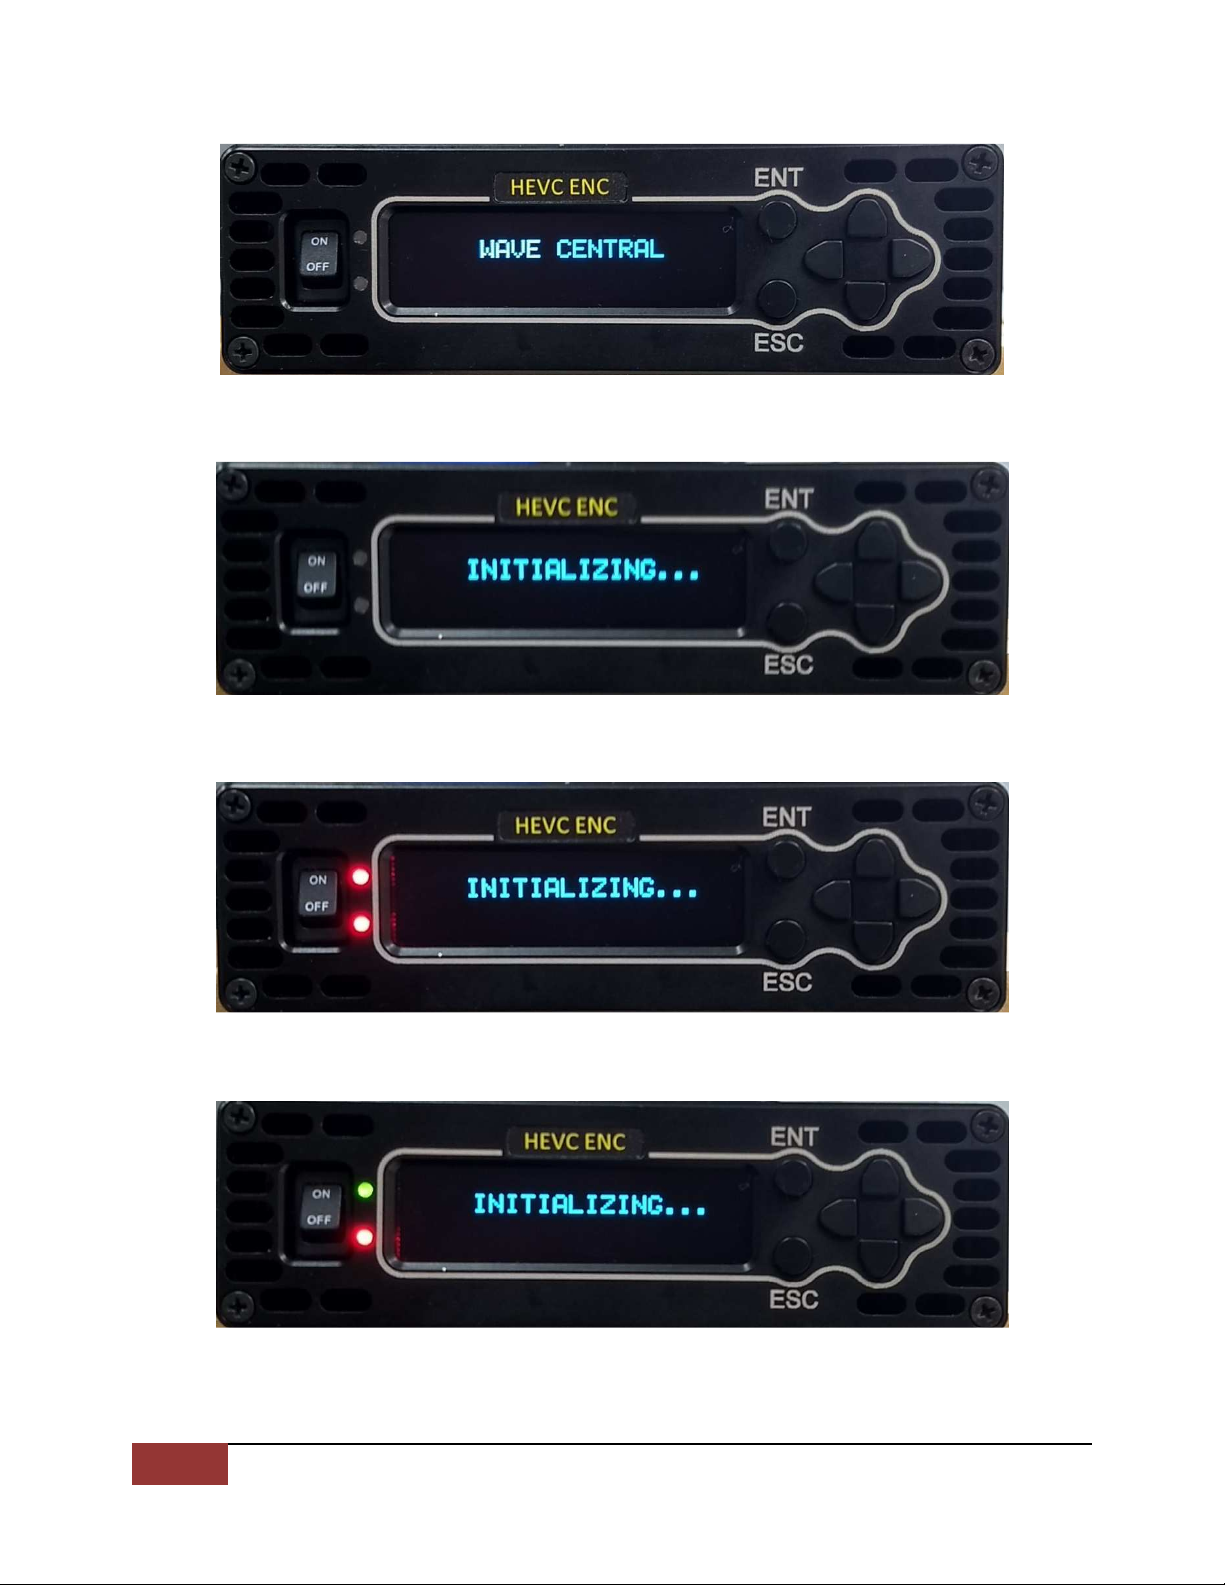
Power On Screen
Initializing Stage 1
Initializing Stage 2
Initializing Stage 3
5
Wave Central LLC
HEVC ENC and DEC
May 2019
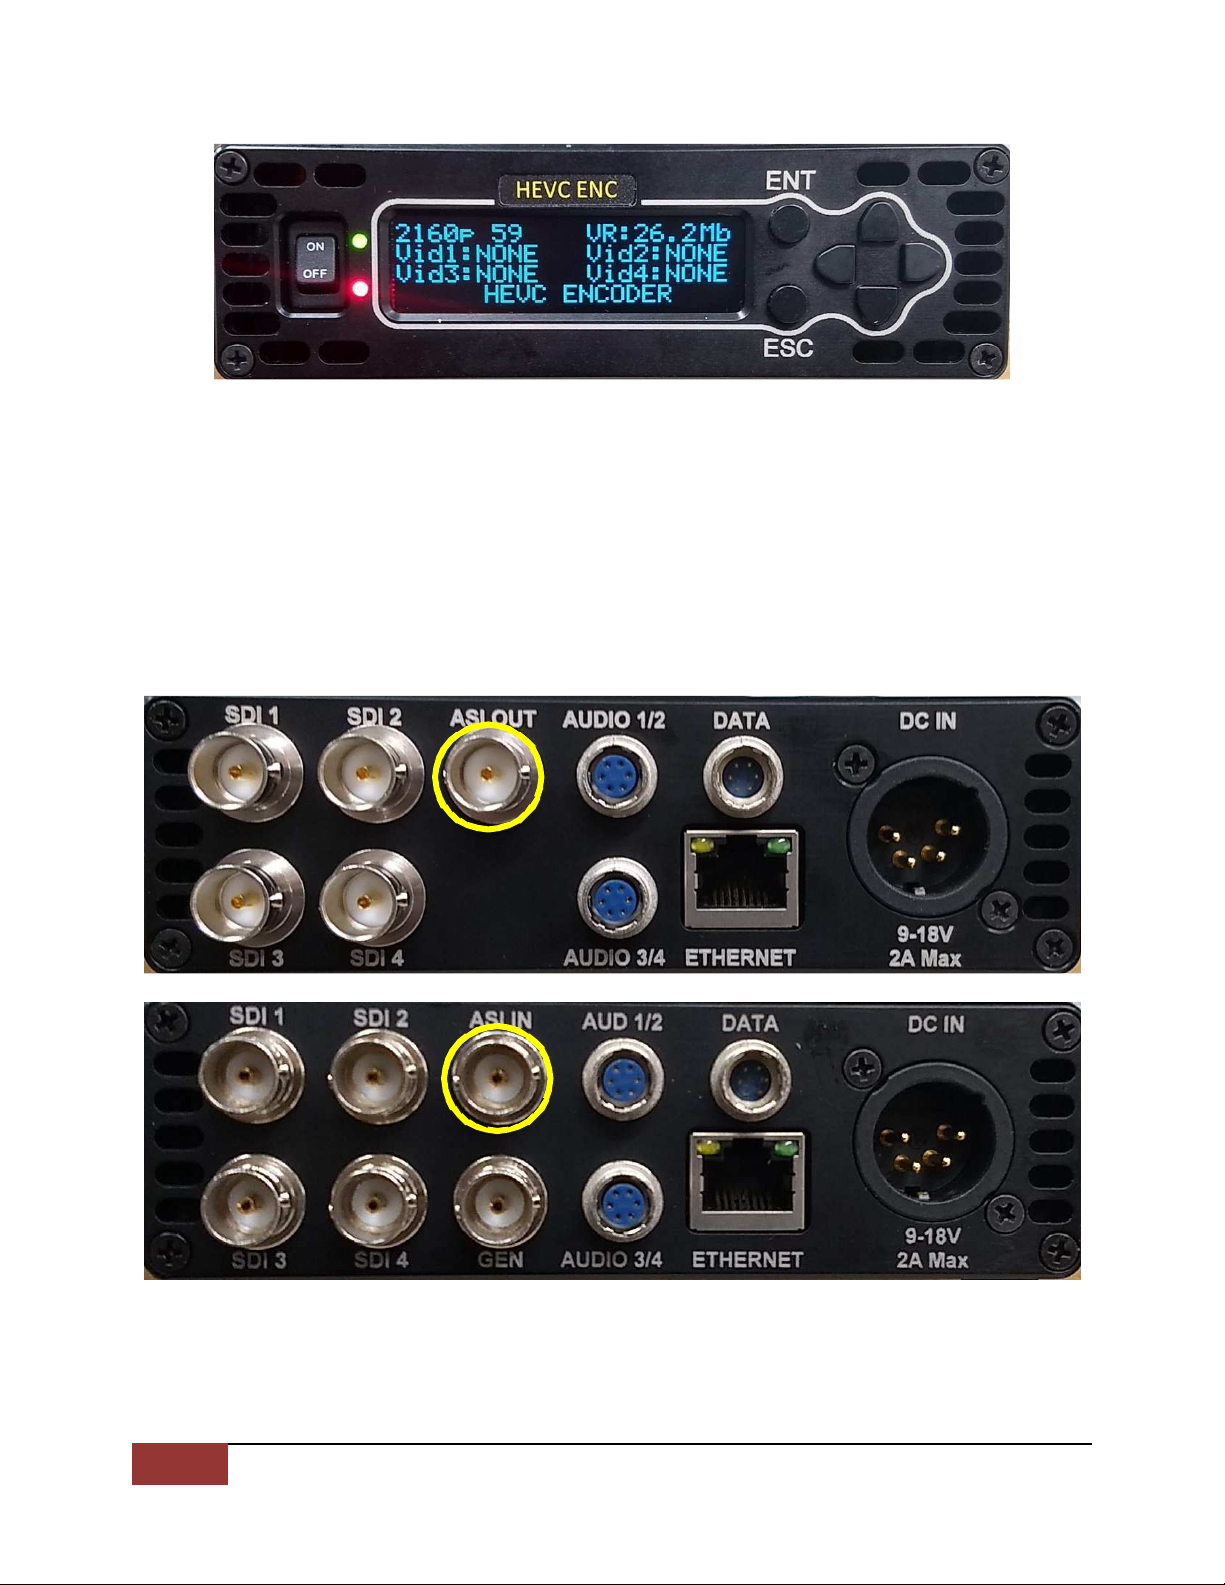
Initializing Complete
The Initialization process takes approximately one minute. The Green LED
indicates the unit has initialized and in communication with the front panel
display. The Red LED indicates there are no input signals present.
In a typical test scenario at Wave Central the AXENC is connected to the
AXDEC via the ASI connectors, using 75 Ohm serial coax cable.
6
Wave Central LLC
HEVC ENC and DEC
May 2019
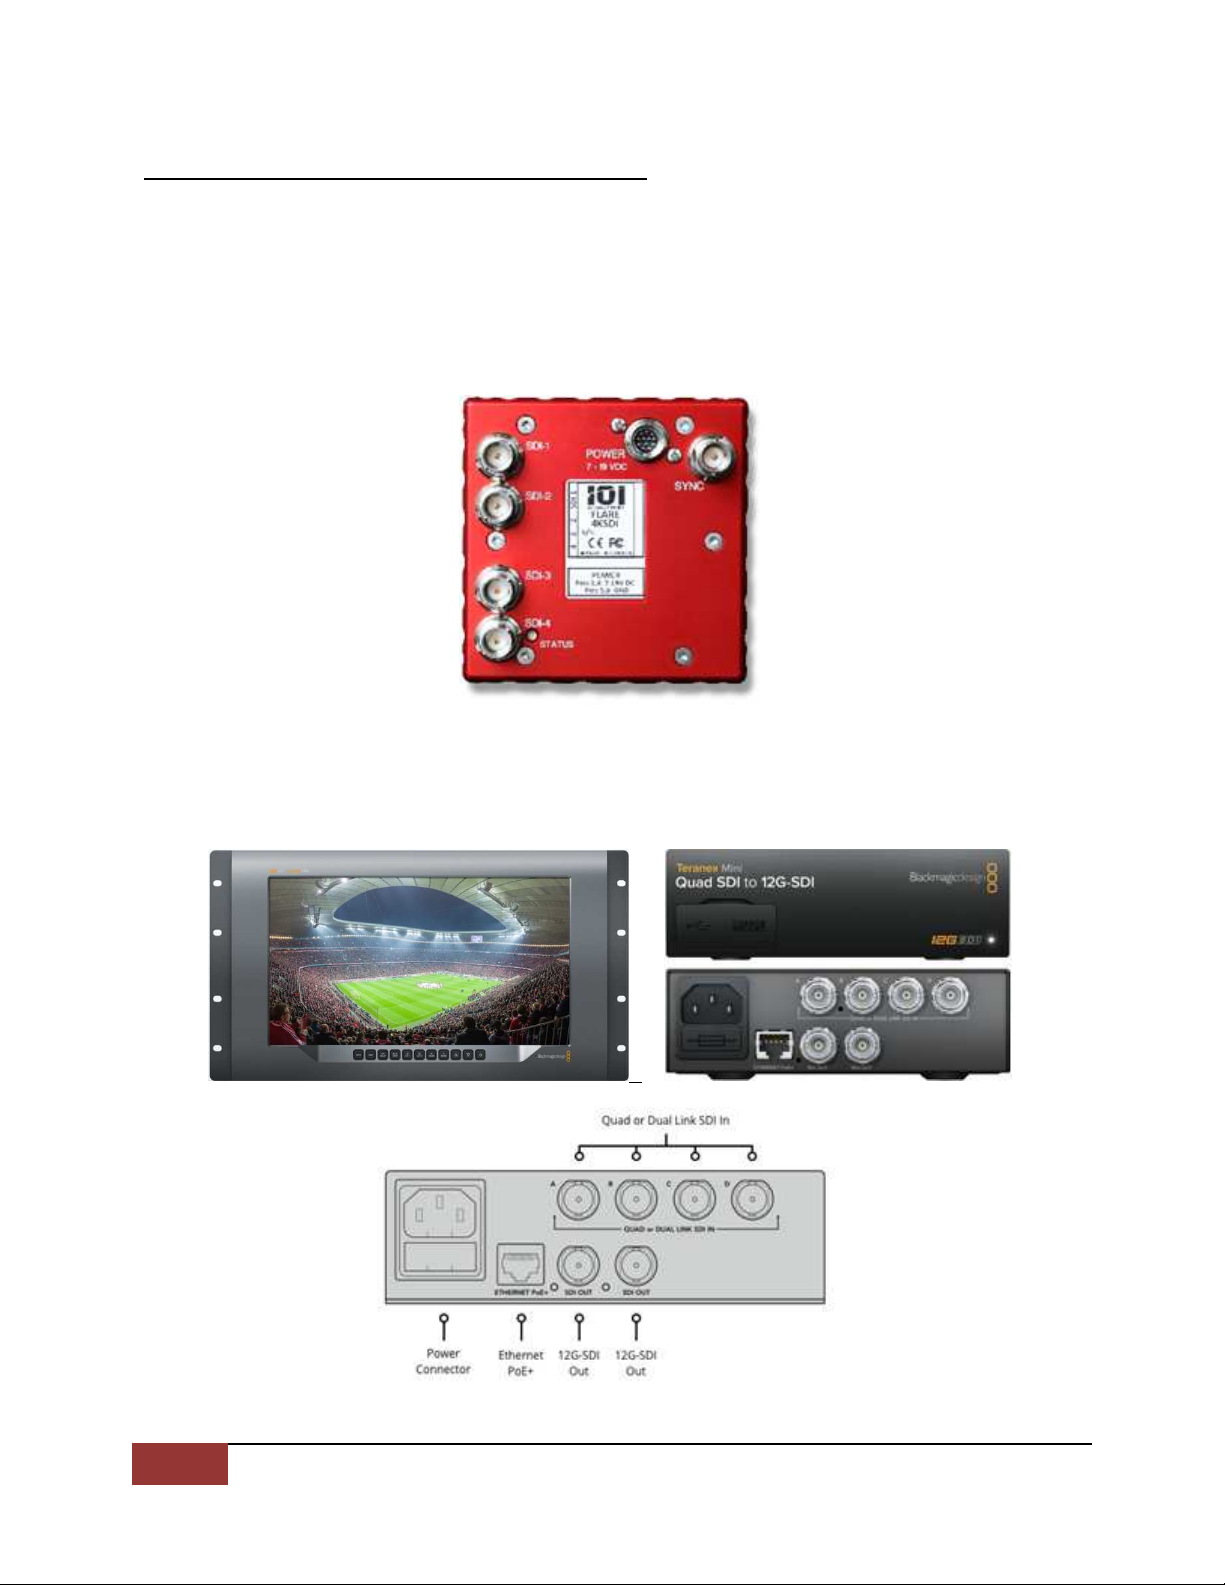
CAMERA SIGNAL SOURCE and MONITORING
The test camera is IO Industries, Flare KSDI, K/UHD, Multiple 3G/HD-SDI
output formats (SMTPE 292/ 25M). Four standard 3G/HD-SDI outputs are
SDI-1, SDI-2, SDI-3 and SDI- . Tri-Level sync input. The FLARE camera
format is set to 2
22
2160
160160
160p
p p
p 59
5959
59 (UHDp59.9 ), 2SI
2SI2SI
2SI (2-Sample Interleave), Color
Sampling :2:0 for Wave Central’s testing purposes.
Video monitor is Blackmagic Designs 12G SDI Ultra HD with a Quad SDI to
12G.

7
Wave Central LLC
HEVC ENC and DEC
May 2019
HEVC ENCODER & DECODER CONNECTIONS
Connect SDI’s 1 through from the camera to the four SDI inputs 1 through
on the HEVC Encoder. Connect the ASI OUT from the Encoder to the ASI
IN on the Decoder.
Connect the four SDI outputs from the Decoder to the four Inputs on the
Quad SDI to 12G converter, SDI-1
11
1 to A
AA
A, SDI-2
22
2 to B
BB
B, SDI-3
33
3 to C
CC
C and SDI-
to
D
DD
D.
Connect 12G-SDI Out to SDI input Ultra HD Monitor.
12G SDI Ultra HD Monitor

8
Wave Central LLC
HEVC ENC and DEC
May 2019
HEVC ENCODER SETTINGS
The Encoder settings are determined, using a Wave Central AXIS Wireless
camera System. The transmit signal is a DVB-T, 8 MHz channel in the
appropriate licensed channel. Modulation: 16-QAM, Code rate 2/3 and GI
(Guard Interval) 1/8, resulting of a Bit rate of 1 .7 Mbits/s. This will provide
an adequate robust signal and very acceptable K picture quality.
Remember this is a base line setting for system testing. Your requirements
will vary and the HEVC Encoder and Decoder can be adjusted to suite
those requirements.
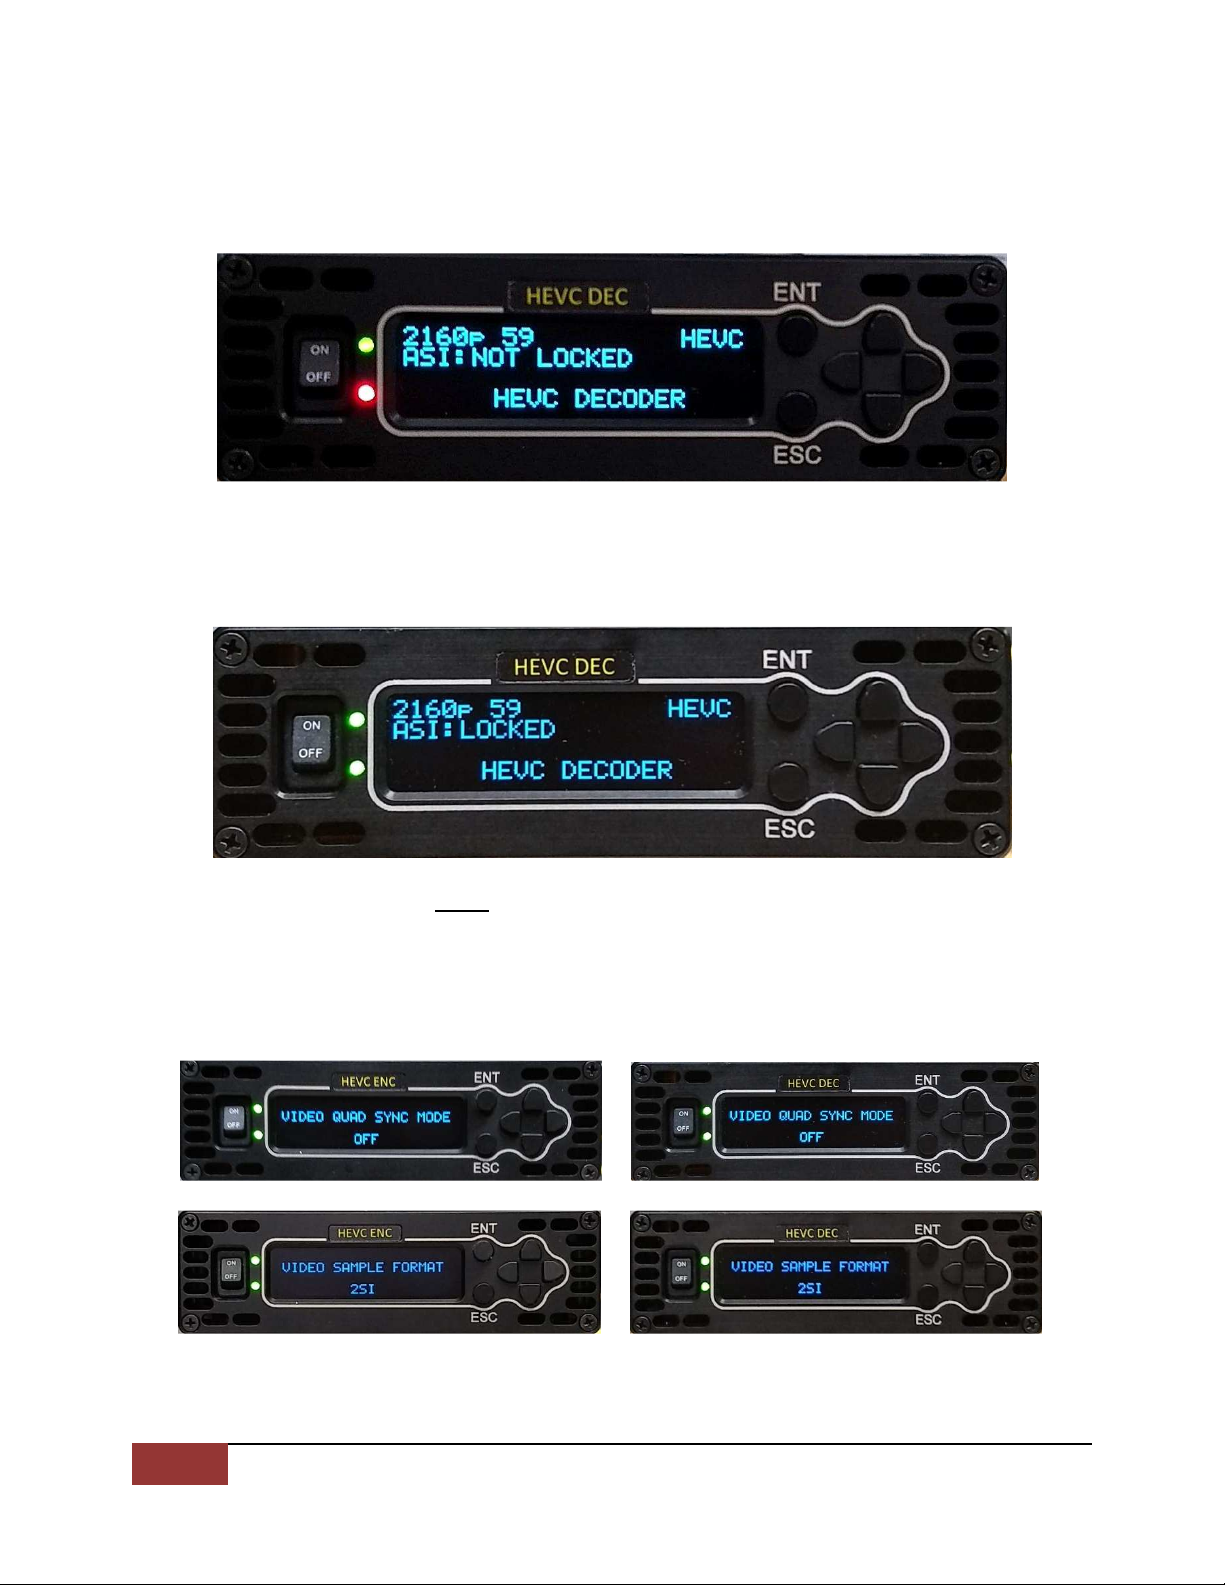
Encoder locked to the four SDI video signals and a bit rate of 1 .5Mb, just
under the bit rate that the camera transmitter is set (1 .7Mb).
NAVIGATING THE HEVC ENC MENUS
Press the ENT button on the front panel. The next menu will be the CONFIG
VIDEO. Press the ENT button, VIDEO SOURCE will display DEFAULT
DEFAULTDEFAULT
DEFAULT. Push
the Down button, VIDEO SAMPLE FORMAT is displayed: 2SI
2SI2SI
2SI (2-Sample
Interleave). Push the down button again and VIDEO FORMAT displays:
2160p 59
2160p 592160p 59
2160p 59 (59.9 ).
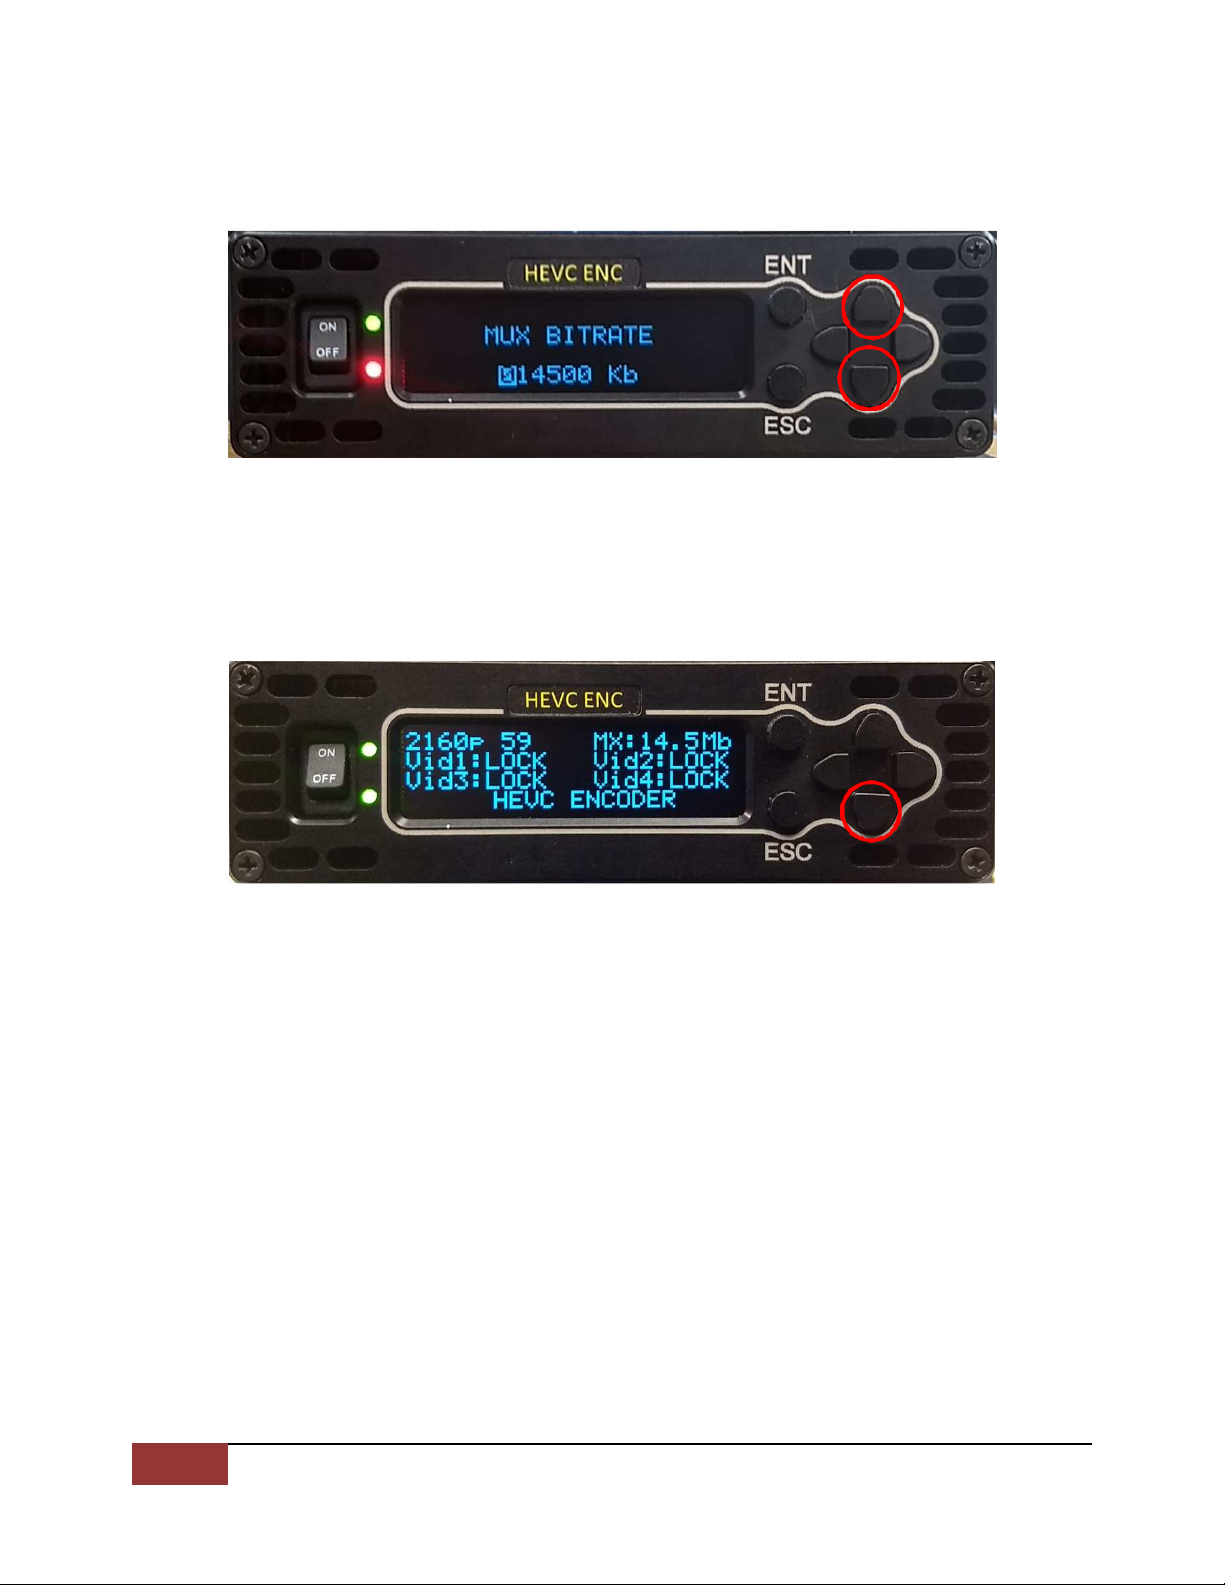
Press the down button and VIDEO BITRATE is displayed: AUTO. Press the
down button and MUX RATE is displayed: 1 .500 Mb
1 .500 Mb1 .500 Mb
1 .500 Mb. The MUX BITRATE
was set by pressing the ENT button. Notice the first intergerr “0” is
highlighted. Toggling the upper or lower button will change the values.
9
Wave Central LLC
HEVC ENC and DEC
May 2019
Using the Right button will toggle to the next position. Up or down buttons
are used to set numbers. Once completed, press the ENT button.
Press the down button and VIDEO MODE is displayed: HEVC (High
Efficiency Video Coding). Press the down button again and VIDEO DELAY
MODE is displayed: LOW DELAY. Press the down button again and VIDEO
CHROMA FORMAT is displayed: :2:0. Press the down button and VIDEO
BIT DEPTH is displayed: 10-bit.
Press the ENT button and the next system menu will appear. Push the
down button and select the CONFIG AUDIO menu. Press the ENT button;
confirm the AUDIO SOURCE 1 EMBEDDED 1 (1/2) is displayed. Continue to
scroll down until the AUDIO MODE PAIR 1 MPEG2 LAYER 1 is displayed.
Continuing to scroll will display the remaining audio menus. All menus are
located at end of this manual.
Press the ESC button and return the CONFIG AUD system menu. The next
menu is CONFIG PIDs; these are set and should not have to be changed.
The next system menu is CONFIG IP. This is used to set the ENC and
decoder parameters via a web browser. Scroll down to UNIT menu by
pressing the down button. Press the ENT button. The HEVC VERSION
software is displayed, scroll down to the following menus: HEVC FPGA
TEMP, HEVC PSU TEMP, HEVC VOLTAGE, HEV SERIAL Number and WC
(Display screen) VERSION. Pressing the ESC button several times will
return to the home screen.
10
Wave Central LLC
HEVC ENC and DEC
May 2019
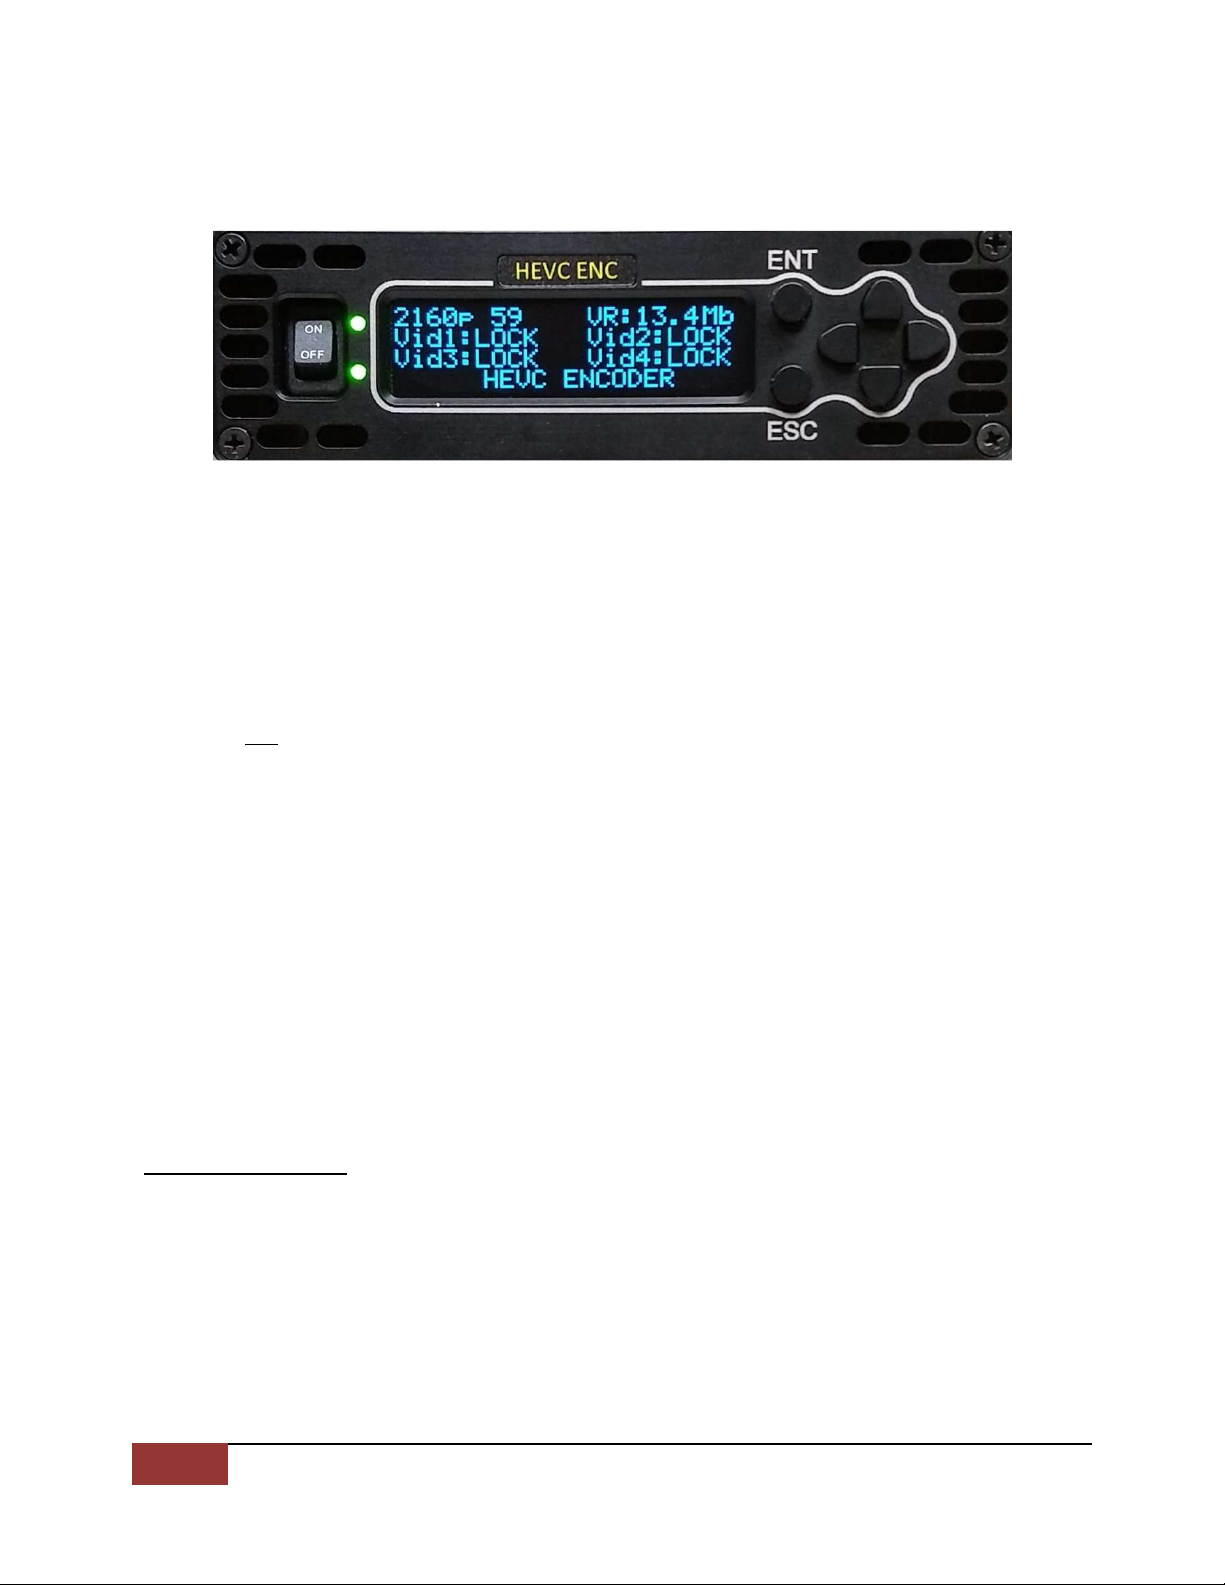
NAVIGATING THE HEVC DEC MENUS
The setting described above is for the HEVC DEC when there is no ASI
signal present.
The HEVC Decoder is now locked to the input ASI signal from the HEVC
Encoder. The video monitor will now display a K UHD picture. If not, Scroll
to the VIDEO CONFIG menu, toggle to and verify on both the ENC and DEC
that they are both set with VIDEO QUAD SYNC OFF and VIDEO SAMPLE:
2SI
11
Wave Central LLC
HEVC ENC and DEC
May 2019
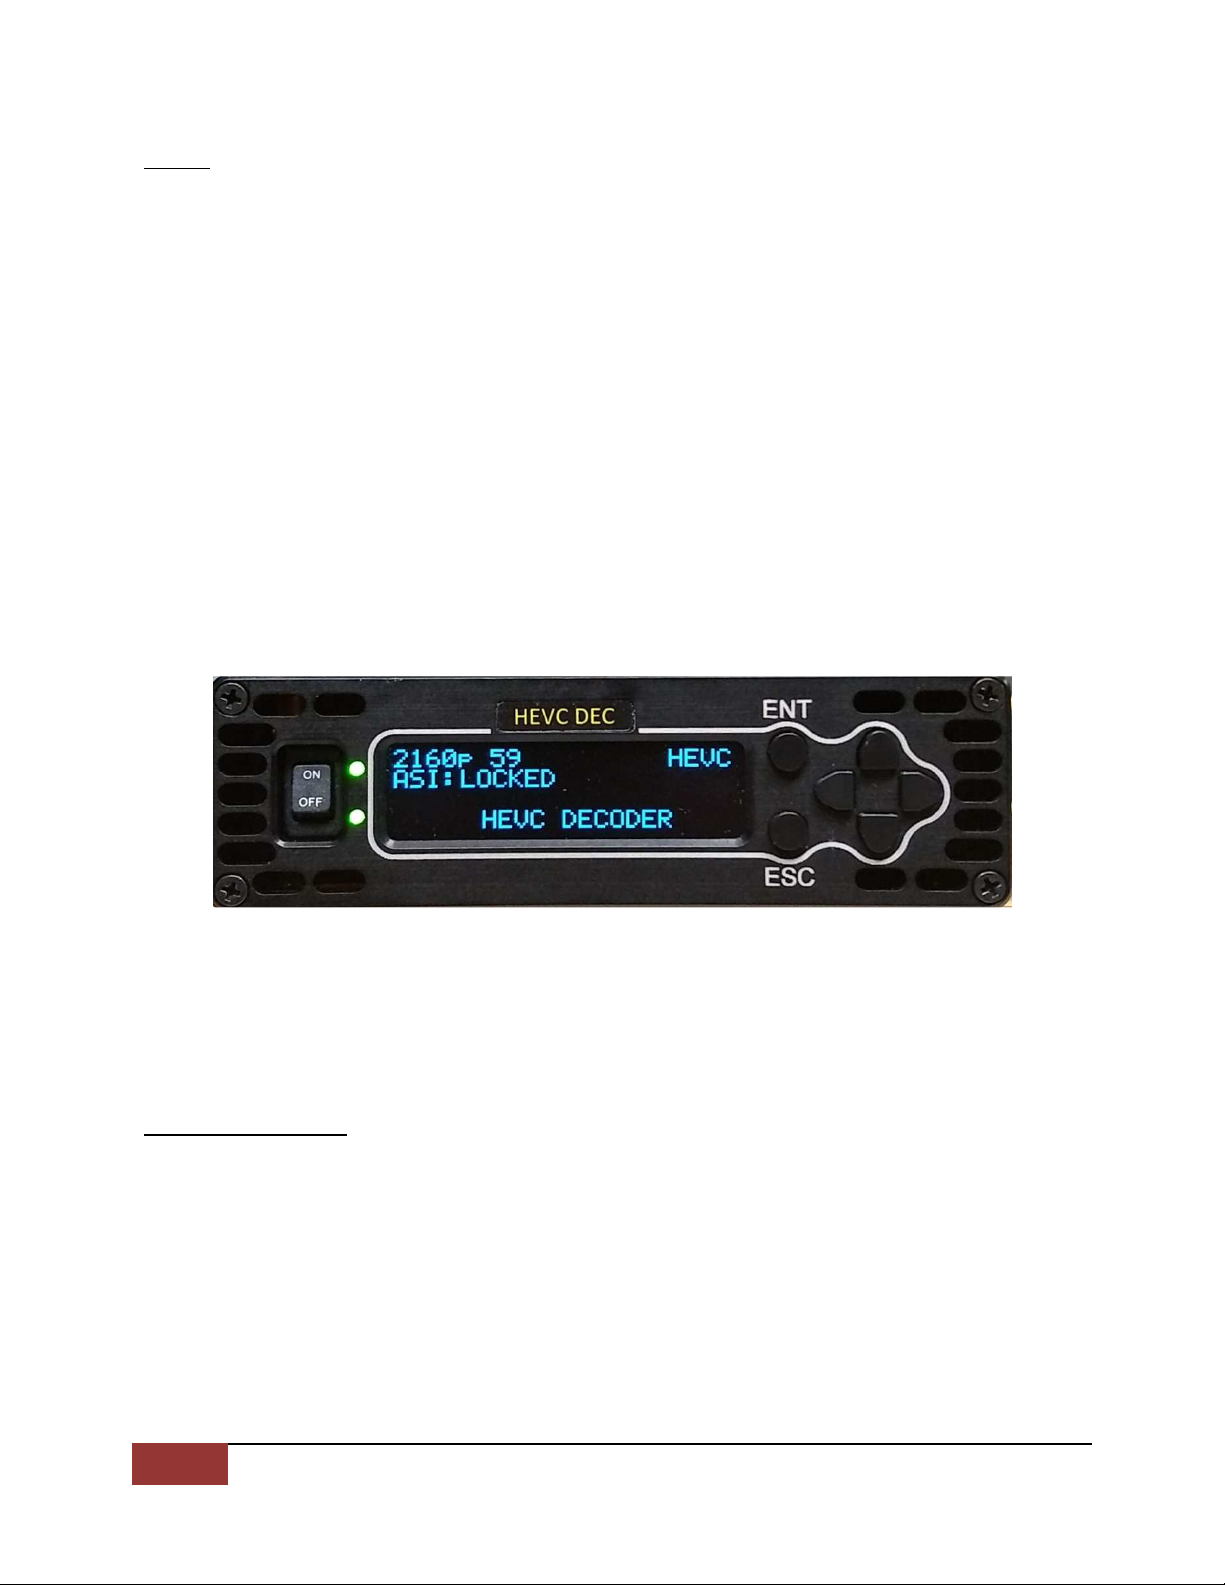
The user is encouraged to navigate the menus of both the Encoder and
Decoder. Using the HVEC ENC, from the default menu,
access to each menu is via the ENT
ENTENT
ENT button. Example: VIDEO CONFIG
VIDEO CONFIGVIDEO CONFIG
VIDEO CONFIG.
Pushing the ENT button again will access the ‘sub’ menus. VIDEO
VIDEO VIDEO
VIDEO
SOURCE
SOURCESOURCE
SOURCE. Pressing the Up or Down buttons, will scroll through the various
menus in each section. Pressing the ENT
ENTENT
ENT button, in a sub menu will
highlight that selection. While highlighted, using the Up or Down buttons,
will change its parameters. Once a new parameter has been selected, the
ENT button is pressed. This will save the changed parameter and now will
appear un-highlighted. Pressing the ESC button until the default menu is
displayed as pictured above. All the PIDs (video, Audio, PRC and PMT)
should match between the HEVC encoder and decoder.
HEVC ENC Main Menu Selections:
CONFIG VIDEO
CONFIG AUDIO
CONFIG PIDs
CONFIG IP
UNIT
SUB Menu Selections:
CONFIG VIDEO
CONFIG VIDEOCONFIG VIDEO
CONFIG VIDEO
VIDEO SOURCE
Default
VIDEO SAMPLE FORMAT
2SI
VIDEO FORMAT
2160p 59

12
Wave Central LLC
HEVC ENC and DEC
May 2019
VIDEO BITRATE
Auto
MUX BITRATE
1 .500 Mb
VIDEO MODE
HEVC
VIDEO DELAY MODE
Low Delay
VIDEO CHROMA FORMAT
:2:0
VIDEO BIT DEPTH
10-bit
VIDEO QUAD SYNC MODE
OFF
VIDEO HD DUPLICATION
Single HD Output
VIDEO HDR/WGC MODE
Auto
CONFIG AU
CONFIG AUCONFIG AU
CONFIG AUDIO
DIODIO
DIO
AUDIO SOURCE 1
Embedded 1 (1/2)
AUDIO SOURCE 2
Embedded 1 (3/ )
AUDIO SOURCE 3
Embedded 1 (5/6)
AUDIO SOURCE
Embedded 1 (7/8)
AUDIO MODE PAIR 1
MPEG2 Layer 2
AUDIO MODE PAIR 2
Off
AUDIO MODE PAIR 3
Off
AUDIO MODE PAIR
Off
LEFT LEVEL GAIN 1
0.0
RIGHT LEVEL GAIN 2
0.0

13
Wave Central LLC
HEVC ENC and DEC
May 2019
CONFIG PIDs
CONFIG PIDsCONFIG PIDs
CONFIG PIDs
VIDEO PID
000100
AUDIO PID 1
000200
AUDIO PID 2
000201
AUDIO PID 3
000202
AUDIO PID
000203
PCR PID
0002 9
PMT PID
000250
SIT PID
000017
CONFIG
CONFIGCONFIG
CONFIG
IP
IPIP
IP
IP ADDRESS 0
192.168.0.21
GATEWAY ADDRESS 0
192.168.0.1
IP MASK 0
255.255.255.0
DHCP 0
On
IP ACTIVE ADDRESS 0
0.0.0.0
IP ADDRESS 1 (Ethernet Port)
192.168.1.21
GATEWAY ADDRESS 1
192.168.1.1
IP MASK 1
255.255.255.0
DHCP 1
Off
IP ACTIVE ADDRESS 1
192.168.1.21
IP BRIDGE
Off
14
Wave Central LLC
HEVC ENC and DEC
May 2019
UNIT
UNITUNIT
UNIT
HEVC VERSION
V1.6.1
HEVC FPGA TEMP
8.1
HEVC PSU TEMP
53.5
HEVC VOLTAGE
11.7
HEVC SERIAL
e09f 738
WC VERSION (Display)
H.1.7
HEVC DEC Main Menu Selections:
Using the HVEC ENC, from the default menu, access to each menu is via
the ENT
ENTENT
ENT button. Example: VIDEO CONFIG
VIDEO CONFIGVIDEO CONFIG
VIDEO CONFIG. Pushing the ENT button again
will access the ‘sub’ menus. VIDEO SOURCE
VIDEO SOURCEVIDEO SOURCE
VIDEO SOURCE. Pressing the Up or Down
buttons, will scroll through the various menus in each section.
CONFIG VIDEO
CONFIG VIDEOCONFIG VIDEO
CONFIG VIDEO
VIDEO SAMPLE FORMAT
2SI
VIDEO FORMAT
2160p 59
VIDEO MODE
HEVC
VIDEO DELAY MODE
Low Delay

15
Wave Central LLC
HEVC ENC and DEC
May 2019
VIDEO CONCEAL
000100
VIDEO CONCEAL REF
000100
GENLOCK MODE
Off
GENLOCK LINE OFFSET
000000
GENLOCK PIXEL OFFSET
00000
VIDEO FAIL MODE
Freeze Frame
VIDEO QUAD SYNC MODE
Off
VIDEO HD DUPLICATION
Single HD Output
CONFIG AUDIO
CONFIG AUDIOCONFIG AUDIO
CONFIG AUDIO
AUDIO MODE PAIR 1
LPCM-16bit
AUDIO MODE PAIR 2
AAC
AUDIO MODE PAIR 3
AAC
AUDIO MODE PAIR
AAA
OUTPUT LEVEL PAIR 1
+2 dBu
OUTPUT LEVEL PAIR 2
+2 dBu
CONFIG PIDs
CONFIG PIDsCONFIG PIDs
CONFIG PIDs
SERVICE SELECT
Auto Service Number
SERVICE NUMBER
000001
VIDEO PID
000100
AUDIO PID 1
000200

16
Wave Central LLC
HEVC ENC and DEC
May 2019
AUDIO PID 2
000201
AUDIO PID 3
000202
AUDIO PID
000203
PCR PID
0002 9
PMT PID
000250
SIT PID
000017
CONFIG IP
CONFIG IPCONFIG IP
CONFIG IP
IP ADDRESS 0
192.168.0.21
GATEWAY ADDRESS 0
192.168.0.1
IP MASK 0
255.255.255.0
DHCP 0
On
IP ACTIVE ADDRESS 0
0.0.0.0
IP ADDRESS 1 (Ethernet Port)
192.168.1.21
GATEWAY ADDRESS 1
192.168.1.1
IP MASK 1
255.255.255.0
DHCP 1
Off
IP ACTIVE ADDRESS 1
192.168.1.21
IP BRIDGE
Off
UNIT
UNITUNIT
UNIT
HEVC VERSION
V1.6.1

17
Wave Central LLC
HEVC ENC and DEC
May 2019
HEVC FPGA TEMP
51.9
HEVC PSU TEMP
53.3
HEVC VOLTAGE
11.7
HEVC SERIAL
F7de7bx9
WC VERSION
H.1.7
The scope of this document is to get you started. When a system is purchased from
Wave Central LLC, all components are staged and tested in accordance with your
operational parameters. Wave Central LLC is not liable for any omissions or errors
that may result in the loss of use of these products described herein.
WAVE CENTRAL LLC
99 GARDEN PARKWAY, SUITE C
CARLISLE, PENNSYLVAINA, USA 17013
1-888-736-9283
WWW.WAVECENTRALRF.COM
This manual suits for next models
3
Table of contents
Popular Media Converter manuals by other brands

MYE
MYE MAG98 Operation manual

CTS
CTS MCT-RACK-12-MGM user guide

CYP
CYP CV-401H Operation manual

Vivace
Vivace VPO10 INSTALLATION, OPERATION, CONFIGURATION AND MAINTENANCE MANUAL

Conrad Electronic
Conrad Electronic 197257 operating instructions

Hall Research Technologies
Hall Research Technologies EX-HDU-WP user manual


