WAXIE SOLSTA PDC User manual

0900314-W Rev: A (3-16-09) Page 1 of 4
INTRODUCTION
The SOLSTA PDC Dispenser is a dilution control system engineered to be portable and versatile. The SOLSTA PDC
is designed to be an integrated bottle-fill or bucket-fill dispenser. Its portable design allows the user to use it in
virtually any environment as long as there is a water source with a spigot and garden hose connection.
BASIC DESCRIPTION AND OPERATION
The Waxie SOLSTA PDC (Portable Dilution Control) is a reliable low cost portable proportioning/dilution system that
attaches to the Waxie-Green Solution Station 3-Liter bottles of superconcentrates. The dispenser is connected and
engaged to the bottleneck of the container through an integrated coupling system that is locked together by a simple
twist of a 38mm locking nut. The SOLSTA Dispenser will dispense cleaners and sanitizers at the proper dilution rate
when the trigger is pressed and will stop when the trigger is released. For continuous flow, the trigger can be locked
into place by moving a sliding lock forward which then engages the trigger. Drawing the lock backward releases the
trigger and shuts off the dispenser.
IMPORTANT NOTES
• The SOLSTA PDC is supplied without a backflow prevention unit. To prevent possible chemical backup into the
water supply, comply with all local plumbing codes and install an appropriate backflow prevention unit.
• Ensure that a pressure regulator with a preset value of 40-50 PSI is inline for optimum performance and safety.
• Do not leave the dispenser unattended with trigger in locked position.
• Turn off water supply after use and disconnect.
SPECIFICATIONS
SOLSTA PDC
INSTRUCTION SHEET
CAUTION: Wear protective clothing and eyewear when dispensing chemicals or other
materials. Observe safety handling instructions (MSDS) of chemical mfrs.
CAUTION: When installing any equipment, ensure that all national and local safety,
electrical, and plumbing codes are met.
Operating Range - Temperature
Min 35°F (2°C)
Max 140°F (60°C)
Operating Pressure
Min 30 PSI (2 bar)
Max 80 psi (5.5 bar)

0900314-W Rev: A (3-16-09) Page 2 of 4
DISPENSER SET UP
(1) Set up hose and accessories as required to the spigot at the water source.
(2) Next, attach the male hose end to the female garden hose coupling end of the Dispenser. Make sure that the
coupling and the hose end are securely fastened.
(3) Turn Dispenser selector to one of the three flow positions. Make sure that the selector is positioned completely
to the bottle (1 GPM) position, the bucket (4 GPM) position, or water only position.
(4) Slowly turn water supply on. Check and correct connections if water leaks occur.
(5) While holding the handle of the dispenser, press the trigger and check for water flow out of the dispenser nozzle.
(6) If water flows, the dispenser is ready to use.
DISPENSER OPERATION
(1) Select required liquid container for use.
(2) Hold dispenser with nozzle end forward.
(3) Next, orient the liquid container with the bottle handle toward the rear side of the dispenser. (Note: Rear side of
the dispenser is the hose attachment side.)
(4) Next, press dispenser down over the container until bottleneck and dispenser locking nut engages.
(5) While pressing lightly, turn locking nut clockwise approximately 1.5 turns or until lock nut is snug. There is no
need to over tighten the locking nut.
(6) For chemical dispensing, select either the bottle (1 GPM) position or the bucket (4 GPM) position. Make sure the
selector is set to the extreme end of movement at either dispensing positions.
• Bottle dispensing
• Set selector to bottle filling position
• Insert nozzle hose of dispenser into the neck of the bottle to be filled. Make sure that the lip of
the bottleneck is never sealed so air could escape out of bottle during filling.
• Press trigger to dispense and fill bottle.
• Release trigger when bottle is filled
• Bucket dispensing
• Set selector to bucket filling position
• Place dispenser on the side of bucket using the hook to hang the dispenser. Orient dispenser
with nozzle facing inside of bucket and the bottle on the out side of bucket.
• Press trigger to dispense and fill bucket.
• For continuous flow, push the lock forward while the trigger is press. This will engage and hold
the trigger down.
• To shut off the dispenser, pull back the lock to release the trigger.
(7) Removing chemical container from dispenser
• Turn locking nut counter-clockwise approximately 1.5 turns. Pull container away from dispenser.
(8) Purging residual chemical from dispenser:
• Remove chemical container, set selector in bottle or bucket fill position, set dispenser over drain, and
press trigger to flush water through dispenser.
(9) Disconnecting the dispenser:
• Shut off water supply, press trigger to release pressure, and disconnect hose connection where
appropriate.
0900314-W Rev: A (3-16-09) Page 3 of 4
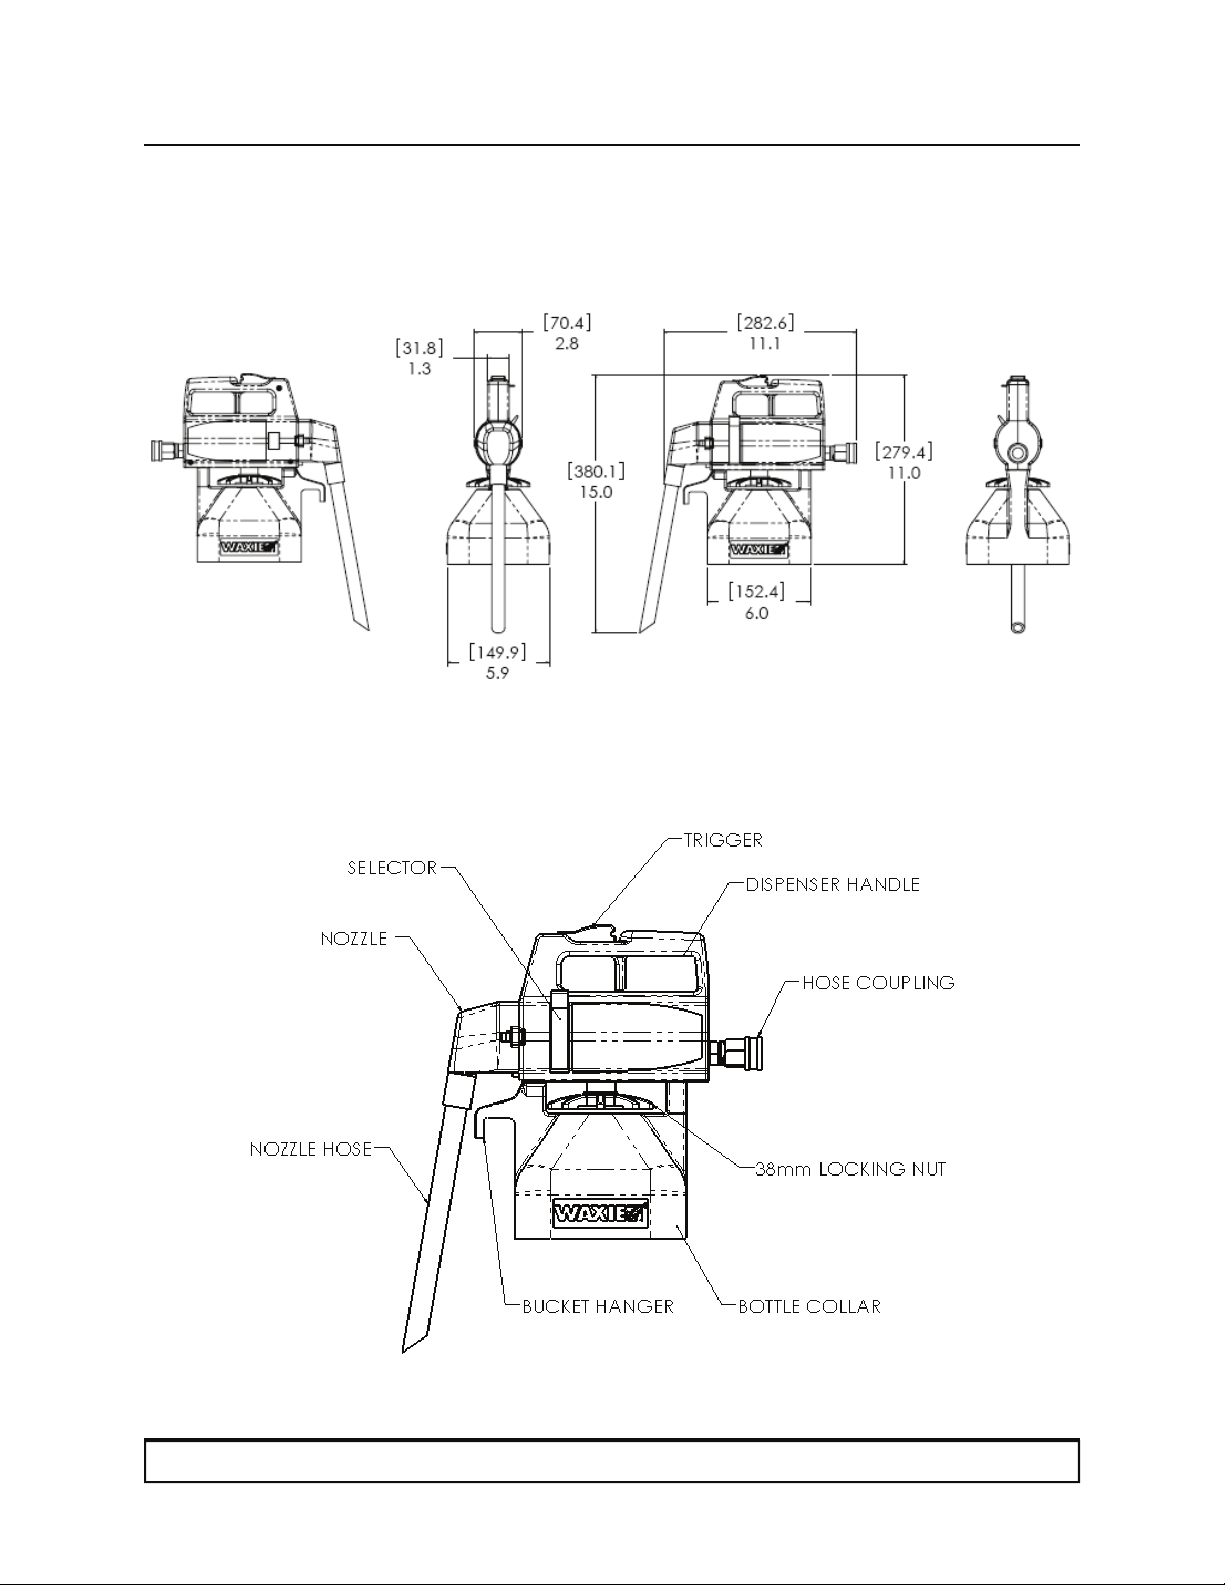
DISPENSER TERMS
GENERAL DIMENSIONS
[millimeters]
0900314-W Rev: A (3-16-09) Page 4 of 4
DISCLAIMER
WAXIE Sanitary Supply does not accept responsibility for the mishandling, misuse, or non-performance of the
described items when used for purposes other than those specified in the instructions. For hazardous materials
information, consult label, MSDS, or your WAXIE Sanitary Maintenance Consultant.
WARRANTY
The WAXIE SOLTA PDC is warranted against defects in material and workmanship for a period of ONE year.
Warranty applies only to the replacement or repair of such parts when reported to WAXIE and found to be defective
upon factory authorized inspection. Sealing or rubber and synthetic rubber parts such as “O” rings, diaphragms,
squeeze tubing, and gaskets are considered expendable and are not covered under warranty. Warranty does not
cover liability resulting from performance of this equipment nor the labor to replace this equipment. Product abuse or
misuse voids warranty.
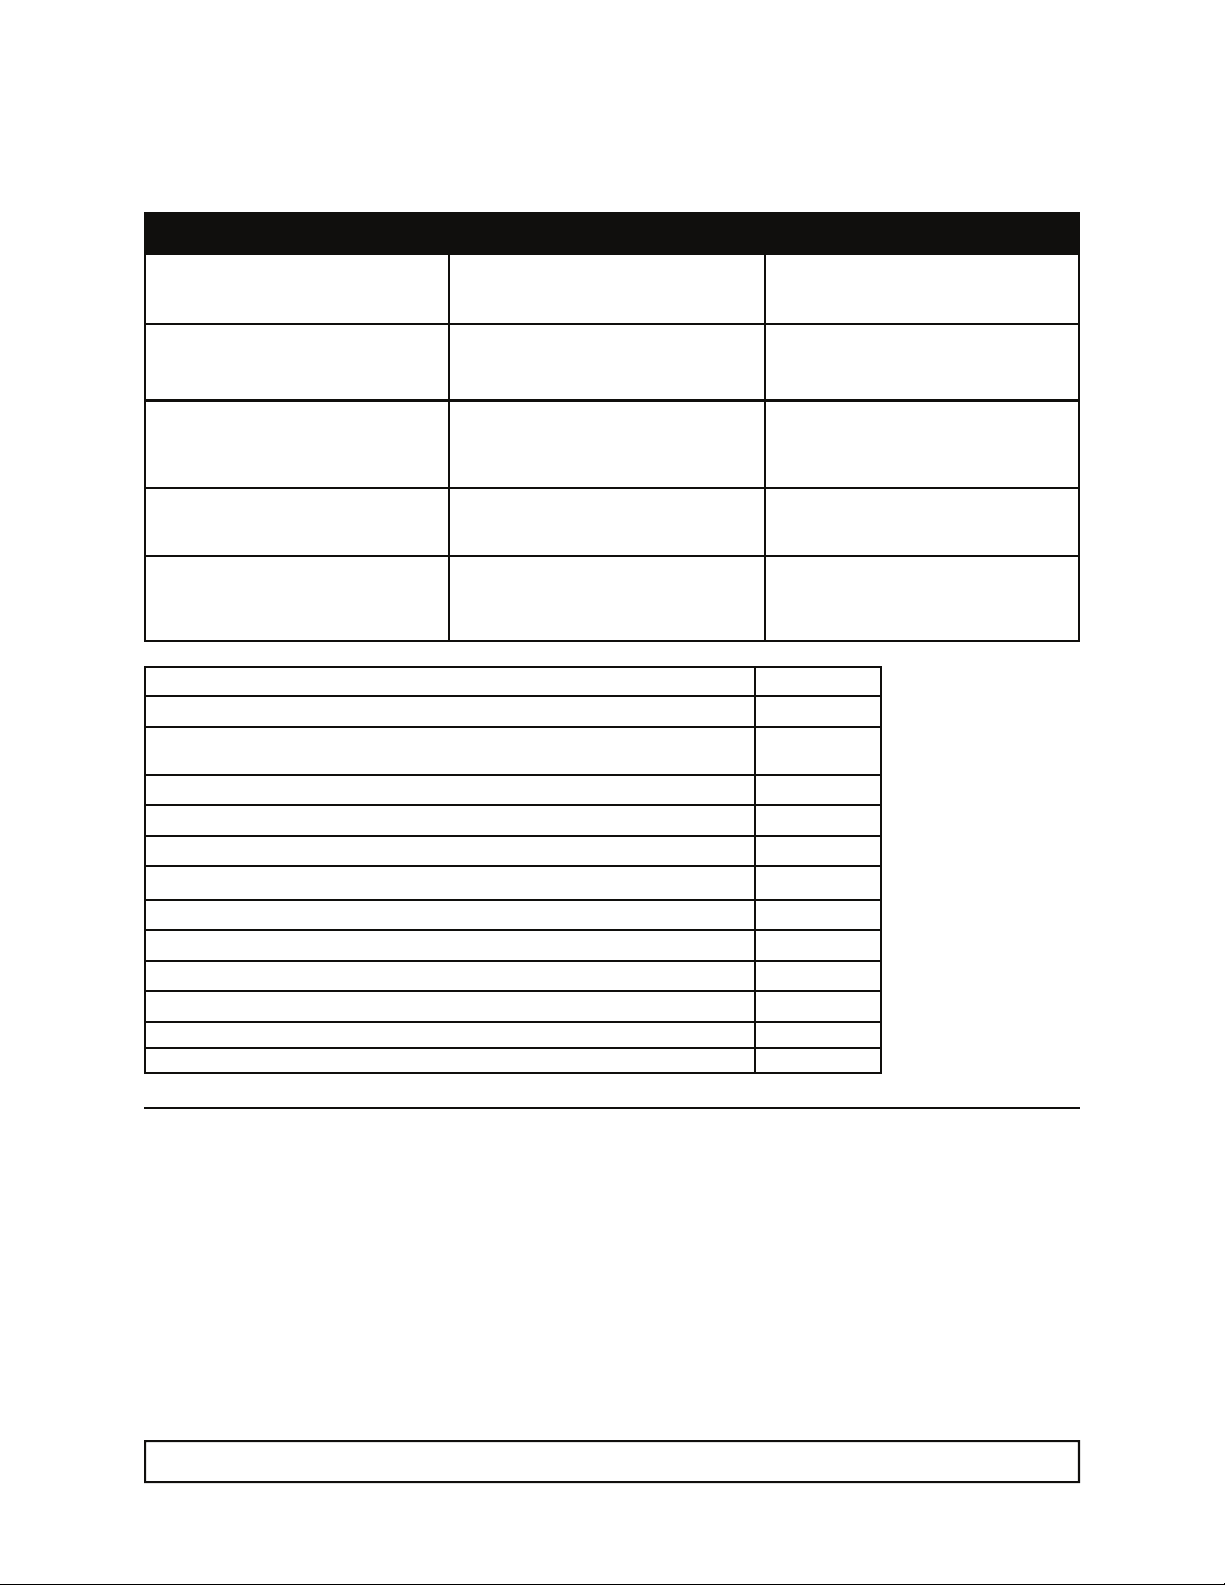
PROBLEM POSSIBLE CAUSE REMEDY
No output 1. Water supply is off
2. Blocked hose coupling screen
1. Turn water supply on
2. Check/clean hose coupling screen
Product is not drawn from container 1. Water inlet blocked
2. Low water pressure
3. No product in container
1. Check/clean hose coupling screen
2. Must be 30 psi min
3. Change product container
Dispenser leaks at nozzle assembly 1. Bottle neck is blocked
2. Discharge Hose/Nozzle assembly is
blocked
1. Pull back dispenser from bottleneck
2. Remove nozzle assembly, clear, and
adjust hose
Excessive foam when dispensing 1. Venturi is not priming
2. Product container is empty
1. Press trigger lightly to prime
2. Change product container
TROUBLESHOOTING
PDC & Misc. Items
321016 PDC Solsta Portable Dilution Control Dispenser ea
321036 High Pressure Hose, Pressure Regulator, Male Quick Disconnect,
Female Coupler w/Water Stop Kit Kit
321037 Bib Vacuum Breaker ea
326740 Brass Y-Valve ea
321039 Ball Shut-off Valve ea
321027 Inline Water Pressure Regulator ea
321024 Water Inlet Hose, 6' Black High Pressure ea
321045 Female Coupler w/Water Stop ea
321046 Male Quick Disconnect ea
321038 Indoor Faucet Connector ea
321013 PDC Rack Holder ea
321012 PDC Drip Tray ea
Popular Dispenser manuals by other brands


Star Manufacturing
Star Manufacturing Peristaltic Heated Condiment Dispensers... Brochure & specs

Stalgast
Stalgast 383190 user manual

PRISMAN
PRISMAN Vario Touchless Instructions for assembly and operation

TECHCON SYSTEMS
TECHCON SYSTEMS TS250 user guide

Gloria
Gloria CleanMaster PERFORMANCE CM 12 manual

BRAVILOR BONAMAT
BRAVILOR BONAMAT Rivero 12 BLRXL-011 user manual